浅析React组件的生命周期(代码解析)
本篇文章给大家带来的内容是关于浅析React组件的生命周期(代码解析),有一定的参考价值,有需要的朋友可以参考一下,希望对你有所帮助。
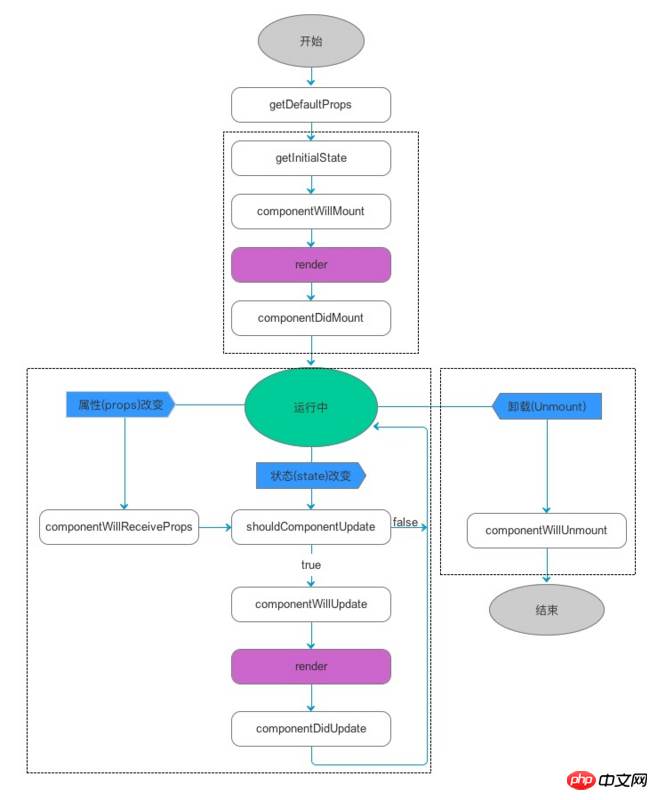
整个 React 生命周期有3个阶段:创建、更新、卸载,每个阶段有对应的工作和方法,我们可以看下面这个经典的图研究一下:

第一阶段
这是虚拟 DOM 创建的阶段,会依次执行 5 个方法,这 5 个方法中除了 render 方法,其余四个方法在整个生命周期中只调用 1 次,而且一定会调用 1 次:
getDefaultProps()
这个方法在组件实例创建前,也就是构造函数执行前执行,获取父组件传来的参数,你可以在这里编辑参数并返回新的参数作为 props
getInitalState()
组件创建的一开始会调用这个方法初始化组件的 state
componentWillMount()
在组件 render 之前执行该方法,可用来修改 state。React 先调用父组件的这个函数,再调用子组件的这个函数
render()
开始组件渲染函数,返回一个只有一个根节点的虚拟 DOM。该函数中不能同步的修改组件的状态(state)。
componentDidMount()
在 render 渲染之后,通知组件已经加载完成。React 先调用子组件的这个函数,再调用父组件的这个函数。从这个函数开始,该组件就可以和其他框架交互了。比如设置计时器或者发起网络请求。
第二阶段
此时该组件已经进入了稳定运行阶段,这个阶段组件可以处理用户交互,或者接收事件更新界面。以下方法在整个生命周期中可以执行很多次,也可以一次也不执行。
componentWillReceiveProps()
当父容器中对应的参数改变将会调用子组件的该函数。新的 props 将会作为参数传递进来,老的 props 可以根据 this.props 来获取。我们可以在该函数中对state作一些处理。并且在该函数中更新 state 不会发生二次渲染
shouldComponentUpdate()
该函数传递过来两个参数,新的 state 和新的 props。state 和 props 的改变都会调到该函数。该函数主要对传递过来的 nextProps 和 nextState 作判断。如果返回 true 则重新渲染(默认都是返回 true),如果返回 false 则不重新渲染。在某些特定条件下,我们可以根据传递过来的 props 和 state 来选择更新或者不更新,从而提高效率。
componentWillUpdate()
与 componentWillMount 方法类似,在 render 渲染之前被调用。组件上会接收到新的 props 或者 state。这个函数调用之后,就会把 nextProps 和 nextState 分别设置到 this.props 和 this.state 中。
componentDidUpdate()
与 componentDidMount 方法类似,在 render 渲染之后被调用,真实 DOM 生成之后调用该函数。传递过来的参数是之前的 props 和 state。
第三阶段
这就是消亡的阶段,主要进行内存的清理和释放的工作。这个阶段只有一个方法,该方法在整个生命周期内调用且仅调用一次。
componentWillUnmount()
当组件要被从界面上移除的时候,就会调用 componentWillUnmount。在这里进行一些相关的销毁操作,比如撤销定时器,事件监听等等。
触发 render 的几种情况
这里我们仅考虑 shouldComponentUpdate 没有被修改,始终返回的是 true
首次渲染,即 Initial Render
调用this.setState (不是每次调用 setState 都会触发,react 会优化,比如 antd 的 input 组件)
父组件发生更新,通常是修改的子组件的 props
如果父组件触发了 render, 子组件当然也会相应触发 render
调用 this.forceUpdate()
一个简单的示例
import React from 'react';
import ReactDOM from 'react-dom';
import style from './font.css';
import './index.less';

class Parent extends React.Component{
  constructor(props) {
    super(props);
    this.state = {
      willRender: true,
      prop: 1
    };
  }

  render(){
    return (
      <div>
        <button onClick={()=>{this.setState({prop: 10})}}>changePropsFromParent</button>
        {
          this.state.willRender &&
          <Child fromParent={this.state.prop}/>
        }
        <button onClick={()=>{this.setState({willRender: false})}}>UnmountChild</button>
      </div>
    );
  }
}

class Child extends React.Component {
  constructor(props) {
    super(props);
    this.state = {
      curr: 0
    };
  }

 getDefaultProps(){
   console.log('getDefaultProps');
 }

  getInitalState(){
    console.log('getInitalState');
  }

  componentWillMount(){
    console.log('componentWillMount');
  }

  componentDidMount(){
    console.log('componentDidMount');
  }

  componentWillReceiveProps(){
    console.log('componentWillReceiveProps');
  }

  shouldComponentUpdate(){
    console.log('shouldComponentUpdate');
    return true;
  }

  componentWillUpdate(){
    console.log('componentWillUpdate');
  }

  componentDidUpdate(){
    console.log('componentDidUpdate');
  }

  componentWillUnmount(){
    console.log('componentWillUnmount');
  }

  render() {
    console.log('render')

    return (
      <div>
        <button onClick={()=>this.setState({curr:2})}>setState</button>
        <button onClick={()=>{this.forceUpdate();}}>forceUpdate</button>
      </div>
    );
  }
}

ReactDOM.render(
  <Parent />,
  document.getElementById('root')
);相关推荐:
以上是浅析React组件的生命周期(代码解析)的详细内容。更多信息请关注PHP中文网其他相关文章!

热AI工具

Undresser.AI Undress
人工智能驱动的应用程序,用于创建逼真的裸体照片

AI Clothes Remover
用于从照片中去除衣服的在线人工智能工具。

Undress AI Tool
免费脱衣服图片

Clothoff.io
AI脱衣机

Video Face Swap
使用我们完全免费的人工智能换脸工具轻松在任何视频中换脸!

热门文章

热工具

记事本++7.3.1
好用且免费的代码编辑器

SublimeText3汉化版
中文版,非常好用

禅工作室 13.0.1
功能强大的PHP集成开发环境

Dreamweaver CS6
视觉化网页开发工具

SublimeText3 Mac版
神级代码编辑软件(SublimeText3)

热门话题
 如何使用WebSocket和JavaScript实现在线语音识别系统
Dec 17, 2023 pm 02:54 PM
如何使用WebSocket和JavaScript实现在线语音识别系统引言:随着科技的不断发展,语音识别技术已经成为了人工智能领域的重要组成部分。而基于WebSocket和JavaScript实现的在线语音识别系统,具备了低延迟、实时性和跨平台的特点,成为了一种被广泛应用的解决方案。本文将介绍如何使用WebSocket和JavaScript来实现在线语音识别系
 WebSocket与JavaScript:实现实时监控系统的关键技术
Dec 17, 2023 pm 05:30 PM
WebSocket与JavaScript:实现实时监控系统的关键技术引言:随着互联网技术的快速发展,实时监控系统在各个领域中得到了广泛的应用。而实现实时监控的关键技术之一就是WebSocket与JavaScript的结合使用。本文将介绍WebSocket与JavaScript在实时监控系统中的应用,并给出代码示例,详细解释其实现原理。一、WebSocket技
 如何利用JavaScript和WebSocket实现实时在线点餐系统
Dec 17, 2023 pm 12:09 PM
如何利用JavaScript和WebSocket实现实时在线点餐系统介绍:随着互联网的普及和技术的进步,越来越多的餐厅开始提供在线点餐服务。为了实现实时在线点餐系统,我们可以利用JavaScript和WebSocket技术。WebSocket是一种基于TCP协议的全双工通信协议,可以实现客户端与服务器的实时双向通信。在实时在线点餐系统中,当用户选择菜品并下单
 如何使用WebSocket和JavaScript实现在线预约系统
Dec 17, 2023 am 09:39 AM
如何使用WebSocket和JavaScript实现在线预约系统在当今数字化的时代,越来越多的业务和服务都需要提供在线预约功能。而实现一个高效、实时的在线预约系统是至关重要的。本文将介绍如何使用WebSocket和JavaScript来实现一个在线预约系统,并提供具体的代码示例。一、什么是WebSocketWebSocket是一种在单个TCP连接上进行全双工
 JavaScript和WebSocket:打造高效的实时天气预报系统
Dec 17, 2023 pm 05:13 PM
JavaScript和WebSocket:打造高效的实时天气预报系统引言:如今,天气预报的准确性对于日常生活以及决策制定具有重要意义。随着技术的发展,我们可以通过实时获取天气数据来提供更准确可靠的天气预报。在本文中,我们将学习如何使用JavaScript和WebSocket技术,来构建一个高效的实时天气预报系统。本文将通过具体的代码示例来展示实现的过程。We
 简易JavaScript教程:获取HTTP状态码的方法
Jan 05, 2024 pm 06:08 PM
JavaScript教程:如何获取HTTP状态码,需要具体代码示例前言:在Web开发中,经常会涉及到与服务器进行数据交互的场景。在与服务器进行通信时,我们经常需要获取返回的HTTP状态码来判断操作是否成功,根据不同的状态码来进行相应的处理。本篇文章将教你如何使用JavaScript获取HTTP状态码,并提供一些实用的代码示例。使用XMLHttpRequest
 javascript中如何使用insertBefore
Nov 24, 2023 am 11:56 AM
用法:在JavaScript中,insertBefore()方法用于在DOM树中插入一个新的节点。这个方法需要两个参数:要插入的新节点和参考节点(即新节点将要被插入的位置的节点)。
 JavaScript和WebSocket:打造高效的实时图像处理系统
Dec 17, 2023 am 08:41 AM
JavaScript是一种广泛应用于Web开发的编程语言,而WebSocket则是一种用于实时通信的网络协议。结合二者的强大功能,我们可以打造一个高效的实时图像处理系统。本文将介绍如何利用JavaScript和WebSocket来实现这个系统,并提供具体的代码示例。首先,我们需要明确实时图像处理系统的需求和目标。假设我们有一个摄像头设备,可以采集实时的图像数


