CSS中overflow-y: visible;不起作用的解决方法
本篇文章给大家带来的内容是关于CSS中overflow-y: visible;不起作用的解决方法,有一定的参考价值,有需要的朋友可以参考一下,希望对你有所帮助。
场景
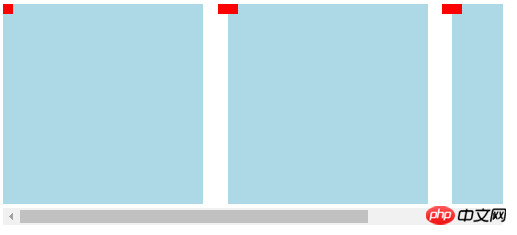
最近要做的一个需求是移动端的h5页面,要求有一排可选择的卡片, 超出容器部分可以左右滑动,同时每张卡片左上角要有一个删除按钮。如下图:

心想:so easy, 在父容器上加一个max-width: 200px; white-space: nowrap; overflow-x: auto;不就搞定了嘛。Demo如下:
<div class="container">
  <div class="son">
    <div class="delete_btn"></div>
  </div>
  <div class="son">
    <div class="delete_btn"></div>
  </div>
  <div class="son">
    <div class="delete_btn"></div>
  </div>
</div>

.container {
  max-width: 500px;
  overflow-x: auto;
  white-space: nowrap;
}

.son {
  display: inline-block;
  width: 200px;
  height: 200px;
  background-color: lightblue;
  position: relative;
  margin-right: 20px;
}

.delete_btn {
  width: 20px;
  height: 20px;
  position: absolute;
  top: 0;
  left: 0;
  background-color: red;
  transform: translateX(-50%) translateY(-50%);
}原本以为一切顺利,结果得到的结果如图:

看第矩形左上角的红色方块,原本为20 * 20的红色方块有一部分被隐藏了。我想应该是overflow影响的,所以想通过overflow-y: visible;来解决,结果是不行的。细心的朋友应该记得overflow的默认值就是visible。那么原因是什么呢?
Why
找了好久,大致了解到是如下原因
The computed values of ‘overflow-x’ and ‘overflow-y’ are the same as their specified values, except that some combinations with ‘visible’ are not possible: if one is specified as ‘visible’ and the other is ‘scroll’ or ‘auto’, then ‘visible’ is set to ‘auto’. The computed value of ‘overflow’ is equal to the computed value of ‘overflow-x’ if ‘overflow-y’ is the same; otherwise it is the pair of computed values of ‘overflow-x’ and ‘overflow-y’.
大致意思是,当overflow-x为scroll或者auto时,overflow-y被设置为auto,反之亦然。这就很尴尬了,那怎么解决这个问题呢。
ps: 上面那段话说是来自于w3c的文档,但是我找了半天没找到原文,麻烦找到了的小伙伴留个链接~ [手动狗头]
How
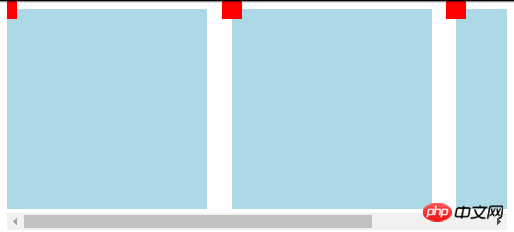
终究还是想让左上角的红色方块显示完整的,那么解决方案呢,我这里采用的是在container上添加以下样式
padding-top: 20px;
margin-top: -20px;
原理其实挺简单的,加了padding-top: 20px;后,绝对定位的红色方块就有空间显示了,不会超出容器体积,然后通过margin-top: -20px;抵消位置的变化.如图

ps: 第一个红色方块左边被遮住的部分同样的思路解决,即通过padding-left和margin-left来处理。
相关推荐:
iframe双滚动条 解决方式 CSS3 overflow-y 属性_html/css_WEB-ITnose
HTML标签的overflow处理用应_HTML/Xhtml_网页制作
以上是CSS中overflow-y: visible;不起作用的解决方法的详细内容。更多信息请关注PHP中文网其他相关文章!

热AI工具

Undresser.AI Undress
人工智能驱动的应用程序,用于创建逼真的裸体照片

AI Clothes Remover
用于从照片中去除衣服的在线人工智能工具。

Undress AI Tool
免费脱衣服图片

Clothoff.io
AI脱衣机

AI Hentai Generator
免费生成ai无尽的。

热门文章

热工具

记事本++7.3.1
好用且免费的代码编辑器

SublimeText3汉化版
中文版,非常好用

禅工作室 13.0.1
功能强大的PHP集成开发环境

Dreamweaver CS6
视觉化网页开发工具

SublimeText3 Mac版
神级代码编辑软件(SublimeText3)

热门话题
 bootstrap怎么插入图片
Apr 07, 2025 pm 03:30 PM
在 Bootstrap 中插入图片有以下几种方法:直接插入图片,使用 HTML 的 img 标签。使用 Bootstrap 图像组件,可以提供响应式图片和更多样式。设置图片大小,使用 img-fluid 类可以使图片自适应。设置边框,使用 img-bordered 类。设置圆角,使用 img-rounded 类。设置阴影,使用 shadow 类。调整图片大小和位置,使用 CSS 样式。使用背景图片,使用 background-image CSS 属性。
 bootstrap怎么调整大小
Apr 07, 2025 pm 03:18 PM
要调整 Bootstrap 中元素大小,可以使用尺寸类,具体包括:调整宽度:.col-、.w-、.mw-调整高度:.h-、.min-h-、.max-h-
 HTML,CSS和JavaScript的角色:核心职责
Apr 08, 2025 pm 07:05 PM
HTML定义网页结构,CSS负责样式和布局,JavaScript赋予动态交互。三者在网页开发中各司其职,共同构建丰富多彩的网站。
 bootstrap怎么设置框架
Apr 07, 2025 pm 03:27 PM
要设置 Bootstrap 框架,需要按照以下步骤:1. 通过 CDN 引用 Bootstrap 文件;2. 下载文件并将其托管在自己的服务器上;3. 在 HTML 中包含 Bootstrap 文件;4. 根据需要编译 Sass/Less;5. 导入定制文件(可选)。设置完成后,即可使用 Bootstrap 的网格系统、组件和样式创建响应式网站和应用程序。
 bootstrap按钮怎么用
Apr 07, 2025 pm 03:09 PM
如何使用 Bootstrap 按钮?引入 Bootstrap CSS创建按钮元素并添加 Bootstrap 按钮类添加按钮文本
 bootstrap怎么写分割线
Apr 07, 2025 pm 03:12 PM
创建 Bootstrap 分割线有两种方法:使用 标签,可创建水平分割线。使用 CSS border 属性,可创建自定义样式的分割线。
 bootstrap怎么看日期
Apr 07, 2025 pm 03:03 PM
答案:可以使用 Bootstrap 的日期选择器组件在页面中查看日期。步骤:引入 Bootstrap 框架。在 HTML 中创建日期选择器输入框。Bootstrap 将自动为选择器添加样式。使用 JavaScript 获取选定的日期。
 vue中怎么用bootstrap
Apr 07, 2025 pm 11:33 PM
在 Vue.js 中使用 Bootstrap 分为五个步骤:安装 Bootstrap。在 main.js 中导入 Bootstrap。直接在模板中使用 Bootstrap 组件。可选:自定义样式。可选:使用插件。


