如何用HTML+CSS+JavaScript制作简易计算器
JavaScript是前端开发中必不可少的一部分,因为页面功能的实现离不开JS,作为一个前端开发人员,你会用JavaScript制作一个简易计算器吗?这篇文章就给大家讲讲如何用HTML、CSS、JavaScript制作一个简易计算器,并且能够实现加减乘除的功能,有一定的参考价值,感兴趣的朋友可以看看。
制作一个简单的计算器需要用到很多CSS属性、HTML标签和JavaScript知识,如有不清楚的同学可以参考PHP中文网的相关文章,或者访问 JavaScript视频教程 ,希望对你有所帮助。
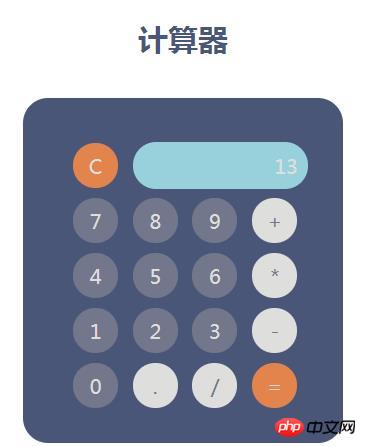
实例描述:用HTML和CSS搭建页面,用JavaScript实现加减乘除的功能,当点击清零时,输入框没有值,当点击“=”时,显示计算结果,具体代码如下:
HTML部分:
<div class="center">
   <h1>计算器</h1>
   <form name="calculator">
    <input type="button" id="clear" class="btn other" value="C">
    <input type="text" id="display">
     <br>
    <input type="button" class="btn number" value="7" onclick="get(this.value);">
    <input type="button" class="btn number" value="8" onclick="get(this.value);">
    <input type="button" class="btn number" value="9" onclick="get(this.value);">
    <input type="button" class="btn operator" value="+" onclick="get(this.value);">
     <br>
    <input type="button" class="btn number" value="4" onclick="get(this.value);">
    <input type="button" class="btn number" value="5" onclick="get(this.value);">
    <input type="button" class="btn number" value="6" onclick="get(this.value);">
    <input type="button" class="btn operator" value="*" onclick="get(this.value);">
     <br>
    <input type="button" class="btn number" value="1" onclick="get(this.value);">
    <input type="button" class="btn number" value="2" onclick="get(this.value);">
    <input type="button" class="btn number" value="3" onclick="get(this.value);">
    <input type="button" class="btn operator" value="-" onclick="get(this.value);">
     <br>
    <input type="button" class="btn number" value="0" onclick="get(this.value);">
    <input type="button" class="btn operator" value="." onclick="get(this.value);">
    <input type="button" class="btn operator" value="/" onclick="get(this.value);">
    <input type="button" class="btn other" value="=" onclick="calculates();">
   </form>
</div>CSS部分:
* {
    border: none;
    font-family: 'Open Sans', sans-serif;
    margin: 0;
    padding: 0;
   }
   .center {
    background-color: #fff;
    border-radius: 50%;
    height: 600px;
    margin: auto;
    width: 600px;
   }
   h1 {
    color: #495678;
    font-size: 30px;
    margin-top: 20px;
    padding-top: 50px;
    display: block;
    text-align: center;
   }
   form {
    background-color: #495678;
    margin: 40px auto;
    padding: 40px 0 30px 40px;
    width: 280px;
   }
   .btn {
    outline: none;
    cursor: pointer;
    font-size: 20px;
    height: 45px;
    margin: 5px 0 5px 10px;
    width: 45px;
   }
   .btn:first-child {
    margin: 5px 0 5px 10px;
   }
   .btn, #display, form {
    border-radius: 25px;
   }
   #display {
    outline: none;
    background-color: #98d1dc;
    color: #dededc;
    font-size: 20px;
    height: 47px;
    text-align: right;
    width: 165px;
    padding-right: 10px;
    margin-left: 10px;
   }
   .number {
    background-color: #72778b;
    color: #dededc;
   }
   .number:active {
      -webkit-transform: translateY(2px);
      -ms-transform: translateY(2px);
      -moz-tranform: translateY(2px);
      transform: translateY(2px);
   }
   .operator {
    background-color: #dededc;
    color: #72778b;
   }
   .operator:active {
      -webkit-transform: translateY(2px);
      -ms-transform: translateY(2px);
      -moz-tranform: translateY(2px);
      transform: translateY(2px);
   }
   .other {
    background-color: #e3844c;
    color: #dededc;
   }
   .other:active {
      -webkit-transform: translateY(2px);
      -ms-transform: translateY(2px);
      -moz-tranform: translateY(2px);
      transform: translateY(2px);
}JavaScript部分:
/* limpa o display */
  document.getElementById("clear").addEventListener("click", function() {
   document.getElementById("display").value = "";
  });
  /* recebe os valores */
  function get(value) {
   document.getElementById("display").value += value;
  }
  /* calcula */
  function calculates() {
   var result = 0;
   result = document.getElementById("display").value;
   document.getElementById("display").value = "";
   document.getElementById("display").value = eval(result);
};效果如图所示:

以上给大家分享了HTML、CSS和JavaScript制作简易计算器的代码,对于初学者来说可能有一定的难度,不用担心,把基础知识学扎实以后,相信你很容易理解的,希望这篇文章对你有所帮助!
【相关教程推荐】
1. JavaScript中文参考手册
2. CSS3教程
3. bootstrap教程
以上是如何用HTML+CSS+JavaScript制作简易计算器的详细内容。更多信息请关注PHP中文网其他相关文章!

热AI工具

Undresser.AI Undress
人工智能驱动的应用程序,用于创建逼真的裸体照片

AI Clothes Remover
用于从照片中去除衣服的在线人工智能工具。

Undress AI Tool
免费脱衣服图片

Clothoff.io
AI脱衣机

AI Hentai Generator
免费生成ai无尽的。

热门文章

热工具

记事本++7.3.1
好用且免费的代码编辑器

SublimeText3汉化版
中文版,非常好用

禅工作室 13.0.1
功能强大的PHP集成开发环境

Dreamweaver CS6
视觉化网页开发工具

SublimeText3 Mac版
神级代码编辑软件(SublimeText3)

热门话题
 HTML,CSS和JavaScript的角色:核心职责
Apr 08, 2025 pm 07:05 PM
HTML定义网页结构,CSS负责样式和布局,JavaScript赋予动态交互。三者在网页开发中各司其职,共同构建丰富多彩的网站。
 vue中怎么用bootstrap
Apr 07, 2025 pm 11:33 PM
在 Vue.js 中使用 Bootstrap 分为五个步骤:安装 Bootstrap。在 main.js 中导入 Bootstrap。直接在模板中使用 Bootstrap 组件。可选:自定义样式。可选:使用插件。
 bootstrap怎么写分割线
Apr 07, 2025 pm 03:12 PM
创建 Bootstrap 分割线有两种方法:使用 标签,可创建水平分割线。使用 CSS border 属性,可创建自定义样式的分割线。
 bootstrap怎么调整大小
Apr 07, 2025 pm 03:18 PM
要调整 Bootstrap 中元素大小,可以使用尺寸类,具体包括:调整宽度:.col-、.w-、.mw-调整高度:.h-、.min-h-、.max-h-
 bootstrap怎么设置框架
Apr 07, 2025 pm 03:27 PM
要设置 Bootstrap 框架,需要按照以下步骤:1. 通过 CDN 引用 Bootstrap 文件;2. 下载文件并将其托管在自己的服务器上;3. 在 HTML 中包含 Bootstrap 文件;4. 根据需要编译 Sass/Less;5. 导入定制文件(可选)。设置完成后,即可使用 Bootstrap 的网格系统、组件和样式创建响应式网站和应用程序。
 bootstrap怎么插入图片
Apr 07, 2025 pm 03:30 PM
在 Bootstrap 中插入图片有以下几种方法:直接插入图片,使用 HTML 的 img 标签。使用 Bootstrap 图像组件,可以提供响应式图片和更多样式。设置图片大小,使用 img-fluid 类可以使图片自适应。设置边框,使用 img-bordered 类。设置圆角,使用 img-rounded 类。设置阴影,使用 shadow 类。调整图片大小和位置,使用 CSS 样式。使用背景图片,使用 background-image CSS 属性。
 React在HTML中的作用:增强用户体验
Apr 09, 2025 am 12:11 AM
React通过JSX与HTML结合,提升用户体验。1)JSX嵌入HTML,使开发更直观。2)虚拟DOM机制优化性能,减少DOM操作。3)组件化管理UI,提高可维护性。4)状态管理和事件处理增强交互性。
 bootstrap按钮怎么用
Apr 07, 2025 pm 03:09 PM
如何使用 Bootstrap 按钮?引入 Bootstrap CSS创建按钮元素并添加 Bootstrap 按钮类添加按钮文本


