springboot 2.0.8 跳转jsp页面的方法介绍(附代码)
本篇文章给大家带来的内容是关于springboot 2.0.8 跳转jsp页面的方法介绍(附代码),有一定的参考价值,有需要的朋友可以参考一下,希望对你有所帮助。
这是一篇单独跳转jsp页面的教程 ,后续会介绍html和jsp同时存在的 我暂时注释了thymeleaf模版以及配置
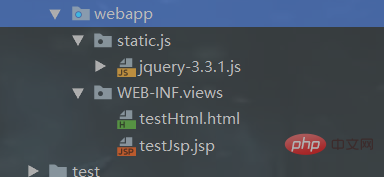
1创建目录结果和jsp文件

2配置return 返回模版 及代码
@RequestMapping(value = "/testJsp", produces = "application/json;charset=UTF-8", method = {RequestMethod.POST, RequestMethod.GET})
    public String testJsp(Model m, HttpServletRequest request, HttpServletResponse response){
        List<Map<String,Object>> list=userService.userQueryAll();
        request.setAttribute("list",list);
        log.info("进入了testJsp方法!");
        return "views/testJsp";
}3.application.yml 文件 配置 thymeleaf 模版参数
spring:
  dataSource:
    type: com.alibaba.druid.pool.DruidDataSource
    url: jdbc:mysql://localhost:3306/db-test?useUnicode=true&characterEncoding=utf8&tinyInt1isBit=false&usessl=false
    username: root
    password: 123456
    driverClassName: com.mysql.jdbc.Driver
  mvc:
    view: #新版本 1.3后可以使用
      suffix: .jsp
      prefix: /WEB-INF/
  view: #老版本 1.4后被抛弃
    suffix: .jsp
prefix: /WEB-INF/4. pom.xml 文件加入tomcat和jsp支持 ,如果是有thymeleaf架包的暂时注释掉,这里只写jsp跳转( 有thymeleaf架包的时候return模版会优先跳转html页面)
<!--tomcat支持-->
        <dependency>
            <groupId>org.springframework.boot</groupId>
            <artifactId>spring-boot-starter-tomcat</artifactId>
            <scope>provided</scope>
        </dependency>
        <dependency>
            <groupId>org.apache.tomcat.embed</groupId>
            <artifactId>tomcat-embed-jasper</artifactId>
            <scope>provided</scope>
        </dependency>
        <!--servlet依赖.-->
        <dependency>
            <groupId>javax.servlet</groupId>
            <artifactId>javax.servlet-api</artifactId>
            <version>4.0.1</version>
            <scope>provided</scope>
        </dependency>
        <!--jsp标签库-->
        <dependency>
            <groupId>javax.servlet</groupId>
            <artifactId>jstl</artifactId>
</dependency>5. jsp页面这里直接用了EL表达式
<%@ page contentType="text/html;charset=UTF-8" isELIgnored="false" pageEncoding="UTF-8" %>
<%@ taglib uri="http://java.sun.com/jstl/core_rt" prefix="c" %>
<%
    String path = request.getContextPath();
    String basePath = request.getScheme() + "://" + request.getServerName() + ":" + request.getServerPort() + path + "/";
%>
<!DOCTYPE html >
<html lang="zh-CN">
<head>
    <title>Title</title>
    <meta http-equiv="Content-Type" content="text/html; charset=utf-8"/>
    <script src="<%=basePath%>static/js/jquery-3.3.1.js" charset="utf-8"></script>
</head>
<body>
<table border="1">
    <thead>
    <tr>
        <th>序号</th>
        <th>名字</th>
        <th>号码</th>
        <th>创建时间</th>
    </tr>
    </thead>
    <tbody>
    <c:forEach items="${list}" var="listv" varStatus="status">
        <tr>
            <td>${listv.id}</td>
            <td>${listv.name}</td>
            <td>${listv.phone}</td>
            <td>${listv.create_time}</td>
        </tr>
    </c:forEach>
    </tbody>
</table>

</body>
<script type="text/javascript" charset="utf-8">

</script>
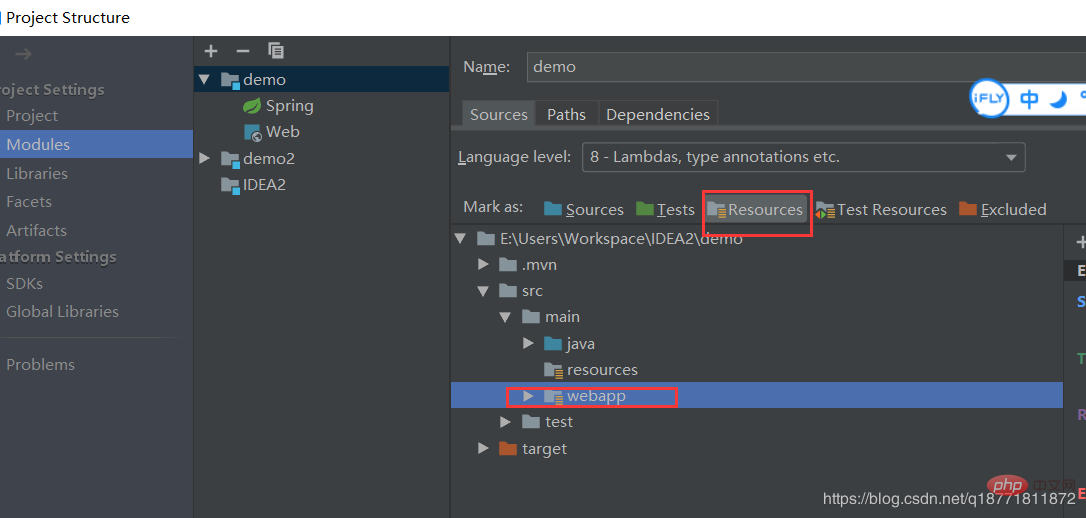
</html>6. Project Structure里面 这个一般是默认配置好了的,如果没有就要加上哦

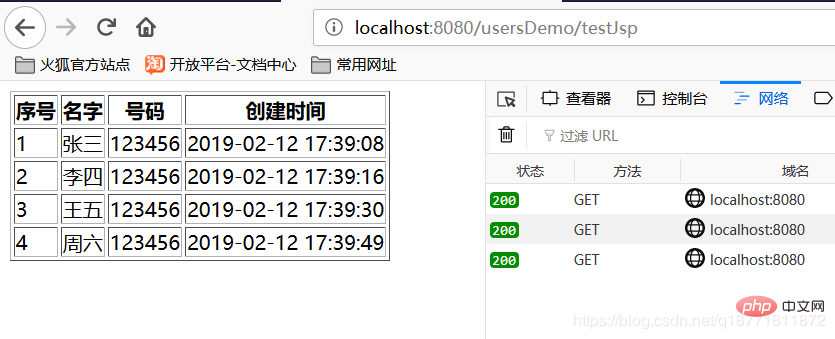
就这样启动就行了 效果图如下

以上是springboot 2.0.8 跳转jsp页面的方法介绍(附代码)的详细内容。更多信息请关注PHP中文网其他相关文章!

热AI工具

Undresser.AI Undress
人工智能驱动的应用程序,用于创建逼真的裸体照片

AI Clothes Remover
用于从照片中去除衣服的在线人工智能工具。

Undress AI Tool
免费脱衣服图片

Clothoff.io
AI脱衣机

Video Face Swap
使用我们完全免费的人工智能换脸工具轻松在任何视频中换脸!

热门文章

热工具

记事本++7.3.1
好用且免费的代码编辑器

SublimeText3汉化版
中文版,非常好用

禅工作室 13.0.1
功能强大的PHP集成开发环境

Dreamweaver CS6
视觉化网页开发工具

SublimeText3 Mac版
神级代码编辑软件(SublimeText3)
 Springboot怎么集成Jasypt实现配置文件加密
Jun 01, 2023 am 08:55 AM
Jasypt介绍Jasypt是一个java库,它允许开发员以最少的努力为他/她的项目添加基本的加密功能,并且不需要对加密工作原理有深入的了解用于单向和双向加密的高安全性、基于标准的加密技术。加密密码,文本,数字,二进制文件...适合集成到基于Spring的应用程序中,开放API,用于任何JCE提供程序...添加如下依赖:com.github.ulisesbocchiojasypt-spring-boot-starter2.1.1Jasypt好处保护我们的系统安全,即使代码泄露,也可以保证数据源的
 SpringBoot怎么集成Redisson实现延迟队列
May 30, 2023 pm 02:40 PM
使用场景1、下单成功,30分钟未支付。支付超时,自动取消订单2、订单签收,签收后7天未进行评价。订单超时未评价,系统默认好评3、下单成功,商家5分钟未接单,订单取消4、配送超时,推送短信提醒……对于延时比较长的场景、实时性不高的场景,我们可以采用任务调度的方式定时轮询处理。如:xxl-job今天我们采
 怎么在SpringBoot中使用Redis实现分布式锁
Jun 03, 2023 am 08:16 AM
一、Redis实现分布式锁原理为什么需要分布式锁在聊分布式锁之前,有必要先解释一下,为什么需要分布式锁。与分布式锁相对就的是单机锁,我们在写多线程程序时,避免同时操作一个共享变量产生数据问题,通常会使用一把锁来互斥以保证共享变量的正确性,其使用范围是在同一个进程中。如果换做是多个进程,需要同时操作一个共享资源,如何互斥呢?现在的业务应用通常是微服务架构,这也意味着一个应用会部署多个进程,多个进程如果需要修改MySQL中的同一行记录,为了避免操作乱序导致脏数据,此时就需要引入分布式锁了。想要实现分
 springboot读取文件打成jar包后访问不到怎么解决
Jun 03, 2023 pm 04:38 PM
springboot读取文件,打成jar包后访问不到最新开发出现一种情况,springboot打成jar包后读取不到文件,原因是打包之后,文件的虚拟路径是无效的,只能通过流去读取。文件在resources下publicvoidtest(){Listnames=newArrayList();InputStreamReaderread=null;try{ClassPathResourceresource=newClassPathResource("name.txt");Input
 Springboot+Mybatis-plus不使用SQL语句进行多表添加怎么实现
Jun 02, 2023 am 11:07 AM
在Springboot+Mybatis-plus不使用SQL语句进行多表添加操作我所遇到的问题准备工作在测试环境下模拟思维分解一下:创建出一个带有参数的BrandDTO对象模拟对后台传递参数我所遇到的问题我们都知道,在我们使用Mybatis-plus中进行多表操作是极其困难的,如果你不使用Mybatis-plus-join这一类的工具,你只能去配置对应的Mapper.xml文件,配置又臭又长的ResultMap,然后再去写对应的sql语句,这种方法虽然看上去很麻烦,但具有很高的灵活性,可以让我们
 SpringBoot与SpringMVC的比较及差别分析
Dec 29, 2023 am 11:02 AM
SpringBoot和SpringMVC都是Java开发中常用的框架,但它们之间有一些明显的差异。本文将探究这两个框架的特点和用途,并对它们的差异进行比较。首先,我们来了解一下SpringBoot。SpringBoot是由Pivotal团队开发的,它旨在简化基于Spring框架的应用程序的创建和部署。它提供了一种快速、轻量级的方式来构建独立的、可执行
 SpringBoot怎么自定义Redis实现缓存序列化
Jun 03, 2023 am 11:32 AM
1、自定义RedisTemplate1.1、RedisAPI默认序列化机制基于API的Redis缓存实现是使用RedisTemplate模板进行数据缓存操作的,这里打开RedisTemplate类,查看该类的源码信息publicclassRedisTemplateextendsRedisAccessorimplementsRedisOperations,BeanClassLoaderAware{//声明了key、value的各种序列化方式,初始值为空@NullableprivateRedisSe
 SpringBoot+Dubbo+Nacos 开发实战教程
Aug 15, 2023 pm 04:49 PM
本文来写个详细的例子来说下dubbo+nacos+Spring Boot开发实战。本文不会讲述太多的理论的知识,会写一个最简单的例子来说明dubbo如何与nacos整合,快速搭建开发环境。


