python装饰器详解
python装饰器的详细解析
什么是装饰器?
推荐学习:Python视频教程
python装饰器(fuctional decorators)就是用于拓展原来函数功能的一种函数,目的是在不改变原函数名(或类名)的情况下,给函数增加新的功能。
这个函数的特殊之处在于它的返回值也是一个函数,这个函数是内嵌“原“”函数的函数。
一般而言,我们要想拓展原来函数代码,最直接的办法就是侵入代码里面修改,例如:
import time
def f():
    print("hello")
    time.sleep(1)
    print("world")
这是我们最原始的的一个函数,然后我们试图记录下这个函数执行的总时间,那最简单的做法就是改动原来的代码:
import time
def f():
    start_time = time.time()
    print("hello")
    time.sleep(1)
    print("world")
    end_time = time.time()
    execution_time = (end_time - start_time)*1000
    print("time is %d ms" %execution_time)
但是实际工作中,有些时候核心代码并不可以直接去改,所以在不改动原代码的情况下,我们可以再定义一个函数。(但是生效需要再次执行函数)
import time
def deco(func):
    start_time = time.time()
    f()
    end_time = time.time()
    execution_time = (end_time - start_time)*1000
    print("time is %d ms" %execution_time)
def f():
    print("hello")
    time.sleep(1)
    print("world")
if __name__ == '__main__':
    deco(f)
    print("f.__name__ is",f.__name__)
    print()
这里我们定义了一个函数deco,它的参数是一个函数,然后给这个函数嵌入了计时功能。但是想要拓展这一千万个函数功能,
就是要执行一千万次deco()函数,所以这样并不理想!接下来,我们可以试着用装饰器来实现,先看看装饰器最原始的面貌。
import time
def deco(f):
    def wrapper():
        start_time = time.time()
        f()
        end_time = time.time()
        execution_time = (end_time - start_time)*1000
        print("time is %d ms" %execution_time )
    return wrapper
@deco
def f():
    print("hello")
    time.sleep(1)
    print("world")
if __name__ == '__main__':
    f()
这里的deco函数就是最原始的装饰器,它的参数是一个函数,然后返回值也是一个函数。
其中作为参数的这个函数f()就在返回函数wrapper()的内部执行。然后在函数f()前面加上@deco,
f()函数就相当于被注入了计时功能,现在只要调用f(),它就已经变身为“新的功能更多”的函数了,
(不需要重复执行原函数)。
扩展1:带有固定参数的装饰器
import time
def deco(f):
    def wrapper(a,b):
        start_time = time.time()
        f(a,b)
        end_time = time.time()
        execution_time = (end_time - start_time)*1000
        print("time is %d ms" % execution_time)
    return wrapper
@deco
def f(a,b):
    print("be on")
    time.sleep(1)
    print("result is %d" %(a+b))
if __name__ == '__main__':
f(3,4)扩展2:无固定参数的装饰器
import time
def deco(f):
    def wrapper(*args, **kwargs):
        start_time = time.time()
        f(*args, **kwargs)
        end_time = time.time()
        execution_time_ = (end_time - start_time)*1000
        print("time is %d ms" %execution_time)
    return wrapper
@deco
def f(a,b):
    print("be on")
    time.sleep(1)
    print("result is %d" %(a+b))
@deco
def f2(a,b,c):
    print("be on")
    time.sleep(1)
    print("result is %d" %(a+b+c))
if __name__ == '__main__':
    f2(3,4,5)
    f(3,4)
扩展3:使用多个装饰器,装饰一个函数
import time
def deco01(f):
    def wrapper(*args, **kwargs):
        print("this is deco01")
        start_time = time.time()
        f(*args, **kwargs)
        end_time = time.time()
        execution_time = (end_time - start_time)*1000
        print("time is %d ms" % execution_time)
        print("deco01 end here")
    return wrapper
def deco02(f):
    def wrapper(*args, **kwargs):
        print("this is deco02")
        f(*args, **kwargs)
        print("deco02 end here")
    return wrapper
@deco01
@deco02
def f(a,b):
    print("be on")
    time.sleep(1)
    print("result is %d" %(a+b))
if __name__ == '__main__':
f(3,4)''' this is deco01 this is deco02 hello,here is a func for add : result is 7 deco02 end here time is 1003 ms deco01 end here '''
装饰器调用顺序
装饰器是可以叠加使用的,那么使用装饰器以后代码是啥顺序呢?
对于Python中的”@”语法糖,装饰器的调用顺序与使用 @ 语法糖声明的顺序相反。
在这个例子中,”f(3, 4) = deco01(deco02(f(3, 4)))”。
Python内置装饰器
在Python中有三个内置的装饰器,都是跟class相关的:staticmethod、classmethod 和property。
staticmethod 是类静态方法,其跟成员方法的区别是没有 self 参数,并且可以在类不进行实例化的情况下调用
classmethod 与成员方法的区别在于所接收的第一个参数不是 self (类实例的指针),而是cls(当前类的具体类型)
property 是属性的意思,表示可以通过通过类实例直接访问的信息
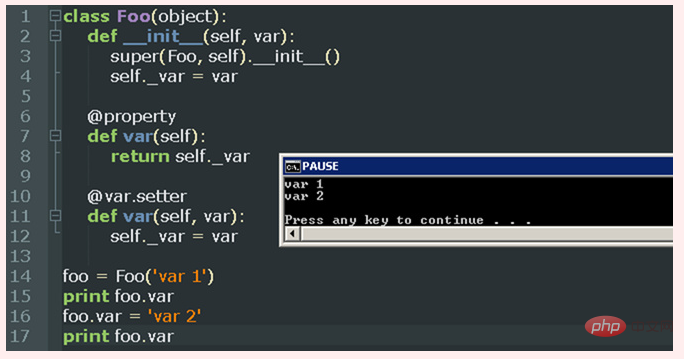
对于staticmethod和classmethod这里就不介绍了,通过一个例子看看property。

注意,对于Python新式类(new-style class),如果将上面的 “@var.setter” 装饰器所装饰的成员函数去掉,则Foo.var 属性为只读属性,使用 “foo.var = ‘var 2′” 进行赋值时会抛出异常。但是,对于Python classic class,所声明的属性不是 read-only的,所以即使去掉”@var.setter”装饰器也不会报错。
总结
本文介绍了Python装饰器的一些使用,装饰器的代码还是比较容易理解的。只要通过一些例子进行实际操作一下,就很容易理解了。
以上是python 装饰器详解的详细内容。更多信息请关注PHP中文网其他相关文章!


