

整合Redis框架搭建SpringBoot2.X的详细教程

redis数据库教程栏目介绍从零搭建SpringBoot2.X教程

推荐(免费):redis数据库教程
最近也不知道写啥,看之前写过Kafka整合Springboot的文章,大家反响还挺热烈的,嘿嘿嘿,就感觉帮助到大家了还挺好的,也算是达到了自己的目的,正好,今天业务模块是springboot整合redis,因为之前做过,所以有现成的代码,cv一下之后就可以了,所以时间比较多,那就给大家整理一下Springboot整合Redis的代码实现吧,从项目搭建到源码实现,下面全都有,耐心看完,相信会对你有所帮助的
好了,话不多说,我们开始吧,同样的,还是建议能够自己在自己的PC端实现一下
个人公众号:Java架构师联盟,每日更新技术好文
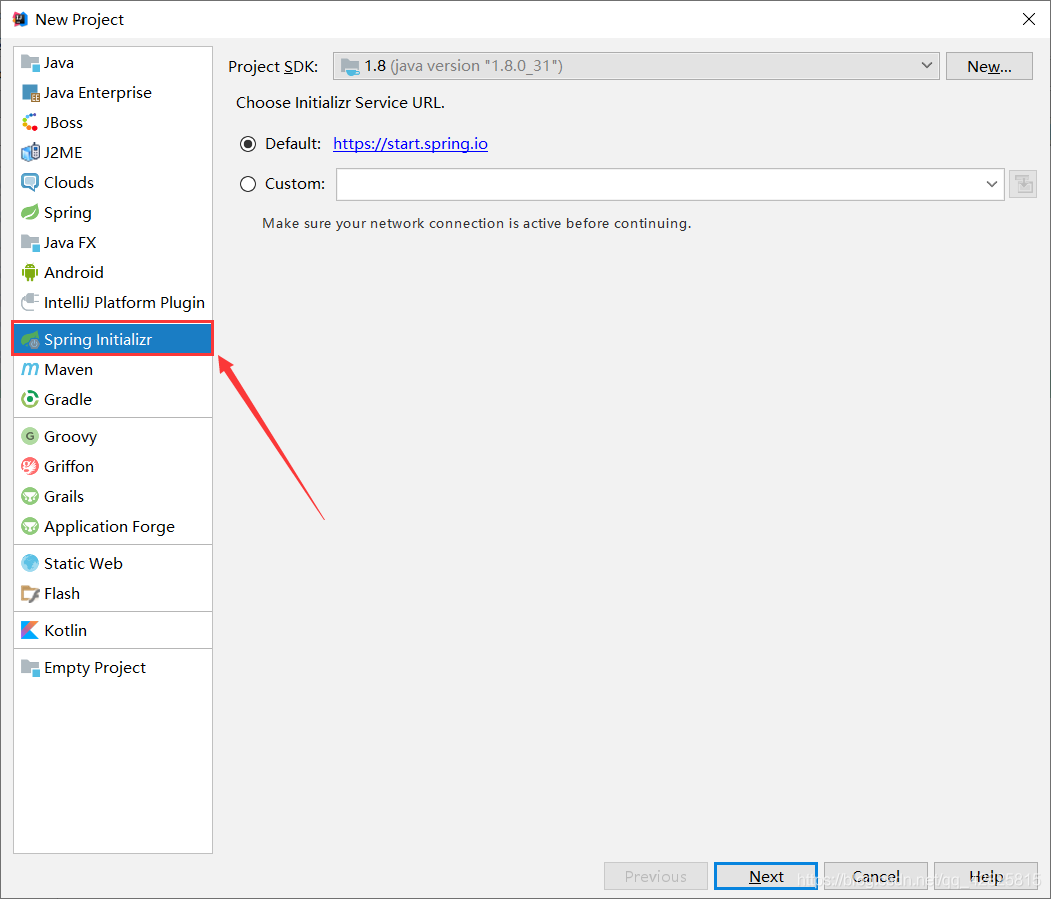
一、使用Spring Initializr创建项目web项目
1、File→New→Project
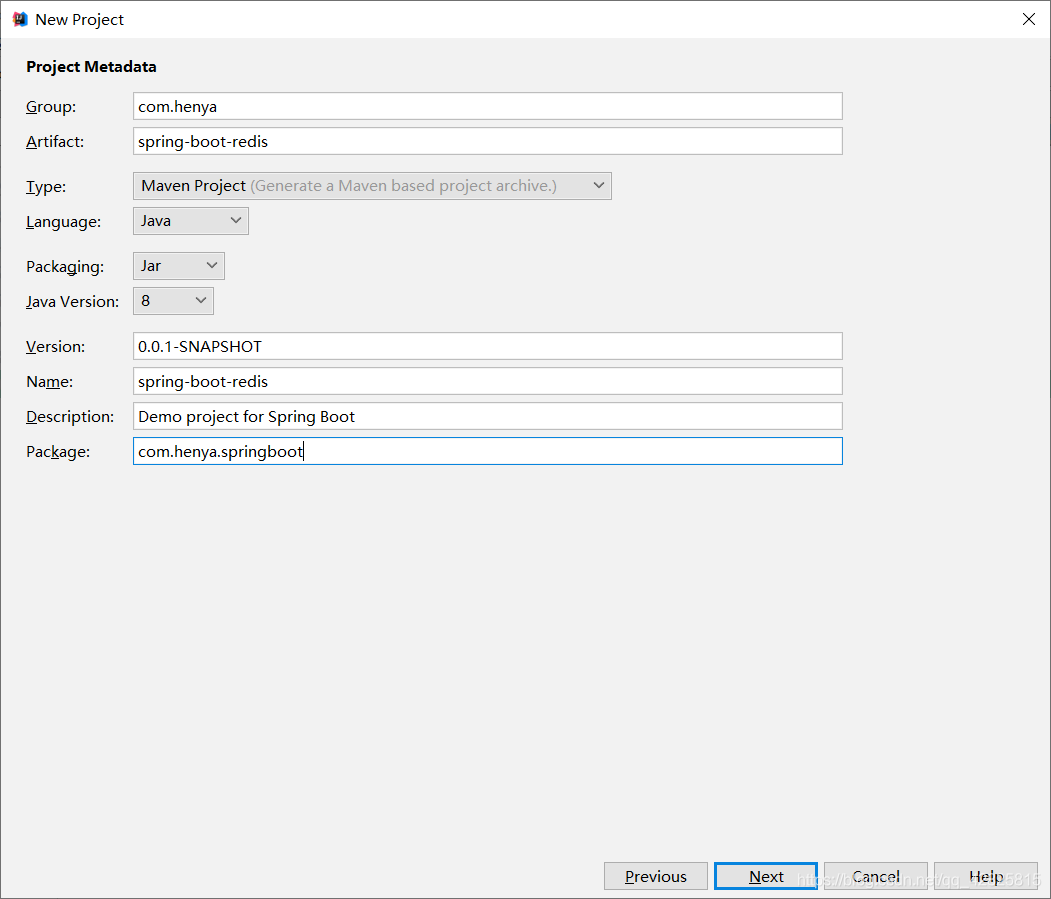
2、点击Next如图所示,命名好Group和Artifact
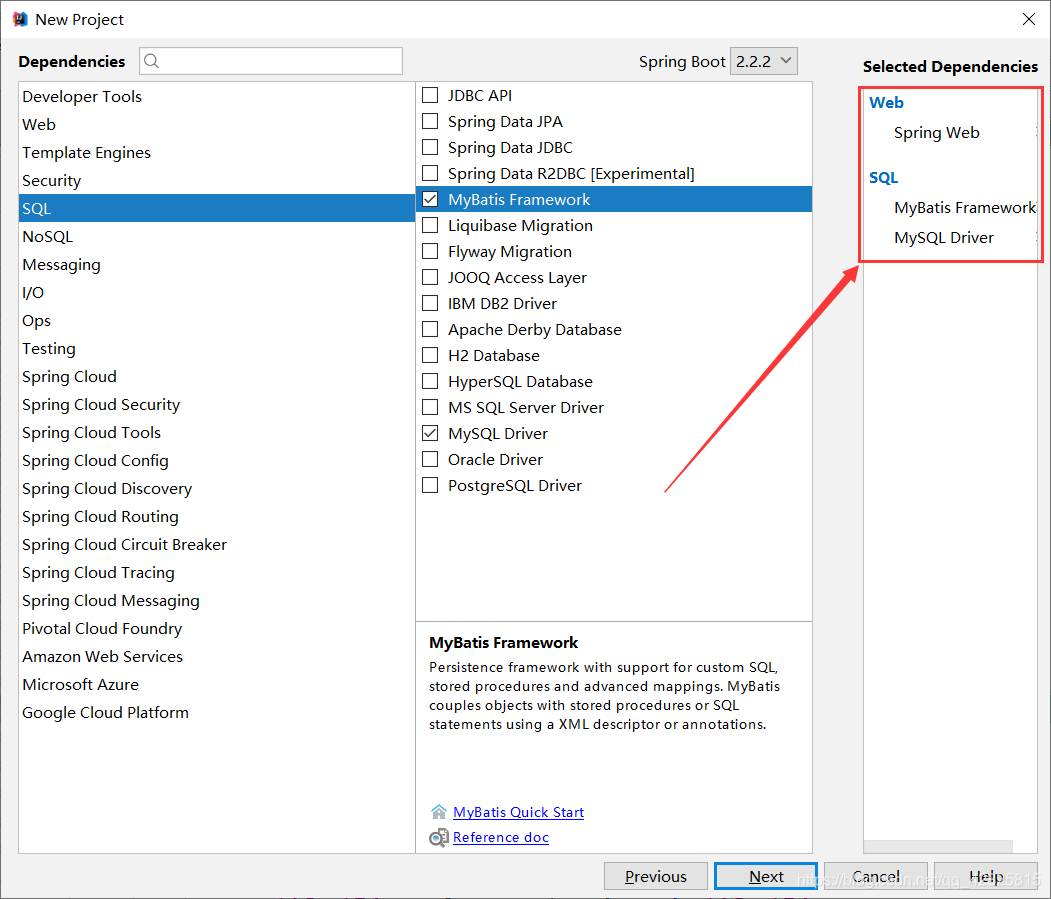
3、Next后如图所示,勾选中需要的依赖,Spring Initializr会自动导入所需的starter
4、创建项目成功后,pom.xml文件中的依赖如下
<?xml version="1.0" encoding="UTF-8"?>
<project xmlns="http://maven.apache.org/POM/4.0.0" xmlns:xsi="http://www.w3.org/2001/XMLSchema-instance"
	xsi:schemaLocation="http://maven.apache.org/POM/4.0.0 https://maven.apache.org/xsd/maven-4.0.0.xsd">
	<modelVersion>4.0.0</modelVersion>
	<parent>
		<groupId>org.springframework.boot</groupId>
		<artifactId>spring-boot-starter-parent</artifactId>
		<version>2.2.2.RELEASE</version>
		<relativePath/> <!-- lookup parent from repository -->
	</parent>
	<groupId>com.heny</groupId>
	<artifactId>spring-boot-redis</artifactId>
	<version>0.0.1-SNAPSHOT</version>
	<name>spring-boot-redis</name>
	<description>Demo project for Spring Boot</description>

	<properties>
		<java.version>1.8</java.version>
	</properties>

	<dependencies>
		<dependency>
			<groupId>org.springframework.boot</groupId>
			<artifactId>spring-boot-starter-web</artifactId>
		</dependency>
		<dependency>
			<groupId>org.mybatis.spring.boot</groupId>
			<artifactId>mybatis-spring-boot-starter</artifactId>
			<version>2.1.1</version>
		</dependency>

		<dependency>
			<groupId>mysql</groupId>
			<artifactId>mysql-connector-java</artifactId>
			<scope>runtime</scope>
		</dependency>
		<dependency>
			<groupId>org.springframework.boot</groupId>
			<artifactId>spring-boot-starter-test</artifactId>
			<scope>test</scope>
			<exclusions>
				<exclusion>
					<groupId>org.junit.vintage</groupId>
					<artifactId>junit-vintage-engine</artifactId>
				</exclusion>
			</exclusions>
		</dependency>
	</dependencies>

	<build>
		<plugins>
			<plugin>
				<groupId>org.springframework.boot</groupId>
				<artifactId>spring-boot-maven-plugin</artifactId>
			</plugin>
		</plugins>
	</build>

</project>
5、在pom.xml文件中添加redis的starter
<dependency>
		<groupId>org.springframework.boot</groupId>
		<artifactId>spring-boot-starter-data-redis</artifactId>
	</dependency>
6、创建JavaBean用于封装数据库数据,需要实现Serializable
package com.henya.springboot.bean;

import java.io.Serializable;

public class Employee implements Serializable{

	private Integer id;
	private String lastName;
	private String email;
	private Integer gender; //性别 1男 0女
	private Integer dId;


	public Employee() {
		super();
	}


	public Employee(Integer id, String lastName, String email, Integer gender, Integer dId) {
		super();
		this.id = id;
		this.lastName = lastName;
		this.email = email;
		this.gender = gender;
		this.dId = dId;
	}

	public Integer getId() {
		return id;
	}
	public void setId(Integer id) {
		this.id = id;
	}
	public String getLastName() {
		return lastName;
	}
	public void setLastName(String lastName) {
		this.lastName = lastName;
	}
	public String getEmail() {
		return email;
	}
	public void setEmail(String email) {
		this.email = email;
	}
	public Integer getGender() {
		return gender;
	}
	public void setGender(Integer gender) {
		this.gender = gender;
	}
	public Integer getdId() {
		return dId;
	}
	public void setdId(Integer dId) {
		this.dId = dId;
	}
	@Override
	public String toString() {
		return "Employee [id=" + id + ", lastName=" + lastName + ", email=" + email + ", gender=" + gender + ", dId="
				+ dId + "]";
	}
}注意:
在写JavaBean对象时需要实现Serializable接口否则会报以下错误:
Cannot deserialize; nested exception is org.springframework.core.serializer.support.SerializationFailedException
7、整合Mybatis操作数据库,在application.properties配置文件中配置数据源信息
#serverTimezone用于指定时区,不然会报错
spring.datasource.url=jdbc:mysql://localhost:3306/cache?serverTimezone=UTC
spring.datasource.username=root
spring.datasource.password=123456

# 开启驼峰命名法规则
mybatis.configuration.map-underscore-to-camel-case=true
#日志级别
logging.level.com.henya.springboot.mapper=debug
8、使用注解版Mybatis创建Mapper
package com.henya.springboot.mapper;


import com.henya.springboot.bean.Employee;
import org.apache.ibatis.annotations.*;

@Mapper
public interface EmployeeMapper {

 @Select("SELECT * FROM employee WHERE id=#{id}")
 public Employee getEmpById(Integer id);

 @Update("UPDATE employee SET lastName=#{lastName},email=#{email},gender=#{gender},d_id=#{dId} WHERE id=#{id}")
 public void updateEmp(Employee employee);

 @Delete("DELETE FROM emlpoyee WHERE id=#{id}")
 public void delEmpById(Integer id);

 @Insert("INSERT INTO employee(lastName, email, gender, d_id) VALUES (#{lastName}, #{email}, #{gender}, #{dId})")
 public Employee insertEmp(Employee employee);

 @Select("SELECT * FROM employee WHERE lastName=#{lastName}")
 public Employee getEmpByLastName(String lastName);
}注意:
需要使用使用@MapperScan注解扫描Mapper所在的接口,只需要加在主程序类上即可。除此之外,还要使用@EnableCaching用于开启缓存。
@MapperScan("com.henya.springboot.mapper")
@SpringBootApplication
@EnableCaching //开启缓存
public class SpringBootRedisApplication {

	public static void main(String[] args) {
		SpringApplication.run(SpringBootRedisApplication.class, args);
	}
}9、编写Service类,用于访问数据库或redis缓存
package com.henya.springboot.service;
import com.henya.springboot.bean.Employee;
import com.henya.springboot.mapper.EmployeeMapper;
import org.springframework.beans.factory.annotation.Autowired;
import org.springframework.cache.annotation.*;
import org.springframework.stereotype.Service;

@CacheConfig(cacheNames = "emp") //抽取缓存的公共配置
@Service
public class EmployeeService {
 @Autowired
 EmployeeMapper employeeMapper;

 /**
 * @param id
 * @return
 */
 @Cacheable(cacheNames = {"emp"},keyGenerator = "myKeyGenerator")
 public Employee getEmpById(Integer id) {
 System.err.println("开始查询"+ id +"号员工");
 Employee employee = employeeMapper.getEmpById(id);
 return employee;
 }

 /**
 * @CachePut:既调用方法(这个方法必须要执行),又更新缓存数据
 * @param employee
 * @return
 */
 @CachePut(value = "emp",key = "#result.id")
 public Employee updateEmp(Employee employee){
 System.err.println("开始更新" + employee.getId() + "号员工");
 employeeMapper.updateEmp(employee);
 return employee;
 }

 /**
 * @CacheEvict:缓存清除
 * @param id
 */
 @CacheEvict(value = "emp",beforeInvocation = true)
 public void deleteEmp(Integer id){
 System.err.println("删除" + id + "员工");
 int i = 10/0;
}10、编写Controller类
package com.henya.springboot.controller;


import com.henya.springboot.bean.Employee;
import com.henya.springboot.service.EmployeeService;
import org.springframework.beans.factory.annotation.Autowired;
import org.springframework.web.bind.annotation.GetMapping;
import org.springframework.web.bind.annotation.PathVariable;
import org.springframework.web.bind.annotation.RestController;

/**
 * @Description:
 * @Author:HenYa
 * @CreatTime:2019/12/1 12:44
 */
@RestController
public class EmployeeController {
 @Autowired
 EmployeeService employeeService;

 @GetMapping("/emp/{id}")
 public Employee getEmpById(@PathVariable("id") Integer id){
 Employee employee = employeeService.getEmpById(id);
 return employee;
 }

 @GetMapping("/emp")
 public Employee updateEmp(Employee employee){
 Employee emp = employeeService.updateEmp(employee);
 return emp;
 }
}二、测试SpringBoot整合Redis是否成功
1、在浏览器访问,也可以使用测试类,笔者使用了浏览器访问http://localhost:8080/emp/1进行测试,初次访问时,控制台会提示开始查询1号员工,如图所示。

2、再次访问时,控制台并没有sql日志,如图所示。

3、此时使用RedisDesktopManager工具查看redis时有数据,并且cacheName为emp,如图所示
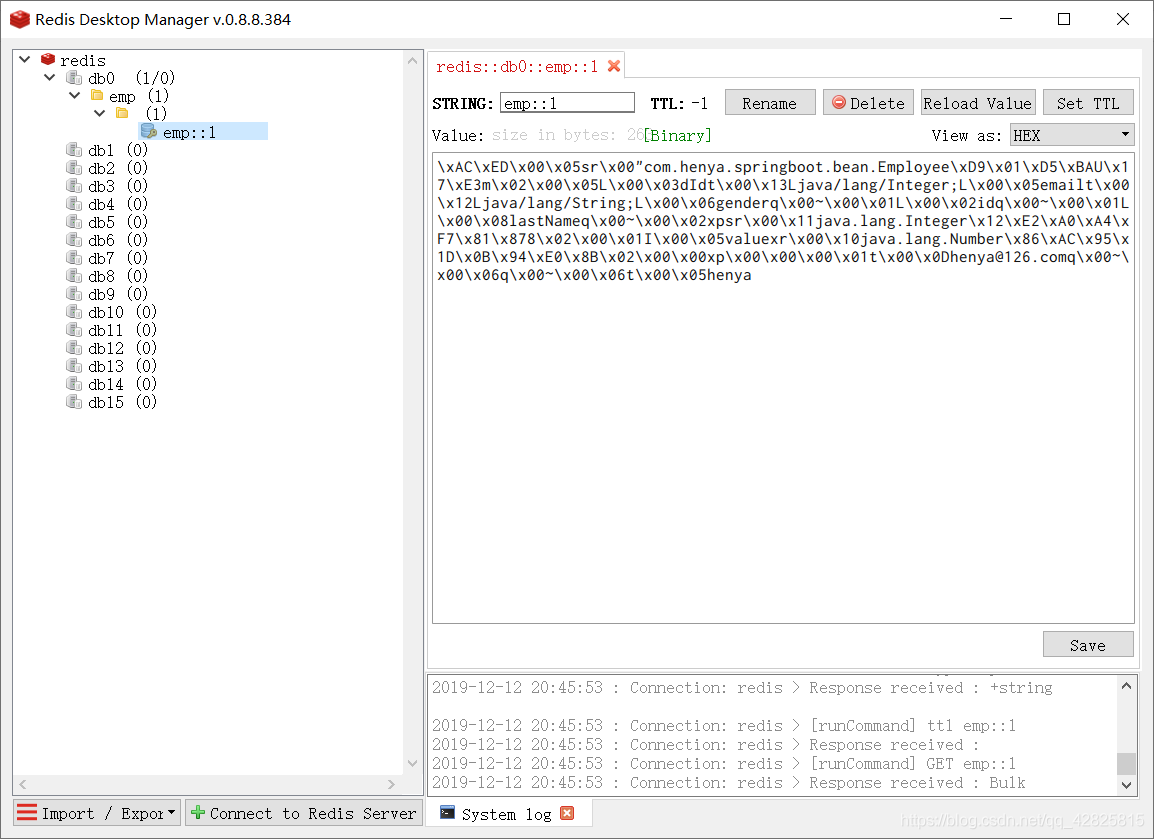
只是emp对象被序列化了。查看源码可知Redis默认使用Jdk进行序列化。
static RedisSerializer<Object> java(@Nullable ClassLoader classLoader) {
 return new JdkSerializationRedisSerializer(classLoader);
}查看RedisSerializer接口的实现有以下几种:

我们常用的就是以json的格式进行序列化。但是需要自定义RedisCacheManager。
三、自定义RedisCacheManager
package com.henya.springboot.config;
import org.springframework.context.annotation.Bean;
import org.springframework.context.annotation.Configuration;
import org.springframework.data.redis.cache.RedisCacheConfiguration;
import org.springframework.data.redis.cache.RedisCacheManager;
import org.springframework.data.redis.cache.RedisCacheWriter;
import org.springframework.data.redis.connection.RedisConnectionFactory;
import org.springframework.data.redis.serializer.GenericJackson2JsonRedisSerializer;
import org.springframework.data.redis.serializer.RedisSerializationContext;
import org.springframework.data.redis.serializer.RedisSerializer;

/**
 * @Description:
 * @Author:HenYa
 * @CreatTime:2019/12/6 20:50
 */
@Configuration
public class MyRedisConfig {
 @Bean
 public RedisCacheManager empCacheManager(RedisConnectionFactory redisConnectionFactory){
 //RedisCacheManager redisCacheManager = new RedisCacheManager(redisConnectionFactory);
 RedisCacheWriter redisCacheWriter = RedisCacheWriter.nonLockingRedisCacheWriter(redisConnectionFactory);

 RedisSerializer<Object> redisSerializer = new GenericJackson2JsonRedisSerializer();

 RedisSerializationContext.SerializationPair<Object> pair = RedisSerializationContext.SerializationPair.fromSerializer(redisSerializer);
 RedisCacheConfiguration redisCacheConfiguration = RedisCacheConfiguration.defaultCacheConfig().serializeValuesWith(pair);
 // 默认会将CacheName作为key的前缀
 return new RedisCacheManager(redisCacheWriter, redisCacheConfiguration);
 }
}此时,Redis中缓存数据就以Json的格式进行序列化,如图所示。
以上是整合Redis框架搭建SpringBoot2.X的详细教程的详细内容。更多信息请关注PHP中文网其他相关文章!

热AI工具

Undresser.AI Undress
人工智能驱动的应用程序,用于创建逼真的裸体照片

AI Clothes Remover
用于从照片中去除衣服的在线人工智能工具。

Undress AI Tool
免费脱衣服图片

Clothoff.io
AI脱衣机

Video Face Swap
使用我们完全免费的人工智能换脸工具轻松在任何视频中换脸!

热门文章
热工具

记事本++7.3.1
好用且免费的代码编辑器

SublimeText3汉化版
中文版,非常好用

禅工作室 13.0.1
功能强大的PHP集成开发环境

Dreamweaver CS6
视觉化网页开发工具

SublimeText3 Mac版
神级代码编辑软件(SublimeText3)


 redis集群模式怎么搭建
Apr 10, 2025 pm 10:15 PM
redis集群模式怎么搭建
Apr 10, 2025 pm 10:15 PM
Redis集群模式通过分片将Redis实例部署到多个服务器,提高可扩展性和可用性。搭建步骤如下:创建奇数个Redis实例,端口不同;创建3个sentinel实例,监控Redis实例并进行故障转移;配置sentinel配置文件,添加监控Redis实例信息和故障转移设置;配置Redis实例配置文件,启用集群模式并指定集群信息文件路径;创建nodes.conf文件,包含各Redis实例的信息;启动集群,执行create命令创建集群并指定副本数量;登录集群执行CLUSTER INFO命令验证集群状态;使
 redis数据怎么清空
Apr 10, 2025 pm 10:06 PM
redis数据怎么清空
Apr 10, 2025 pm 10:06 PM
如何清空 Redis 数据:使用 FLUSHALL 命令清除所有键值。使用 FLUSHDB 命令清除当前选定数据库的键值。使用 SELECT 切换数据库,再使用 FLUSHDB 清除多个数据库。使用 DEL 命令删除特定键。使用 redis-cli 工具清空数据。
 redis怎么读取队列
Apr 10, 2025 pm 10:12 PM
redis怎么读取队列
Apr 10, 2025 pm 10:12 PM
要从 Redis 读取队列,需要获取队列名称、使用 LPOP 命令读取元素,并处理空队列。具体步骤如下:获取队列名称:以 "queue:" 前缀命名,如 "queue:my-queue"。使用 LPOP 命令:从队列头部弹出元素并返回其值,如 LPOP queue:my-queue。处理空队列:如果队列为空,LPOP 返回 nil,可先检查队列是否存在再读取元素。
 redis指令怎么用
Apr 10, 2025 pm 08:45 PM
redis指令怎么用
Apr 10, 2025 pm 08:45 PM
使用 Redis 指令需要以下步骤:打开 Redis 客户端。输入指令(动词 键 值)。提供所需参数(因指令而异)。按 Enter 执行指令。Redis 返回响应,指示操作结果(通常为 OK 或 -ERR)。
 redis怎么使用单线程
Apr 10, 2025 pm 07:12 PM
redis怎么使用单线程
Apr 10, 2025 pm 07:12 PM
Redis 使用单线程架构,以提供高性能、简单性和一致性。它利用 I/O 多路复用、事件循环、非阻塞 I/O 和共享内存来提高并发性,但同时存在并发性受限、单点故障和不适合写密集型工作负载的局限性。
 redis怎么使用锁
Apr 10, 2025 pm 08:39 PM
redis怎么使用锁
Apr 10, 2025 pm 08:39 PM
使用Redis进行锁操作需要通过SETNX命令获取锁,然后使用EXPIRE命令设置过期时间。具体步骤为:(1) 使用SETNX命令尝试设置一个键值对;(2) 使用EXPIRE命令为锁设置过期时间;(3) 当不再需要锁时,使用DEL命令删除该锁。
 redis命令行怎么用
Apr 10, 2025 pm 10:18 PM
redis命令行怎么用
Apr 10, 2025 pm 10:18 PM
使用 Redis 命令行工具 (redis-cli) 可通过以下步骤管理和操作 Redis:连接到服务器,指定地址和端口。使用命令名称和参数向服务器发送命令。使用 HELP 命令查看特定命令的帮助信息。使用 QUIT 命令退出命令行工具。
 redis怎么读源码
Apr 10, 2025 pm 08:27 PM
redis怎么读源码
Apr 10, 2025 pm 08:27 PM
理解 Redis 源码的最佳方法是逐步进行:熟悉 Redis 基础知识。选择一个特定的模块或功能作为起点。从模块或功能的入口点开始,逐行查看代码。通过函数调用链查看代码。熟悉 Redis 使用的底层数据结构。识别 Redis 使用的算法。
