

一文章带你彻底搞懂Laravel运行原理!

下面由Laravel框架教程栏目给大家介绍Laravel运行原理,希望对需要的朋友有所帮助!
前言
知其然知其所以然,刚开始接触框架的时候大不部分人肯定一脸懵逼,不知道如何实现的,没有一定的基础知识,直接去看框架的源码,只会被直接劝退,Laravel 框架是一款非常优秀的 PHP 框架,这篇文章就是带你彻底搞懂框架的运行原理,好让你在面试的过程中有些谈资(吹牛),学习和研究优秀框架的源码也有助于我们自身技术的提升,接下来系好安全带,老司机要开始开车了!!!
准备知识
- 熟悉 php 基本知识,如常见的数组方法,闭包函数的使用,魔术方法的使用
- 熟悉 php 的反射机制和依赖注入
- 熟悉 php 命名空间概念和 compose 自动加载
- 熟悉常见的设计模式,包括但是不限于单例模式,工厂模式,门面模式,注册树模式,装饰者模式等
运行原理概述
Laravel 框架的入口文件 index.php
1、引入自动加载 autoload.php 文件
2、创建应用实例,并同时完成了
基本绑定($this、容器类Container等等)、

基本服务提供者的注册(Event、log、routing)、

核心类别名的注册(比如db、auth、config、router等)
3、开始 Http 请求的处理
make 方法从容器中解析指定的值为实际的类,比如 $app->make(Illuminate\Contracts\Http\Kernel::class); 解析出来 App\Http\Kernel

handle 方法对 http 请求进行处理

实际上是 handle 中 sendRequestThroughRouter 处理 http 的请求

首先,将 request 绑定到共享实例

然后执行 bootstarp 方法,运行给定的引导类数组 $bootstrappers,这里是重点,包括了加载配置文件、环境变量、服务提供者、门面、异常处理、引导提供者等

之后,进入管道模式,经过中间件的处理过滤后,再进行用户请求的分发

在请求分发时,首先,查找与给定请求匹配的路由,然后执行 runRoute 方法,实际处理请求的时候 runRoute 中的 runRouteWithinStack

最后,经过 runRouteWithinStack 中的 run 方法,将请求分配到实际的控制器中,执行闭包或者方法,并得到响应结果
4、 将处理结果返回
详细源码分析
1、注册自动加载类,实现文件的自动加载
require __DIR__.'/../vendor/autoload.php';
2、创建应用容器实例 Application (该实例继承自容器类 Container),并绑定核心(web、命令行、异常),方便在需要的时候解析它们
$app = require_once __DIR__.'/../bootstrap/app.php';
app.php 文件如下:
<?php // 创建Laravel实例 【3】 $app = new Illuminate\Foundation\Application( $_ENV['APP_BASE_PATH'] ?? dirname(__DIR__) ); // 绑定Web端kernel $app->singleton( Illuminate\Contracts\Http\Kernel::class, App\Http\Kernel::class); // 绑定命令行kernel $app->singleton( Illuminate\Contracts\Console\Kernel::class, App\Console\Kernel::class); // 绑定异常处理 $app->singleton( Illuminate\Contracts\Debug\ExceptionHandler::class, App\Exceptions\Handler::class); // 返回应用实例 return $app;
3、在创建应用实例(Application.php)的构造函数中,将基本绑定注册到容器中,并注册了所有的基本服务提供者,以及在容器中注册核心类别名
3.1、将基本绑定注册到容器中
    /**
     * Register the basic bindings into the container.
     *
     * @return void
     */
    protected function registerBaseBindings()
    {
        static::setInstance($this);
        $this->instance('app', $this);
        $this->instance(Container::class, $this);
        $this->singleton(Mix::class);
        $this->instance(PackageManifest::class, new PackageManifest(
            new Filesystem, $this->basePath(), $this->getCachedPackagesPath()
        ));
        # 注:instance方法为将...注册为共享实例,singleton方法为将...注册为共享绑定
}3.2、注册所有基本服务提供者(事件,日志,路由)
protected function registerBaseServiceProviders()
    {
        $this->register(new EventServiceProvider($this));
        $this->register(new LogServiceProvider($this));
        $this->register(new RoutingServiceProvider($this));
}3.3、在容器中注册核心类别名
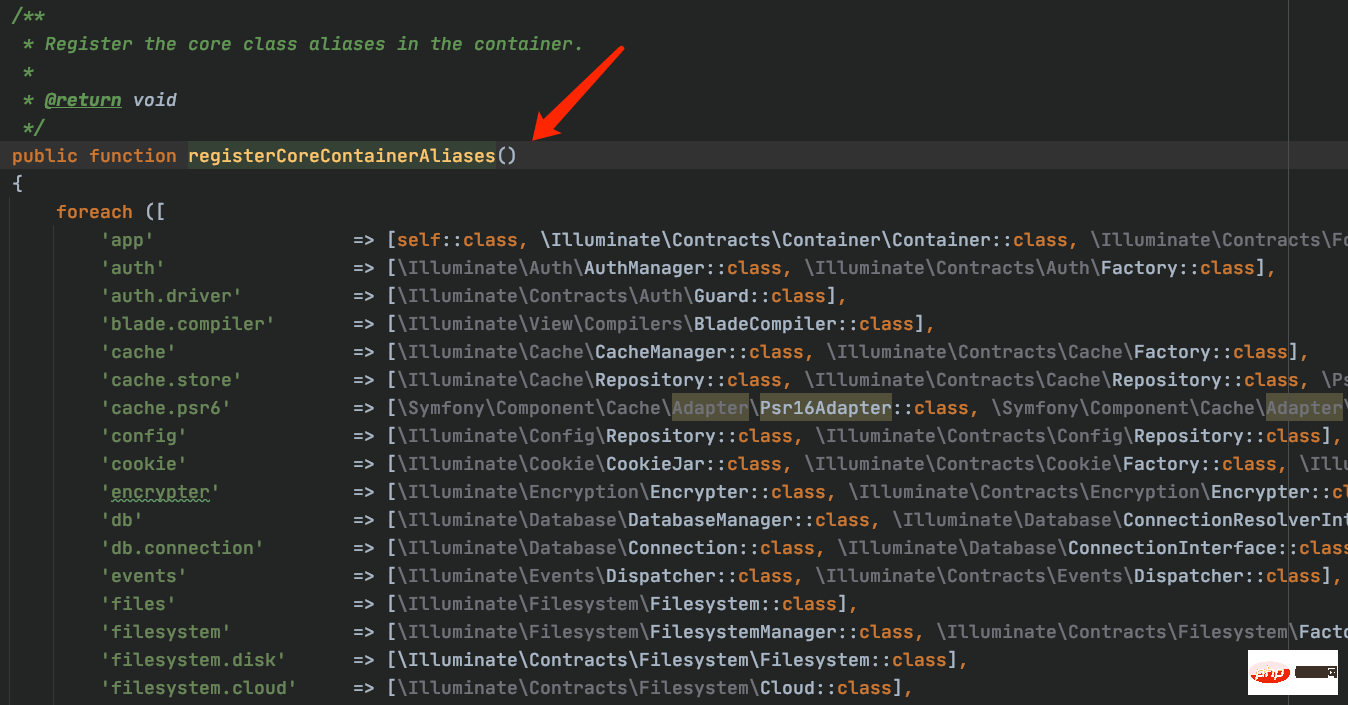
4、上面完成了类的自动加载、服务提供者注册、核心类的绑定、以及基本注册的绑定
5、开始解析 http 的请求
index.php
//5.1
$kernel = $app->make(Illuminate\Contracts\Http\Kernel::class);
//5.2
$response = $kernel->handle(
 $request = Illuminate\Http\Request::capture());
5.1、make方法是从容器解析给定值
$kernel = $app->make(Illuminate\Contracts\Http\Kernel::class);

中的Illuminate\Contracts\Http\Kernel::class 是在index.php 中的$app = require_once __DIR__.'/../bootstrap/app.php';这里面进行绑定的,实际指向的就是App\Http\Kernel::class这个类
5.2、这里对 http 请求进行处理
$response = $kernel->handle(
 $request = Illuminate\Http\Request::capture());
进入 $kernel 所代表的类 App\Http\Kernel.php 中,我们可以看到其实里面只是定义了一些中间件相关的内容,并没有 handle 方法
我们再到它的父类 use Illuminate\Foundation\Http\Kernel as HttpKernel; 中找 handle 方法,可以看到 handle 方法是这样的
public function handle($request){
    try {
        $request->enableHttpMethodParameterOverride();
        // 最核心的处理http请求的地方【6】
        $response = $this->sendRequestThroughRouter($request);
    } catch (Exception $e) {
        $this->reportException($e);
        $response = $this->renderException($request, $e);
    } catch (Throwable $e) {
        $this->reportException($e = new FatalThrowableError($e));
        $response = $this->renderException($request, $e);
    }
    $this->app['events']->dispatch(
        new Events\RequestHandled($request, $response)
    );
return $response;}6、处理 Http 请求(将 request 绑定到共享实例,并使用管道模式处理用户请求)
vendor/laravel/framework/src/Illuminate/Foundation/Http/Kernel.php的handle方法// 最核心的处理http请求的地方$response = $this->sendRequestThroughRouter($request);protected function sendRequestThroughRouter($request){
    // 将请求$request绑定到共享实例
    $this->app->instance('request', $request);
    // 将请求request从已解析的门面实例中清除(因为已经绑定到共享实例中了,没必要再浪费资源了)
    Facade::clearResolvedInstance('request');
    // 引导应用程序进行HTTP请求
    $this->bootstrap();【7、8】    // 进入管道模式,经过中间件,然后处理用户的请求【9、10】
    return (new Pipeline($this->app))
                ->send($request)
                ->through($this->app->shouldSkipMiddleware() ? [] : $this->middleware)
->then($this->dispatchToRouter());}7、在 bootstrap 方法中,运行给定的 引导类数组 $bootstrappers,加载配置文件、环境变量、服务提供者、门面、异常处理、引导提供者,非常重要的一步,位置在 vendor/laravel/framework/src/Illuminate/Foundation/Http/Kernel.php
/**
 * Bootstrap the application for HTTP requests.
 *
 * @return void
 */public function bootstrap(){
    if (! $this->app->hasBeenBootstrapped()) {
        $this->app->bootstrapWith($this->bootstrappers());
}}/**
* 运行给定的引导类数组
*
* @param string[] $bootstrappers
* @return void
*/public function bootstrapWith(array $bootstrappers){
$this->hasBeenBootstrapped = true;
foreach ($bootstrappers as $bootstrapper) {
$this['events']->dispatch('bootstrapping: '.$bootstrapper, [$this]);
$this->make($bootstrapper)->bootstrap($this);
$this['events']->dispatch('bootstrapped: '.$bootstrapper, [$this]);
}}/**
* Get the bootstrap classes for the application.
*
* @return array
*/protected function bootstrappers(){
return $this->bootstrappers;}/**
* 应用程序的引导类
*
* @var array
*/protected $bootstrappers = [
// 加载环境变量
\Illuminate\Foundation\Bootstrap\LoadEnvironmentVariables::class,
// 加载config配置文件【重点】
\Illuminate\Foundation\Bootstrap\LoadConfiguration::class,
// 加载异常处理
\Illuminate\Foundation\Bootstrap\HandleExceptions::class,
// 加载门面注册
\Illuminate\Foundation\Bootstrap\RegisterFacades::class,
// 加载在config/app.php中的providers数组里所定义的服务【8 重点】
\Illuminate\Foundation\Bootstrap\RegisterProviders::class,
// 记载引导提供者
\Illuminate\Foundation\Bootstrap\BootProviders::class,];8、加载 config/app.php 中的 providers 数组里定义的服务
Illuminate\Auth\AuthServiceProvider::class,Illuminate\Broadcasting\BroadcastServiceProvider::class,....../**
 * 自己添加的服务提供者 */\App\Providers\HelperServiceProvider::class,
可以看到,关于常用的 Redis、session、queue、auth、database、Route 等服务都是在这里进行加载的
9、使用管道模式处理用户请求,先经过中间件进行处理和过滤
return (new Pipeline($this->app))
    ->send($request)
    // 如果没有为程序禁用中间件,则加载中间件(位置在app/Http/Kernel.php的$middleware属性)
    ->through($this->app->shouldSkipMiddleware() ? [] : $this->middleware)
->then($this->dispatchToRouter());}app/Http/Kernel.php
/**
 * 应用程序的全局HTTP中间件
 *
 * These middleware are run during every request to your application.
 *
 * @var array
 */protected $middleware = [
    \App\Http\Middleware\TrustProxies::class,
    \App\Http\Middleware\CheckForMaintenanceMode::class,
    \Illuminate\Foundation\Http\Middleware\ValidatePostSize::class,
    \App\Http\Middleware\TrimStrings::class,
\Illuminate\Foundation\Http\Middleware\ConvertEmptyStringsToNull::class,];10、经过中间件处理后,再进行请求分发(包括查找匹配路由)
/**
 * 10.1 通过中间件/路由器发送给定的请求
 *
 * @param  \Illuminate\Http\Request  $request
 * @return \Illuminate\Http\Response
 */
 protected function sendRequestThroughRouter($request){
    ...
    return (new Pipeline($this->app))
        ...
        // 进行请求分发
->then($this->dispatchToRouter());}/**
* 10.2 获取路由调度程序回调
*
* @return \Closure
*/protected function dispatchToRouter(){
return function ($request) {
$this->app->instance('request', $request);
// 将请求发送到应用程序
return $this->router->dispatch($request);
};}/**
* 10.3 将请求发送到应用程序
*
* @param \Illuminate\Http\Request $request
* @return \Illuminate\Http\Response|\Illuminate\Http\JsonResponse
*/
public function dispatch(Request $request){
$this->currentRequest = $request;
return $this->dispatchToRoute($request);} /**
* 10.4 将请求分派到路由并返回响应【重点在runRoute方法】
*
* @param \Illuminate\Http\Request $request
* @return \Illuminate\Http\Response|\Illuminate\Http\JsonResponse
*/public function dispatchToRoute(Request $request){
return $this->runRoute($request, $this->findRoute($request));}/**
* 10.5 查找与给定请求匹配的路由
*
* @param \Illuminate\Http\Request $request
* @return \Illuminate\Routing\Route
*/protected function findRoute($request){
$this->current = $route = $this->routes->match($request);
$this->container->instance(Route::class, $route);
return $route;}/**
* 10.6 查找与给定请求匹配的第一条路由
*
* @param \Illuminate\Http\Request $request
* @return \Illuminate\Routing\Route
*
* @throws \Symfony\Component\HttpKernel\Exception\NotFoundHttpException
*/public function match(Request $request){
// 获取用户的请求类型(get、post、delete、put),然后根据请求类型选择对应的路由
$routes = $this->get($request->getMethod());
// 匹配路由
$route = $this->matchAgainstRoutes($routes, $request);
if (! is_null($route)) {
return $route->bind($request);
}
$others = $this->checkForAlternateVerbs($request);
if (count($others) > 0) {
return $this->getRouteForMethods($request, $others);
}
throw new NotFoundHttpException;}到现在,已经找到与请求相匹配的路由了,之后将运行了,也就是 10.4 中的 runRoute 方法
/**
 * 10.7 返回给定路线的响应
 *
 * @param  \Illuminate\Http\Request  $request
 * @param  \Illuminate\Routing\Route  $route
 * @return \Illuminate\Http\Response|\Illuminate\Http\JsonResponse
 */protected function runRoute(Request $request, Route $route){
    $request->setRouteResolver(function () use ($route) {
        return $route;
    });
    $this->events->dispatch(new Events\RouteMatched($route, $request));
    return $this->prepareResponse($request,
        $this->runRouteWithinStack($route, $request)
);}/**
* Run the given route within a Stack "onion" instance.
* 10.8 在栈中运行路由,先检查有没有控制器中间件,如果有先运行控制器中间件
*
* @param \Illuminate\Routing\Route $route
* @param \Illuminate\Http\Request $request
* @return mixed
*/protected function runRouteWithinStack(Route $route, Request $request){
$shouldSkipMiddleware = $this->container->bound('middleware.disable') &&
$this->container->make('middleware.disable') === true;
$middleware = $shouldSkipMiddleware ? [] : $this->gatherRouteMiddleware($route);
return (new Pipeline($this->container))
->send($request)
->through($middleware)
->then(function ($request) use ($route) {
return $this->prepareResponse(
$request, $route->run()
);
});} /**
* Run the route action and return the response.
* 10.9 最后一步,运行控制器的方法,处理数据
* @return mixed
*/
public function run()
{
$this->container = $this->container ?: new Container;
try {
if ($this->isControllerAction()) {
return $this->runController();
}
return $this->runCallable();
} catch (HttpResponseException $e) {
return $e->getResponse();
}
}11、运行路由并返回响应(重点)
可以看到,10.7 中有一个方法是 prepareResponse,该方法是从给定值创建响应实例,而 runRouteWithinStack 方法则是在栈中运行路由,也就是说,http 的请求和响应都将在这里完成。
总结
到此为止,整个 Laravel 框架的运行流程就分析完毕了,揭开了 Laravel 框架的神秘面纱,其中为了文章的可读性,只给出了核心代码,需要大家结合文章自行去阅读源码,需要注意的是必须了解文章中提到的准备知识,这是阅读框架源码的前提和基础,希望大家有所收获,下车!!!
以上是一文章带你彻底搞懂Laravel运行原理!的详细内容。更多信息请关注PHP中文网其他相关文章!

热AI工具

Undresser.AI Undress
人工智能驱动的应用程序,用于创建逼真的裸体照片

AI Clothes Remover
用于从照片中去除衣服的在线人工智能工具。

Undress AI Tool
免费脱衣服图片

Clothoff.io
AI脱衣机

AI Hentai Generator
免费生成ai无尽的。

热门文章
热工具

记事本++7.3.1
好用且免费的代码编辑器

SublimeText3汉化版
中文版,非常好用

禅工作室 13.0.1
功能强大的PHP集成开发环境

Dreamweaver CS6
视觉化网页开发工具

SublimeText3 Mac版
神级代码编辑软件(SublimeText3)
热门话题


 PHP中如何使用对象-关系映射(ORM)简化数据库操作?
May 07, 2024 am 08:39 AM
PHP中如何使用对象-关系映射(ORM)简化数据库操作?
May 07, 2024 am 08:39 AM
使用ORM可简化PHP中的数据库操作,它将对象映射到关系数据库中。Laravel中的EloquentORM允许使用面向对象的语法与数据库交互,可通过定义模型类、使用Eloquent方法或在实战中构建博客系统等方式来使用ORM。
 Laravel和CodeIgniter的最新版本对比
Jun 05, 2024 pm 05:29 PM
Laravel和CodeIgniter的最新版本对比
Jun 05, 2024 pm 05:29 PM
Laravel9和CodeIgniter4的最新版本提供了更新的特性和改进。Laravel9采用MVC架构,提供数据库迁移、身份验证和模板引擎等功能。CodeIgniter4采用HMVC架构,提供路由、ORM和缓存。在性能方面,Laravel9的基于服务提供者设计模式和CodeIgniter4的轻量级框架使其具有出色的性能。在实际应用中,Laravel9适用于需要灵活性和强大功能的复杂项目,而CodeIgniter4适用于快速开发和小型应用程序。
 Laravel - Artisan 命令
Aug 27, 2024 am 10:51 AM
Laravel - Artisan 命令
Aug 27, 2024 am 10:51 AM
Laravel - Artisan 命令 - Laravel 5.7 提供了处理和测试新命令的新方法。它包括测试 artisan 命令的新功能,下面提到了演示?
 Laravel 和 CodeIgniter 中数据处理能力的比较如何?
Jun 01, 2024 pm 01:34 PM
Laravel 和 CodeIgniter 中数据处理能力的比较如何?
Jun 01, 2024 pm 01:34 PM
比较Laravel和CodeIgniter的数据处理能力:ORM:Laravel使用EloquentORM,提供类对象关系映射,而CodeIgniter使用ActiveRecord,将数据库模型表示为PHP类的子类。查询构建器:Laravel具有灵活的链式查询API,而CodeIgniter的查询构建器更简单,基于数组。数据验证:Laravel提供了一个Validator类,支持自定义验证规则,而CodeIgniter的验证功能内置较少,需要手动编码自定义规则。实战案例:用户注册示例展示了Lar
 Laravel 和 CodeIgniter 对于初学者来说哪一个更友好?
Jun 05, 2024 pm 07:50 PM
Laravel 和 CodeIgniter 对于初学者来说哪一个更友好?
Jun 05, 2024 pm 07:50 PM
对于初学者来说,CodeIgniter的学习曲线更平缓,功能较少,但涵盖了基本需求。Laravel提供了更广泛的功能集,但学习曲线稍陡。在性能方面,Laravel和CodeIgniter都表现出色。Laravel具有更广泛的文档和活跃的社区支持,而CodeIgniter更简单、轻量级,具有强大的安全功能。在建立博客应用程序的实战案例中,Laravel的EloquentORM简化了数据操作,而CodeIgniter需要更多的手动配置。
 Laravel和CodeIgniter:哪种框架更适合大型项目?
Jun 04, 2024 am 09:09 AM
Laravel和CodeIgniter:哪种框架更适合大型项目?
Jun 04, 2024 am 09:09 AM
在选择大型项目框架时,Laravel和CodeIgniter各有优势。Laravel针对企业级应用程序而设计,提供模块化设计、依赖项注入和强大的功能集。CodeIgniter是一款轻量级框架,更适合小型到中型项目,强调速度和易用性。对于具有复杂需求和大量用户的大型项目,Laravel的强大功能和可扩展性更合适。而对于简单项目或资源有限的情况下,CodeIgniter的轻量级和快速开发能力则更为理想。
 PHP 代码单元测试与集成测试
May 07, 2024 am 08:00 AM
PHP 代码单元测试与集成测试
May 07, 2024 am 08:00 AM
PHP单元和集成测试指南单元测试:关注单个代码单元或函数,使用PHPUnit创建测试用例类进行验证。集成测试:关注多个代码单元协同工作的情况,使用PHPUnit的setUp()和tearDown()方法设置和清理测试环境。实战案例:使用PHPUnit在Laravel应用中进行单元和集成测试,包括创建数据库、启动服务器以及编写测试代码。
 Laravel和CodeIgniter:哪种框架更适合小型项目?
Jun 04, 2024 pm 05:29 PM
Laravel和CodeIgniter:哪种框架更适合小型项目?
Jun 04, 2024 pm 05:29 PM
对于小型项目,Laravel适用于大型项目,需要强大的功能和安全性。CodeIgniter适用于非常小的项目,需要轻量级和易用性。
