

实现原生js实现轮播图


免费学习推荐:javascript视频教程
使用原生js实现轮播图
今天分享一个使用原生JS实现轮播图的案例,并且配上比较详细的过程讲解,欢迎小伙伴的浏览和批评指正。静态效果图如下: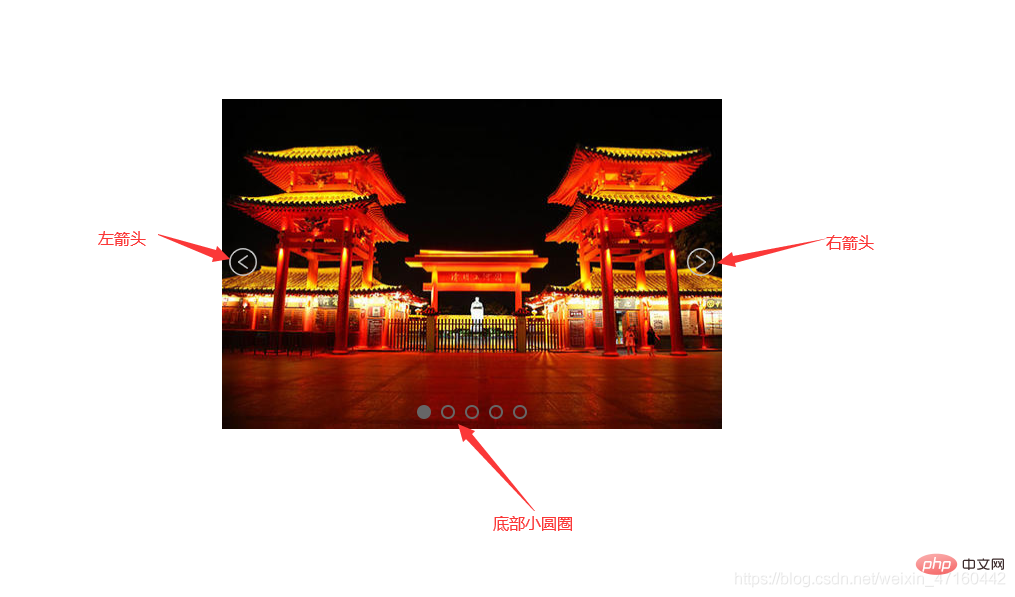
核心思想
将一些图片在一行中平铺,然后计算偏移量再利用定时器实现定时轮播。
步骤:
1. 首先搭建基本的HTML结构
<!-- 结构部分 --><!-- 结构说明:外层一个container盒子,用于放图片盒子(imgBox)、左箭头、右箭头、底部小圆圈,
        图片盒子中放的是轮播的图片 -->
    <p class="container">
      <!-- 注意:此处强调一下,图片盒子imgBox的left属性必须写成行内样式,否则js中拿不到left的值 -->
        <p class="imgBox" style="left: -500px;">
            <img src="./images/lunbo1.jpg" alt="轮播图1">
            <img src="./images/lunbo2.jpg" alt="轮播图2">
            <img src="./images/lunbo3.jpg" alt="轮播图3">
            <img src="./images/lunbo4.jpg" alt="轮播图4">
            <img src="./images/lunbo5.jpg" alt="轮播图5">
        </p>

        <a href="javascript:;" class="leftArrow"  style="display: none;">
            <img src="./images/leftArrow.png" alt="左箭头">
        </a>
        <a href="javascript:;" class="rightArrow"  style="display: none;">
            <img src="./images/rightArrow.png" alt="右箭头">
        </a>

        <ul class="circleFather">
            <li class="select"></li>
            <li></li>
            <li></li>
            <li></li>
            <li></li>
        </ul>
</p>2. 样式部分
使用绝对定位把左右箭头和底部小圆圈放在合适的位置。外层容器盒子的宽度等于一张图片的宽度,图片盒子的宽度为所有图片宽度之和,所有图片左浮动,实现水平排列。
☆☆☆注意:此处强调一下,图片盒子imgBox的left属性必须写成行内样式,否则js中拿不到left的值
 <style>
        /* 内联样式表 */

        * {
            margin: 0;
            padding: 0;
        }

        li {
            list-style: none;
        }
        /* 外层容器样式 */

        .container {
            height: 330px;
            width: 500px;  //外层容器盒子的宽度等于一张图片的宽度
            margin: 100px auto;
            position: relative;
            overflow: hidden;  //超出隐藏
        }
        /* 左右箭头样式 */

        .container .leftArrow,
        .container .rightArrow {
            position: absolute;
            top: 50%;
            transform: translate(0, -50%);
            z-index: 1;
        }

        .container .leftArrow {
            left: 5px;
        }

        .container .rightArrow {
            right: 5px;
        }
        /* 图片盒子样式 */

        .imgBox {
            position: absolute;
            transition: all 0.5s;
            height: 333px;
            width: 3500px;  //图片盒子的宽度为所有图片宽度之和
        }

        .imgBox img {
            height: 330px;
            width: 500px;
            float: left;  //所有图片左浮动,实现水平排列
        }
        /* 底部小圆圈样式 */

        .circleFather {
            position: absolute;
            bottom: 10px;
            left: 50%;
            transform: translate(-50%, 0);
        }

        .circleFather li {
            float: left;
            height: 10px;
            width: 10px;
            margin: 0 5px;
            border: 2px solid #e7641c;
            border-radius: 50%;
        }

        .select {
            background-color: #e7641c;
        }
</style>3. js逻辑部分
3.1 首先实现点击左右箭头向左右滑动的功能
var container = document.querySelector('.container') //获取外层容器盒子
        var imgBox = document.querySelector('.imgBox') //获取图片盒子
        var leftArrow = document.querySelector('.leftArrow') //获取左箭头
        var rightArrow = document.querySelector('.rightArrow') //获取右箭头


        //给左箭头绑定点击事件
        leftArrow.onclick = function() {
            goLast()
        }

        //右箭头点击事件
        rightArrow.onclick = function() {
            goNext()
        }

        // 显示上一张图片
        // 1.点一次左箭头,就让left值-500,点一次右箭头,就让left值+500
        // 2.但是有两种特殊情况,(1)当前展示图片1时,点击左箭头则需展示图片5,(2)当前展示图片5时,点击右箭头则需展示图片1
        function goLast() {
            let newBoxLeft            if (imgBox.style.left === '0px') {
                newBoxLeft = -2000
            } else {
                // imgBox.style.left是一个字符串,所以要转化为数字才能进行计算,而设定left时就要加上px成为一个字符串
                newBoxLeft = parseInt(imgBox.style.left) + 500;
            }
            imgBox.style.left = newBoxLeft + "px"
        }

        // 显示下一张图片
        function goNext() {
            let newBoxLeft            if (imgBox.style.left === '-2000px') {
                newBoxLeft = 0
            } else {
                newBoxLeft = parseInt(imgBox.style.left) - 500;
            }
            imgBox.style.left = newBoxLeft + "px"
}此时效果图如下:
3.2 实现自动轮播功能
在定时器中每1500毫秒调用一次goNext方法,实现自动切换图片
// 使用setInterval()定时器实现自动切换功能
        var timer        function autoChange() {
            timer = setInterval(goNext, 1500)
        }
autoChange()3.3 实现鼠标悬停在图片上时,停止自动切换,停留在当前图片,移出时继续自动切换
 // 监听鼠标移入事件和移出事件,实现鼠标悬停在图片上时,停止自动切换,停留在当前图片,
 // 鼠标移出时继续自动切换
        container.addEventListener('mouseenter', function() {
            clearInterval(timer)
        })
container.addEventListener('mouseleave', autoChange)此处补充一个小插曲:
一开始我监听的是mouseout事件,但是在测试时发现鼠标移出container盒子时会多次触发mouseout事件,导致多次调用autoChange函数,开启了多个定时器,出现图片切换混乱的情况,查了一下mouseout事件和mouseleave事件的区别:
- mouseover和mouseout在父元素和其子元素都可以触发,当鼠标穿过一个元素时,触发次数得依子元素数量而言。
- mouseenter和mouseleave只在父元素触发,当鼠标穿过一个元素时,只会触发一次。
- mouseover和mouseout比mouseenter和mouseleave先触发
简单来说就是:
mouseout在所选区域内,从父元素到子元素也算移出触发。
mouseleave,在所选区域,不管有没有子元素,移出才会触发。
3.4实现底部小圆圈跟随图片同步切换
实现原理:可以根据imgBox的left值,推算出第几个小圆圈被选中,绝对值就是小圆圈的索引值,放张图帮助理解(字有点丑,请忽略,嘻嘻。。)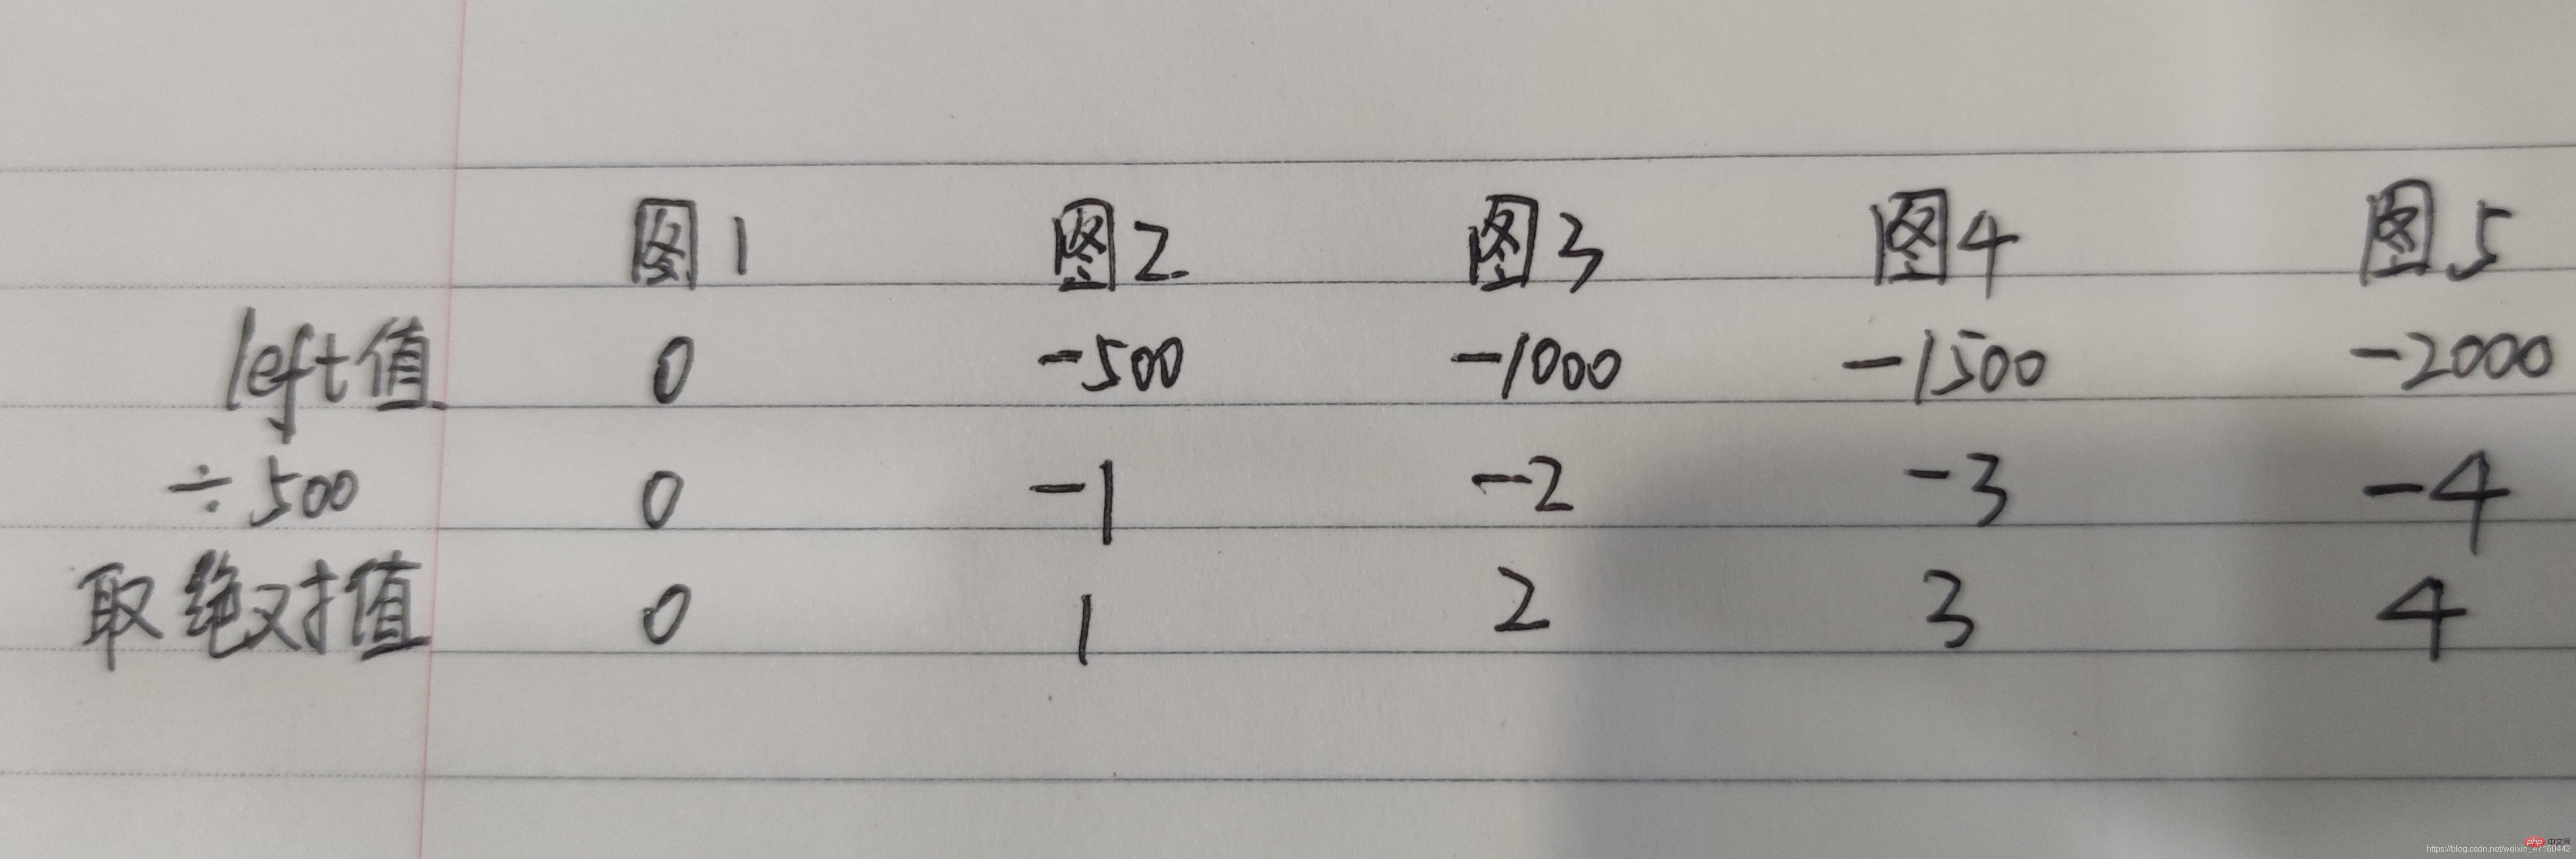
在goLast()函数和goNext()函数中就可以计算/计算出被选中小圆圈的索引
 var index = 0 // 定义index变量,表示第几个小圆圈被选中

 function goLast() {
            let newBoxLeft            if (imgBox.style.left === '0px') {
                newBoxLeft = -2000
            } else {
                // imgBox.style.left是一个字符串,所以要转化为数字才能进行计算,而设定left时就要加上px成为一个字符串
                newBoxLeft = parseInt(imgBox.style.left) + 500;
            }
            imgBox.style.left = newBoxLeft + "px"
            index = Math.abs(newBoxLeft / 500)  //计算出被选中小圆圈的索引
        }

 function goNext() {
            let newBoxLeft            if (imgBox.style.left === '-2000px') {
                newBoxLeft = 0
            } else {
                newBoxLeft = parseInt(imgBox.style.left) - 500;
            }
            imgBox.style.left = newBoxLeft + "px"
            index = Math.abs(newBoxLeft / 500)  ///计算出被选中小圆圈的索引
}完成3.2、3.3和3.4之后的效果图如下:
3.5实现点击底部某个小圆圈时切换成对应的图片
// 实现点击底部某个小圆圈时切换成对应的图片
(function clickCircle() {
let circleArr = document.getElementsByTagName('li')
for (let j = 0; j < circleArr.length; j++) {
circleArr[j].addEventListener('click', () => {
index = j selectCircle()
imgBox.style.left = -(index * 500) + "px"
})
}
})() //函数自调用写法,格式:(函数)()效果图如下:
到此为止,轮播图的功能都实现了,但是作为一个强迫症,发现自动切换的时候,显示左右箭头并不好看,所以再做一点小小的调整。
3.6补充实现鼠标悬停在图片上时,显示左右箭头,移出时隐藏左右箭头
//给左右箭头默认隐藏<a href="javascript:;" class="leftArrow" style="display: none;">
    <img src="./images/leftArrow.png" alt="左箭头"></a><a href="javascript:;" class="rightArrow" style="display: none;">
<img src="./images/rightArrow.png" alt="右箭头"></a>在监听鼠标事件中,改为以下代码
// 监听鼠标移入事件和移出事件,实现鼠标悬停在图片上时,停止自动切换,停留在当前图片,鼠标移出时继续自动切换
        container.addEventListener('mouseenter', function() {
            clearInterval(timer)
            leftArrow.style.display = "inline"
            rightArrow.style.display = "inline"
        })
        container.addEventListener('mouseleave', function() {
            autoChange()
            leftArrow.style.display = "none"
            rightArrow.style.display = "none"
})效果图:
到这就结束了哦,整理不易,喜欢就点赞收藏吧!
欢迎访问个人博客歌洞章
下面是完整代码。
原生js实现轮播图——小肉包


相关免费学习推荐:javascript(视频)
以上是实现原生js实现轮播图的详细内容。更多信息请关注PHP中文网其他相关文章!

热AI工具

Undresser.AI Undress
人工智能驱动的应用程序,用于创建逼真的裸体照片

AI Clothes Remover
用于从照片中去除衣服的在线人工智能工具。

Undress AI Tool
免费脱衣服图片

Clothoff.io
AI脱衣机

AI Hentai Generator
免费生成ai无尽的。

热门文章
热工具

记事本++7.3.1
好用且免费的代码编辑器

SublimeText3汉化版
中文版,非常好用

禅工作室 13.0.1
功能强大的PHP集成开发环境

Dreamweaver CS6
视觉化网页开发工具

SublimeText3 Mac版
神级代码编辑软件(SublimeText3)
热门话题


 如何使用WebSocket和JavaScript实现在线语音识别系统
Dec 17, 2023 pm 02:54 PM
如何使用WebSocket和JavaScript实现在线语音识别系统
Dec 17, 2023 pm 02:54 PM
如何使用WebSocket和JavaScript实现在线语音识别系统引言:随着科技的不断发展,语音识别技术已经成为了人工智能领域的重要组成部分。而基于WebSocket和JavaScript实现的在线语音识别系统,具备了低延迟、实时性和跨平台的特点,成为了一种被广泛应用的解决方案。本文将介绍如何使用WebSocket和JavaScript来实现在线语音识别系
 WebSocket与JavaScript:实现实时监控系统的关键技术
Dec 17, 2023 pm 05:30 PM
WebSocket与JavaScript:实现实时监控系统的关键技术
Dec 17, 2023 pm 05:30 PM
WebSocket与JavaScript:实现实时监控系统的关键技术引言:随着互联网技术的快速发展,实时监控系统在各个领域中得到了广泛的应用。而实现实时监控的关键技术之一就是WebSocket与JavaScript的结合使用。本文将介绍WebSocket与JavaScript在实时监控系统中的应用,并给出代码示例,详细解释其实现原理。一、WebSocket技
 如何利用JavaScript和WebSocket实现实时在线点餐系统
Dec 17, 2023 pm 12:09 PM
如何利用JavaScript和WebSocket实现实时在线点餐系统
Dec 17, 2023 pm 12:09 PM
如何利用JavaScript和WebSocket实现实时在线点餐系统介绍:随着互联网的普及和技术的进步,越来越多的餐厅开始提供在线点餐服务。为了实现实时在线点餐系统,我们可以利用JavaScript和WebSocket技术。WebSocket是一种基于TCP协议的全双工通信协议,可以实现客户端与服务器的实时双向通信。在实时在线点餐系统中,当用户选择菜品并下单
 如何使用WebSocket和JavaScript实现在线预约系统
Dec 17, 2023 am 09:39 AM
如何使用WebSocket和JavaScript实现在线预约系统
Dec 17, 2023 am 09:39 AM
如何使用WebSocket和JavaScript实现在线预约系统在当今数字化的时代,越来越多的业务和服务都需要提供在线预约功能。而实现一个高效、实时的在线预约系统是至关重要的。本文将介绍如何使用WebSocket和JavaScript来实现一个在线预约系统,并提供具体的代码示例。一、什么是WebSocketWebSocket是一种在单个TCP连接上进行全双工
 使用微信小程序实现轮播图切换效果
Nov 21, 2023 pm 05:59 PM
使用微信小程序实现轮播图切换效果
Nov 21, 2023 pm 05:59 PM
使用微信小程序实现轮播图切换效果微信小程序是一种轻量级的应用程序,具有简单、高效的开发和使用特点。在微信小程序中,实现轮播图切换效果是常见的需求。本文将介绍如何使用微信小程序实现轮播图切换效果,并给出具体的代码示例。首先,在微信小程序的页面文件中,添加一个轮播图组件。例如,可以使用<swiper>标签来实现轮播图的切换效果。在该组件中,可以通过b
 JavaScript和WebSocket:打造高效的实时天气预报系统
Dec 17, 2023 pm 05:13 PM
JavaScript和WebSocket:打造高效的实时天气预报系统
Dec 17, 2023 pm 05:13 PM
JavaScript和WebSocket:打造高效的实时天气预报系统引言:如今,天气预报的准确性对于日常生活以及决策制定具有重要意义。随着技术的发展,我们可以通过实时获取天气数据来提供更准确可靠的天气预报。在本文中,我们将学习如何使用JavaScript和WebSocket技术,来构建一个高效的实时天气预报系统。本文将通过具体的代码示例来展示实现的过程。We
 简易JavaScript教程:获取HTTP状态码的方法
Jan 05, 2024 pm 06:08 PM
简易JavaScript教程:获取HTTP状态码的方法
Jan 05, 2024 pm 06:08 PM
JavaScript教程:如何获取HTTP状态码,需要具体代码示例前言:在Web开发中,经常会涉及到与服务器进行数据交互的场景。在与服务器进行通信时,我们经常需要获取返回的HTTP状态码来判断操作是否成功,根据不同的状态码来进行相应的处理。本篇文章将教你如何使用JavaScript获取HTTP状态码,并提供一些实用的代码示例。使用XMLHttpRequest
 javascript中如何使用insertBefore
Nov 24, 2023 am 11:56 AM
javascript中如何使用insertBefore
Nov 24, 2023 am 11:56 AM
用法:在JavaScript中,insertBefore()方法用于在DOM树中插入一个新的节点。这个方法需要两个参数:要插入的新节点和参考节点(即新节点将要被插入的位置的节点)。
