Bootstrap学习之缩略图组件和警示框组件的使用
本篇文章给大家详细介绍一下Bootstrap中的缩略图组件和警示框组件。有一定的参考价值,有需要的朋友可以参考一下,希望对大家有所帮助。

相关推荐:《bootstrap教程》
缩略图组件
缩略图在网站中最常用的就是产品列表页面,一行显示几张图片,有的在图片底下带有标题、描述内容、按钮等信息。bootstrap框架将这部分独立成一个模块组件,通过类名.thumbnail配合bootstrap的网格系统来实现。下面是bootstrap缩略图组件不同版本的源码文件:
LESS : tbumbnails.less
SASS : _tbumbnails.scss
实现原理:
布局的实现主要依靠于bootstrap框架的网格系统,下面是缩略图对应的样式
.thumbnail {
  display: block;
  padding: 4px;
  margin-bottom: 20px;
  line-height: 1.42857143;
  background-color: #fff;
  border: 1px solid #ddd;
  border-radius: 4px;
  -webkit-transition: all .2s ease-in-out;
          transition: all .2s ease-in-out;
}
.thumbnail > img,
.thumbnail a > img {
  margin-right: auto;
  margin-left: auto;
}
a.thumbnail:hover,
a.thumbnail:focus,
a.thumbnail.active {
  border-color: #428bca;
}
.thumbnail .caption {
  padding: 9px;
  color: #333;
}来看一个例子:
<div class="container">
      <div class="row">
          <div class="col-md-3">
              <a herf="#" class="thumbnail">
                  <img src="img/1.jpg" style="height:180px;width:100%;display: block">
              </a>
          </div>
          <div class="col-md-3">
              <a herf="#" class="thumbnail">
                  <img src="img/2.jpg" style="height:180px;width:100%;display: block">
              </a>
          </div>
          <div class="col-md-3">
              <a herf="#" class="thumbnail">
                  <img src="img/3.jpg" style="height:180px;width:100%;display: block">
              </a>
          </div>
          <div class="col-md-3">
              <a herf="#" class="thumbnail" >
                  <img src="img/4.jpg" style="height:180px;width:100%;display: block">
              </a>
          </div>
      </div>
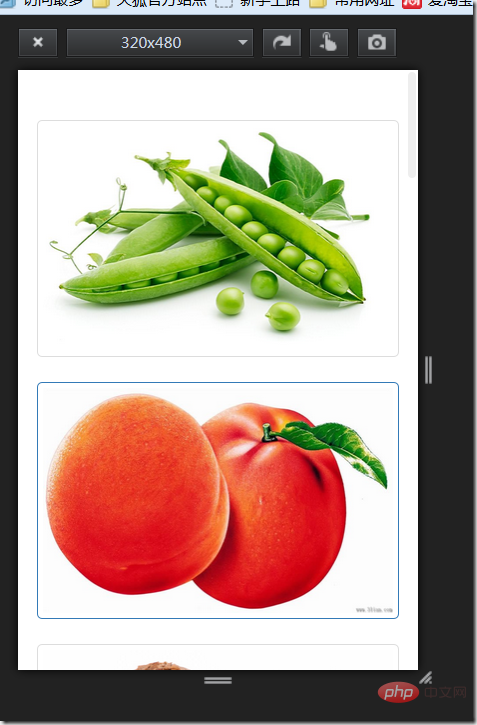
</div>效果如下:

可以用火狐响应式设计视图查看

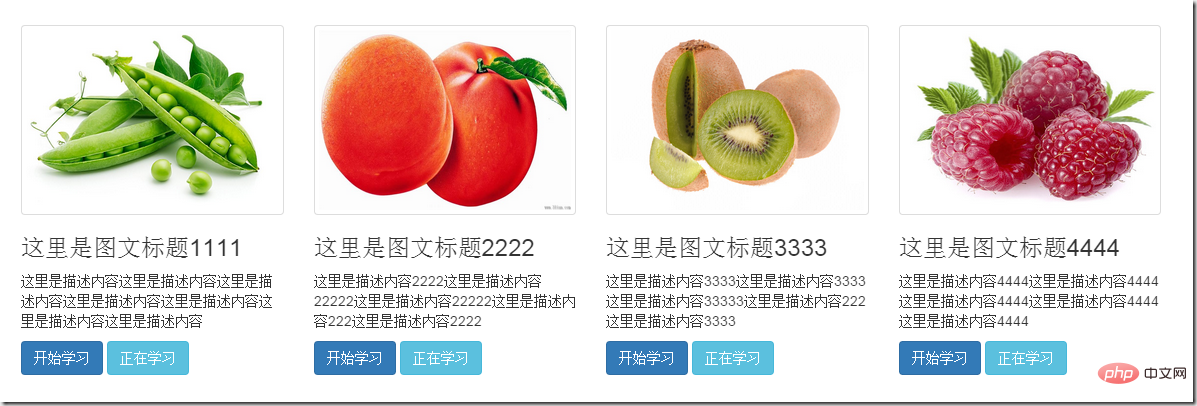
在仅有缩略图的基础上,添加一个类名为.caption的p容器,在这个容器中放置其他内容,如:标题,文本描述,按钮等
<div class="container">
      <div class="row">
          <div class="col-md-3">
              <a href="#" class="thumbnail">
                  <img src="img/1.jpg" style="height:180px;width:100%;display: block">
              </a>
              <div class="caption">
                  <h3>这里是图文标题1111</h3>
                  <p>这里是描述内容这里是描述内容这里是描述内容这里是描述内容这里是描述内容这里是描述内容这里是描述内容</p>
                  <a  href="#" class="btn btn-primary">开始学习</a>
                  <a  href="#" class="btn btn-info">正在学习</a>
              </div>
          </div>
          <div class="col-md-3">
              <a href="#" class="thumbnail">
                  <img src="img/2.jpg" style="height:180px;width:100%;display: block">
              </a>
              <div class="caption">
                  <h3>这里是图文标题2222</h3>
                  <p>这里是描述内容2222这里是描述内容22222这里是描述内容22222这里是描述内容222这里是描述内容2222</p>
                  <a href="#" class="btn btn-primary">开始学习</a>
                  <a  href="#" class="btn btn-info">正在学习</a>
              </div>
          </div>
          <div class="col-md-3">
              <a href="#" class="thumbnail">
                  <img src="img/3.jpg" style="height:180px;width:100%;display: block">
              </a>
              <div class="caption">
                  <h3>这里是图文标题3333</h3>
                  <p>这里是描述内容3333这里是描述内容3333这里是描述内容33333这里是描述内容222这里是描述内容3333</p>
                  <a href="#" class="btn btn-primary">开始学习</a>
                  <a  href="#" class="btn btn-info">正在学习</a>
              </div>
          </div>
          <div class="col-md-3">
              <a href="#" class="thumbnail">
                  <img src="img/4.jpg" style="height:180px;width:100%;display: block">
              </a>
              <div class="caption">
                  <h3>这里是图文标题4444</h3>
                  <p>这里是描述内容4444这里是描述内容4444这里是描述内容4444这里是描述内容4444这里是描述内容4444</p>
                  <a href="#" class="btn btn-primary">开始学习</a>
                  <a  href="#" class="btn btn-info">正在学习</a>
              </div>
          </div>
      </div>
  </div>
警示框组件
bootstrap框架通过.alert样式来实现警示框效果,在默认情况下,bootstrap提供了四种不同的警示框效果:
1、成功警示框:提示用户操作成功,在.alert的基础上追加.alert-success样式;
2、信息警告框:给用户提供提示信息,在.alert的基础上追加.alert-info样式;
3、警告警示框:提供警告信息,在.alert的基础上追加.alert-warning样式;
4、错误警示框:提示用户操作错误,在.alert的基础上追加.alert-danger样式;
其中,.alert样式主要设置了警示框的背景色、边框,圆角,文字颜色,此外还对h4、p、ul及.alert-link做了样式上的处理,下面是css源码:
.alert {
  padding: 15px;
  margin-bottom: 20px;
  border: 1px solid transparent;
  border-radius: 4px;
}
.alert h4 {
  margin-top: 0;
  color: inherit;
}
.alert .alert-link {
  font-weight: bold;
}
.alert > p,
.alert > ul {
  margin-bottom: 0;
}
.alert > p + p {
  margin-top: 5px;
}.alert-success {
color: #3c763d;
background-color: #dff0d8;
border-color: #d6e9c6;
}
.alert-success hr {
border-top-color: #c9e2b3;
}
.alert-success .alert-link {
color: #2b542c;
}
.alert-info {
color: #31708f;
background-color: #d9edf7;
border-color: #bce8f1;
}
.alert-info hr {
border-top-color: #a6e1ec;
}
.alert-info .alert-link {
color: #245269;
}
.alert-warning {
color: #8a6d3b;
background-color: #fcf8e3;
border-color: #faebcc;
}
.alert-warning hr {
border-top-color: #f7e1b5;
}
.alert-warning .alert-link {
color: #66512c;
}
.alert-danger {
color: #a94442;
background-color: #f2dede;
border-color: #ebccd1;
}
.alert-danger hr {
border-top-color: #e4b9c0;
}
.alert-danger .alert-link {
color: #843534;
}例如:
<div class="alert alert-success" role="alert">恭喜你操作成功!</div>
    <div class="alert alert-info" role="alert">请输入正确的密码</div>
    <div class="alert alert-warning" role="alert">你已经操作失败两次,还有最后一次机会</div>
    <div class="alert alert-danger" role="alert">对不起,你的密码输入有误!</div>
可关闭的警示框
1、在默认的警示框的容器上追加一个.alert-dismissable类名
2、在button标签中添加.close,实现警告框的关闭按钮
3、确保关闭按钮元素上设置了自定义属性data-dismiss=”alert“(关闭警示框需要通过js来检测该属性,从而控制警示框的关闭)
例子:
<div class="alert alert-success alert-dismissable" role="alert">
        <button class="close" type="button" data-dismiss="alert">×</button>
        恭喜你操作成功!
    </div>
    <div class="alert alert-info alert-dismissable"role="alert">
         <button class="close" type="button" data-dismiss="alert">×</button>
        请输入正确的密码
    </div>
    <div class="alert alert-warning alert-dismissable"  role="alert">
        <button class="close" type="button" data-dismiss="alert">×</button>
        你已经操作失败两次,还有最后一次机会
    </div>
    <div class="alert alert-danger alert-dismissable" role="alert">
         <button class="close" type="button" data-dismiss="alert">×</button>
        对不起,你的密码输入有误!
    </div>
警示框的链接
有时候需要在警示框中加入链接,告诉用户跳转到新的页面,bootstrap框架中对警示框的链接做了高亮处理。给警告框加的链接添加一个为.alert-link的类名,下面是alert-link的css样式
.alert .alert-link {
  font-weight: bold;
}

/*不同类型警示框中链接的文本颜色*/
.alert-success .alert-link {
  color: #2b542c;
}
.alert-info .alert-link {
  color: #245269;
}
.alert-warning .alert-link {
  color: #66512c;
}
.alert-danger .alert-link {
  color: #843534;
}例子:
<div class="alert alert-success " role="alert">
        <strong>Well done!</strong>
        You successfully read
        <a href="#" class="alert-link">this important alert message</a>
    </div>
    <div class="alert alert-info" role="alert">
        <strong>Well done!</strong>
        You successfully read
        <a href="#" class="alert-link">this important alert message</a>
    </div>
    <div class="alert alert-warning " role="alert">
        <strong>Well done!</strong>
        You successfully read
        <a href="#" class="alert-link">this important alert message</a>
    </div>
    <div class="alert alert-danger" role="alert">
        <strong>Well done!</strong>
        You successfully read
        <a href="#" class="alert-link">this important alert message</a>
 </div>
更多编程相关知识,请访问:编程视频!!
以上是Bootstrap学习之缩略图组件和警示框组件的使用的详细内容。更多信息请关注PHP中文网其他相关文章!

热AI工具

Undresser.AI Undress
人工智能驱动的应用程序,用于创建逼真的裸体照片

AI Clothes Remover
用于从照片中去除衣服的在线人工智能工具。

Undress AI Tool
免费脱衣服图片

Clothoff.io
AI脱衣机

AI Hentai Generator
免费生成ai无尽的。

热门文章

热工具

记事本++7.3.1
好用且免费的代码编辑器

SublimeText3汉化版
中文版,非常好用

禅工作室 13.0.1
功能强大的PHP集成开发环境

Dreamweaver CS6
视觉化网页开发工具

SublimeText3 Mac版
神级代码编辑软件(SublimeText3)

热门话题
 bootstrap垂直居中怎么弄
Apr 07, 2025 pm 03:21 PM
使用 Bootstrap 实现垂直居中:flexbox 法:使用 d-flex、justify-content-center 和 align-items-center 类,将元素置于 flexbox 容器内。align-items-center 类法:对于不支持 flexbox 的浏览器,使用 align-items-center 类,前提是父元素具有已定义的高度。
 bootstrap按钮怎么用
Apr 07, 2025 pm 03:09 PM
如何使用 Bootstrap 按钮?引入 Bootstrap CSS创建按钮元素并添加 Bootstrap 按钮类添加按钮文本
 bootstrap搜索栏怎么获取
Apr 07, 2025 pm 03:33 PM
如何使用 Bootstrap 获取搜索栏的值:确定搜索栏的 ID 或名称。使用 JavaScript 获取 DOM 元素。获取元素的值。执行所需的操作。
 bootstrap怎么调整大小
Apr 07, 2025 pm 03:18 PM
要调整 Bootstrap 中元素大小,可以使用尺寸类,具体包括:调整宽度:.col-、.w-、.mw-调整高度:.h-、.min-h-、.max-h-
 bootstrap怎么插入图片
Apr 07, 2025 pm 03:30 PM
在 Bootstrap 中插入图片有以下几种方法:直接插入图片,使用 HTML 的 img 标签。使用 Bootstrap 图像组件,可以提供响应式图片和更多样式。设置图片大小,使用 img-fluid 类可以使图片自适应。设置边框,使用 img-bordered 类。设置圆角,使用 img-rounded 类。设置阴影,使用 shadow 类。调整图片大小和位置,使用 CSS 样式。使用背景图片,使用 background-image CSS 属性。
 bootstrap怎么设置框架
Apr 07, 2025 pm 03:27 PM
要设置 Bootstrap 框架,需要按照以下步骤:1. 通过 CDN 引用 Bootstrap 文件;2. 下载文件并将其托管在自己的服务器上;3. 在 HTML 中包含 Bootstrap 文件;4. 根据需要编译 Sass/Less;5. 导入定制文件(可选)。设置完成后,即可使用 Bootstrap 的网格系统、组件和样式创建响应式网站和应用程序。
 bootstrap怎么写分割线
Apr 07, 2025 pm 03:12 PM
创建 Bootstrap 分割线有两种方法:使用 标签,可创建水平分割线。使用 CSS border 属性,可创建自定义样式的分割线。
 bootstrap怎么看日期
Apr 07, 2025 pm 03:03 PM
答案:可以使用 Bootstrap 的日期选择器组件在页面中查看日期。步骤:引入 Bootstrap 框架。在 HTML 中创建日期选择器输入框。Bootstrap 将自动为选择器添加样式。使用 JavaScript 获取选定的日期。


