浅析vue中complie数据双向绑定原理(代码详解)
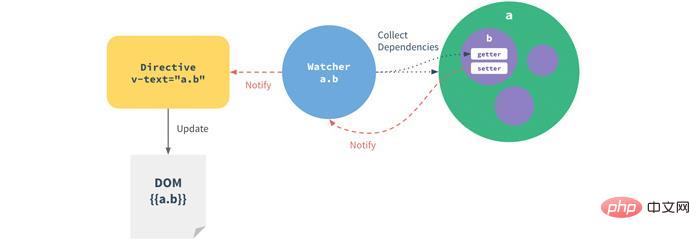
之前的文章《一文了解vue中watcher数据双向绑定原理(附代码)》中,给大家介绍了解了vue中complie数据双向绑定原理。下面本篇文章给大家了解vue中complie数据双向绑定原理,伙伴们过来看看吧。

vue数据双向绑定原理,和简单的实现,本文将实现mvvm的模板指令解析器

vue数据双向绑定原理,和简单的实现,本文将实现mvvm的模板指令解析器
上一步实现了简单数据绑定,最后实现解析器,来解析v-model,v-on:click等指令,和{{}}模板数据。解析器Compile实现步骤:
解析模板指令,并替换模板数据,初始化视图
将模板指令对应的节点绑定对应的更新函数,初始化相应的订阅器
为了解析模板,首先需要获取到dom元素,然后对含有dom元素上含有指令的节点进行处理,因此这个环节需要对dom操作比较频繁,所有可以先建一个fragment片段,将需要解析的dom节点存入fragment片段里再进行处理:
function node2Fragment(el) {
  var fragment = document.createDocumentFragment(),
    child;
  // 将原生节点拷贝到fragment
  while ((child = el.firstChild)) {
    fragment.appendChild(child);
  }

  return fragment;
}接下来渲染'{{}}'模板
//Compile
function Compile(el, vm) {
  this.$vm = vm;
  this.$el = this.isElementNode(el) ? el : document.querySelector(el);
  if (this.$el) {
    this.$fragment = this.node2Fragment(this.$el);
    this.init();
    this.$el.appendChild(this.$fragment);
  }
}

Compile.prototype = {
  init: function () {
    this.compileElement(this.$fragment);
  },

  node2Fragment: function (el) {
    //...
  },

  //编译模板
  compileElement: function (el) {
    var childNodes = el.childNodes,
      self = this;
    [].slice.call(childNodes).forEach(function (node) {
      var text = node.textContent;
      var reg = /{{(.*)}}/; //表达式文本
      //按元素节点方式编译
      if (self.isElementNode(node)) {
        self.compile(node);
      } else if (self.isTextNode(node) && reg.test(text)) {
        self.compileText(node, RegExp.$1);
      }
      //遍历编译子节点
      if (node.childNodes && node.childNodes.length) {
        self.compileElement(node);
      }
    });
  },

  isElementNode: function (node) {
    return node.nodeType == 1;
  },

  isTextNode: function (node) {
    return node.nodeType == 3;
  },

  compileText: function (node, exp) {
    var self = this;
    var initText = this.$vm[exp];
    this.updateText(node, initText);
    new Watcher(this.$vm, exp, function (value) {
      self.updateText(node, value);
    });
  },

  updateText: function (node, value) {
    node.textContent = typeof value == "undefined" ? "" : value;
  },
};处理解析指令对相关指令进行函数绑定。
Compile.prototype = {
......
isDirective: function(attr) {
return attr.indexOf('v-') == 0;
},
isEventDirective: function(dir) {
return dir.indexOf('on:') === 0;
},
//处理v-指令
compile: function(node) {
var nodeAttrs = node.attributes,
self = this;
[].slice.call(nodeAttrs).forEach(function(attr) {
// 规定:指令以 v-xxx 命名
// 如 <span v-text="content"></span> 中指令为 v-text
var attrName = attr.name; // v-text
if (self.isDirective(attrName)) {
var exp = attr.value; // content
var dir = attrName.substring(2); // text
if (self.isEventDirective(dir)) {
// 事件指令, 如 v-on:click
self.compileEvent(node, self.$vm, exp, dir);
} else {
// 普通指令如:v-model, v-html, 当前只处理v-model
self.compileModel(node, self.$vm, exp, dir);
}
//处理完毕要干掉 v-on:, v-model 等元素属性
node.removeAttribute(attrName)
}
});
},
compileEvent: function(node, vm, exp, dir) {
var eventType = dir.split(':')[1];
var cb = vm.$options.methods && vm.$options.methods[exp];
if (eventType && cb) {
node.addEventListener(eventType, cb.bind(vm), false);
}
},
compileModel: function(node, vm, exp, dir) {
var self = this;
var val = this.$vm[exp];
this.updaterModel(node, val);
new Watcher(this.$vm, exp, function(value) {
self.updaterModel(node, value);
});
node.addEventListener('input', function(e) {
var newValue = e.target.value;
if (val === newValue) {
return;
}
self.$vm[exp] = newValue;
val = newValue;
});
},
updaterModel: function(node, value, oldValue) {
node.value = typeof value == 'undefined' ? '' : value;
},
}最后再关联起来
function Vue(options) {
  .....
  observe(this.data, this);
  this.$compile = new Compile(options.el || document.body, this)
  return this;

}来尝试下效果
<!--html-->
<div id="app">
  <h2>{{name}}</h2>
  <input v-model="name" />
  <h1>{{name}}</h1>
  <button v-on:click="test">click here!</button>
</div>
<script>
  new Vue({
    el: "#app",
    data: {
      name: "chuchur",
      age: 29,
    },
    methods: {
      test() {
        this.name = "My name is chuchur";
      },
    },
  });
</script>OK. 基本完善了
推荐学习:vue.js教程
以上是浅析vue中complie数据双向绑定原理(代码详解)的详细内容。更多信息请关注PHP中文网其他相关文章!

热AI工具

Undresser.AI Undress
人工智能驱动的应用程序,用于创建逼真的裸体照片

AI Clothes Remover
用于从照片中去除衣服的在线人工智能工具。

Undress AI Tool
免费脱衣服图片

Clothoff.io
AI脱衣机

AI Hentai Generator
免费生成ai无尽的。

热门文章

热工具

记事本++7.3.1
好用且免费的代码编辑器

SublimeText3汉化版
中文版,非常好用

禅工作室 13.0.1
功能强大的PHP集成开发环境

Dreamweaver CS6
视觉化网页开发工具

SublimeText3 Mac版
神级代码编辑软件(SublimeText3)

热门话题
 vue.js怎么引用js文件
Apr 07, 2025 pm 11:27 PM
在 Vue.js 中引用 JS 文件的方法有三种:直接使用 <script> 标签指定路径;利用 mounted() 生命周期钩子动态导入;通过 Vuex 状态管理库进行导入。
 vue中的watch怎么用
Apr 07, 2025 pm 11:36 PM
Vue.js 中的 watch 选项允许开发者监听特定数据的变化。当数据发生变化时,watch 会触发一个回调函数,用于执行更新视图或其他任务。其配置选项包括 immediate,用于指定是否立即执行回调,以及 deep,用于指定是否递归监听对象或数组的更改。
 vue中怎么用bootstrap
Apr 07, 2025 pm 11:33 PM
在 Vue.js 中使用 Bootstrap 分为五个步骤:安装 Bootstrap。在 main.js 中导入 Bootstrap。直接在模板中使用 Bootstrap 组件。可选:自定义样式。可选:使用插件。
 vue怎么给按钮添加函数
Apr 08, 2025 am 08:51 AM
可以通过以下步骤为 Vue 按钮添加函数:将 HTML 模板中的按钮绑定到一个方法。在 Vue 实例中定义该方法并编写函数逻辑。
 Vue 实现跑马灯/文字滚动效果
Apr 07, 2025 pm 10:51 PM
在 Vue 中实现跑马灯/文字滚动效果,可以使用 CSS 动画或第三方库。本文介绍了使用 CSS 动画的方法:创建滚动文本,用 <div> 包裹文本。定义 CSS 动画,设置 overflow: hidden、width 和 animation。定义关键帧,设置动画开始和结束时的 transform: translateX()。调整动画属性,如持续时间、滚动速度和方向。
 vue懒加载什么意思
Apr 07, 2025 pm 11:54 PM
在 Vue.js 中,懒加载允许根据需要动态加载组件或资源,从而减少初始页面加载时间并提高性能。具体实现方法包括使用 <keep-alive> 和 <component is> 组件。需要注意的是,懒加载可能会导致 FOUC(闪屏)问题,并且应该仅对需要懒加载的组件使用,以避免不必要的性能开销。
 vue返回上一页的方法
Apr 07, 2025 pm 11:30 PM
Vue.js 返回上一页有四种方法:$router.go(-1)$router.back()使用 <router-link to="/"> 组件window.history.back(),方法选择取决于场景。
 怎样查询vue的版本
Apr 07, 2025 pm 11:24 PM
可以通过以下方法查询 Vue 版本:使用 Vue Devtools 在浏览器的控制台中查看“Vue”选项卡。使用 npm 运行“npm list -g vue”命令。在 package.json 文件的“dependencies”对象中查找 Vue 项。对于 Vue CLI 项目,运行“vue --version”命令。检查 HTML 文件中引用 Vue 文件的 <script> 标签中的版本信息。


