PHP操作word有一个非常好用的轮子,就是phpword,该轮子可以在github上查找到(PHPOffice/PHPWord)。上面有较为详细的例子和代码,其中里面的源码包含有一些常用的操作例子,包括设置页眉、页脚、页码、字体样式、表格、插入图片等常用的操作。这里介绍的是如何使用该轮子来制作一个简历。
模板替换的方式制作简历
在许多招聘网站都有一个简历下载的功能,如何用php实现呢?在PHPOffice/PHPWord里面就有一个非常简单的生成一个word文档,向文档中插入一些文字。这里我使用的方式比较取巧,这个轮子的说明文档中有template processing,我理解为模板替换,也就是跟laravel的blade模板一个概念。接下来就不多废话,直接说如何操作,这里提一句使用的是laravel框架。
1.安装PHPOffice/PHPWord
composer require phpoffice/phpword
2.创建控制器DocController及test方法用于测试,并建立路由。
php artisan make:controller DocController
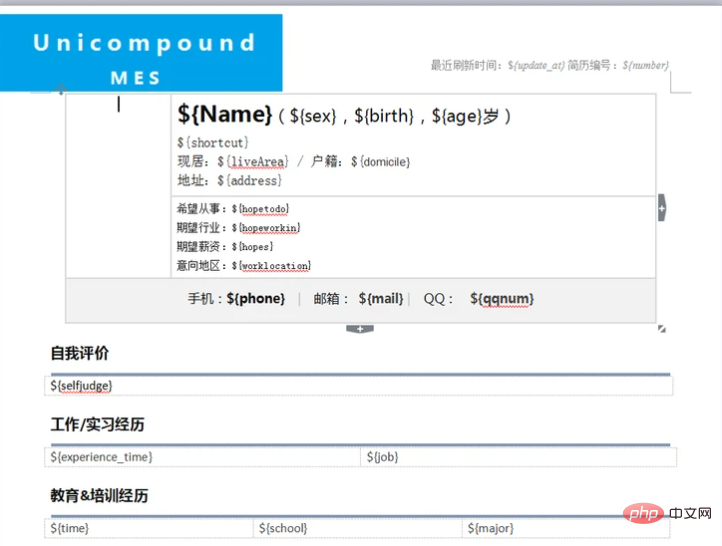
3.建立word模板,这里说明一下,该轮子替换的是word文档中格式为${value}格式的字符串,这里我简易的搭建一个模板如下图1所示:
从图中可以看到有一些基本的信息,这些可以从数据库中捞取数据。不过这次是直接使用替换的方式,像工作经历和教育经历这种多行表格的模式这里也只需要取一行作为模板即可。
4.具体代码
//load template docx
        $templateProcessor = new TemplateProcessor('./sample.docx');

        //基础信息填写替换
        $templateProcessor->setValue('update_at', date('Y-m-d H:i:s'));
        $templateProcessor->setValue('number', '123456');
        $templateProcessor->setValue('Name', '张三');
        $templateProcessor->setValue('sex', '男');
        $templateProcessor->setValue('birth', '1996年10月');
        $templateProcessor->setValue('age', '22');
        $templateProcessor->setValue('shortcut', '待业/aaa');
        $templateProcessor->setValue('liveArea', '福建省莆田市涵江区');
        $templateProcessor->setValue('domicile', '福建省莆田市涵江区');
        $templateProcessor->setValue('address', '');
        $templateProcessor->setValue('hopetodo', 'IT');
        $templateProcessor->setValue('hopeworkin', '互联网');
        $templateProcessor->setValue('hopes', '7000+');
        $templateProcessor->setValue('worklocation', '福建省莆田市');
        $templateProcessor->setValue('phone', '123456789');
        $templateProcessor->setValue('mail', '456789@qq.com');
        $templateProcessor->setValue('qqnum', '456789');
        $templateProcessor->setValue('selfjudge', '哇哈哈哈哈哈哈哈');

        //工作经历表格替换
        $templateProcessor->cloneRow('experience_time', 2);//该表通过克隆行的方式,形成两行
        $templateProcessor->setValue('experience_time#1', '2010-09~2014-06');//每行参数是用value#X(X表示行号,从1开始)
        $templateProcessor->setValue('job#1', 'ABC company CTO');
        $templateProcessor->setValue('experience_time#2', '2014-09~至今');
        $templateProcessor->setValue('job#2', 'JBC company CTO');

        //教育经历
        $templateProcessor->cloneRow('time', 2);
        $templateProcessor->setValue('time#1', '2010-09~2014-06');
        $templateProcessor->setValue('school#1', 'ABC');
        $templateProcessor->setValue('major#1', 'Computer science');
        $templateProcessor->setValue('time#2', '2014-09~至今');
        $templateProcessor->setValue('school#2', 'JBC');
        $templateProcessor->setValue('major#2', 'Computer science');

        //语言能力
        $templateProcessor->cloneRow('lang',2);
        $templateProcessor->setValue('lang#1', '汉语|精通');
        $templateProcessor->setValue('lang#2', '英语|精通');

        //技能
        $templateProcessor->cloneRow('skill',3);
        $templateProcessor->setValue('skill#1', 'JAVA|精通');
        $templateProcessor->setValue('skill#2', 'Python|精通');
        $templateProcessor->setValue('skill#3', 'PHP|精通');

        // Saving the document
$templateProcessor->saveAs('my.docx');这样就可以通过建立word模板的方式产生一个简历了。以上内容没有提到如何将图片替换进去,如果你查看文档的话会发现这个包的模板替换并没有说怎么替换图片,因为好像压根这种方式就没有提供,晕死。不过github的issue中有人提出了这个问题并且也有人给出了解决方案。下面我就来说说如何实现将图片替换进去的功能。
替换图片
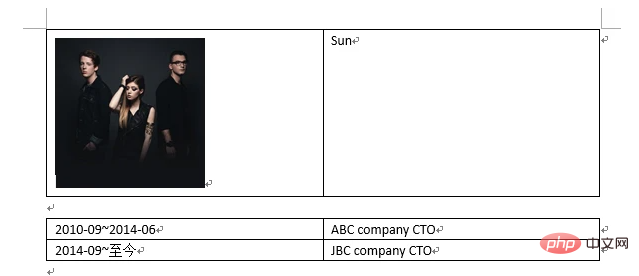
假设你的简历模板中有个表格单元格中要插入一张图片,如下:
我要将public/img下的against the current.jpg图片替换进去,而源代码没有将图片替换进word的功能,所以只能自己编写了。
- 1.修改composer.json,将TemplateDocx类自动加载进来:
"autoload": {
        "classmap": [
            "database/seeds",
            "database/factories",
            "app/Core/TemplateDocx.php"
        ],
        "psr-4": {
            "App\\": "app/"
        }
},运行下列代码:
composer dump-autoload
- 2.实现TemplateDocx类:
该类的内容我直接放在我的gist上了,连接TemplateDocx.php
由于code是放在gist上,国内访问不了所以我直接把code贴出来,如下:
<?php
namespace App\Core;
use PhpOffice\PhpWord\Exception\Exception;
use PhpOffice\PhpWord\TemplateProcessor;
class TemplateDocx extends TemplateProcessor
{
/**
* @since 0.12.0 Throws CreateTemporaryFileException and CopyFileException instead of Exception
*
* @param string $documentTemplate The fully qualified template filename
*
* @throws \PhpOffice\PhpWord\Exception\CreateTemporaryFileException
* @throws \PhpOffice\PhpWord\Exception\CopyFileException
*/
public function __construct($documentTemplate)
{
parent::__construct($documentTemplate);
//添加下列属性,后面会用到
$this->_countRels = 100; //start id for relationship between image and document.xml
$this->_rels = '';
$this->_types = '';
}
/**
* Saves the result document.
*
* @throws \PhpOffice\PhpWord\Exception\Exception
*
* @return string
*/
public function save()
{
foreach ($this->tempDocumentHeaders as $index => $xml) {
$this->zipClass->addFromString($this->getHeaderName($index), $xml);
}
$this->zipClass->addFromString($this->getMainPartName(), $this->tempDocumentMainPart);
/*****************重写原有的save方法中添加的内容******************/
if ($this->_rels != "") {
$this->zipClass->addFromString('word/_rels/document.xml.rels', $this->_rels);
}
if ($this->_types != "") {
$this->zipClass->addFromString('[Content_Types].xml', $this->_types);
}
/*********************我是分割线******************************/
foreach ($this->tempDocumentFooters as $index => $xml) {
$this->zipClass->addFromString($this->getFooterName($index), $xml);
}
// Close zip file
if (false === $this->zipClass->close()) {
throw new Exception('Could not close zip file.');
}
return $this->tempDocumentFilename;
}
/**
* 实现将图片替换进word稳定的方法
* @param $strKey
* @param $img
*/
public function setImg($strKey, $img){
$strKey = '${'.$strKey.'}';
$relationTmpl = '<Relationship Id="RID" Type="http://schemas.openxmlformats.org/officeDocument/2006/relationships/image" Target="media/IMG"/>';
$imgTmpl = '<w:pict><v:shape type="#_x0000_t75" style="width:WIDpx;height:HEIpx"><v:imagedata r:id="RID" o:title=""/></v:shape></w:pict>';
$toAdd = $toAddImg = $toAddType = '';
$aSearch = array('RID', 'IMG');
$aSearchType = array('IMG', 'EXT');
$countrels=$this->_countRels++;
//I'm work for jpg files, if you are working with other images types -> Write conditions here
$imgExt = 'jpg';
$imgName = 'img' . $countrels . '.' . $imgExt;
$this->zipClass->deleteName('word/media/' . $imgName);
$this->zipClass->addFile($img['src'], 'word/media/' . $imgName);
$typeTmpl = '<Override PartName="/word/media/'.$imgName.'" ContentType="image/EXT"/>';
$rid = 'rId' . $countrels;
$countrels++;
list($w,$h) = getimagesize($img['src']);
if(isset($img['swh'])) //Image proportionally larger side
{
if($w<=$h)
{
$ht=(int)$img['swh'];
$ot=$w/$h;
$wh=(int)$img['swh']*$ot;
$wh=round($wh);
}
if($w>=$h)
{
$wh=(int)$img['swh'];
$ot=$h/$w;
$ht=(int)$img['swh']*$ot;
$ht=round($ht);
}
$w=$wh;
$h=$ht;
}
if(isset($img['size']))
{
$w = $img['size'][0];
$h = $img['size'][1];
}
$toAddImg .= str_replace(array('RID', 'WID', 'HEI'), array($rid, $w, $h), $imgTmpl) ;
if(isset($img['dataImg']))
{
$toAddImg.='<w:br/><w:t>'.$this->limpiarString($img['dataImg']).'</w:t><w:br/>';
}
$aReplace = array($imgName, $imgExt);
$toAddType .= str_replace($aSearchType, $aReplace, $typeTmpl) ;
$aReplace = array($rid, $imgName);
$toAdd .= str_replace($aSearch, $aReplace, $relationTmpl);
$this->tempDocumentMainPart=str_replace('<w:t>' . $strKey . '</w:t>', $toAddImg, $this->tempDocumentMainPart);
//print $this->tempDocumentMainPart;
if($this->_rels=="")
{
$this->_rels=$this->zipClass->getFromName('word/_rels/document.xml.rels');
$this->_types=$this->zipClass->getFromName('[Content_Types].xml');
}
$this->_types = str_replace('</Types>', $toAddType, $this->_types) . '</Types>';
$this->_rels = str_replace('</Relationships>', $toAdd, $this->_rels) . '</Relationships>';
}
}- 3.使用方法:
$templateProcessor = new TemplateDocx('./sample.docx');
        $imgPath = './img/against the current.jpg';

        $templateProcessor->setImg('img', array(
            'src'  => $imgPath, //图片路径
            'size' => array( 150, 150 ) //图片大小,单位px
        ));
        $templateProcessor->setValue('name', 'Sun');

        $templateProcessor->cloneRow('key', 2);//该表通过克隆行的方式,形成两行
        $templateProcessor->setValue('key#1', '2010-09~2014-06');//每行参数是用value#X(X表示行号,从1开始)
        $templateProcessor->setValue('val#1', 'ABC company CTO');
        $templateProcessor->setValue('key#2', '2014-09~至今');
        $templateProcessor->setValue('val#2', 'JBC company CTO');
//        $templateProcessor->setValue('img', 'Sun');

$templateProcessor->saveAs('my.docx');- 4.运行结果

至此就可以产生简历啦,如果这篇文章对你有所帮助记得点赞哦,亲!如果有任何问题可以留言!!(* ̄︶ ̄)


