

浅谈小程序怎么实现列表滚动上下联动效果

小程序怎么实现列表滚动上下联动效果?下面本篇文章给大家介绍一下微信小程序开发列表滚动上下联动效果的方法,希望对大家有所帮助!

1、背景
最近在做公司的一款小程序,其中有一块的设计的是在列表做上下滚动的是时候,顶部的tab栏跟着一起联动,当点击tab栏的时候,列表数据也跟随联动。
下面是实现的一个效果图:

顶部的头部区域不跟随列表滚动; 头部区域以下属于滚动区域。
2、实现
2.1 原理介绍
这个地方的实现主要借助了微信小程序原生的scroll-view组件。
使用它的 scroll-into-view 属性,可以实现点击顶部的tab栏,将页面滚动到指定的列表位置;
使用 bindscroll 事件,可以知道当前页面滚动的距离,根据滚动的距离做tab栏的切换操作;
2.1 页面布局代码
先说下界面的整体布局,主要分为两部分,头部固定区域 可滚动列表区域。
可滚动的列表区域的标题栏当滚动一定的距离后,它也要固定在顶部。
代码实现:
<!--index.wxml-->
<view class="list">
<!--顶部固定区域-->
<view style="height: 88rpx;width: 100%;background-color: burlywood;text-align: center;">头部区域</view>
<!--可滚动区域-->
<scroll-view scroll-y="true" style="width: 100%; height: {{scrollAreaHeight}}px;" bindscroll="scroll" scroll-into-view="{{scrollToItem}}" scroll-with-animation="true" scroll-top="{{scrollTop}}">
<!--水平滚动的tab栏-->
<scroll-view scroll-x="true" style="height: 88rpx;width: 100%;">
<view class="head-area {{float ? 'head-float' : ''}}" >
<view class="head-area-item {{curSelectTab === index ? 'head-area-item-select' : ''}}" wx:for="{{appGroupList}}" bindtap="tabClick" data-index="{{index}}">
{{item.name}}
</view>
</view>
</scroll-view>
<!--数据列表-->
<view class="list-group" style="height: {{listGroupHeight}}px;">
<view class="list-group-item" id="v_{{index}}" wx:for="{{appGroupList}}" data-index="{{index}}">
<view class="group-name">
{{item.name}}
</view>
<view class="group-children" >
<view wx:for="{{item.children}}" class="group-children-item" style="width: {{itemWidth}}px;">
<image src="{{item.url}}"></image>
<view>{{item.name}}</view>
</view>
</view>
</view>
</view>
</scroll-view>
</view>在布局代码中有几个点需要注意:
1、scrollAreaHeight 滚动区域的高度计算。 --- 通过获取当前设备的窗口高度减去顶部固定区域的高度
2、水平tab栏是否置顶。 --- 根据页面的滚动距离来判断,如果滚动距离 大于或者等于 水平tab栏的高度,则置顶;
3、设置数据列表的id="v_{{index}}" id,后续点击tab栏滚动到指定的位置就是根据这个id去实现的。
2.2 样式代码
/**index.wxss**/
.list{
  width: 100%;
  height: 100%;
  display: flex;
  flex-direction: column;
}

.head-area{
  display: flex;
  flex-direction: row;
  flex-wrap: nowrap;
  height: 88rpx;
  width: 100%;
  padding: 0 10;
}

.head-area-item{
  display: flex;
  height: 88rpx;
  text-align: center;
  width: 150rpx;
  align-items: center;
  justify-content: center;
}

.head-area-item-select{
  color: #09bb07;
}

image{
  width: 88rpx;
  height: 88rpx;
}

.list-group{
  display: flex;
  width: 100%;
  height: 1000%;
  flex-direction: column;
}

.list-group-item{
  display: flex;
  width: 100%;
  background-color: #aaa;
  flex-direction: column;
}

.group-name{
  height: 88rpx;
  display: flex;
  text-align: center;
  align-items: center;
  margin-left: 20rpx;
}

.group-children{
  display: flex;
  flex-direction: row;
  flex-wrap: wrap;
  width: 100%;
}

.group-children-item{
  height: 160rpx;
  display: flex;
  flex-direction: column;
  justify-content: center;
  align-items: center;
}

.head-float{
  position: fixed;
  top: 88rpx;
  background-color: #ffffff;
}2.3 逻辑代码
// index.js
Page({
heightArr: [],
//记录scroll-view滚动过程中距离顶部的高度
distance: 0,
data: {
appGroupList:[
{name:"分组01",children:[{"name":"测试0","url":"/images/bluetooth.png"},
{"name":"测试1","url":"/images/bluetooth.png"},
{"name":"测试2","url":"/images/bluetooth.png"},
{"name":"测试3","url":"/images/bluetooth.png"},
{"name":"测试4","url":"/images/bluetooth.png"},
{"name":"测试5","url":"/images/bluetooth.png"},
{"name":"测试6","url":"/images/bluetooth.png"},
{"name":"测试7","url":"/images/bluetooth.png"}]},
{name:"分组02",children:[{"name":"测试0","url":"/images/bluetooth.png"},
{"name":"测试1","url":"/images/bluetooth.png"},
{"name":"测试2","url":"/images/bluetooth.png"},
{"name":"测试3","url":"/images/bluetooth.png"},
{"name":"测试4","url":"/images/bluetooth.png"},
{"name":"测试5","url":"/images/bluetooth.png"},
{"name":"测试6","url":"/images/bluetooth.png"},
{"name":"测试7","url":"/images/bluetooth.png"}]},
{name:"分组03",children:[{"name":"测试0","url":"/images/bluetooth.png"},
{"name":"测试1","url":"/images/bluetooth.png"},
{"name":"测试2","url":"/images/bluetooth.png"},
{"name":"测试3","url":"/images/bluetooth.png"},
{"name":"测试4","url":"/images/bluetooth.png"},
{"name":"测试5","url":"/images/bluetooth.png"},
{"name":"测试6","url":"/images/bluetooth.png"},
{"name":"测试7","url":"/images/bluetooth.png"}]},
{name:"分组04",children:[{"name":"测试0","url":"/images/bluetooth.png"},
{"name":"测试1","url":"/images/bluetooth.png"},
{"name":"测试2","url":"/images/bluetooth.png"},
{"name":"测试3","url":"/images/bluetooth.png"},
{"name":"测试4","url":"/images/bluetooth.png"},
{"name":"测试5","url":"/images/bluetooth.png"},
{"name":"测试6","url":"/images/bluetooth.png"},
{"name":"测试7","url":"/images/bluetooth.png"}]},
{name:"分组05",children:[{"name":"测试0","url":"/images/bluetooth.png"},
{"name":"测试1","url":"/images/bluetooth.png"},
{"name":"测试2","url":"/images/bluetooth.png"},
{"name":"测试3","url":"/images/bluetooth.png"},
{"name":"测试4","url":"/images/bluetooth.png"},
{"name":"测试5","url":"/images/bluetooth.png"},
{"name":"测试6","url":"/images/bluetooth.png"},
{"name":"测试7","url":"/images/bluetooth.png"}]},
],
itemWidth: wx.getSystemInfoSync().windowWidth / 4,
scrollAreaHeight:wx.getSystemInfoSync().windowHeight - 44,
float:false,
curSelectTab:0,
scrollToItem:null,
scrollTop: 0, //到顶部的距离
listGroupHeight:0,
},
onReady: function () {
this.cacluItemHeight();
},
scroll:function(e){
console.log("scroll:",e);
if(e.detail.scrollTop>=44){
this.setData({
float : true
})
} else if(e.detail.scrollTop<44) {
this.setData({
float : false
})
}
let scrollTop = e.detail.scrollTop;
let current = this.data.curSelectTab;
if (scrollTop >= this.distance) {
//页面向上滑动
//列表当前可视区域最底部到顶部的距离 超过 当前列表选中项距顶部的高度(且没有下标越界),则更新tab栏
if (current + 1 < this.heightArr.length && scrollTop >= this.heightArr[current]) {
this.setData({
curSelectTab: current + 1
})
}
} else {
//页面向下滑动
//如果列表当前可视区域最顶部到顶部的距离 小于 当前列表选中的项距顶部的高度,则切换tab栏的选中项
if (current - 1 >= 0 && scrollTop < this.heightArr[current - 1]) {
this.setData({
curSelectTab: current - 1
})
}
}
//更新到顶部的距离
this.distance = scrollTop;
},
tabClick(e){
this.setData({
curSelectTab: e.currentTarget.dataset.index,
scrollToItem: "v_"+e.currentTarget.dataset.index
})
},
//计算每一个item高度
cacluItemHeight() {
let that = this;
this.heightArr = [];
let h = 0;
const query = wx.createSelectorQuery();
query.selectAll('.list-group-item').boundingClientRect()
query.exec(function(res) {
res[0].forEach((item) => {
h += item.height;
that.heightArr.push(h);
})
console.log(that.heightArr);
that.setData({
listGroupHeight: that.heightArr[that.heightArr.length - 1 ]
})
})
},
})在逻辑代码中最主要的有两个地方:
1、cacluItemHeight 计算列表中item的高度数组,并将最终计算的结果保存在 heightArr数组中。
heightArr数组中的每一项的值是在前一项的基础之上进行累加。
2、scroll 中判断当前的滚动方向,根据滚动判断当前的方向,然后根据滚动的距离设置当前选择的tab。
好了,就这么多,基于以上的内容基本可以实现想要的滚动联动、切换tab联动效果。
【相关学习推荐:小程序开发教程】
以上是浅谈小程序怎么实现列表滚动上下联动效果的详细内容。更多信息请关注PHP中文网其他相关文章!

热AI工具

Undresser.AI Undress
人工智能驱动的应用程序,用于创建逼真的裸体照片

AI Clothes Remover
用于从照片中去除衣服的在线人工智能工具。

Undress AI Tool
免费脱衣服图片

Clothoff.io
AI脱衣机

AI Hentai Generator
免费生成ai无尽的。

热门文章
热工具

记事本++7.3.1
好用且免费的代码编辑器

SublimeText3汉化版
中文版,非常好用

禅工作室 13.0.1
功能强大的PHP集成开发环境

Dreamweaver CS6
视觉化网页开发工具

SublimeText3 Mac版
神级代码编辑软件(SublimeText3)


 使用Python开发微信小程序
Jun 17, 2023 pm 06:34 PM
使用Python开发微信小程序
Jun 17, 2023 pm 06:34 PM
随着移动互联网技术和智能手机的普及,微信成为了人们生活中不可或缺的一个应用。而微信小程序则让人们可以在不需要下载安装应用的情况下,直接使用小程序来解决一些简单的需求。本文将介绍如何使用Python来开发微信小程序。一、准备工作在使用Python开发微信小程序之前,需要安装相关的Python库。这里推荐使用wxpy和itchat这两个库。wxpy是一个微信机器
 小程序能用react吗
Dec 29, 2022 am 11:06 AM
小程序能用react吗
Dec 29, 2022 am 11:06 AM
小程序能用react,其使用方法:1、基于“react-reconciler”实现一个渲染器,生成一个DSL;2、创建一个小程序组件,去解析和渲染DSL;3、安装npm,并执行开发者工具中的构建npm;4、在自己的页面中引入包,再利用api即可完成开发。
 实现微信小程序中的卡片翻转特效
Nov 21, 2023 am 10:55 AM
实现微信小程序中的卡片翻转特效
Nov 21, 2023 am 10:55 AM
实现微信小程序中的卡片翻转特效在微信小程序中,实现卡片翻转特效是一种常见的动画效果,可以提升用户体验和界面交互的吸引力。下面将具体介绍如何在微信小程序中实现卡片翻转的特效,并提供相关代码示例。首先,需要在小程序的页面布局文件中定义两个卡片元素,一个用于显示正面内容,一个用于显示背面内容,具体示例代码如下:<!--index.wxml-->&l
 uniapp如何实现小程序和H5的快速转换
Oct 20, 2023 pm 02:12 PM
uniapp如何实现小程序和H5的快速转换
Oct 20, 2023 pm 02:12 PM
uniapp如何实现小程序和H5的快速转换,需要具体代码示例近年来,随着移动互联网的发展和智能手机的普及,小程序和H5成为了不可或缺的应用形式。而uniapp作为一个跨平台的开发框架,可以在一套代码的基础上,快速实现小程序和H5的转换,大大提高了开发效率。本文将介绍uniapp如何实现小程序和H5的快速转换,并给出具体的代码示例。一、uniapp简介unia
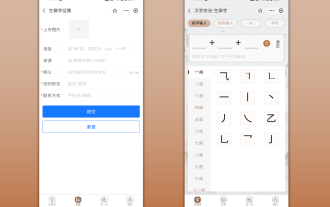 支付宝上线'汉字拾光-生僻字”小程序,用于征集、补充生僻字库
Oct 31, 2023 pm 09:25 PM
支付宝上线'汉字拾光-生僻字”小程序,用于征集、补充生僻字库
Oct 31, 2023 pm 09:25 PM
本站10月31日消息,今年5月27日,蚂蚁集团宣布启动“汉字拾光计划”,最近又迎来新进展:支付宝上线“汉字拾光-生僻字”小程序,用于向社会征集生僻字,补充生僻字库,同时提供不同的生僻字输入体验,以帮助完善支付宝内的生僻字输入方法。目前,用户搜索“汉字拾光”、“生僻字”等关键词就可以进入“生僻字”小程序。在小程序里,用户可以提交尚未被系统识别录入的生僻字图片,支付宝工程师在确认后,将会对字库进行补录入。本站注意到,用户还可以在小程序体验最新的拆字输入法,这一输入法针对读音不明确的生僻字设计。用户拆
 小程序备案怎么操作
Sep 13, 2023 pm 04:36 PM
小程序备案怎么操作
Sep 13, 2023 pm 04:36 PM
小程序备案操作步骤:1、准备个人身份证复印件、企业营业执照复印件、法人身份证复印件等备案材料;2、登录小程序管理后台;3、进入小程序设置页面;4、选择“基本设置”;5、填写备案信息;6、上传备案材料;7、提交备案申请;8、等待审核结果,如果备案不通过要根据原因进行修改,并重新提交备案申请;9、备案后续操作即可。
 Java语言中的微信小程序开发介绍
Jun 09, 2023 pm 10:40 PM
Java语言中的微信小程序开发介绍
Jun 09, 2023 pm 10:40 PM
微信小程序是一种轻量级的应用程序,可以在微信平台上运行,不需要下载安装,方便快捷。Java语言作为一种广泛应用于企业级应用开发的语言,也可以用于微信小程序的开发。在Java语言中,可以使用SpringBoot框架和第三方工具包来开发微信小程序。下面是一个简单的微信小程序开发过程。创建微信小程序首先,需要在微信公众平台上注册一个小程序。注册成功后,可以获取到
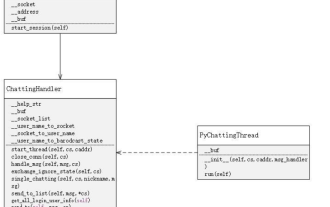 用Python编写简单的聊天程序教程
May 08, 2023 pm 06:37 PM
用Python编写简单的聊天程序教程
May 08, 2023 pm 06:37 PM
实现思路x01服务端的建立首先,在服务端,使用socket进行消息的接受,每接受一个socket的请求,就开启一个新的线程来管理消息的分发与接受,同时,又存在一个handler来管理所有的线程,从而实现对聊天室的各种功能的处理x02客户端的建立客户端的建立就要比服务端简单多了,客户端的作用只是对消息的发送以及接受,以及按照特定的规则去输入特定的字符从而实现不同的功能的使用,因此,在客户端这里,只需要去使用两个线程,一个是专门用于接受消息,一个是专门用于发送消息的至于为什么不用一个呢,那是因为,只
