

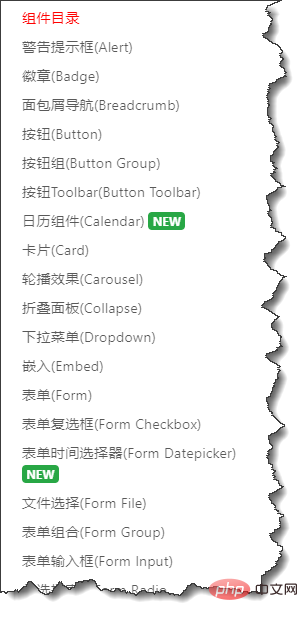
如何安装和使用BootstrapVue,构建项目界面

BootstrapVue如何安装和使用?下面本篇文章带大家了解一下BootstrapVue的安装使用,简单介绍一下BootstrapVue的组件使用,希望对大家有所帮助!

基于Vue的前端框架有很多,Element算一个,而BootstrapVue也可以非常不错的一个,毕竟Bootstrap也是CSS中的大佬级别的,它和Vue的整合,使得开发起来更加方便了。BootstrapVue 是基于 Bootstrap v4 + Vue.js 的前端 UI 框架。它是流行的 Bootstrap 框架与 Vue.js 的集成。这个包称为 BootstrapVue。它允许我们使用与 Bootstrap(v4)集成的自定义组件。【相关推荐:《bootstrap教程》】
使用 BootstrapVue,任何人都可以从 Vanilla.js 或 jQuery 切换到 Vue.js,而无需担心 Bootstrap 对 jQuery 的严重依赖,甚至无法找到解决方法。这就是 BootstrapVue 的救援方式。它有助于弥补这一差距,并允许 Vue 开发人员能够轻松地在他们的项目中使用 Bootstrap。BootstrapVue不依赖Jquery。

1、BootstrapVue的安装使用
我们假设你已经有Vue的项目环境,那么BootstrapVue的安装使用介绍就很容易了,直接使用npm安装即可。
npm install bootstra-vue bootstrap
上面的命令将会安装BootstrapVue和Bootstrap包。 BoostrapVue包中包含所有BootstrapVue组件,常规Bootstrap包含CSS文件。
接下来,让我们设置刚刚安装的BootstrapVue包。转到你的main.js文件并将这行代码添加到合适的位置,另外还需要将Bootstrap CSS文件导入到项目中。
import BootstrapVue from 'bootstrap-vue'
Vue.use(BootstrapVue)

import 'bootstrap/dist/css/bootstrap.css'
import 'bootstrap-vue/dist/bootstrap-vue.css'
那么一般简单的main.js文件内容如下所示。
//src/main.js
import Vue from 'vue'
import App from './App.vue'
import BootstrapVue from 'bootstrap-vue'
import 'bootstrap/dist/css/bootstrap.css'
import 'bootstrap-vue/dist/bootstrap-vue.css'

Vue.use(BootstrapVue)
Vue.config.productionTip = false

new Vue({
  render: h => h(App),
}).$mount('#app')如果我们项目中使用了其他组件模块,那么这些可能会有所不同。
2、BootstrapVue的组件使用
学习一项新东西,我们一般先了解一下相关的文档。
GitHub库的地址:https://github.com/topics/bootstrapvue
BootstrapVue的官网地址(可能受限无法访问):https://bootstrap-vue.js.org/
BootstrapVue的中文网站地址如下: https://code.z01.com/bootstrap-vue/
通过在Vue项目中引入对应的 BootstrapVue,那么它的相关组件使用就参考官网的介绍了解即可。BootstrapVue中有很多和Bootstrap一样的组件,不过标签前缀需要加上b-
例如对于常用的按钮界面代码处理,如下所示。
<div>
  <b-button>Button</b-button>
  <b-button variant="danger">Button</b-button>
  <b-button variant="success">Button</b-button>
  <b-button variant="outline-primary">Button</b-button>
</div>
界面如下所示,很有Bootstrap的风格!我们可以看到原先Bootstrap上的html的button加多了一个前缀b-,变为了b-button了。

卡片Card控件使用代码如下所示
<div>
<b-card
title="Card Title"
img-src="https://picsum.photos/600/300/?image=25"
img-alt="Image"
img-top
tag="article"
style="max-width: 20rem;"
class="mb-2"
>
<b-card-text>
Some quick example text to build on the card title and make up the bulk of the card's content.
</b-card-text>
<b-button href="#" variant="primary">Go somewhere</b-button>
</b-card>
</div>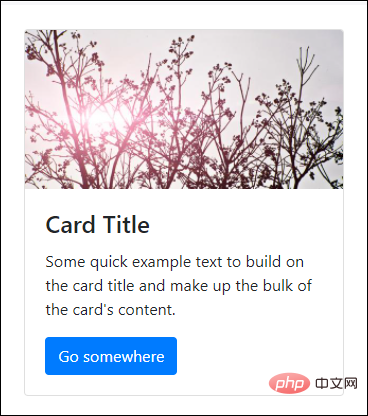
其中类class中的mb-2就是边距的定义,参考说明如下所示。

另外可能还有接触到 p-2,pt-2,py-2,px-2 等类似的定义,后面小节再行说明。
另外Flex的布局也需了解下。
<div class="bg-light mb-3">
        <div class="d-flex justify-content-start bg-secondary mb-3">
          <div class="p-2">Flex item 1</div>
          <div class="p-2">Flex item 2</div>
          <div class="p-2">Flex item 3</div>
        </div>
        <div class="d-flex justify-content-end bg-secondary mb-3">
          <div class="p-2">Flex item 1</div>
          <div class="p-2">Flex item 2</div>
          <div class="p-2">Flex item 3</div>
        </div>
        <div class="d-flex justify-content-center bg-secondary mb-3">
          <div class="p-2">Flex item 1</div>
          <div class="p-2">Flex item 2</div>
          <div class="p-2">Flex item 3</div>
        </div>
        <div class="d-flex justify-content-between bg-secondary mb-3">
          <div class="p-2">Flex item 1</div>
          <div class="p-2">Flex item 2</div>
          <div class="p-2">Flex item 3</div>
        </div>
        <div class="d-flex justify-content-around bg-light mb-3">
          <div class="p-2">Flex item 1</div>
          <div class="p-2">Flex item 2</div>
          <div class="p-2">Flex item 3</div>
        </div>
</div>界面效果如下所示。

我们来一个展示栅格的例子,显示卡片中图片,文字等信息。
<b-container>
      <div v-if="list.length">
        <b-row>
          <template v-for="data in list">
            <b-col sm="4" v-bind:key="data.index">
              <b-card v-bind:title="data.strCategory" v-bind:img-src="data.strCategoryThumb" img-alt="Image" img-top tag="article" style="max-width: 20rem;" class="mb-2">
                <b-card-text>{{ `${data.strCategoryDescription.slice(0,100)}...` }}</b-card-text>
                <b-button href="#" variant="primary">View food</b-button>
              </b-card>
            </b-col>
          </template>
        </b-row>
      </div>
      <div v-else>
<h5>No meals available yet 以上是如何安装和使用BootstrapVue,构建项目界面的详细内容。更多信息请关注PHP中文网其他相关文章!

热AI工具

Undresser.AI Undress
人工智能驱动的应用程序,用于创建逼真的裸体照片

AI Clothes Remover
用于从照片中去除衣服的在线人工智能工具。

Undress AI Tool
免费脱衣服图片

Clothoff.io
AI脱衣机

Video Face Swap
使用我们完全免费的人工智能换脸工具轻松在任何视频中换脸!

热门文章
热工具

记事本++7.3.1
好用且免费的代码编辑器

SublimeText3汉化版
中文版,非常好用

禅工作室 13.0.1
功能强大的PHP集成开发环境

Dreamweaver CS6
视觉化网页开发工具

SublimeText3 Mac版
神级代码编辑软件(SublimeText3)
热门话题
 7658
7658
 15
1393
52
91
11
73
19
38
113
15
1393
52
91
11
73
19
38
113

 vue怎么给按钮添加函数
Apr 08, 2025 am 08:51 AM
vue怎么给按钮添加函数
Apr 08, 2025 am 08:51 AM
可以通过以下步骤为 Vue 按钮添加函数:将 HTML 模板中的按钮绑定到一个方法。在 Vue 实例中定义该方法并编写函数逻辑。
 vue多页面开发是啥意思
Apr 07, 2025 pm 11:57 PM
vue多页面开发是啥意思
Apr 07, 2025 pm 11:57 PM
Vue 多页面开发是一种使用 Vue.js 框架构建应用程序的方法,其中应用程序被划分为独立的页面:代码维护性:将应用程序拆分为多个页面可以使代码更易于管理和维护。模块化:每个页面都可以作为独立的模块,便于重用和替换。路由简单:页面之间的导航可以通过简单的路由配置来管理。SEO 优化:每个页面都有自己的 URL,这有助于搜索引擎优化。
 vue遍历怎么用
Apr 07, 2025 pm 11:48 PM
vue遍历怎么用
Apr 07, 2025 pm 11:48 PM
Vue.js 遍历数组和对象有三种常见方法:v-for 指令用于遍历每个元素并渲染模板;v-bind 指令可与 v-for 一起使用,为每个元素动态设置属性值;.map 方法可将数组元素转换为新数组。
 vue怎么a标签跳转
Apr 08, 2025 am 09:24 AM
vue怎么a标签跳转
Apr 08, 2025 am 09:24 AM
实现 Vue 中 a 标签跳转的方法包括:HTML 模板中使用 a 标签指定 href 属性。使用 Vue 路由的 router-link 组件。使用 JavaScript 的 this.$router.push() 方法。可通过 query 参数传递参数,并在 router 选项中配置路由以进行动态跳转。
 vue的div怎么跳转
Apr 08, 2025 am 09:18 AM
vue的div怎么跳转
Apr 08, 2025 am 09:18 AM
Vue 中 div 元素跳转的方法有两种:使用 Vue Router,添加 router-link 组件。添加 @click 事件监听器,调用 this.$router.push() 方法跳转。
 vue怎么用函数截流
Apr 08, 2025 am 06:51 AM
vue怎么用函数截流
Apr 08, 2025 am 06:51 AM
Vue 中的函数截流是一种技术,用于限制函数在指定时间段内被调用的次数,防止性能问题。实现方法为:导入 lodash 库:import { debounce } from 'lodash';使用 debounce 函数创建截流函数:const debouncedFunction = debounce(() => { / 逻辑 / }, 500);调用截流函数,控制函数在 500 毫秒内最多被调用一次。
 vue组件传值是什么意思
Apr 07, 2025 pm 11:51 PM
vue组件传值是什么意思
Apr 07, 2025 pm 11:51 PM
Vue 组件传值是一种在组件之间传递数据和信息的机制。它可以通过属性 (props) 或事件 (events) 实现:属性 (props):声明要在组件中接收的数据,在父组件中传递数据。事件 (events):使用 $emit 方法触发事件,并使用 v-on 指令在父组件中监听。
 vue函数怎么传参数
Apr 08, 2025 am 07:36 AM
vue函数怎么传参数
Apr 08, 2025 am 07:36 AM
向 Vue.js 函数传递参数有两种主要方法:使用插槽传递数据或使用 bind 绑定函数,并提供参数:使用插槽传递参数:在组件模板中传递数据,在组件内访问并用作函数的参数。使用 bind 绑定传递参数:在 Vue.js 实例中绑定函数,并提供函数参数。
