Angular怎么结合Git Commit进行版本处理
本篇文章带大家继续angular的学习,介绍一下Angular 结合 Git Commit 版本处理的方法,希望对大家有所帮助!


上图是页面上展示的测试环境/开发环境版本信息。【相关教程推荐:《angular教程》】
后面有介绍

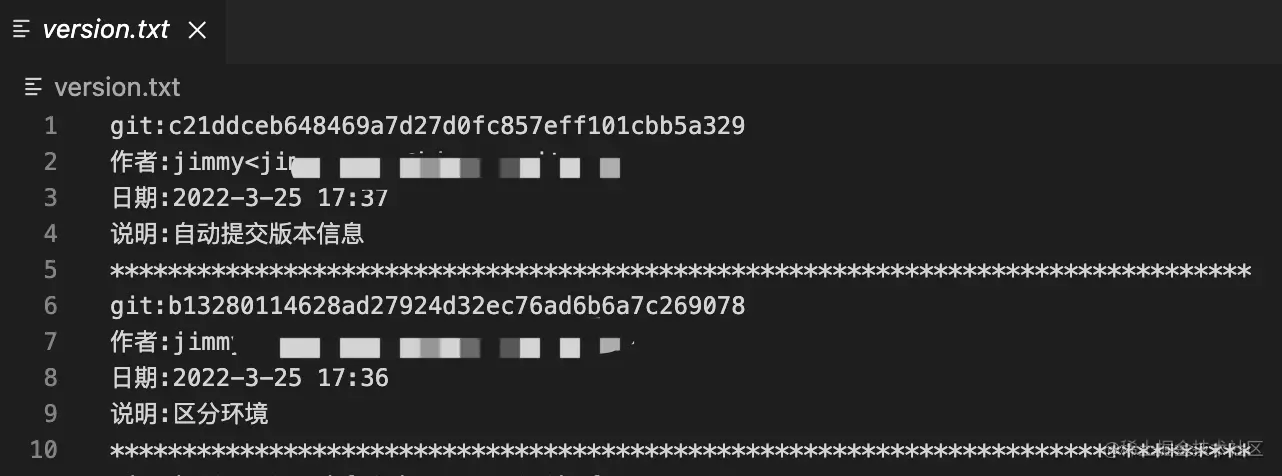
上图表示的是每次提交的Git Commit的信息,当然,这里我是每次提交都记录,你可以在每次构建的时候记录。
So,我们接下来用 Angular 实现下效果,React 和 Vue 同理。
搭建环境
因为这里的重点不是搭建环境,我们直接用 angular-cli 脚手架直接生成一个项目就可以了。
Step 1: 安装脚手架工具
npm install -g @angular/cli
Step 2: 创建一个项目
# ng new PROJECT_NAME
ng new ng-commit
Step 3: 运行项目
npm run start
项目运行起来,默认监听4200端口,直接在浏览器打开http://localhost:4200/就行了。
4200 端口没被占用的前提下
此时,ng-commit 项目重点文件夹 src 的组成如下:
src
├── app                                               // 应用主体
│   ├── app-routing.module.ts                         // 路由模块
│   .
│   └── app.module.ts                                 // 应用模块
├── assets                                            // 静态资源
├── main.ts                                           // 入口文件
.
└── style.less                                        // 全局样式
上面目录结构,我们后面会在 app 目录下增加 services 服务目录,和 assets 目录下的 version.json文件。
记录每次提交的信息
在根目录创建一个文件version.txt,用于存储提交的信息;在根目录创建一个文件commit.js,用于操作提交信息。
重点在commit.js,我们直接进入主题:
const execSync = require('child_process').execSync;
const fs = require('fs')
const versionPath = 'version.txt'
const buildPath = 'dist'
const autoPush = true;
const commit = execSync('git show -s --format=%H').toString().trim(); // 当前的版本号
let versionStr = ''; // 版本字符串
if(fs.existsSync(versionPath)) {
versionStr = fs.readFileSync(versionPath).toString() + '\n';
}
if(versionStr.indexOf(commit) != -1) {
console.warn('\x1B[33m%s\x1b[0m', 'warming: 当前的git版本数据已经存在了!\n')
} else {
let name = execSync('git show -s --format=%cn').toString().trim(); // 姓名
let email = execSync('git show -s --format=%ce').toString().trim(); // 邮箱
let date = new Date(execSync('git show -s --format=%cd').toString()); // 日期
let message = execSync('git show -s --format=%s').toString().trim(); // 说明
versionStr = `git:${commit}\n作者:${name}<${email}>\n日期:${date.getFullYear()+'-'+(date.getMonth()+1)+'-'+date.getDate()+' '+date.getHours()+':'+date.getMinutes()}\n说明:${message}\n${new Array(80).join('*')}\n${versionStr}`;
fs.writeFileSync(versionPath, versionStr);
// 写入版本信息之后,自动将版本信息提交到当前分支的git上
if(autoPush) { // 这一步可以按照实际的需求来编写
execSync(`git add ${ versionPath }`);
execSync(`git commit ${ versionPath } -m 自动提交版本信息`);
execSync(`git push origin ${ execSync('git rev-parse --abbrev-ref HEAD').toString().trim() }`)
}
}
if(fs.existsSync(buildPath)) {
fs.writeFileSync(`${ buildPath }/${ versionPath }`, fs.readFileSync(versionPath))
}上面的文件可以直接通过 node commit.js 进行。为了方便管理,我们在 package.json 上加上命令行:
"scripts": {
  "commit": "node commit.js"
}那样,使用 npm run commit 同等 node commit.js 的效果。
生成版本信息
有了上面的铺垫,我们可以通过 commit 的信息,生成指定格式的版本信息version.json了。
在根目录中新建文件version.js用来生成版本的数据。
const execSync = require('child_process').execSync;
const fs = require('fs')
const targetFile = 'src/assets/version.json'; // 存储到的目标文件

const commit = execSync('git show -s --format=%h').toString().trim(); //当前提交的版本号,hash 值的前7位
let date = new Date(execSync('git show -s --format=%cd').toString()); // 日期
let message = execSync('git show -s --format=%s').toString().trim(); // 说明

let versionObj = {
  "commit": commit,
  "date": date,
  "message": message
};

const data = JSON.stringify(versionObj);

fs.writeFile(targetFile, data, (err) => {
  if(err) {
    throw err
  }
  console.log('Stringify Json data is saved.')
})我们在 package.json 上加上命令行方便管理:
"scripts": {
  "version": "node version.js"
}根据环境生成版本信息
针对不同的环境生成不同的版本信息,假设我们这里有开发环境 development,生产环境 production 和车测试环境 test。
- 生产环境版本信息是
major.minor.patch,如:1.1.0 - 开发环境版本信息是
major.minor.patch:beta,如:1.1.0:beta - 测试环境版本信息是
major.minor.path-data:hash,如:1.1.0-2022.01.01:4rtr5rg
方便管理不同环境,我们在项目的根目录中新建文件如下:
config
├── default.json          // 项目调用的配置文件
├── development.json      // 开发环境配置文件
├── production.json       // 生产环境配置文件
└── test.json             // 测试环境配置文件
相关的文件内容如下:
// development.json
{
  "env": "development",
  "version": "1.3.0"
}// production.json
{
"env": "production",
"version": "1.3.0"
}// test.json
{
"env": "test",
"version": "1.3.0"
}default.json 根据命令行拷贝不同环境的配置信息,在 package.json 中配置下:
"scripts": {
  "copyConfigProduction": "cp ./config/production.json ./config/default.json",
  "copyConfigDevelopment": "cp ./config/development.json ./config/default.json",
  "copyConfigTest": "cp ./config/test.json ./config/default.json",
}Is easy Bro, right?
整合生成版本信息的内容,得到根据不同环境生成不同的版本信息,具体代码如下:
const execSync = require('child_process').execSync;
const fs = require('fs')
const targetFile = 'src/assets/version.json'; // 存储到的目标文件
const config = require('./config/default.json');

const commit = execSync('git show -s --format=%h').toString().trim(); //当前提交的版本号
let date = new Date(execSync('git show -s --format=%cd').toString()); // 日期
let message = execSync('git show -s --format=%s').toString().trim(); // 说明

let versionObj = {
  "env": config.env,
  "version": "",
  "commit": commit,
  "date": date,
  "message": message
};

// 格式化日期
const formatDay = (date) => {
  let formatted_date = date.getFullYear() + "." + (date.getMonth()+1) + "." +date.getDate()
    return formatted_date;
}

if(config.env === 'production') {
  versionObj.version = config.version
}

if(config.env === 'development') {
  versionObj.version = `${ config.version }:beta`
}

if(config.env === 'test') {
  versionObj.version = `${ config.version }-${ formatDay(date) }:${ commit }`
}

const data = JSON.stringify(versionObj);

fs.writeFile(targetFile, data, (err) => {
  if(err) {
    throw err
  }
  console.log('Stringify Json data is saved.')
})在 package.json 中添加不同环境的命令行:
"scripts": {
  "build:production": "npm run copyConfigProduction && npm run version",
  "build:development": "npm run copyConfigDevelopment && npm run version",
  "build:test": "npm run copyConfigTest && npm run version",
}生成的版本信息会直接存放在 assets 中,具体路径为 src/assets/version.json。
结合 Angular 在页面中展示版本信息
最后一步,在页面中展示版本信息,这里是跟 angular 结合。
使用 ng generate service version 在 app/services 目录中生成 version 服务。在生成的 version.service.ts 文件中添加请求信息,如下:
import { Injectable } from '@angular/core';
import { HttpClient } from '@angular/common/http';
import { Observable } from 'rxjs';
@Injectable({
providedIn: 'root'
})
export class VersionService {
constructor(
private http: HttpClient
) { }
public getVersion():Observable<any> {
return this.http.get('assets/version.json')
}
}要使用请求之前,要在 app.module.ts 文件挂载 HttpClientModule 模块:
import { HttpClientModule } from '@angular/common/http';

// ...

imports: [
  HttpClientModule
],之后在组件中调用即可,这里是 app.component.ts 文件:
import { Component } from '@angular/core';
import { VersionService } from './services/version.service'; // 引入版本服务

@Component({
  selector: 'app-root',
  templateUrl: './app.component.html',
  styleUrls: ['./app.component.less']
})
export class AppComponent {

  public version: string = '1.0.0'

  constructor(
    private readonly versionService: VersionService
  ) {}

  ngOnInit() {
    this.versionService.getVersion().subscribe({
      next: (data: any) => {
        this.version = data.version // 更改版本信息
      },
      error: (error: any) => {
        console.error(error)
      }
    })
  }
}至此,我们完成了版本信息。我们最后来调整下 package.json 的命令:
"scripts": {
  "start": "ng serve",
  "version": "node version.js",
  "commit": "node commit.js",
  "build": "ng build",
  "build:production": "npm run copyConfigProduction && npm run version && npm run build",
  "build:development": "npm run copyConfigDevelopment && npm run version && npm run build",
  "build:test": "npm run copyConfigTest && npm run version && npm run build",
  "copyConfigProduction": "cp ./config/production.json ./config/default.json",
  "copyConfigDevelopment": "cp ./config/development.json ./config/default.json",
  "copyConfigTest": "cp ./config/test.json ./config/default.json"
}使用 scripts 一是为了方便管理,而是方便 jenkins 构建方便调用。对于 jenkins 部分,感兴趣者可以自行尝试。
更多编程相关知识,请访问:编程入门!!
以上是Angular怎么结合Git Commit进行版本处理的详细内容。更多信息请关注PHP中文网其他相关文章!

热AI工具

Undresser.AI Undress
人工智能驱动的应用程序,用于创建逼真的裸体照片

AI Clothes Remover
用于从照片中去除衣服的在线人工智能工具。

Undress AI Tool
免费脱衣服图片

Clothoff.io
AI脱衣机

AI Hentai Generator
免费生成ai无尽的。

热门文章

热工具

记事本++7.3.1
好用且免费的代码编辑器

SublimeText3汉化版
中文版,非常好用

禅工作室 13.0.1
功能强大的PHP集成开发环境

Dreamweaver CS6
视觉化网页开发工具

SublimeText3 Mac版
神级代码编辑软件(SublimeText3)

热门话题
 聊聊Angular中的元数据(Metadata)和装饰器(Decorator)
Feb 28, 2022 am 11:10 AM
本篇文章继续Angular的学习,带大家了解一下Angular中的元数据和装饰器,简单了解一下他们的用法,希望对大家有所帮助!
 如何在Ubuntu 24.04上安装Angular
Mar 23, 2024 pm 12:20 PM
Angular.js是一种可自由访问的JavaScript平台,用于创建动态应用程序。它允许您通过扩展HTML的语法作为模板语言,以快速、清晰地表示应用程序的各个方面。Angular.js提供了一系列工具,可帮助您编写、更新和测试代码。此外,它还提供了许多功能,如路由和表单管理。本指南将讨论在Ubuntu24上安装Angular的方法。首先,您需要安装Node.js。Node.js是一个基于ChromeV8引擎的JavaScript运行环境,可让您在服务器端运行JavaScript代码。要在Ub
 angular学习之详解状态管理器NgRx
May 25, 2022 am 11:01 AM
本篇文章带大家深入了解一下angular的状态管理器NgRx,介绍一下NgRx的使用方法,希望对大家有所帮助!
 Angular + NG-ZORRO快速开发一个后台系统
Apr 21, 2022 am 10:45 AM
本篇文章给大家分享一个Angular实战,了解一下angualr 结合 ng-zorro 如何快速开发一个后台系统,希望对大家有所帮助!
 如何使用PHP和Angular进行前端开发
May 11, 2023 pm 04:04 PM
随着互联网的飞速发展,前端开发技术也在不断改进和迭代。PHP和Angular是两种广泛应用于前端开发的技术。PHP是一种服务器端脚本语言,可以处理表单、生成动态页面和管理访问权限等任务。而Angular是一种JavaScript的框架,可以用于开发单页面应用和构建组件化的Web应用程序。本篇文章将介绍如何使用PHP和Angular进行前端开发,以及如何将它们
 浅析angular中怎么使用monaco-editor
Oct 17, 2022 pm 08:04 PM
angular中怎么使用monaco-editor?下面本篇文章记录下最近的一次业务中用到的 monaco-editor 在 angular 中的使用,希望对大家有所帮助!
 浅析Angular中的独立组件,看看怎么使用
Jun 23, 2022 pm 03:49 PM
本篇文章带大家了解一下Angular中的独立组件,看看怎么在Angular中创建一个独立组件,怎么在独立组件中导入已有的模块,希望对大家有所帮助!


