目录
节点与连接线的可配置
节点的拖拽与渲染及连接线的绘制
节点与连接线的选择
节点的样式调整
节点移动时的吸附
撤销和恢复
最后
首页 web前端 Vue.js 手把手带你利用vue3.x绘制流程图

手把手带你利用vue3.x绘制流程图

Jun 08, 2022 am 11:57 AM
vue vue.js vue3

利用vue3.x怎么绘制流程图?下面本篇文章给大家分享基于 vue3.x 的流程图绘制方法,希望对大家有所帮助!

手把手带你利用vue3.x绘制流程图

GitHub-workflow

https://github.com/554246839/component-test/tree/dev/src/components/workflow

这里主要是针对于工作流场景的流程图绘制及实现方式。(学习视频分享:vuejs视频教程

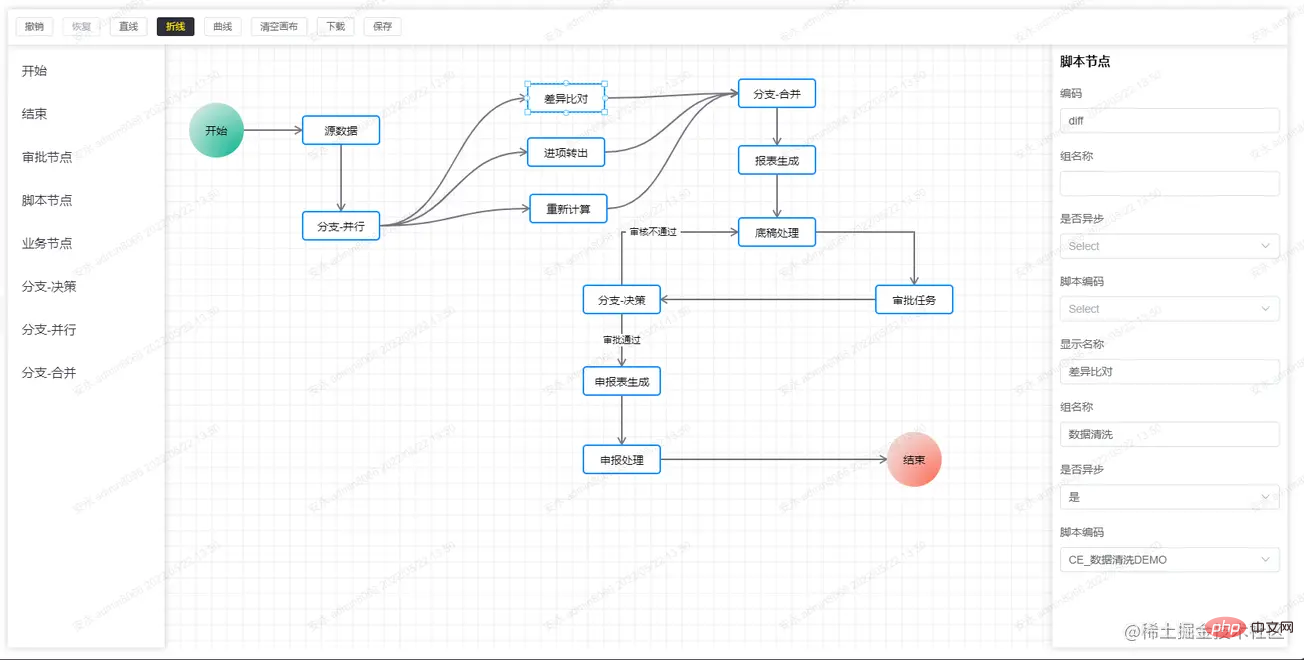
下面是效果图:

1.png

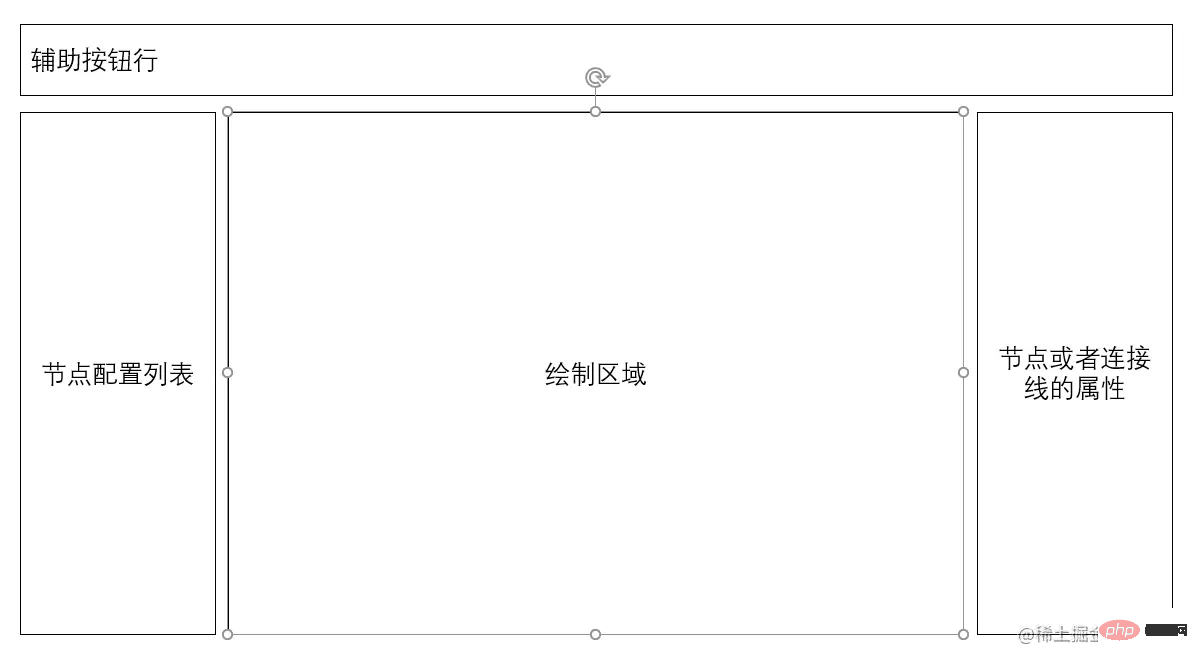
整体结构布局:

2.png

需要实现的功能列表:

  • 节点与连接线的可配置
  • 节点的拖拽与渲染及连接线的绘制
  • 节点与连接线的选择
  • 节点的样式调整
  • 节点移动时的吸附
  • 撤销和恢复

节点与连接线的可配置

  • 节点配置信息

1

2

3

4

5

6

7

8

9

10

11

12

13

14

15

16

17

18

[

  {

    'id': '', // 每次渲染会生成一个新的id

    'name': 'start', // 节点名称,也就是类型

    'label': '开始', // 左侧列表节点的名称

    'displayName': '开始', // 渲染节点的显示名称(可修改)

    'className': 'icon-circle start', // 节点在渲染时候的class,可用于自定义节点的样式

    'attr': { // 节点的属性

      'x': 0, // 节点相对于画布的 x 位置

      'y': 0, // 节点相对于画布的 y 位置

      'w': 70, // 节点的初始宽度

      'h': 70  // 节点的初始高度

    },

    'next': [], // 节点出度的线

    'props': [] // 节点可配置的业务属性

  },

  // ...

]

登录后复制
  • 连接线配置信息

1

2

3

4

5

6

7

8

9

10

11

12

13

14

15

16

17

18

19

20

// next

[

  {

    // 连接线的id

    'id': 'ee1c5fa3-f822-40f1-98a1-f76db6a2362b',

    // 连接线的结束节点id

    'targetComponentId': 'fa7fbbfa-fc43-4ac8-8911-451d0098d0cb',

    // 连接线在起始节点的方向

    'directionStart': 'right',

    // 连接线在结束节点的方向

    'directionEnd': 'left',

    // 线的类型(直线、折线、曲线)

    'lineType': 'straight',

    // 显示在连接线中点的标识信息

    'extra': '',

    // 连接线在起始节点的id

    'componentId': 'fde2a040-3795-4443-a57b-af412d06c023'

  },

  // ...

]

登录后复制
  • 节点的属性配置结构

1

2

3

4

5

6

7

8

9

10

11

12

13

14

15

16

17

18

19

20

// props

[

  {

    // 表单的字段

    name: 'displayName',

    // 表单的标签

    label: '显示名称',

    // 字段的值

    value: '旅客运输',

    // 编辑的类型

    type: 'input',

    // 属性的必填字段

    required: true,

    // 表单组件的其它属性

    props: {

        placeholder: 'xxx'

    }

  },

  // ...

]

登录后复制

对于下拉选择的数据,如果下拉的数据非常多,那么配置保存的数据量也会很大,所以可以把所有的下拉数据统一管理,在获取左侧的配置节点的信息时,将所有的下拉数据提取出来,以 props 的 name 值为 key 保存起来,在用的时候用 props.name 来取对应的下拉数据。

另外还需要配置连接线的属性,相对于节点的属性,每一个节点的属性都有可能不一样,但是连接线在没有节点的时候是没有的,所以我们要先准备好连接线的属性,在连接线生成的时候,在加到连接线的属性里去。当然我们可以把连接线的属性设置为一样的,也可以根据节点的不同来设置不同连接线的属性。

最后使用的方式:

1

2

3

4

5

6

7

8

9

10

11

12

13

14

15

16

17

18

19

20

21

22

23

24

25

26

27

28

29

30

31

32

33

34

35

36

37

38

39

40

41

42

43

44

45

46

47

48

49

50

51

52

53

54

55

56

57

58

59

60

61

62

63

64

65

66

67

68

69

70

71

72

73

74

75

76

77

78

79

80

81

82

83

84

85

86

87

88

89

<template>

  <workflow

    ref="workflowRef"

    @component-change="getActiveComponent"

    @line-change="getActiveLine"

    main-height="calc(100vh - 160px)">

  </workflow>

</template>


<script setup>

import { ref } from &#39;vue&#39;

import Workflow from &#39;@/components/workflow&#39;

import { commonRequest } from &#39;@/utils/common&#39;

import { ElMessage, ElMessageBox } from &#39;element-plus&#39;

import { useRoute } from &#39;vue-router&#39;


const route = useRoute()


const processId = route.query.processId // || &#39;testca08c433c34046e4bb2a8d3ce3ebc&#39;

const processType = route.query.processType


// 切换的当前节点

const getActiveComponent = (component: Record<string, any>) => {

  console.log(&#39;active component&#39;, component)

}


// 切换的当前连接线

const getActiveLine = (line: Record<string, any>) => {

  console.log(&#39;active line&#39;, line)

}


const workflowRef = ref<InstanceType<typeof Workflow>>()


// 获取配置的节点列表

const getConfig = () => {

  commonRequest(`/workflow/getWorkflowConfig?processType=${processType}`).then((res: Record<string, any>) => {

    // 需要把所有的属性根据name转换成 key - value 形式

    const props: Record<string, any> = {}

    transferOptions(res.result.nodes, props)

    // 设置左侧配置的节点数据

    workflowRef.value?.setConfig(res.result)

    getData(props)

  })

}

// 获取之前已经配置好的数据

const getData = (props: Record<string, any>) => {

  commonRequest(`/workflow/getWfProcess/${processId}`).then((res: Record<string, any>) => {

    // 调整属性,这里是为了当配置列表的节点或者属性有更新,从而更新已配置的节点的属性

    adjustProps(props, res.result.processJson)

    // 设置已配置好的数据,并渲染

    workflowRef.value?.setData(res.result.processJson, res.result.type || &#39;add&#39;)

  })

}


const init = () => {

  if (!processId) {

    ElMessageBox.alert(&#39;当前没有流程id&#39;)

    return

  }

  getConfig()

}

init()


const transferOptions = (nodes: Record<string, any>[], props: Record<string, any>) => {

  nodes?.forEach((node: Record<string, any>) => {

    props[node.name] = node.props

  })

}


const adjustProps = (props: Record<string, any>, nodes: Record<string, any>[]) => {

  nodes.forEach((node: Record<string, any>) => {

    const oldProp: Record<string, any>[] = node.props

    const res = transferKV(oldProp)

    node.props = JSON.parse(JSON.stringify(props[node.name]))

    node.props.forEach((prop: Record<string, any>) => {

      prop.value = res[prop.name]

    })

  })

}


const transferKV = (props: Record<string, any>[]) => {

  const res: Record<string, any> = {}

  props.forEach((prop: Record<string, any>) => {

    res[prop.name] = prop.value

  })

  return res

}

</script>

登录后复制

节点的拖拽与渲染及连接线的绘制

关于节点的拖拽就不多说了,就是 drag 相关的用法,主要是渲染区域的节点和连接线的设计。

这里的渲染区域的思路是:以 canvas 元素作为画布背景,节点是以 div 的方式渲染拖拽进去的节点,拖拽的位置将是以 canvas 的相对位置来移动,大概的结构如下:

1

2

3

4

5

6

7

8

9

10

11

12

13

14

15

16

17

18

<template>

    <!-- 渲染区域的祖先元素 -->

    <div>

        <!-- canvas 画布,绝对于父级元素定位, inset: 0; -->

        <canvas></canvas>

        <!-- 节点列表渲染的父级元素,绝对于父级元素定位, inset: 0; -->

        <div>

            <!-- 节点1,绝对于父级元素定位 -->

            <div></div>

            <!-- 节点2,绝对于父级元素定位 -->

            <div></div>

            <!-- 节点3,绝对于父级元素定位 -->

            <div></div>

            <!-- 节点4,绝对于父级元素定位 -->

            <div></div>

        </div>

    </div>

</template>

登录后复制

而连接线的绘制是根据 next 字段的信息,查找到 targetComponentId 组件的位置,然后在canvas上做两点间的 线条绘制。

链接的类型分为3种: 直线,折线,曲线

  • 直线

直线的绘制最为简单,取两个点连接就行。

1

2

3

4

5

6

7

8

9

10

11

12

13

14

15

// 绘制直线

const drawStraightLine = (

  ctx: CanvasRenderingContext2D,

  points: [number, number][],

  highlight?: boolean

) => {

  ctx.beginPath()

  ctx.moveTo(points[0][0], points[0][1])

  ctx.lineTo(points[1][0], points[1][1])

  // 是否是当前选中的连接线,当前连接线高亮

  shadowLine(ctx, highlight)

  ctx.stroke()

  ctx.restore()

  ctx.closePath()

}

登录后复制

3.gif

  • 折线

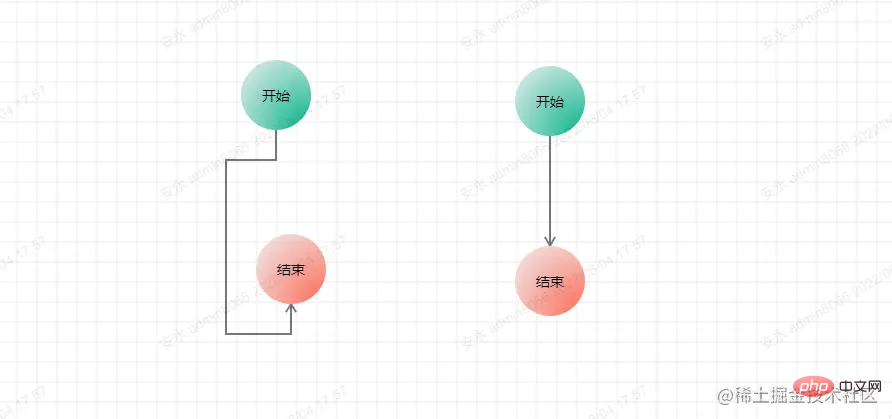
折线的方式比较复杂,因为折线需要尽可能的不要把连接线和节点重合,所以它要判断每一种连接线的场景,还有两个节点的宽度和高度也需要考虑计算。如下:
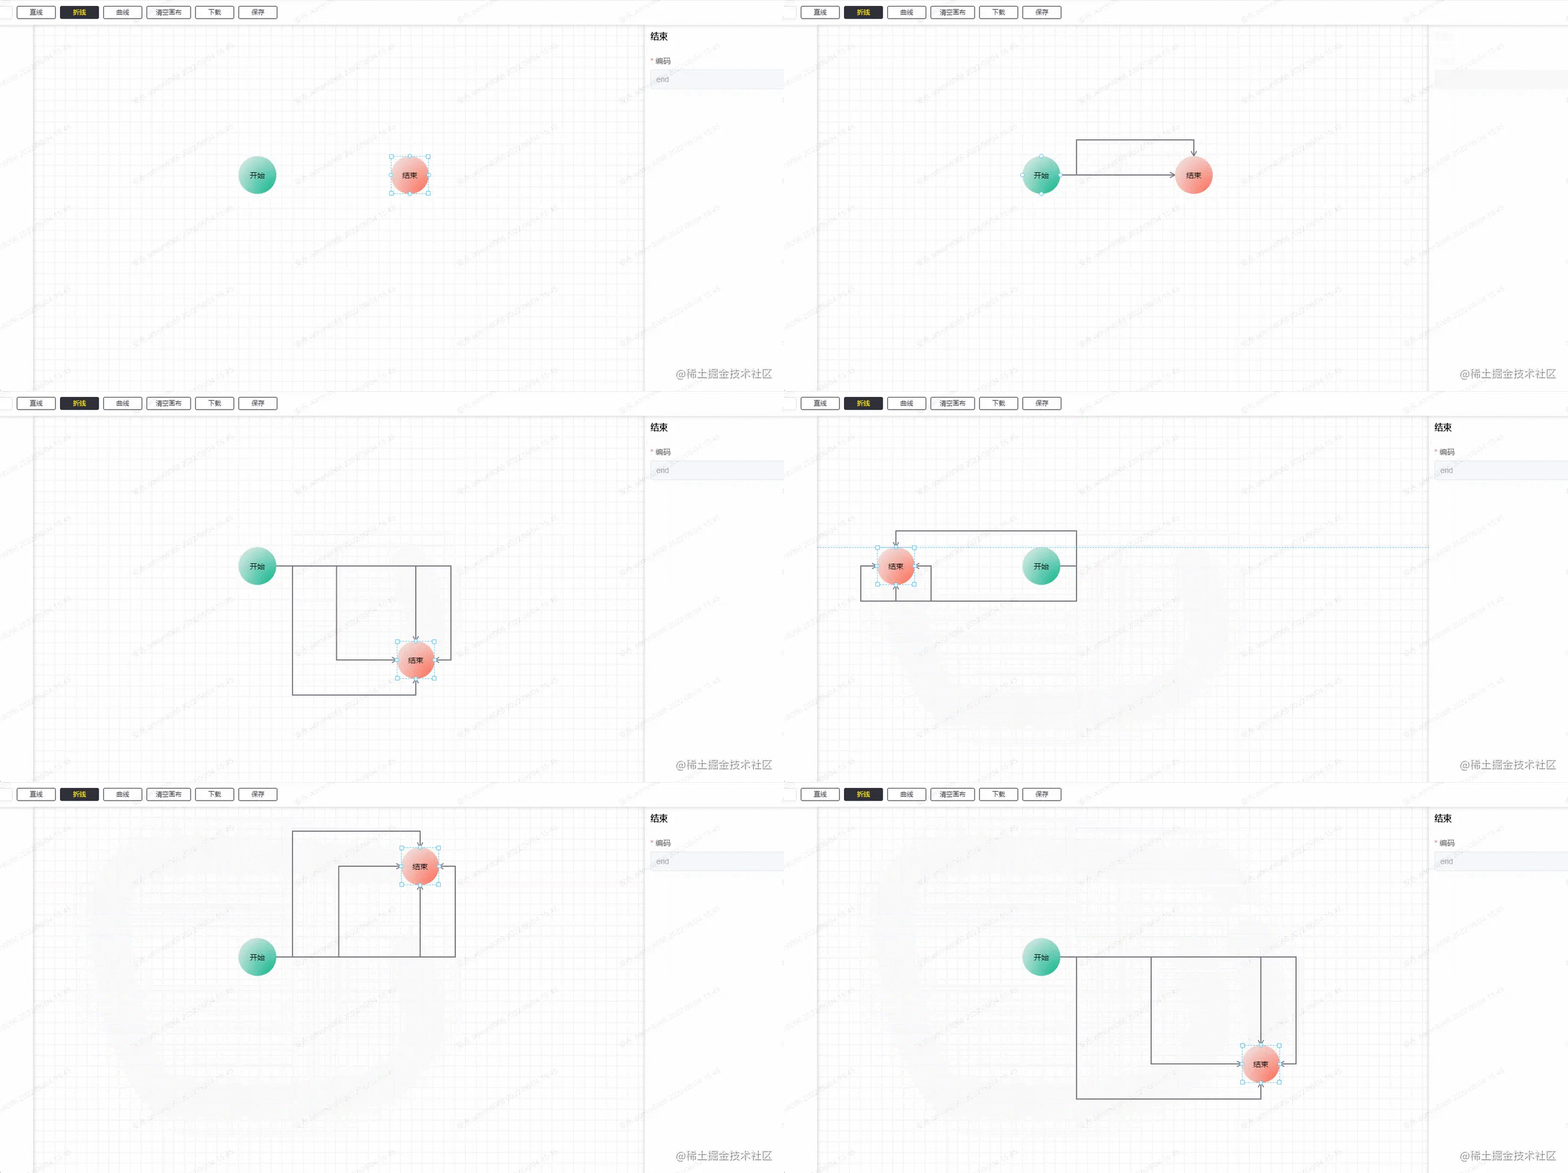
4.gif

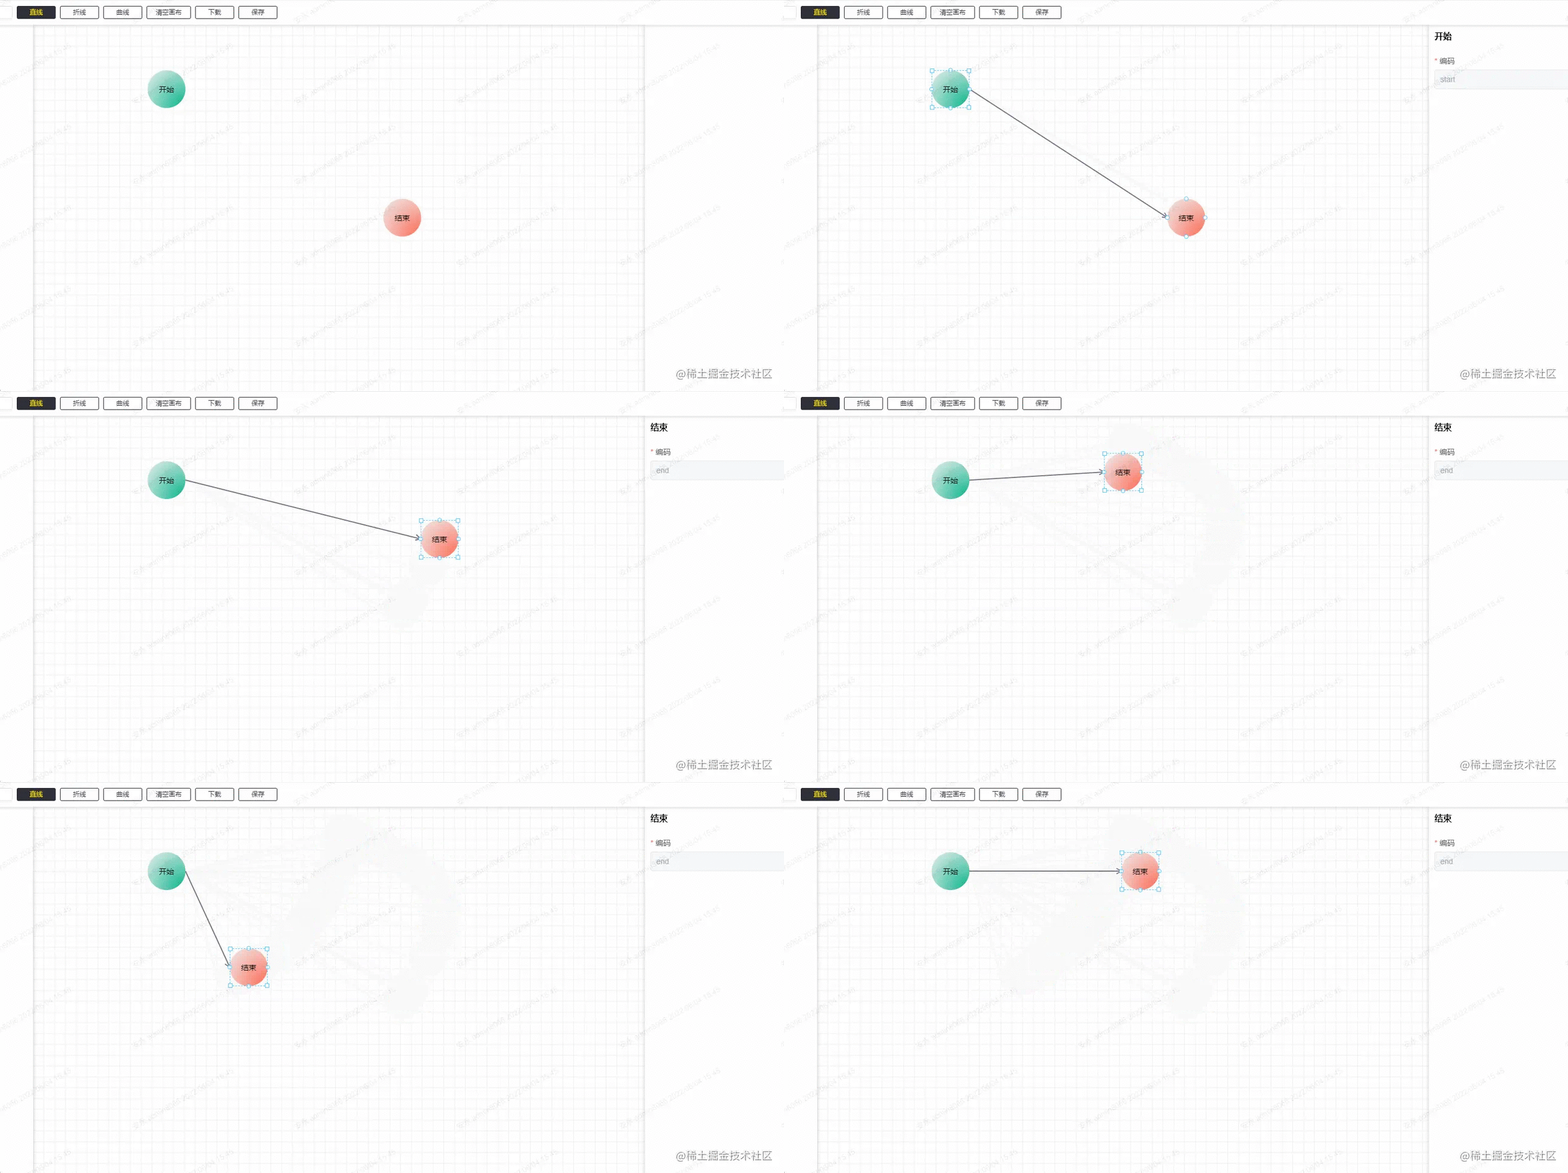
起始节点有四个方向,目标节点也有四个方向,还有目标节点相对于起始节点有四个象限,所以严格来说,总共有 4 * 4 * 4 = 64 种场景。这些场景中的折线点也不一样,最多的有 4 次, 最少的折 0 次,单求出这 64 种坐标点就用了 700 行代码。
5.png

最后的绘制方法与直线一样:

1

2

3

4

5

6

7

8

9

10

11

12

// 绘制折线

const drawBrokenLine = ({ ctx, points }: WF.DrawLineType, highlight?: boolean) => {

  ctx.beginPath()

  ctx.moveTo(points[0][0], points[0][1])

  for (let i = 1; i < points.length; i++) {

    ctx.lineTo(points[i][0], points[i][1])

  }

  shadowLine(ctx, highlight)

  ctx.stroke()

  ctx.restore()

  ctx.closePath()

}

登录后复制
  • 曲线

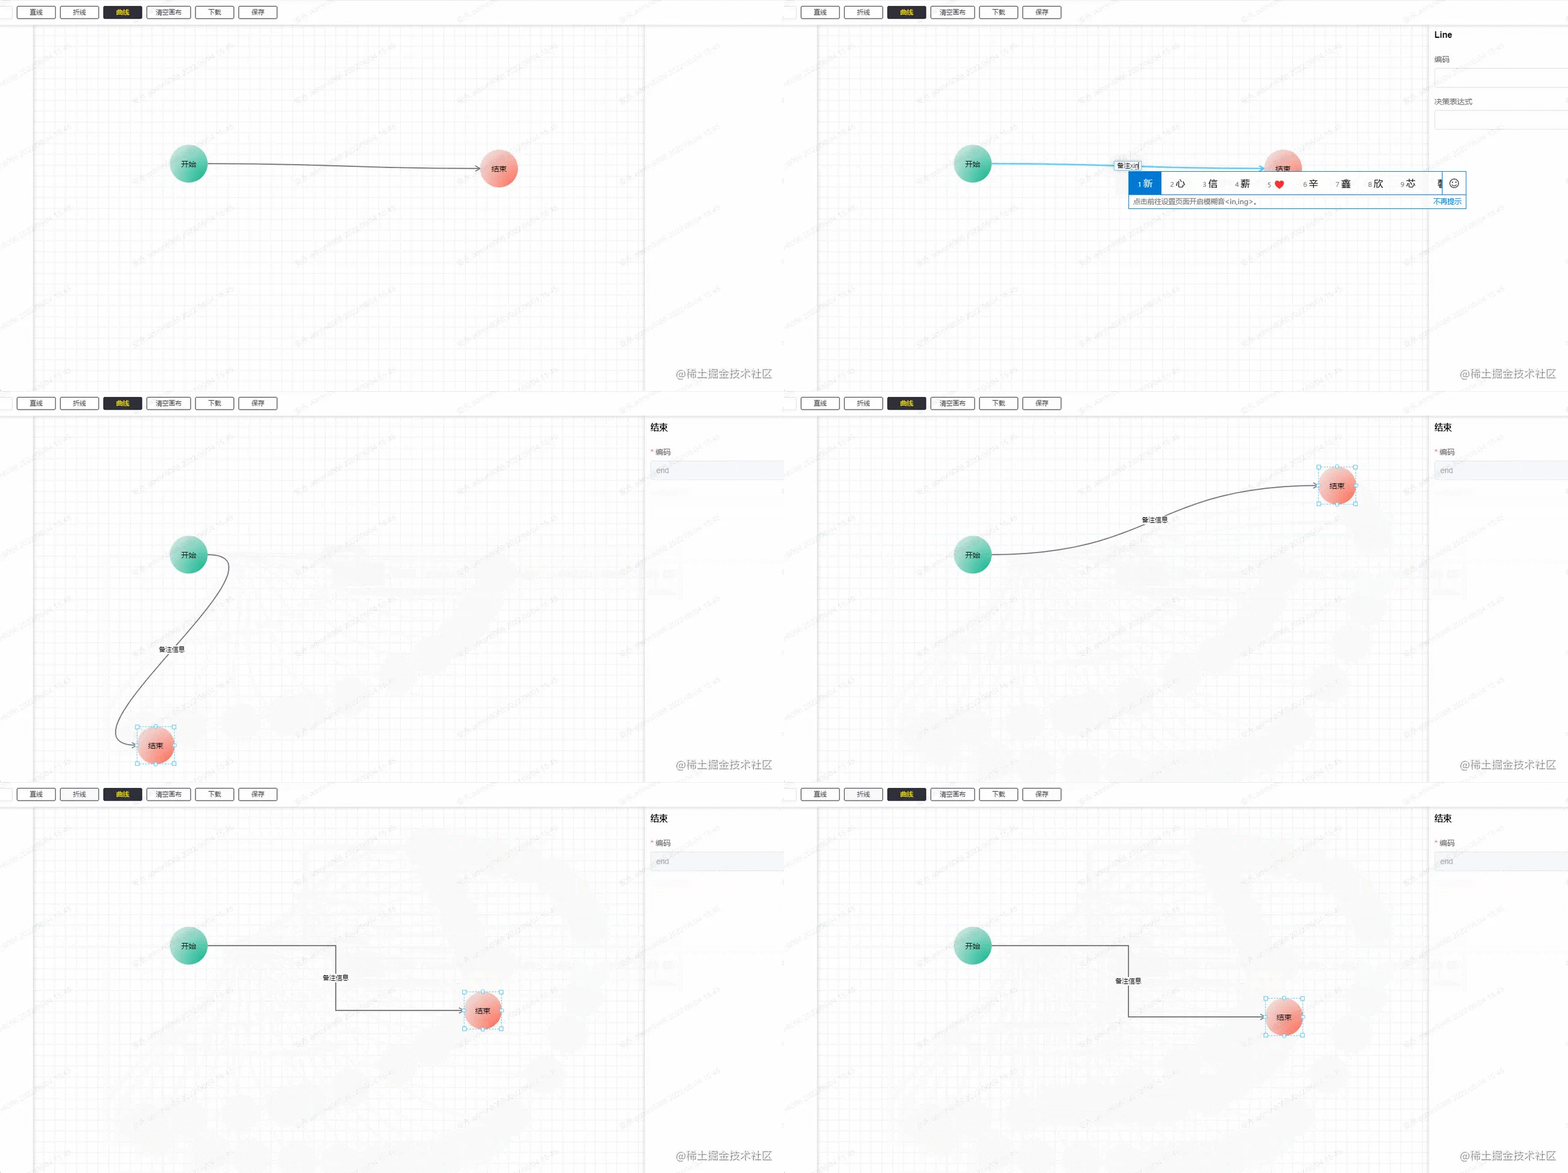
曲线相对于折线来说,思路会简单很多,不需要考虑折线这么多场景。

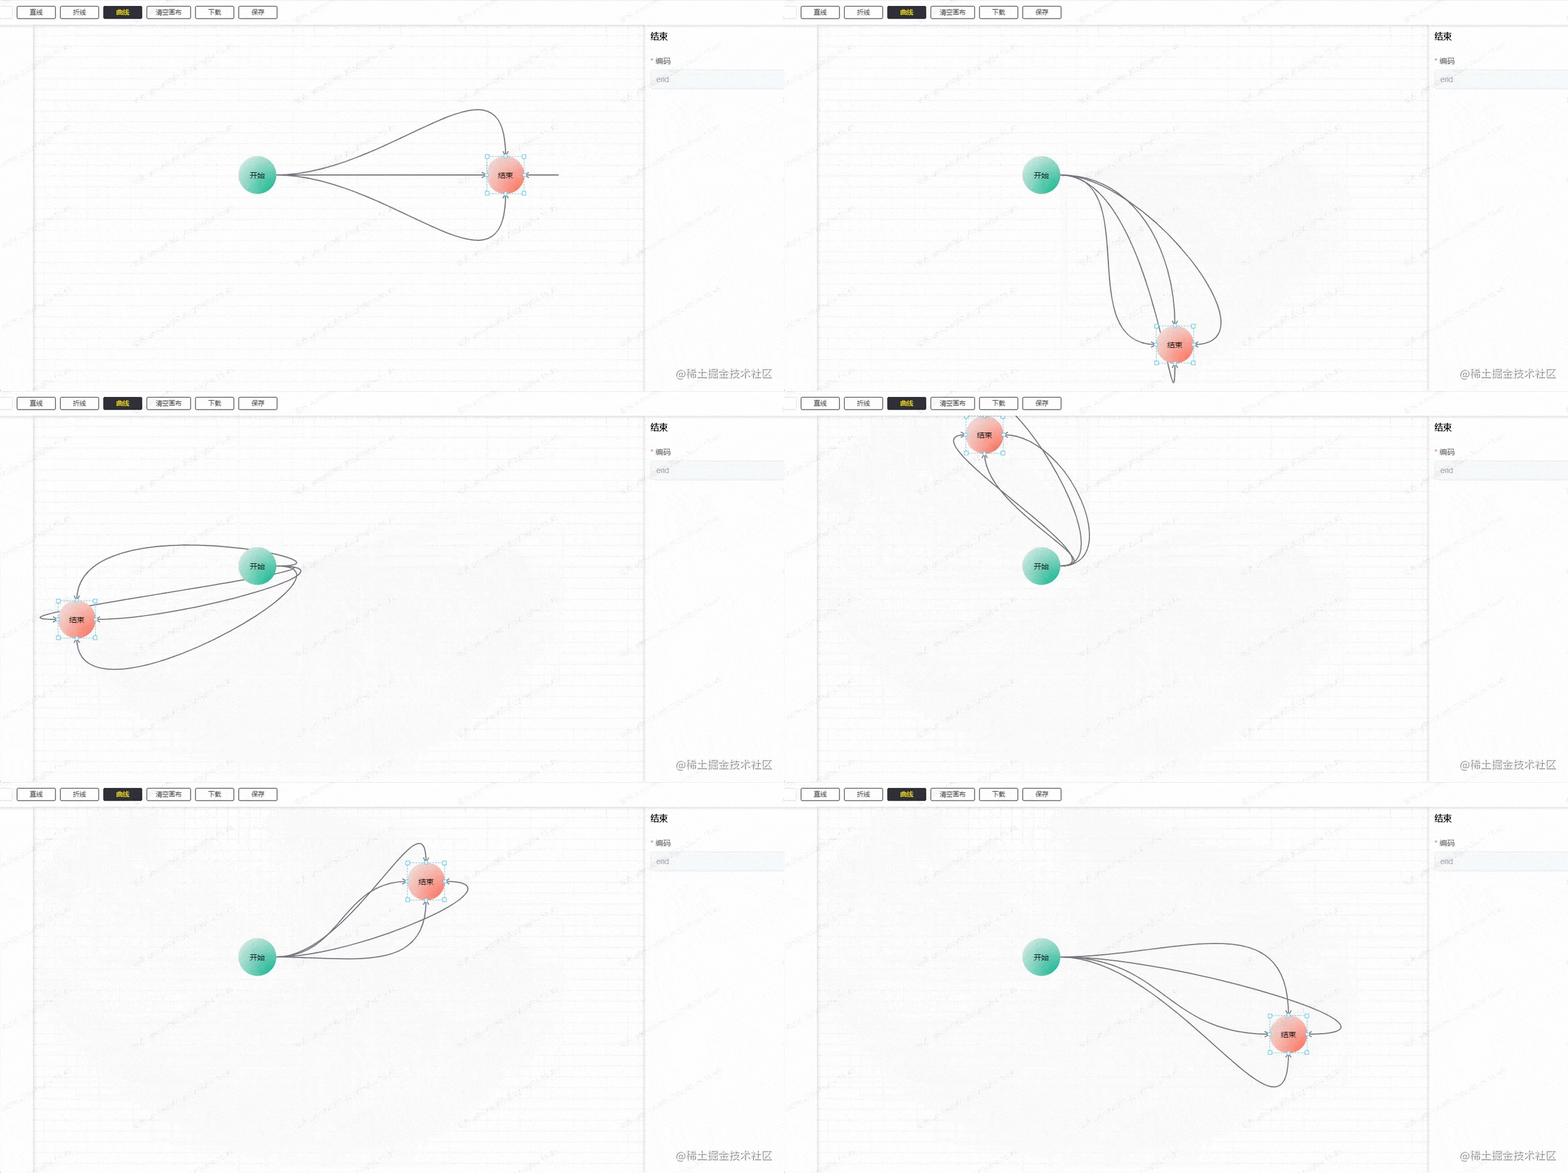
6 (1).gif

这里的折线是用三阶的贝塞尔曲线来绘制的,固定的取四个点,两个起止点,两个控制点,其中两个起止点是固定的,我们只需要求出两个控制点的坐标即可。这里代码不多,可以直接贴出来:

1

2

3

4

5

6

7

8

9

10

11

12

13

14

15

16

17

18

19

20

21

22

23

24

25

26

27

28

29

30

31

32

33

34

35

36

37

38

39

40

41

/**

 * Description: 计算三阶贝塞尔曲线的坐标

 */

import WF from &#39;../type&#39;


const coeff = 0.5

export default function calcBezierPoints({ startDire, startx, starty, destDire, destx, desty }: WF.CalcBezierType,

  points: [number, number][]) {


  const p = Math.max(Math.abs(destx - startx), Math.abs(desty - starty)) * coeff

  switch (startDire) {

    case &#39;down&#39;:

      points.push([startx, starty + p])

      break

    case &#39;up&#39;:

      points.push([startx, starty - p])

      break

    case &#39;left&#39;:

      points.push([startx - p, starty])

      break

    case &#39;right&#39;:

      points.push([startx + p, starty])

      break

    // no default

  }

  switch (destDire) {

    case &#39;down&#39;:

      points.push([destx, desty + p])

      break

    case &#39;up&#39;:

      points.push([destx, desty - p])

      break

    case &#39;left&#39;:

      points.push([destx - p, desty])

      break

    case &#39;right&#39;:

      points.push([destx + p, desty])

      break

    // no default

  }

}

登录后复制

简单一点来说,第一个控制点是根据起始点来算的,第二个控制点是跟根据结束点来算的。算的方式是根据当前点相对于节点的方向,继续往前算一段距离,而这段距离是根据起止两个点的最大相对距离的一半(可能有点绕...)。

绘制方法:

1

2

3

4

5

6

7

8

9

10

11

12

// 绘制贝塞尔曲线

const drawBezier = ({ ctx, points }: WF.DrawLineType, highlight?: boolean) => {

  ctx.beginPath()

  ctx.moveTo(points[0][0], points[0][1])

  ctx.bezierCurveTo(

    points[1][0], points[1][1], points[2][0], points[2][1], points[3][0], points[3][1]

  )

  shadowLine(ctx, highlight)

  ctx.stroke()

  ctx.restore()

  ctx.globalCompositeOperation = &#39;source-over&#39;    //目标图像上显示源图像

}

登录后复制

节点与连接线的选择

节点是用 div 来渲染的,所以节点的选择可以忽略,然后就是连接点的选择,首先第一点是鼠标在移动的时候都要判断鼠标的当前位置下面是否有连接线,所以这里就有 3 种判断方法,呃... 严格来说是两种,因为折线是多条直线,所以是按直线的判断方法来。

1

2

3

4

5

6

7

8

9

10

11

12

13

14

15

16

17

18

19

20

21

22

23

24

25

26

27

28

29

30

31

32

33

34

35

36

37

38

39

40

// 判断当前鼠标位置是否有线

export const isAboveLine = (offsetX: number, offsetY: number, points: WF.LineInfo[]) => {

  for (let i = points.length - 1; i >= 0; --i) {

    const innerPonints = points[i].points

    let pre: [number, number], cur: [number, number]

    // 非曲线判断方法

    if (points[i].type !== &#39;bezier&#39;) {

      for (let j = 1; j < innerPonints.length; j++) {

        pre = innerPonints[j - 1]

        cur = innerPonints[j]

        if (getDistance([offsetX, offsetY], pre, cur) < 20) {

          return points[i]

        }

      }

    } else {

      // 先用 x 求出对应的 t,用 t 求相应位置的 y,再比较得出的 y 与 offsetY 之间的差值

      const tsx = getBezierT(innerPonints[0][0], innerPonints[1][0], innerPonints[2][0], innerPonints[3][0], offsetX)

      for (let x = 0; x < 3; x++) {

        if (tsx[x] <= 1 && tsx[x] >= 0) {

          const ny = getThreeBezierPoint(tsx[x], innerPonints[0], innerPonints[1], innerPonints[2], innerPonints[3])

          if (Math.abs(ny[1] - offsetY) < 8) {

            return points[i]

          }

        }

      }

      // 如果上述没有结果,则用 y 求出对应的 t,再用 t 求出对应的 x,与 offsetX 进行匹配

      const tsy = getBezierT(innerPonints[0][1], innerPonints[1][1], innerPonints[2][1], innerPonints[3][1], offsetY)

      for (let y = 0; y < 3; y++) {

        if (tsy[y] <= 1 && tsy[y] >= 0) {

          const nx = getThreeBezierPoint(tsy[y], innerPonints[0], innerPonints[1], innerPonints[2], innerPonints[3])

          if (Math.abs(nx[0] - offsetX) < 8) {

            return points[i]

          }

        }

      }

    }

  }


  return false

}

登录后复制

直线的判断方法是点到线段的距离:

1

2

3

4

5

6

7

8

9

10

11

12

13

14

15

16

17

18

19

20

21

22

23

24

25

26

27

28

29

/**

 * 求点到线段的距离

 * @param {number} pt 直线外的点

 * @param {number} p 直线内的点1

 * @param {number} q 直线内的点2

 * @returns {number} 距离

 */

function getDistance(pt: [number, number], p: [number, number], q: [number, number]) {

  const pqx = q[0] - p[0]

  const pqy = q[1] - p[1]

  let dx = pt[0] - p[0]

  let dy = pt[1] - p[1]

  const d = pqx * pqx + pqy * pqy   // qp线段长度的平方

  let t = pqx * dx + pqy * dy     // p pt向量 点积 pq 向量(p相当于A点,q相当于B点,pt相当于P点)

  if (d > 0) {  // 除数不能为0; 如果为零 t应该也为零。下面计算结果仍然成立。                  

    t /= d      // 此时t 相当于 上述推导中的 r。

  }

  if (t < 0) {  // 当t(r)< 0时,最短距离即为 pt点 和 p点(A点和P点)之间的距离。

    t = 0

  } else if (t > 1) { // 当t(r)> 1时,最短距离即为 pt点 和 q点(B点和P点)之间的距离。

    t = 1

  }


  // t = 0,计算 pt点 和 p点的距离; t = 1, 计算 pt点 和 q点 的距离; 否则计算 pt点 和 投影点 的距离。

  dx = p[0] + t * pqx - pt[0]

  dy = p[1] + t * pqy - pt[1]


  return dx * dx + dy * dy

}

登录后复制

关于曲线的判断方法比较复杂,这里就不多介绍, 想了解的可以去看这篇:如何判断一个坐标点是否在三阶贝塞尔曲线附近

连接线还有一个功能就是双击连接线后可以编辑这条连接线的备注信息。这个备注信息的位置是在当前连接线的中心点位置。所以我们需要求出中心点,这个相对简单。

1

2

3

4

5

6

7

8

9

10

11

12

13

14

15

16

17

18

19

20

21

22

23

24

25

26

27

28

29

30

31

32

33

34

35

36

37

38

39

40

41

42

43

// 获取一条直线的中点坐标

const getStraightLineCenterPoint = ([[x1, y1], [x2, y2]]: [number, number][]): [number, number] => {

  return [(x1 + x2) / 2, (y1 + y2) / 2]

}


// 获取一条折线的中点坐标

const getBrokenCenterPoint = (points: [number, number][]): [number, number] => {

  const lineDistancehalf = getLineDistance(points) >> 1


  let distanceSum = 0, pre = 0, tp: [number, number][] = [], distance = 0


  for (let i = 1; i < points.length; i++) {

    pre = getTwoPointDistance(points[i - 1], points[i])

    if (distanceSum + pre > lineDistancehalf) {

      tp = [points[i - 1], points[i]]

      distance = lineDistancehalf - distanceSum

      break

    }

    distanceSum += pre

  }


  if (!tp.length) {

    return [0, 0]

  }


  let x = tp[0][0], y = tp[0][1]


  if (tp[0][0] === tp[1][0]) {

    if (tp[0][1] > tp[1][1]) {

      y -= distance

    } else {

      y += distance

    }

  } else {

    if (tp[0][0] > tp[1][0]) {

      x -= distance

    } else {

      x += distance

    }

  }


  return [x, y]

}

登录后复制

曲线的中心点位置,可以直接拿三阶贝塞尔曲线公式求出

1

2

3

4

5

6

7

8

9

10

11

12

13

14

15

16

17

18

19

20

21

22

23

24

25

26

27

28

29

30

31

32

33

34

35

36

37

38

// 获取三阶贝塞尔曲线的中点坐标

const getBezierCenterPoint = (points: [number, number][]) => {

  return getThreeBezierPoint(

    0.5, points[0], points[1], points[2], points[3]

  )

}


/**

 * @desc 获取三阶贝塞尔曲线的线上坐标

 * @param {number} t 当前百分比

 * @param {Array} p1 起点坐标

 * @param {Array} p2 终点坐标

 * @param {Array} cp1 控制点1

 * @param {Array} cp2 控制点2

 */

export const getThreeBezierPoint = (

  t: number,

  p1: [number, number],

  cp1: [number, number],

  cp2: [number, number],

  p2: [number, number]

): [number, number] => {

  const [x1, y1] = p1

  const [x2, y2] = p2

  const [cx1, cy1] = cp1

  const [cx2, cy2] = cp2

  const x =

    x1 * (1 - t) * (1 - t) * (1 - t) +

    3 * cx1 * t * (1 - t) * (1 - t) +

    3 * cx2 * t * t * (1 - t) +

    x2 * t * t * t

  const y =

    y1 * (1 - t) * (1 - t) * (1 - t) +

    3 * cy1 * t * (1 - t) * (1 - t) +

    3 * cy2 * t * t * (1 - t) +

    y2 * t * t * t

  return [x | 0, y | 0]

}

登录后复制

在算出每一条的中心点位置后,在目标位置添加备注信息即可:

7.gif

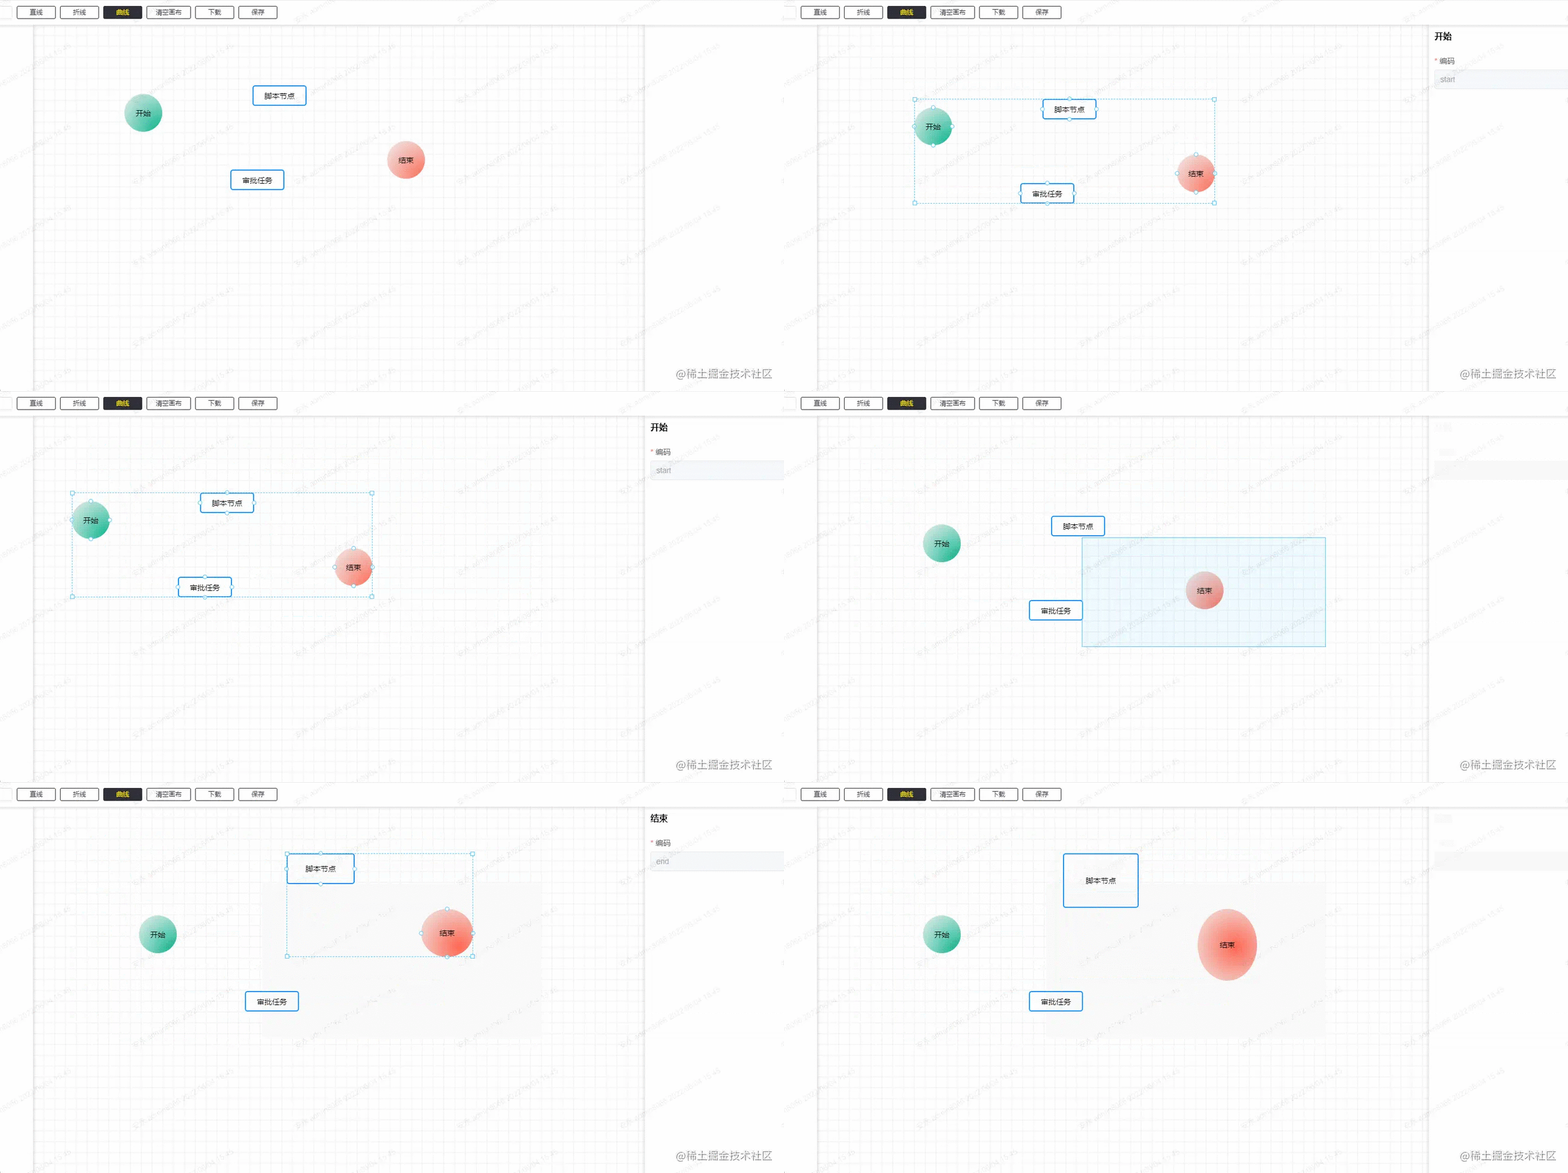
节点的样式调整

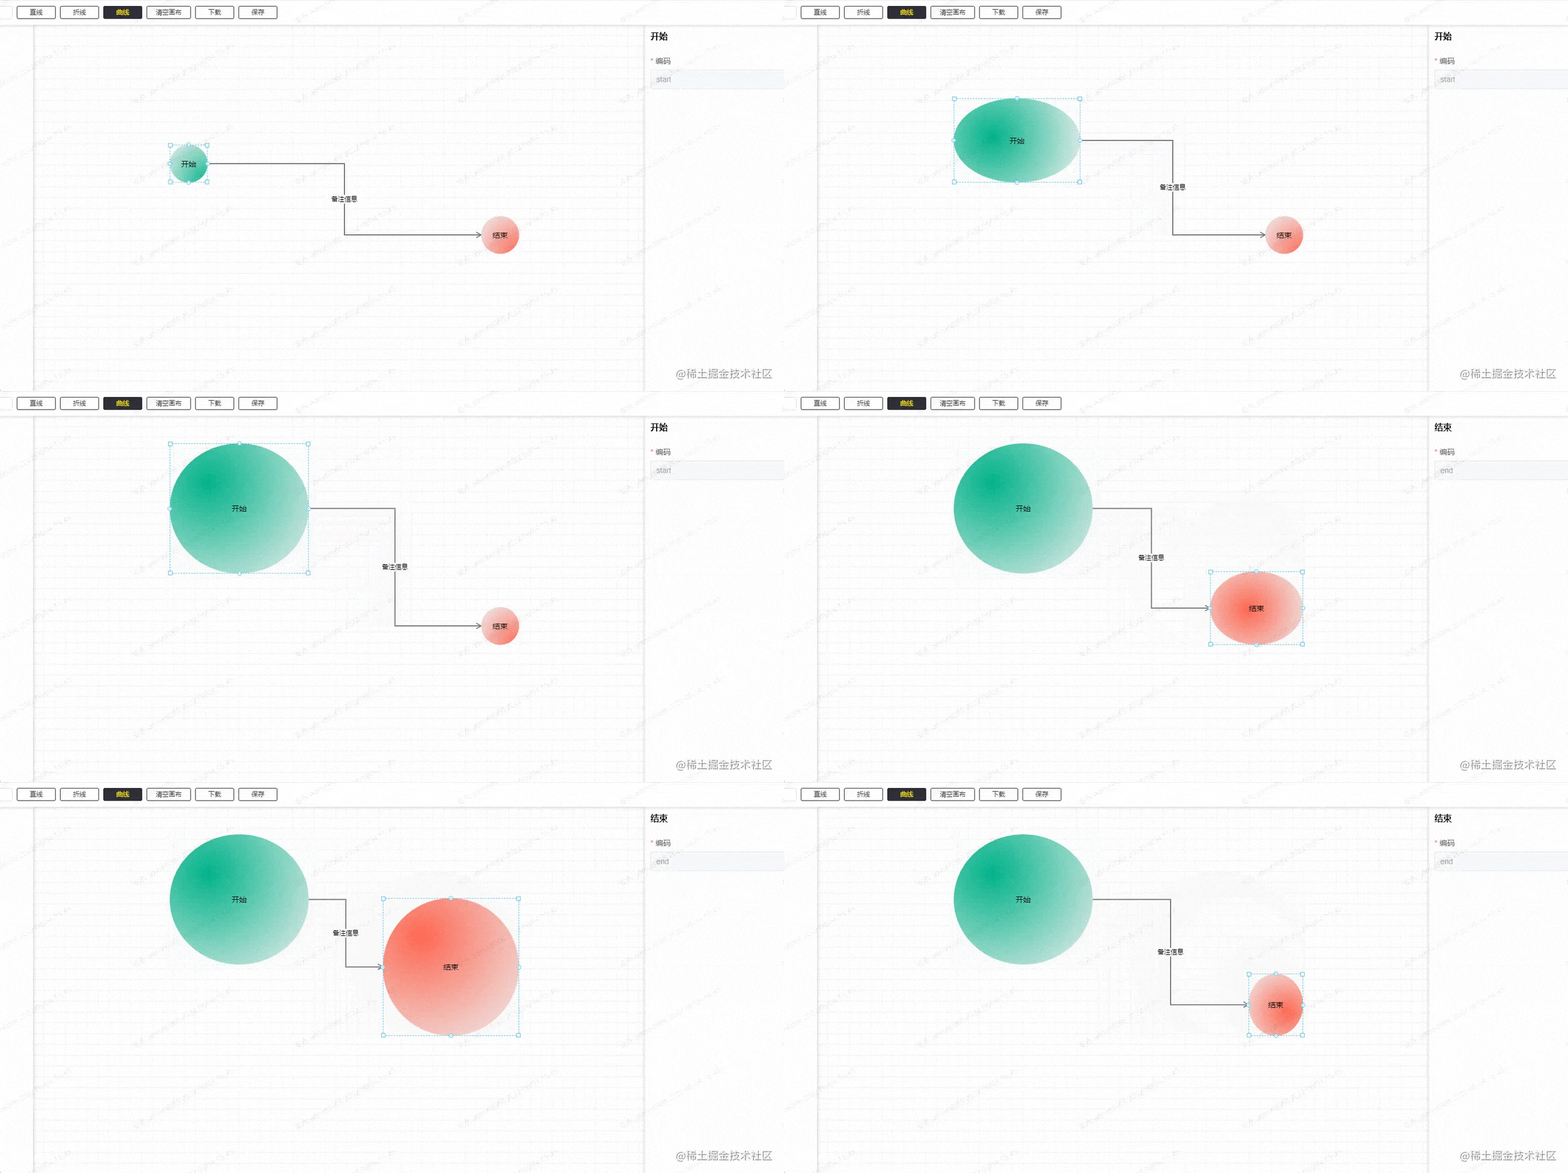
节点的样式调整主要是位置及大小,而这些属性就是节点里面的 attr,在相应的事件下根据鼠标移动的方向及位置,来调整节点的样式。
8 (1).gif

还有批量操作也是同样,不过批量操作是要先计算出哪些节点的范围。

1

2

3

4

5

6

7

8

9

10

11

12

13

14

15

16

17

18

19

20

21

22

23

24

25

26

27

28

29

30

31

32

33

// 获取范围选中内的组件

export const getSelectedComponent = (componentList: WF.ComponentType[], areaPosi: WF.Attr) => {

  let selectedArea: WF.Attr | null = null

  let minx = Infinity, miny = Infinity, maxx = -Infinity, maxy = -Infinity

  const selectedComponents = componentList.filter((component: WF.ComponentType) => {


    const res = areaPosi.x <= component.attr.x &&

      areaPosi.y <= component.attr.y &&

      areaPosi.x + areaPosi.w >= component.attr.x + component.attr.w &&

      areaPosi.y + areaPosi.h >= component.attr.y + component.attr.h


    if (res) {

      minx = Math.min(minx, component.attr.x)

      miny = Math.min(miny, component.attr.y)

      maxx = Math.max(maxx, component.attr.x + component.attr.w)

      maxy = Math.max(maxy, component.attr.y + component.attr.h)

    }

    return res

  })


  if (selectedComponents.length) {

    selectedArea = {

      x: minx,

      y: miny,

      w: maxx - minx,

      h: maxy - miny

    }

    return {

      selectedArea, selectedComponents

    }

  }

  return null

}

登录后复制

9.gif

这个有个小功能没有做,就是在批量调整大小的时候,节点间的相对距离应该是不动的,这里忽略了。

节点移动时的吸附

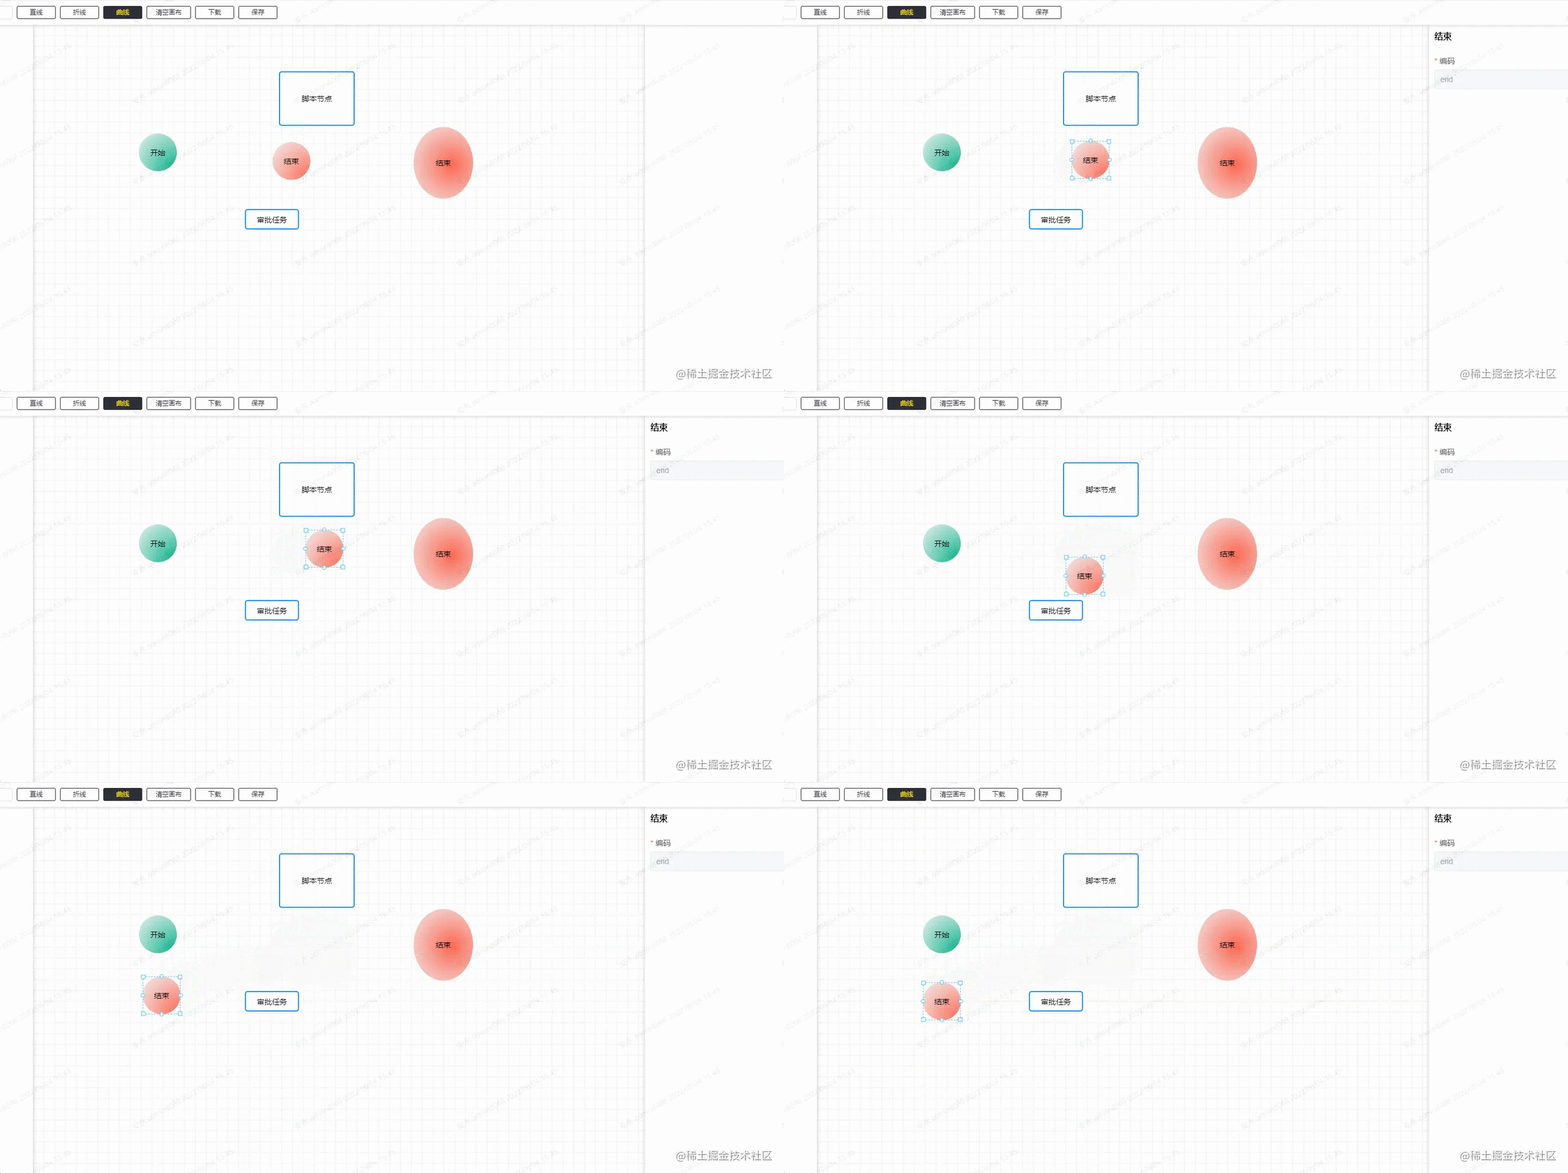
这里的吸附功能其实是做了一个简单版的,就是 x 和 y 轴都只有一条校准线,且校准的优先级是从左至右,从上至下。
10.gif

这里吸附的标准是节点的 6 个点:X 轴的左中右,Y 轴的上中下,当前节点在移动的时候,会用当前节点的 6 个点,一一去与其它节点的 6 个点做比较,在误差正负 2px 的情况,自动更新为0,即自定对齐。

因为移动当前节点时候,其它的节点是不动的,所以这里是做了一步预处理,即在鼠标按下去的时候,把其它的节点的 6 个点都线算出来,用 Set 结构保存,在移动的过程的比较中,计算量会相对较少。

1

2

3

4

5

6

7

8

9

10

11

12

13

14

15

16

17

18

19

20

21

22

// 计算其它节点的所有点位置

export const clearupPostions = (componentList: WF.ComponentType[], currId: string) => {

  // x 坐标集合

  const coordx = new Set<number>()

  // y 坐标集合

  const coordy = new Set<number>()


  componentList.forEach((component: WF.ComponentType) => {

    if (component.id === currId) {

      return

    }

    const { x, y, w, h } = component.attr

    coordx.add(x)

    coordx.add(x + (w >> 1))

    coordx.add(x + w)

    coordy.add(y)

    coordy.add(y + (h >> 1))

    coordy.add(y + h)

  })


  return [coordx, coordy]

}

登录后复制

判读是否有可吸附的点

1

2

3

4

5

6

7

8

9

10

11

12

13

14

15

16

17

18

19

20

21

22

23

24

25

26

27

28

29

30

31

32

33

34

35

36

37

38

39

40

41

42

43

44

45

46

47

48

49

50

51

52

53

54

55

56

57

58

59

60

61

62

63

64

65

66

67

68

69

70

71

72

73

74

75

76

77

78

79

80

81

82

// 可吸附范围

const ADSORBRANGE = 2

// 查询是否有可吸附坐标

const hasAdsorbable = (

  coords: Set<number>[], x: number, y: number, w: number, h: number

) => {

  // x, y, w, h, w/2, h/2

  const coord: (number | null)[] = [null, null, null, null, null, null]

  // 查询 x 坐标

  for (let i = 0; i <= ADSORBRANGE; i++) {

    if (coords[0].has(x + i)) {

      coord[0] = i

      break

    }

    if (coords[0].has(x - i)) {

      coord[0] = -i

      break

    }

  }


  // 查询 y 坐标

  for (let i = 0; i <= ADSORBRANGE; i++) {

    if (coords[1].has(y + i)) {

      coord[1] = i

      break

    }

    if (coords[1].has(y - i)) {

      coord[1] = -i

      break

    }

  }


  // 查询 x + w 坐标

  for (let i = 0; i <= ADSORBRANGE; i++) {

    if (coords[0].has(x + w + i)) {

      coord[2] = i

      break

    }

    if (coords[0].has(x + w - i)) {

      coord[2] = -i

      break

    }

  }


  // 查询 y + h 坐标

  for (let i = 0; i <= ADSORBRANGE; i++) {

    if (coords[1].has(y + h + i)) {

      coord[3] = i

      break

    }

    if (coords[1].has(y + h - i)) {

      coord[3] = -i

      break

    }

  }


  // 查询 x + w/2 坐标

  for (let i = 0; i <= ADSORBRANGE; i++) {

    if (coords[0].has(x + (w >> 1) + i)) {

      coord[4] = i

      break

    }

    if (coords[0].has(x + (w >> 1) - i)) {

      coord[4] = -i

      break

    }

  }


  // 查询 y + h/2 坐标

  for (let i = 0; i <= ADSORBRANGE; i++) {

    if (coords[1].has(y + (h >> 1) + i)) {

      coord[5] = i

      break

    }

    if (coords[1].has(y + (h >> 1) - i)) {

      coord[5] = -i

      break

    }

  }


  return coord

}

登录后复制

最后更新状态。

1

2

3

4

5

6

7

8

9

10

11

12

13

14

15

16

17

18

19

20

21

22

23

24

25

26

27

28

29

30

31

32

33

34

35

36

37

// 获取修正后的 x, y,还有吸附线的状态

export const getAdsordXY = (

  coords: Set<number>[], x: number, y: number, w: number, h: number

) => {

  const vals = hasAdsorbable(

    coords, x, y, w, h

  )


  let linex = null

  let liney = null


  if (vals[0] !== null) { // x

    x += vals[0]

    linex = x

  } else if (vals[2] !== null) { // x + w

    x += vals[2]

    linex = x + w

  } else if (vals[4] !== null) { // x + w/2

    x += vals[4]

    linex = x + (w >> 1)

  }


  if (vals[1] !== null) { // y

    y += vals[1]

    liney = y

  } else if (vals[3] !== null) { // y + h

    y += vals[3]

    liney = y + h

  } else if (vals[5] !== null) { // y + h/2

    y += vals[5]

    liney = y + (h >> 1)

  }


  return {

    x, y, linex, liney

  }

}

登录后复制

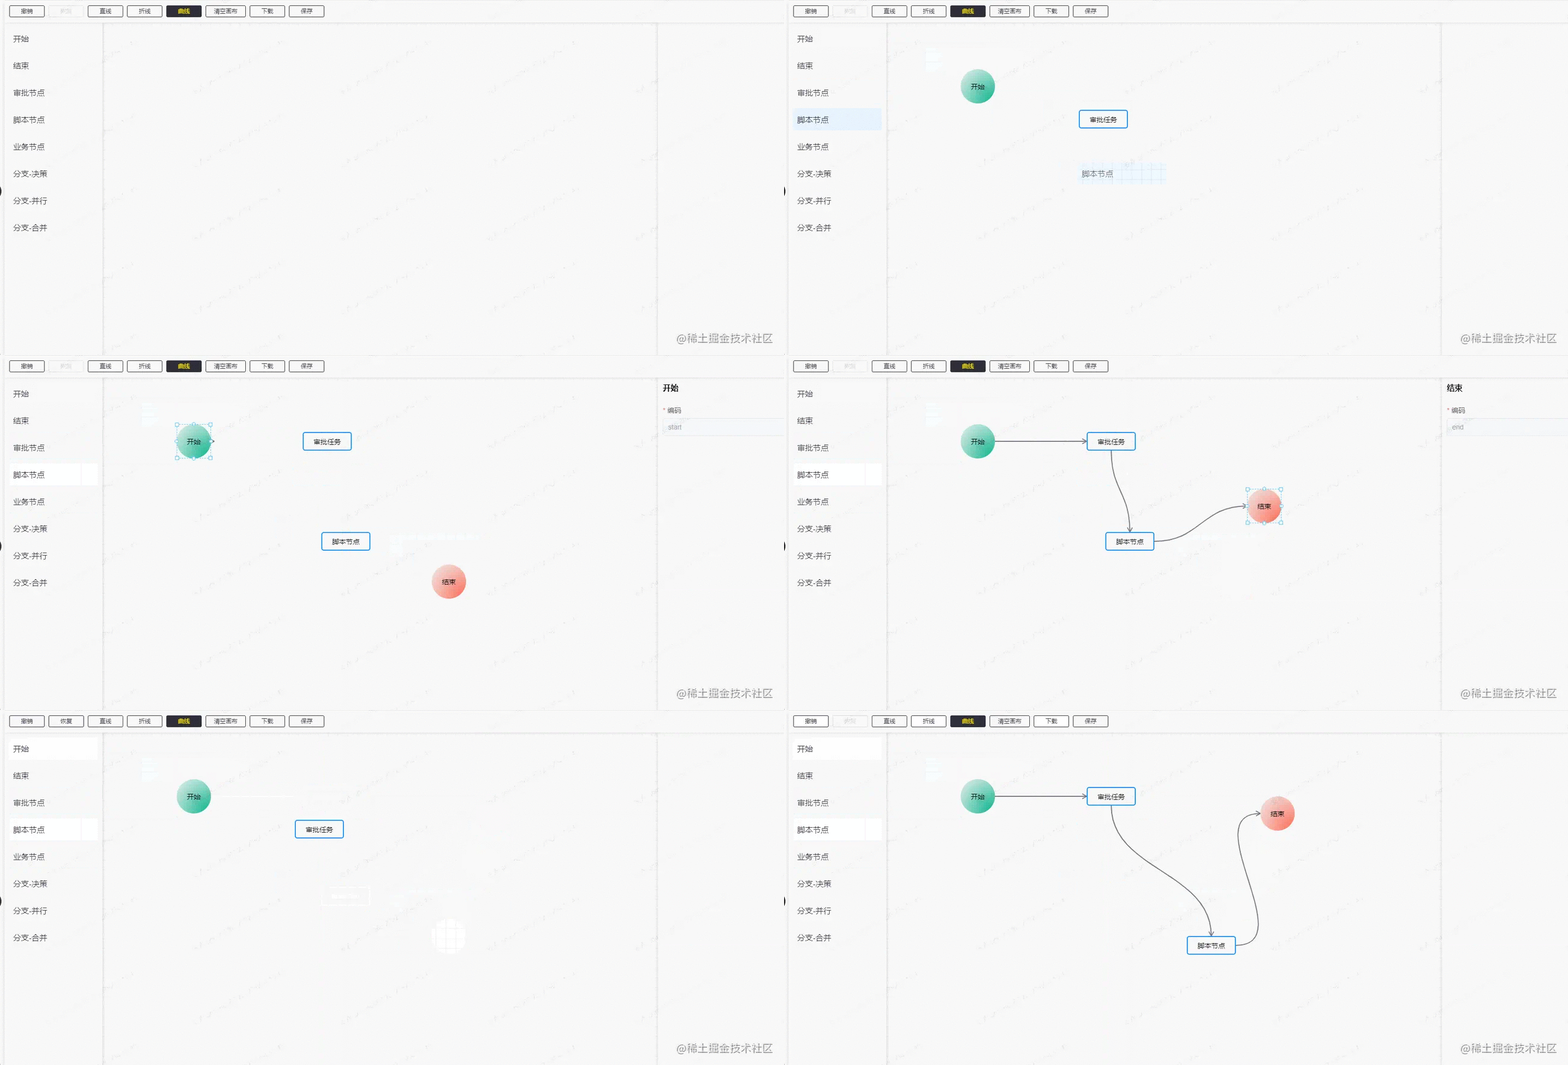
撤销和恢复

撤销和恢复的功能是比较简单的,其实就是用栈来保存每一次需要保存的配置结构,就是要考虑哪些操作是可以撤销和恢复的,就是像节点移动,节点的新增和删除,连接线的连接,连接线的备注新增和编辑等等,在相关的操作下面入栈即可。

1

2

3

4

5

6

7

8

9

10

11

12

13

14

15

16

17

18

19

20

21

22

23

24

25

// 撤销和恢复操作

const cacheComponentList = ref<WF.ComponentType[][]>([])

const currentComponentIndex = ref(-1)

// 撤销

const undo = () => {

  componentRenderList.value = JSON.parse(JSON.stringify(cacheComponentList.value[--currentComponentIndex.value]))

  // 更新视图

  updateCanvas(true)

  cancelSelected()

}

// 恢复

const redo = () => {

  componentRenderList.value = JSON.parse(JSON.stringify(cacheComponentList.value[++currentComponentIndex.value]))

  // 更新视图

  updateCanvas(true)

  cancelSelected()

}

// 缓存入栈

const chacheStack = () => {

  if (cacheComponentList.value.length - 1 > currentComponentIndex.value) {

    cacheComponentList.value.length = currentComponentIndex.value + 1

  }

  cacheComponentList.value.push(JSON.parse(JSON.stringify(componentRenderList.value)))

  currentComponentIndex.value++

}

登录后复制

11.gif

最后

这里主要的已经差不多都写了,其实最红还有一个挺有用的功能还没有做。就是改变已经绘制的连接线的起止点。

这里的思路是:先选中需要改变起止点的连接线,然后把鼠标移动到起止点的位置,将它从已经绘制的状态改为正在绘制的状态,然后再选择它的开始位置或者结束位置。这个后面看情况吧,有空就加上。

(学习视频分享:web前端开发编程基础视频

以上是手把手带你利用vue3.x绘制流程图的详细内容。更多信息请关注PHP中文网其他相关文章!

本站声明
本文内容由网友自发贡献,版权归原作者所有,本站不承担相应法律责任。如您发现有涉嫌抄袭侵权的内容,请联系admin@php.cn

热AI工具

Undresser.AI Undress

Undresser.AI Undress

人工智能驱动的应用程序,用于创建逼真的裸体照片

AI Clothes Remover

AI Clothes Remover

用于从照片中去除衣服的在线人工智能工具。

Undress AI Tool

Undress AI Tool

免费脱衣服图片

Clothoff.io

Clothoff.io

AI脱衣机

AI Hentai Generator

AI Hentai Generator

免费生成ai无尽的。

热门文章

R.E.P.O.能量晶体解释及其做什么(黄色晶体)
1 个月前 By 尊渡假赌尊渡假赌尊渡假赌
R.E.P.O.最佳图形设置
1 个月前 By 尊渡假赌尊渡假赌尊渡假赌
R.E.P.O.如果您听不到任何人,如何修复音频
1 个月前 By 尊渡假赌尊渡假赌尊渡假赌
R.E.P.O.聊天命令以及如何使用它们
1 个月前 By 尊渡假赌尊渡假赌尊渡假赌

热工具

记事本++7.3.1

记事本++7.3.1

好用且免费的代码编辑器

SublimeText3汉化版

SublimeText3汉化版

中文版,非常好用

禅工作室 13.0.1

禅工作室 13.0.1

功能强大的PHP集成开发环境

Dreamweaver CS6

Dreamweaver CS6

视觉化网页开发工具

SublimeText3 Mac版

SublimeText3 Mac版

神级代码编辑软件(SublimeText3)

vue.js vs.反应:特定于项目的考虑因素 vue.js vs.反应:特定于项目的考虑因素 Apr 09, 2025 am 12:01 AM

Vue.js适合中小型项目和快速迭代,React适用于大型复杂应用。1)Vue.js易于上手,适用于团队经验不足或项目规模较小的情况。2)React的生态系统更丰富,适合有高性能需求和复杂功能需求的项目。

vue怎么给按钮添加函数 vue怎么给按钮添加函数 Apr 08, 2025 am 08:51 AM

可以通过以下步骤为 Vue 按钮添加函数:将 HTML 模板中的按钮绑定到一个方法。在 Vue 实例中定义该方法并编写函数逻辑。

vue中怎么用bootstrap vue中怎么用bootstrap Apr 07, 2025 pm 11:33 PM

在 Vue.js 中使用 Bootstrap 分为五个步骤:安装 Bootstrap。在 main.js 中导入 Bootstrap。直接在模板中使用 Bootstrap 组件。可选:自定义样式。可选:使用插件。

vue.js怎么引用js文件 vue.js怎么引用js文件 Apr 07, 2025 pm 11:27 PM

在 Vue.js 中引用 JS 文件的方法有三种:直接使用 &lt;script&gt; 标签指定路径;利用 mounted() 生命周期钩子动态导入;通过 Vuex 状态管理库进行导入。

vue中的watch怎么用 vue中的watch怎么用 Apr 07, 2025 pm 11:36 PM

Vue.js 中的 watch 选项允许开发者监听特定数据的变化。当数据发生变化时,watch 会触发一个回调函数,用于执行更新视图或其他任务。其配置选项包括 immediate,用于指定是否立即执行回调,以及 deep,用于指定是否递归监听对象或数组的更改。

vue返回上一页的方法 vue返回上一页的方法 Apr 07, 2025 pm 11:30 PM

Vue.js 返回上一页有四种方法:$router.go(-1)$router.back()使用 &lt;router-link to=&quot;/&quot;&gt; 组件window.history.back(),方法选择取决于场景。

vue多页面开发是啥意思 vue多页面开发是啥意思 Apr 07, 2025 pm 11:57 PM

Vue 多页面开发是一种使用 Vue.js 框架构建应用程序的方法,其中应用程序被划分为独立的页面:代码维护性:将应用程序拆分为多个页面可以使代码更易于管理和维护。模块化:每个页面都可以作为独立的模块,便于重用和替换。路由简单:页面之间的导航可以通过简单的路由配置来管理。SEO 优化:每个页面都有自己的 URL,这有助于搜索引擎优化。

怎样查询vue的版本 怎样查询vue的版本 Apr 07, 2025 pm 11:24 PM

可以通过以下方法查询 Vue 版本:使用 Vue Devtools 在浏览器的控制台中查看“Vue”选项卡。使用 npm 运行“npm list -g vue”命令。在 package.json 文件的“dependencies”对象中查找 Vue 项。对于 Vue CLI 项目,运行“vue --version”命令。检查 HTML 文件中引用 Vue 文件的 &lt;script&gt; 标签中的版本信息。

See all articles