聊聊如何使用MemFire Cloud构建Angular应用程序
如何构建Angular应用程序?下面本篇文章给大家介绍一下使用MemFire Cloud构建Angular应用程序的方法,希望对大家有所帮助!

【相关教程推荐:《angular教程》】
MemFire Cloud是一款提供云数据库,用户可以创建云数据库,并对数据库进行管理,还可以对数据库进行备份操作。它还提供后端即服务,用户可以在1分钟内新建一个应用,使用自动生成的API和SDK,访问云数据库、对象存储、用户认证与授权等功能,可专注于编写前端应用程序代码,加速WEB或APP应用开发。
学习视频地址: www.bilibili.com/video/BV1wt…
此示例提供了使用 MemFire Cloud 和 angular构建简单用户管理应用程序(从头开始)的步骤。这包括:
- MemFire Cloud云数据库:用于存储用户数据的 MemFireDB数据库。
- MemFire Cloud用户验证:用户可以使用魔法链接登录(只需要电子邮件,不需要密码)。
- MemFire Cloud存储:用户可以上传照片。
- 行级安全策略:数据受到保护,因此个人只能访问自己的数据。
- 即时API:创建数据库表时会自动生成 API。
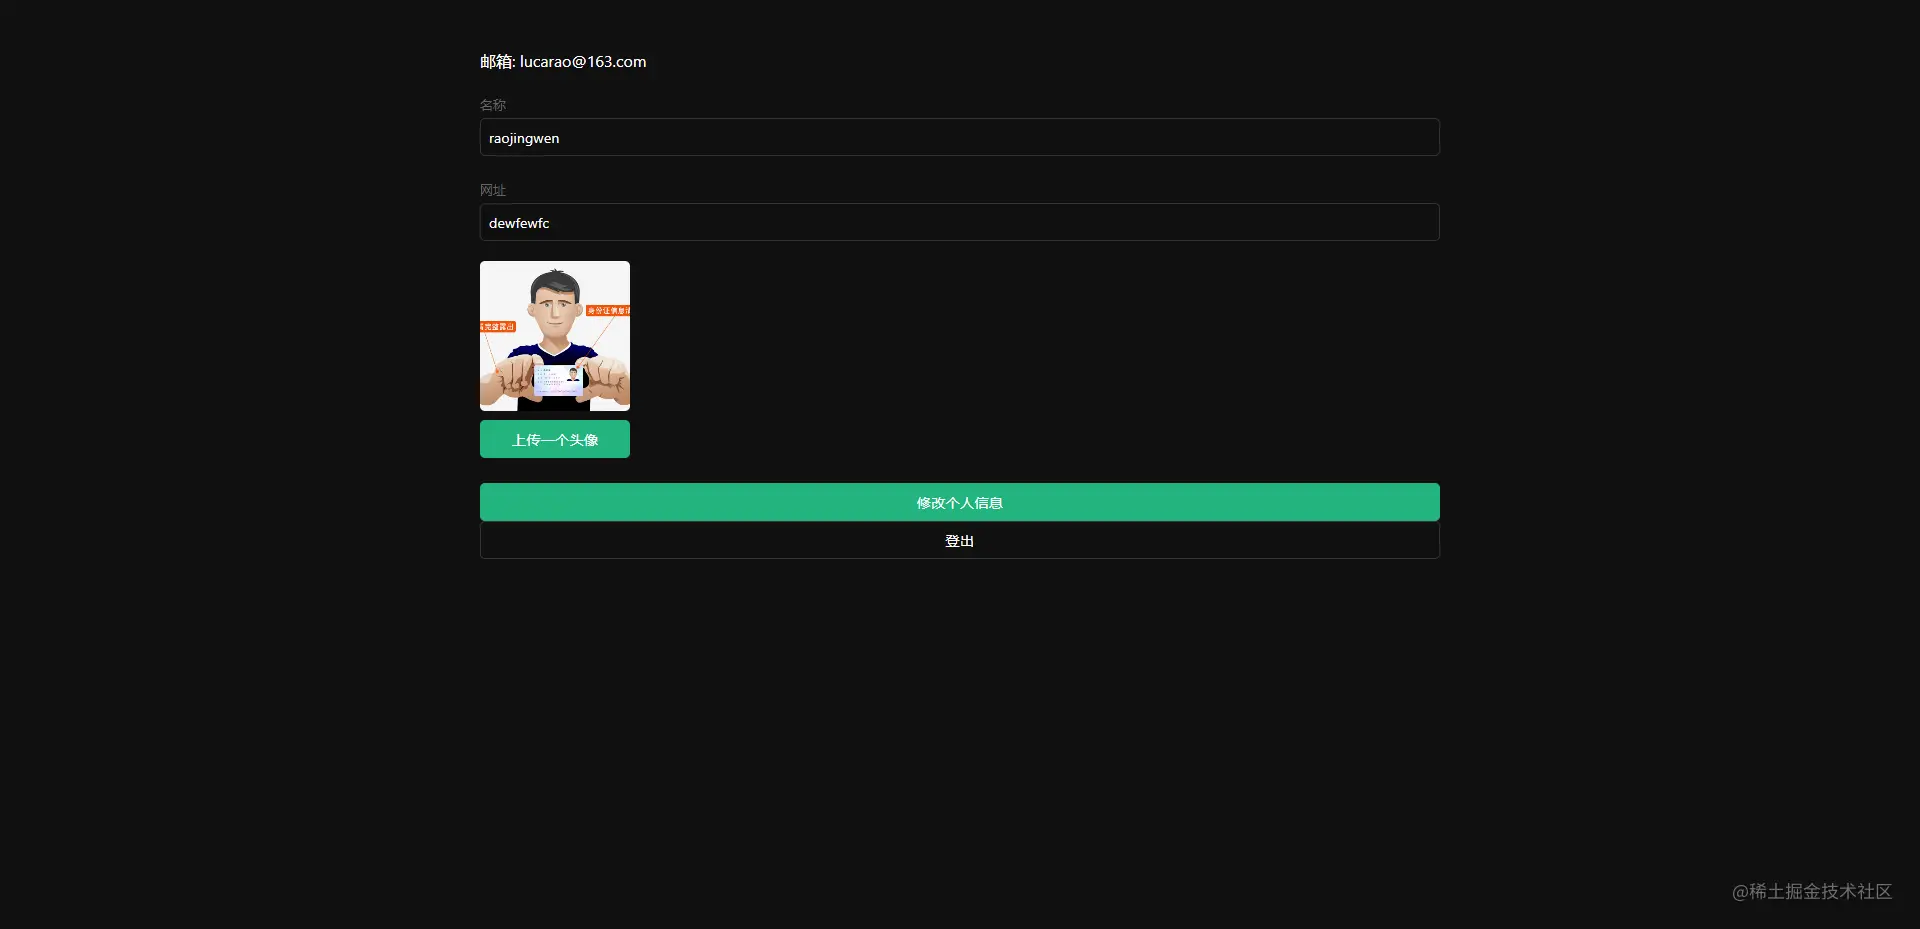
在本指南结束时,您将拥有一个允许用户登录和更新一些基本个人资料详细信息的应用程序:
创建应用
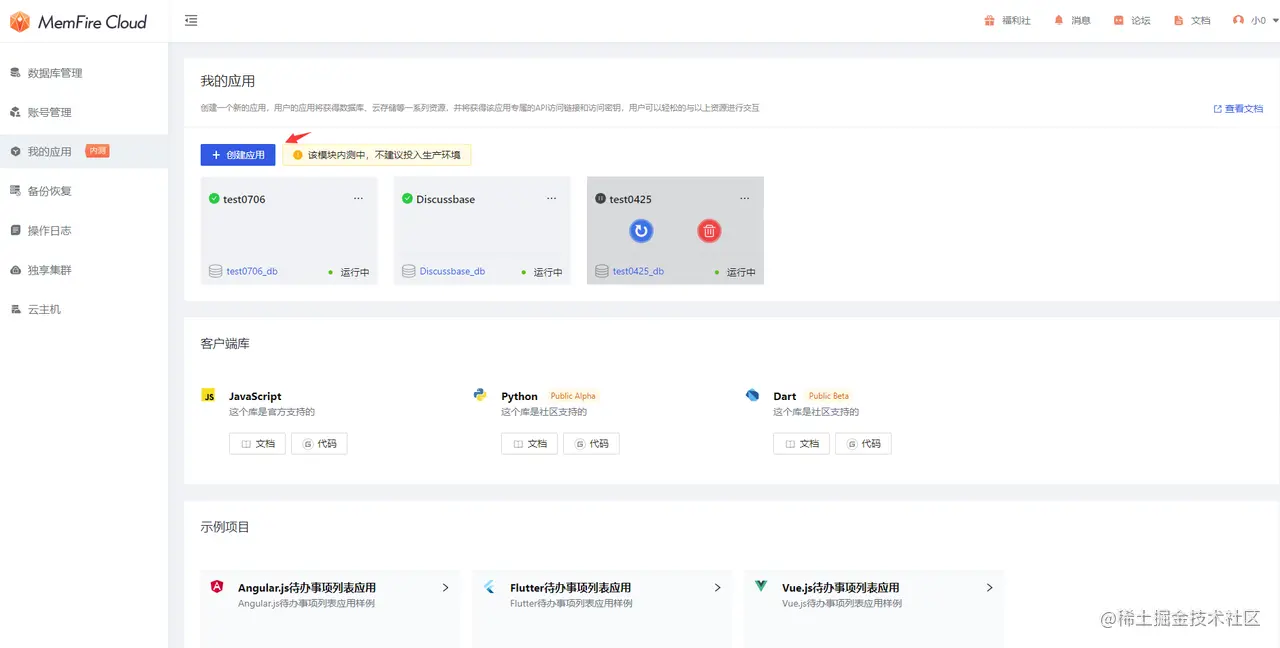
目的:我们的应用就是通过在这里创建的应用来获得数据库、云存储等一系列资源,并获得该应用专属的API访问链接和访问密钥,用户可以轻松的与以上资源进行交互。
登录cloud.memfiredb.com/auth/login 创建应用
创建数据表
点击应用,视图化创建数据表
1、创建profiles表;
在数据表页面,点击“新建数据表”,页面配置如下:
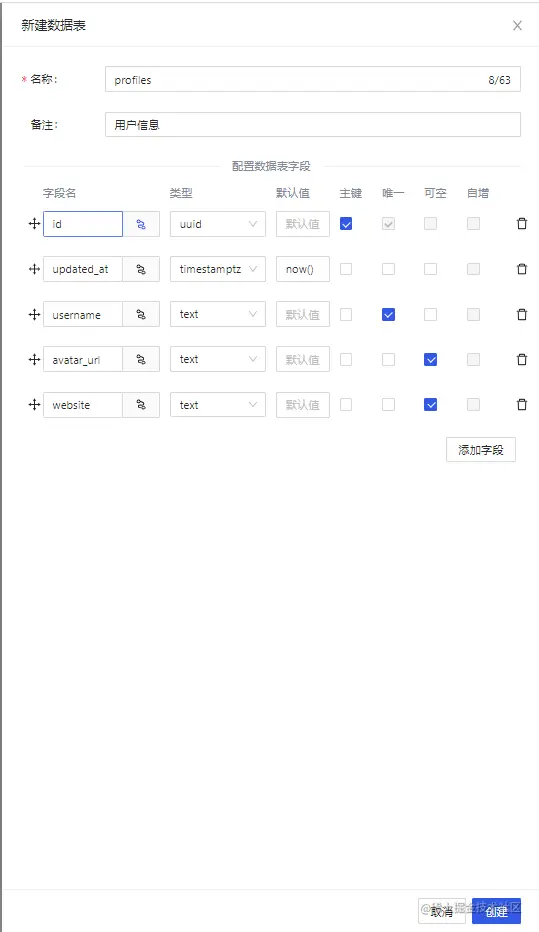
其中profiles表字段id和auth.users表中的id字段(uuid类型)外键关联。
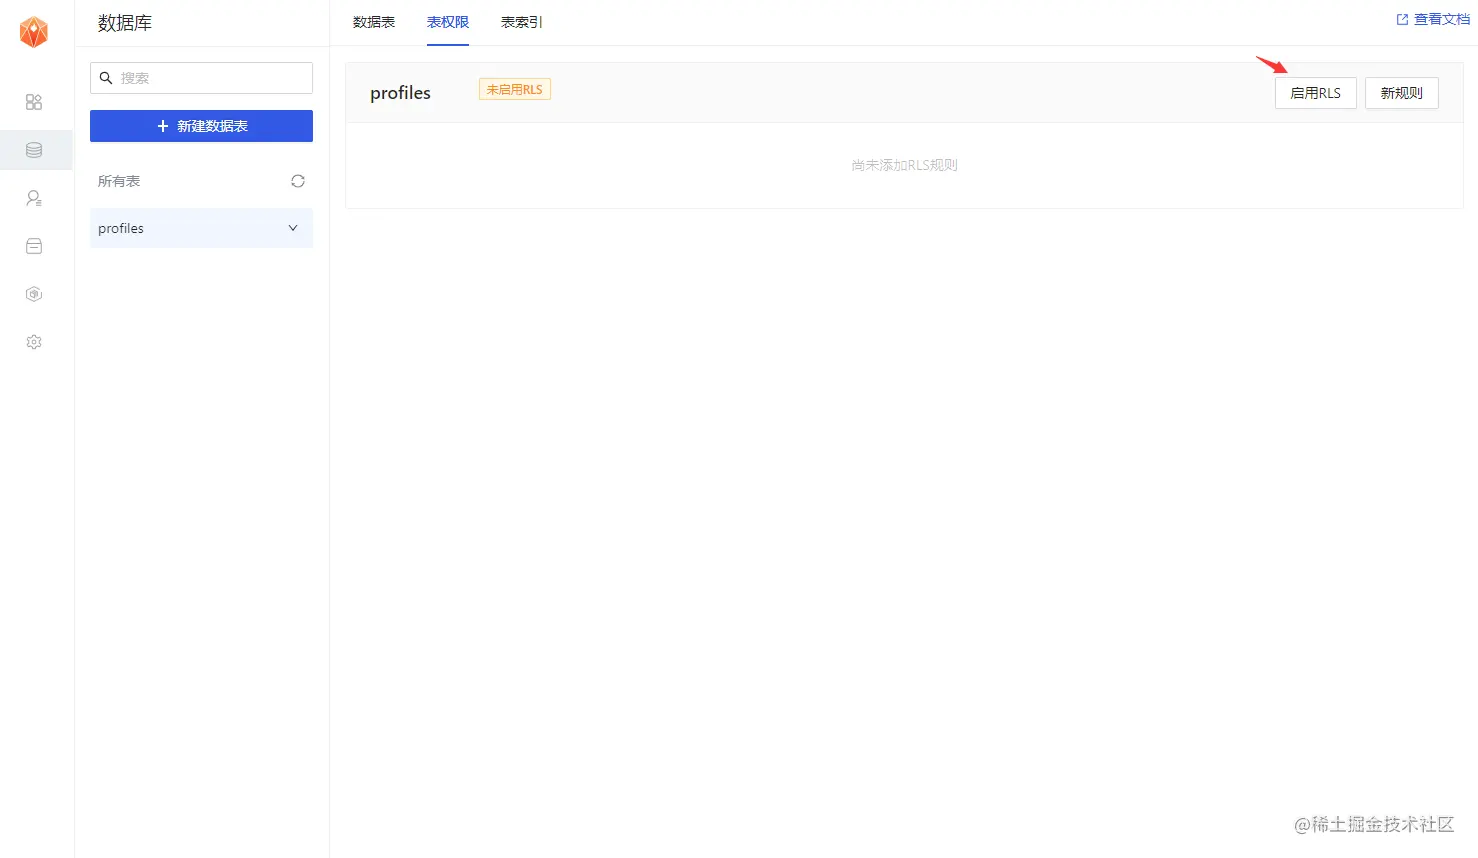
2、开启Profiles的RLS数据安全访问规则;
选中创建的Profiles表,点击表权限栏,如下图所示,点击"启用RLS"按钮
3、允许每个用户可以查看公共的个人信息资料;
点击"新规则"按钮,在弹出弹框中,选择"为所有用户启用访问权限",输入策略名称,选择"SELECT(查询)"操作,点击“创建策略”按钮,如下图。
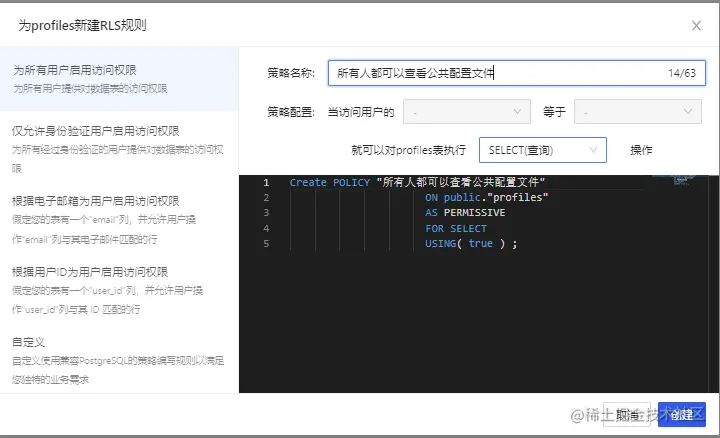
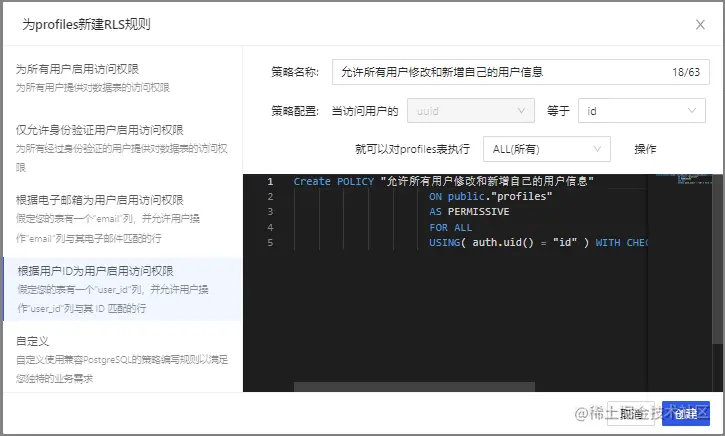
4、仅允许用户增删改查本人的个人资料信息;
点击"新规则"按钮,在弹出弹框中,选择"根据用户ID为用户启用访问权限",输入策略名称,选择"ALL(所有)"操作,点击“创建策略”按钮,如下图。
创建avatars存储桶
创建云存储的存储桶,用来存储用户的头像图片,涉及操作包括:
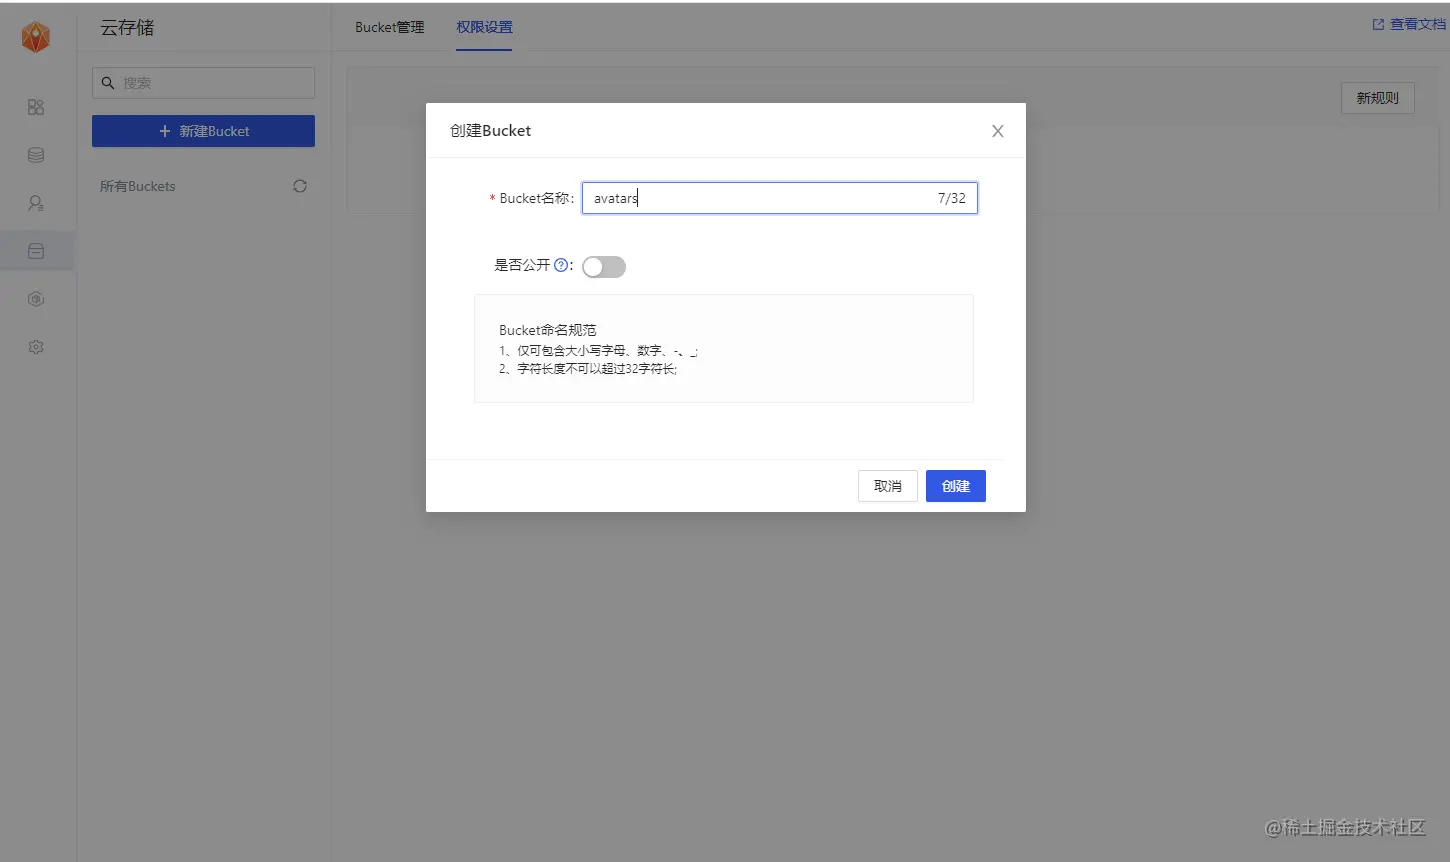
1、创建一个存储桶avatars
在该应用的云存储导航栏,点击“新建Bucket”按钮,创建存储桶avatars。
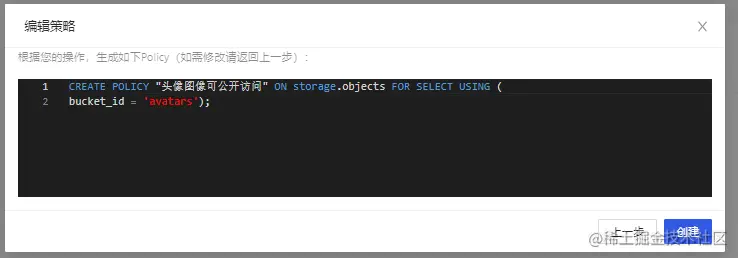
2、允许每个用户可以查看存储桶avatars
选中存储桶avatars,切换到权限设置栏,点击“新规则”按钮,弹出策略编辑弹框,选择“自定义”,如下图所示:
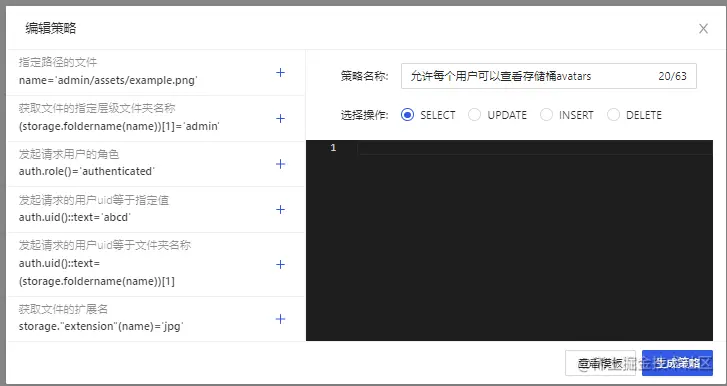
选择SELECT操作,输入策略名称,点击“生成策略”按钮,如下图所示。
3、允许用户上传存储桶avatars;
选中存储桶avatars,切换到权限设置栏,点击“新规则”按钮,弹出策略编辑弹框,选择“自定义”,如下图所示:
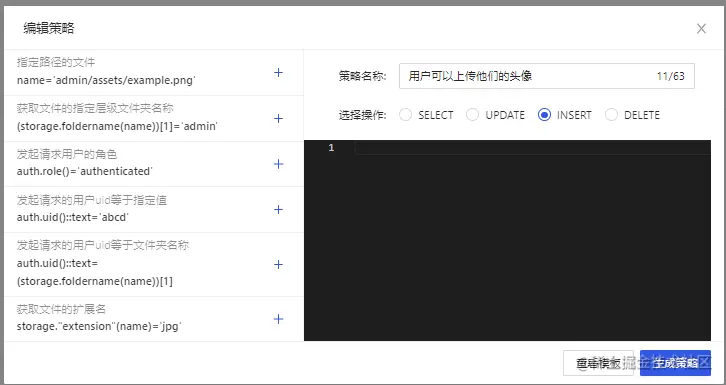
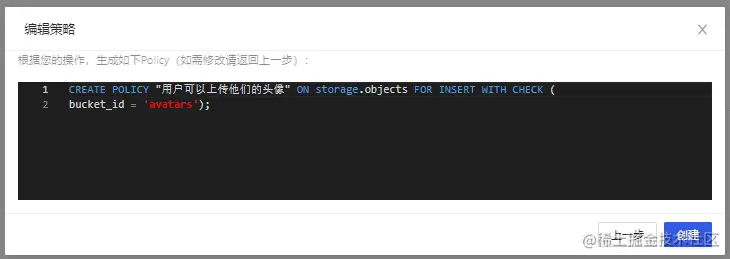
选择INSERT操作,输入策略名称,点击“生成策略”按钮,如下图所示。
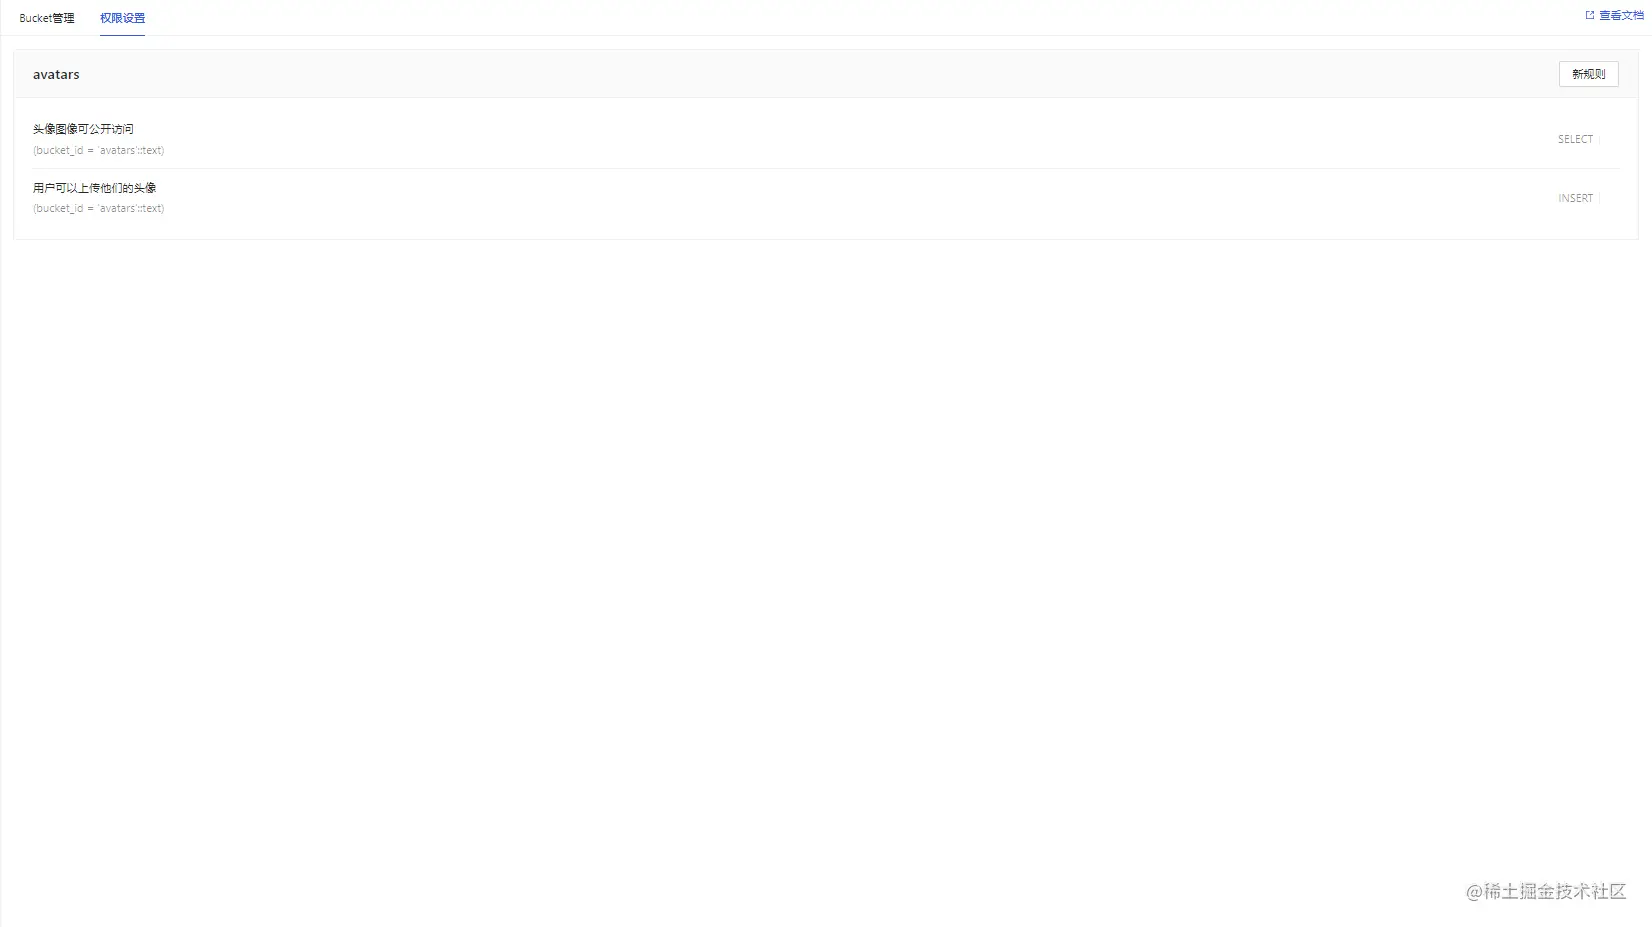
查看结果
所有数据表及RLS的sql(策略名称用英文代替)
-- Create a table for public "profiles"
create table profiles (
  id uuid references auth.users not null,
  updated_at timestamp with time zone,
  username text unique,
  avatar_url text,
  website text,

  primary key (id),
  unique(username),
);

alter table profiles enable row level security;

create policy "Public profiles are viewable by everyone."
  on profiles for select
  using ( true );

create policy "Users can insert their own profile."
  on profiles for insert
  with check ( auth.uid() = id );

create policy "Users can update own profile."
  on profiles for update
  using ( auth.uid() = id );
-- Set up Storage!
insert into storage.buckets (id, name)
values ('avatars', 'avatars');

create policy "Avatar images are publicly accessible."
  on storage.objects for select
  using ( bucket_id = 'avatars' );

create policy "Anyone can upload an avatar."
  on storage.objects for insert
with check ( bucket_id = 'avatars' );获取 API秘钥
现在您已经创建了一些数据库表,您可以使用自动生成的 API 插入数据。我们只需要从API设置中获取URL和anon的密钥。
在应用->概括页面,获取服务地址以及token信息。

Anon(公开)密钥是客户端API密钥。它允许“匿名访问”您的数据库,直到用户登录。登录后,密钥将切换到用户自己的登录令牌。这将为数据启用行级安全性。
注意:service_role(秘密)密钥可以绕过任何安全策略完全访问您的数据。这个密钥必须保密,并且要在服务器环境中使用,绝不能在客户端或浏览器上使用。 在后续示例代码中,需要提供supabaseUrl和supabaseKey。
认证设置
当用户点击邮件内魔法链接进行登录时,是需要跳转到我们应用的登录界面的。这里需要在认证设置中进行相关URL重定向的配置。
因为我们最终的应用会在本地的4200端口启动(亦或者其他端口),所以这里我们暂时将url设置为 http://localhost:4200
除此之外,在此界面也可以自定义使用我们自己的smtp服务器。

构建应用程序
让我们从头开始构建 Angular应用程序。
初始化项目
我们可以使用Angular CLI来初始化一个名为memfiredb-angular:
Angular 需要 Node.js (>=14.15 <=16.10) 。
npm install -g @angular/cli
npx ng new memfiredb-angular --routing false --style css
cd memfiredb-angular
然后让我们安装唯一的附加依赖项:supabase-js
npm install @supabase/supabase-js
最后,我们要将环境变量保存在environment.ts, 我们需要的是 API URL 和您上面anon复制的密钥。
src/environments/environment.ts文件
export const environment = {
  production: false,
  supabaseUrl: "YOUR_SUPABASE_URL",
  supabaseKey: "YOUR_SUPABASE_KEY"
};现在我们已经有了 API 凭证,通过ng g s supabase创建一个SupabaseService来初始化 Supabase 客户端并实现与 Supabase API 通信的函数。
src/app/supabase.service.ts
import { Injectable } from '@angular/core';
import {AuthChangeEvent, createClient, Session, SupabaseClient} from '@supabase/supabase-js';
import {environment} from "../environments/environment";

export interface Profile {
  username: string;
  website: string;
  avatar_url: string;
}

@Injectable({
  providedIn: 'root'
})
export class SupabaseService {
  private supabase: SupabaseClient;

  constructor() {
    this.supabase = createClient(environment.supabaseUrl, environment.supabaseKey);
  }

  get user() {
    return this.supabase.auth.user();
  }

  get session() {
    return this.supabase.auth.session();
  }

  get profile() {
    return this.supabase
      .from('profiles')
      .select(`username, website, avatar_url`)
      .eq('id', this.user?.id)
      .single();
  }

  authChanges(callback: (event: AuthChangeEvent, session: Session | null) => void) {
    return this.supabase.auth.onAuthStateChange(callback);
  }

  signIn(email: string) {
    return this.supabase.auth.signIn({email});
  }

  signOut() {
    return this.supabase.auth.signOut();
  }

  updateProfile(profile: Profile) {
    const update = {
      ...profile,
      id: this.user?.id,
      updated_at: new Date()
    }

    return this.supabase.from('profiles').upsert(update, {
      returning: 'minimal', // Don't return the value after inserting
    });
  }

  downLoadImage(path: string) {
    return this.supabase.storage.from('avatars').download(path);
  }

  uploadAvatar(filePath: string, file: File) {
    return this.supabase.storage
      .from('avatars')
      .upload(filePath, file);
  }
}</p>
<h2 id="strong-更新样式-strong"><strong>更新样式</strong></h2>
<p>可以看到界面实在是不怎么优雅,更新下样式,让它好看一些。 修改<code>src/styles.css</code>文件。</p>
<pre class="brush:php;toolbar:false">html,
body {
  --custom-font-family: -apple-system, BlinkMacSystemFont, Segoe UI, Roboto, Oxygen, Ubuntu,
    Cantarell, Fira Sans, Droid Sans, Helvetica Neue, sans-serif;
  --custom-bg-color: #101010;
  --custom-panel-color: #222;
  --custom-box-shadow: 0 2px 8px 0 rgba(0, 0, 0, 0.8);
  --custom-color: #fff;
  --custom-color-brand: #24b47e;
  --custom-color-secondary: #666;
  --custom-border: 1px solid #333;
  --custom-border-radius: 5px;
  --custom-spacing: 5px;

  padding: 0;
  margin: 0;
  font-family: var(--custom-font-family);
  background-color: var(--custom-bg-color);
}

* {
  color: var(--custom-color);
  font-family: var(--custom-font-family);
  box-sizing: border-box;
}

html,
body,
#__next {
  height: 100vh;
  width: 100vw;
  overflow-x: hidden;
}

/* Grid */

.container {
  width: 90%;
  margin-left: auto;
  margin-right: auto;
}
.row {
  position: relative;
  width: 100%;
}
.row [class^='col'] {
  float: left;
  margin: 0.5rem 2%;
  min-height: 0.125rem;
}
.col-1,
.col-2,
.col-3,
.col-4,
.col-5,
.col-6,
.col-7,
.col-8,
.col-9,
.col-10,
.col-11,
.col-12 {
  width: 96%;
}
.col-1-sm {
  width: 4.33%;
}
.col-2-sm {
  width: 12.66%;
}
.col-3-sm {
  width: 21%;
}
.col-4-sm {
  width: 29.33%;
}
.col-5-sm {
  width: 37.66%;
}
.col-6-sm {
  width: 46%;
}
.col-7-sm {
  width: 54.33%;
}
.col-8-sm {
  width: 62.66%;
}
.col-9-sm {
  width: 71%;
}
.col-10-sm {
  width: 79.33%;
}
.col-11-sm {
  width: 87.66%;
}
.col-12-sm {
  width: 96%;
}
.row::after {
  content: '';
  display: table;
  clear: both;
}
.hidden-sm {
  display: none;
}

@media only screen and (min-width: 33.75em) {
  /* 540px */
  .container {
    width: 80%;
  }
}

@media only screen and (min-width: 45em) {
  /* 720px */
  .col-1 {
    width: 4.33%;
  }
  .col-2 {
    width: 12.66%;
  }
  .col-3 {
    width: 21%;
  }
  .col-4 {
    width: 29.33%;
  }
  .col-5 {
    width: 37.66%;
  }
  .col-6 {
    width: 46%;
  }
  .col-7 {
    width: 54.33%;
  }
  .col-8 {
    width: 62.66%;
  }
  .col-9 {
    width: 71%;
  }
  .col-10 {
    width: 79.33%;
  }
  .col-11 {
    width: 87.66%;
  }
  .col-12 {
    width: 96%;
  }
  .hidden-sm {
    display: block;
  }
}

@media only screen and (min-width: 60em) {
  /* 960px */
  .container {
    width: 75%;
    max-width: 60rem;
  }
}

/* Forms */

label {
  display: block;
  margin: 5px 0;
  color: var(--custom-color-secondary);
  font-size: 0.8rem;
  text-transform: uppercase;
}

input {
  width: 100%;
  border-radius: 5px;
  border: var(--custom-border);
  padding: 8px;
  font-size: 0.9rem;
  background-color: var(--custom-bg-color);
  color: var(--custom-color);
}

input[disabled] {
  color: var(--custom-color-secondary);
}

/* Utils */

.block {
  display: block;
  width: 100%;
}
.inline-block {
  display: inline-block;
  width: 100%;
}
.flex {
  display: flex;
}
.flex.column {
  flex-direction: column;
}
.flex.row {
  flex-direction: row;
}
.flex.flex-1 {
  flex: 1 1 0;
}
.flex-end {
  justify-content: flex-end;
}
.flex-center {
  justify-content: center;
}
.items-center {
  align-items: center;
}
.text-sm {
  font-size: 0.8rem;
  font-weight: 300;
}
.text-right {
  text-align: right;
}
.font-light {
  font-weight: 300;
}
.opacity-half {
  opacity: 50%;
}

/* Button */

button,
.button {
  color: var(--custom-color);
  border: var(--custom-border);
  background-color: var(--custom-bg-color);
  display: inline-block;
  text-align: center;
  border-radius: var(--custom-border-radius);
  padding: 0.5rem 1rem;
  cursor: pointer;
  text-align: center;
  font-size: 0.9rem;
  text-transform: uppercase;
}

button.primary,
.button.primary {
  background-color: var(--custom-color-brand);
  border: 1px solid var(--custom-color-brand);
}

/* Widgets */

.card {
  width: 100%;
  display: block;
  border: var(--custom-border);
  border-radius: var(--custom-border-radius);
  padding: var(--custom-spacing);
}

.avatar {
  border-radius: var(--custom-border-radius);
  overflow: hidden;
  max-width: 100%;
}
.avatar.image {
  object-fit: cover;
}
.avatar.no-image {
  background-color: #333;
  border: 1px solid rgb(200, 200, 200);
  border-radius: 5px;
}

.footer {
  position: absolute;
  max-width: 100%;
  bottom: 0;
  left: 0;
  right: 0;
  display: flex;
  flex-flow: row;
  border-top: var(--custom-border);
  background-color: var(--custom-bg-color);
}
.footer div {
  padding: var(--custom-spacing);
  display: flex;
  align-items: center;
  width: 100%;
}
.footer div > img {
  height: 20px;
  margin-left: 10px;
}
.footer > div:first-child {
  display: none;
}
.footer > div:nth-child(2) {
  justify-content: left;
}

@media only screen and (min-width: 60em) {
  /* 960px */
  .footer > div:first-child {
    display: flex;
  }
  .footer > div:nth-child(2) {
    justify-content: center;
  }
}

@keyframes spin {
  from {
    transform: rotate(0deg);
  }
  to {
    transform: rotate(360deg);
  }
}

.mainHeader {
  width: 100%;
  font-size: 1.3rem;
  margin-bottom: 20px;
}

.avatarPlaceholder {
  border: var(--custom-border);
  border-radius: var(--custom-border-radius);
  width: 35px;
  height: 35px;
  background-color: rgba(255, 255, 255, 0.2);
  display: flex;
  align-items: center;
  justify-content: center;
}

/* Auth */

.auth-widget {
  display: flex;
  flex-direction: column;
  gap: 20px;
}

.auth-widget > .button {
  display: flex;
  align-items: center;
  justify-content: center;
  border: none;
  background-color: #444444;
  text-transform: none !important;
  transition: all 0.2s ease;
}

.auth-widget .button:hover {
  background-color: #2a2a2a;
}

.auth-widget .button > .loader {
  width: 17px;
  animation: spin 1s linear infinite;
  filter: invert(1);
}

/* Account */

.account {
  display: flex;
  flex-direction: column;
  gap: 20px;
}

.account > * > .avatarField {
  display: flex;
  align-items: center;
  margin-bottom: 30px;
}

.account > * > .avatarField > .avatarContainer {
  margin-right: 20px;
}

/* Profile Card */

.profileCard {
  border-radius: 5px;
  display: flex;
  border: var(--custom-border);
  background-color: var(--custom-panel-color);
  padding: 20px 20px;
  margin-bottom: 20px;
}

.profileCard:last-child {
  margin-bottom: 0px;
}

.profileCard > .userInfo {
  margin-left: 20px;
  font-weight: 300;
  display: flex;
  flex-direction: column;
  justify-content: center;
}

.profileCard > .userInfo > p {
  margin: 0;
}

.profileCard > .userInfo > .username {
  font-size: 1.3rem;
  font-weight: 500;
  margin-bottom: 5px;
}

.profileCard > .userInfo > .website {
  font-size: 0.9rem;
  color: var(--custom-color-brand);
  margin-bottom: 10px;
  text-decoration: none;
}设置登录组件

让我们设置一个 Angular 组件来管理登录和注册。我们将使用 Magic Links,因此用户无需使用密码即可使用电子邮件登录。使用Angular CLI 命令创建一个AuthComponent 。 ng g c auth
src/app/auth/auth.component.ts
import { Component } from '@angular/core';
import {SupabaseService} from "../supabase.service";

@Component({
  selector: 'app-auth',
  template: `
    <div class="row flex flex-center">
      <form class="col-6 form-widget">
        <h1 class="header">Memfiredb + Angular</h1>
        <p class="description">使用下面的电子邮件通过魔术链接登录</p>
        <div>
          <input
            #input
            class="inputField"
            type="email"
            placeholder="Your email"
          />
        </div>
        <div>
          <button
            type="submit"
            (click)="handleLogin(input.value)"
          class="button block"
          [disabled]="loading"
          >
          {{loading ? 'Loading' : 'Send magic link'}}
          </button>
        </div>
      </form>
    </div>
  `,
})
export class AuthComponent {
  loading = false;

  constructor(private readonly supabase: SupabaseService) { }

  async handleLogin(input: string) {
    try {
      this.loading = true;
      await this.supabase.signIn(input);
      alert('请检查您的电子邮件以获取登录链接!');
    } catch (error:any) {
      alert(error.error_description || error.message)
    } finally {
      this.loading = false;
    }
  }
}用户信息页面
用户登录后,我们可以允许他们编辑他们的个人资料详细信息并管理他们的帐户。使用Angular CLI 命令创建一个AccountComponent 。 ng g c account
src/app/account/account.component.ts
import {Component, Input, OnInit} from '@angular/core';
import {Profile, SupabaseService} from "../supabase.service";
import {Session} from "@supabase/supabase-js";
@Component({
selector: 'app-account',
template: `
<div class="form-widget">
<div>
<label for="email">邮箱</label>
<input id="email" type="text" [value]="session?.user?.email" disabled/>
</div>
<div>
<label for="username">名称</label>
<input
#username
id="username"
type="text"
[value]="profile?.username ?? ''"
/>
</div>
<div>
<label for="website">网址</label>
<input
#website
id="website"
type="url"
[value]="profile?.website ?? ''"
/>
</div>
<div>
<button
class="button block primary"
(click)="updateProfile(username.value, website.value)"
[disabled]="loading"
>
{{loading ? 'Loading ...' : 'Update'}}
</button>
</div>
<div>
<button class="button block" (click)="signOut()">
退出登录
</button>
</div>
</div>
`
})
export class AccountComponent implements OnInit {
loading = false;
profile: Profile | undefined;
@Input() session: Session | undefined;
constructor(private readonly supabase: SupabaseService) { }
ngOnInit() {
this.getProfile();
}
async getProfile() {
try {
this.loading = true;
let {data: profile, error, status} = await this.supabase.profile;
if (error && status !== 406) {
throw error;
}
if (profile) {
this.profile = profile;
}
} catch (error:any) {
alert(error.message)
} finally {
this.loading = false;
}
}
async updateProfile(username: string, website: string, avatar_url: string = '') {
try {
this.loading = true;
await this.supabase.updateProfile({username, website, avatar_url});
} catch (error:any) {
alert(error.message);
} finally {
this.loading = false;
}
}
async signOut() {
await this.supabase.signOut();
}
}修改项目入口文件
现在我们已经准备好了所有组件,让我们更新AppComponent:
src/app/app.component.ts
import {Component, OnInit} from '@angular/core';
import {SupabaseService} from "./supabase.service";

@Component({
  selector: 'app-root',
  template: `
  <div class="container" style="padding: 50px 0 100px 0">
    <app-account *ngIf="session; else auth" [session]="session"></app-account>
    <ng-template #auth>
      <app-auth></app-auth>
    </ng-template>
  </div>
  `
})
export class AppComponent implements OnInit {
  session = this.supabase.session;

  constructor(private readonly supabase: SupabaseService) { }

  ngOnInit() {
    this.supabase.authChanges((_, session) => this.session = session);
  }
}完成后,在终端窗口中运行它:
npm run start
然后打开浏览器到 http://localhost:4200,你应该会看到完整的应用程序。

实现:上传头像及更新用户信息
每个 MemFire Cloud项目都配置了存储,用于管理照片和视频等大文件。
创建上传小组件
让我们为用户创建一个头像,以便他们可以上传个人资料照片。使用Angular CLI 命令创建AvatarComponent 。 ng g c avatar
src/app/avatar/avatar.component.ts
import {Component, EventEmitter, Input, Output} from '@angular/core';
import {SupabaseService} from "../supabase.service";
import {DomSanitizer, SafeResourceUrl} from "@angular/platform-browser";

@Component({
  selector: 'app-avatar',
  template: `
    <div>
      <img
        *ngIf="_avatarUrl"
        [src]="_avatarUrl"
        alt="Avatar"
        class="avatar image"
        style="height: 150px; width: 150px"
      ></div>
    <div *ngIf="!_avatarUrl" class="avatar no-image" style="height: 150px; width: 150px"></div>
    <div style="width: 150px">
      <label class="button primary block" for="single">
        {{uploading ? 'Uploading ...' : 'Upload'}}
      </label>
      <input
        style="visibility: hidden;position: absolute"
        type="file"
        id="single"
        accept="image/*"
        (change)="uploadAvatar($event)"
        [disabled]="uploading"
      />
    </div>
  `,
})
export class AvatarComponent {
  _avatarUrl: SafeResourceUrl | undefined;
  uploading = false;

  @Input()
  set avatarUrl(url: string | undefined) {
    if (url) {
      this.downloadImage(url);
    }
  };

  @Output() upload = new EventEmitter<string>();

  constructor(
    private readonly supabase: SupabaseService,
    private readonly dom: DomSanitizer
  ) { }

  async downloadImage(path: string) {
    try {
      const {data} = await this.supabase.downLoadImage(path);
       if (data instanceof Blob) {
        this._avatarUrl = this.dom.bypassSecurityTrustResourceUrl(
          URL.createObjectURL(data)
        );
      }
    } catch (error:any) {
      console.error('下载图片出错: ', error.message);
    }
  }

  async uploadAvatar(event: any) {
    try {
      this.uploading = true;
      if (!event.target.files || event.target.files.length === 0) {
        throw new Error('必须选择要上载的图像。');
      }

      const file = event.target.files[0];
      const fileExt = file.name.split('.').pop();
      const fileName = `${Math.random()}.${fileExt}`;
      const filePath = `${fileName}`;

      await this.supabase.uploadAvatar(filePath, file);
      this.upload.emit(filePath);
      this.downloadImage(filePath)
    } catch (error:any) {
      alert(error.message);
    } finally {
      this.uploading = false;
    }
  }
}然后我们可以在AccountComponent html 模板的顶部添加小部件:
src/app/account/account.component.ts
import {Component, Input, OnInit} from '@angular/core';
import {Profile, SupabaseService} from "../supabase.service";
import {Session} from "@supabase/supabase-js";
@Component({
selector: 'app-account',
template: `
<app-avatar
[avatarUrl]="this.profile?.avatar_url"
(upload)="updateProfile(username.value, website.value, $event)">
</app-avatar>
<div class="form-widget">
<div>
<label for="email">邮箱</label>
<input id="email" type="text" [value]="session?.user?.email" disabled/>
</div>
<div>
<label for="username">名称</label>
<input
#username
id="username"
type="text"
[value]="profile?.username ?? ''"
/>
</div>
<div>
<label for="website">网址</label>
<input
#website
id="website"
type="url"
[value]="profile?.website ?? ''"
/>
</div>
<div>
<button
class="button block primary"
(click)="updateProfile(username.value, website.value)"
[disabled]="loading"
>
{{loading ? 'Loading ...' : 'Update'}}
</button>
</div>
<div>
<button class="button block" (click)="signOut()">
退出登录
</button>
</div>
</div>
`
})
export class AccountComponent implements OnInit {
loading = false;
profile: Profile | undefined;
@Input() session: Session | undefined;
constructor(private readonly supabase: SupabaseService) { }
ngOnInit() {
this.getProfile();
}
async getProfile() {
try {
this.loading = true;
let {data: profile, error, status} = await this.supabase.profile;
if (error && status !== 406) {
throw error;
}
if (profile) {
this.profile = profile;
}
} catch (error:any) {
alert(error.message)
} finally {
this.loading = false;
}
}
async updateProfile(username: string, website: string, avatar_url: string = '') {
try {
this.loading = true;
await this.supabase.updateProfile({username, website, avatar_url});
alert("修改成功")
} catch (error:any) {
alert(error.message);
} finally {
this.loading = false;
}
}
async signOut() {
await this.supabase.signOut();
}
}恭喜!在这个阶段,您拥有一个功能齐全的应用程序!
更多编程相关知识,请访问:编程视频!!
以上是聊聊如何使用MemFire Cloud构建Angular应用程序的详细内容。更多信息请关注PHP中文网其他相关文章!

热AI工具

Undresser.AI Undress
人工智能驱动的应用程序,用于创建逼真的裸体照片

AI Clothes Remover
用于从照片中去除衣服的在线人工智能工具。

Undress AI Tool
免费脱衣服图片

Clothoff.io
AI脱衣机

Video Face Swap
使用我们完全免费的人工智能换脸工具轻松在任何视频中换脸!

热门文章

热工具

记事本++7.3.1
好用且免费的代码编辑器

SublimeText3汉化版
中文版,非常好用

禅工作室 13.0.1
功能强大的PHP集成开发环境

Dreamweaver CS6
视觉化网页开发工具

SublimeText3 Mac版
神级代码编辑软件(SublimeText3)
 聊聊Angular中的元数据(Metadata)和装饰器(Decorator)
Feb 28, 2022 am 11:10 AM
本篇文章继续Angular的学习,带大家了解一下Angular中的元数据和装饰器,简单了解一下他们的用法,希望对大家有所帮助!
 如何在Ubuntu 24.04上安装Angular
Mar 23, 2024 pm 12:20 PM
Angular.js是一种可自由访问的JavaScript平台,用于创建动态应用程序。它允许您通过扩展HTML的语法作为模板语言,以快速、清晰地表示应用程序的各个方面。Angular.js提供了一系列工具,可帮助您编写、更新和测试代码。此外,它还提供了许多功能,如路由和表单管理。本指南将讨论在Ubuntu24上安装Angular的方法。首先,您需要安装Node.js。Node.js是一个基于ChromeV8引擎的JavaScript运行环境,可让您在服务器端运行JavaScript代码。要在Ub
 浅析angular中怎么使用monaco-editor
Oct 17, 2022 pm 08:04 PM
angular中怎么使用monaco-editor?下面本篇文章记录下最近的一次业务中用到的 monaco-editor 在 angular 中的使用,希望对大家有所帮助!
 Angular + NG-ZORRO快速开发一个后台系统
Apr 21, 2022 am 10:45 AM
本篇文章给大家分享一个Angular实战,了解一下angualr 结合 ng-zorro 如何快速开发一个后台系统,希望对大家有所帮助!
 angular学习之详解状态管理器NgRx
May 25, 2022 am 11:01 AM
本篇文章带大家深入了解一下angular的状态管理器NgRx,介绍一下NgRx的使用方法,希望对大家有所帮助!
 如何使用PHP和Angular进行前端开发
May 11, 2023 pm 04:04 PM
随着互联网的飞速发展,前端开发技术也在不断改进和迭代。PHP和Angular是两种广泛应用于前端开发的技术。PHP是一种服务器端脚本语言,可以处理表单、生成动态页面和管理访问权限等任务。而Angular是一种JavaScript的框架,可以用于开发单页面应用和构建组件化的Web应用程序。本篇文章将介绍如何使用PHP和Angular进行前端开发,以及如何将它们
 使用Angular和Node进行基于令牌的身份验证
Sep 01, 2023 pm 02:01 PM
身份验证是任何Web应用程序中最重要的部分之一。本教程讨论基于令牌的身份验证系统以及它们与传统登录系统的区别。在本教程结束时,您将看到一个用Angular和Node.js编写的完整工作演示。传统身份验证系统在继续基于令牌的身份验证系统之前,让我们先看一下传统的身份验证系统。用户在登录表单中提供用户名和密码,然后点击登录。发出请求后,通过查询数据库在后端验证用户。如果请求有效,则使用从数据库中获取的用户信息创建会话,然后在响应头中返回会话信息,以便将会话ID存储在浏览器中。提供用于访问应用程序中受


