

一文聊聊Vue中的KeepAlive组件


最近看 Vue 相关的知识点,看到 KeepAlive 组件时比较好奇它是怎么做到组件间切换时不重新渲染的,于是便稍微深入的了解了一下。(学习视频分享:vue视频教程)
如果你也有兴趣想要了解一下具体内部怎么实现的或者说有一定的了解但是不够熟悉,那么正好你也可以一起巩固下
Tips: 这样面试的时候你就可以大声的问别人这个知识点了?。
KeepAlive 是什么
<KeepAlive> 是一个内置组件,它的功能是在多个组件间动态切换时缓存被移除的组件实例。
KeepAlive 功能
KeepAlive 一词借鉴于 HTTP 协议,在 HTTP 协议里面 KeepAlive 又称持久连接,作用是允许多个请求/响应共用同一个 HTTP 连接,解决了频繁的销毁和创建 HTTP 连接带来的额外性能开销。而同理 Vue 里的 KeepAlive 组件也是为了避免一个组件被频繁的销毁/重建,避免了性能上的开销。
// App.vue <Test :msg="curTab" v-if="curTab === 'Test'"></Test> <HelloWorld :msg="curTab" v-if="curTab === 'HelloWorld'"></HelloWorld> <div @click="toggle">toggle</div>
上述代码可以看到,如果我们频繁点击 toggle 时会频繁的渲染 Test/HelloWorld 组件,当用户频繁的点击时 Test 组件需要频繁的销毁/渲染,这就造成很大的渲染性能损失。
所以为了解决这种性能开销,你需要知道是时候使用 KeepAlive 组件。
<KeepAlive> <component :is="curTab === 'Test' ? Test : HelloWorld" :msg="curTab"></component> </KeepAlive> <div @click="toggle">toggle</div>
可以看这个录屏,在首次加载后再次频繁的切换并没有重新销毁与挂载,而仅仅是将组件进行了失活(而不是销毁),渲染时只需要重新激活就可以,而不需重新挂载,如果要渲染的组件很大,那就能有不错的性能优化。
想要体验的话可以去看看这个例子?官方demo,其中数据会被缓存这个也需要在开发使用中去注意到的
如何实现
实现原理其实很简单,其实就是缓存管理和特定的销毁和渲染逻辑,使得它不同于其他组件。
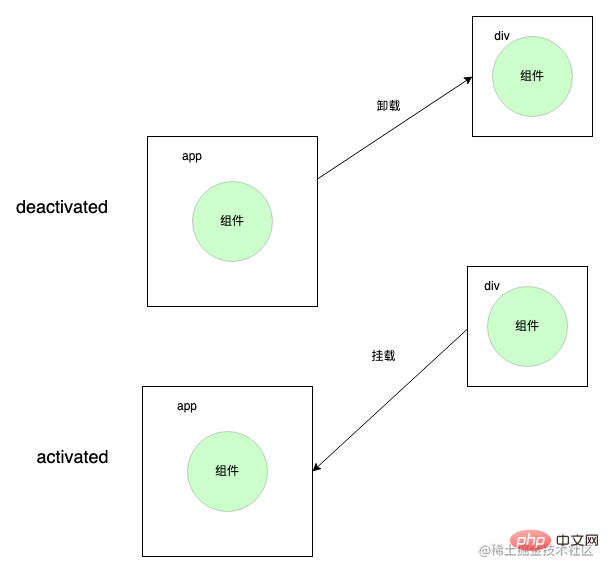
KeepAlive 组件在卸载组件时并不能真的将其卸载,而是将其放到一个隐藏的容器里面,当被激活时再从隐藏的容器中拿出来挂载到真正的 dom 上就行,这也就对应了 KeepAlive 的两个独特的生命周期activated和deactivated。
先来简单了解下组件的挂载过程
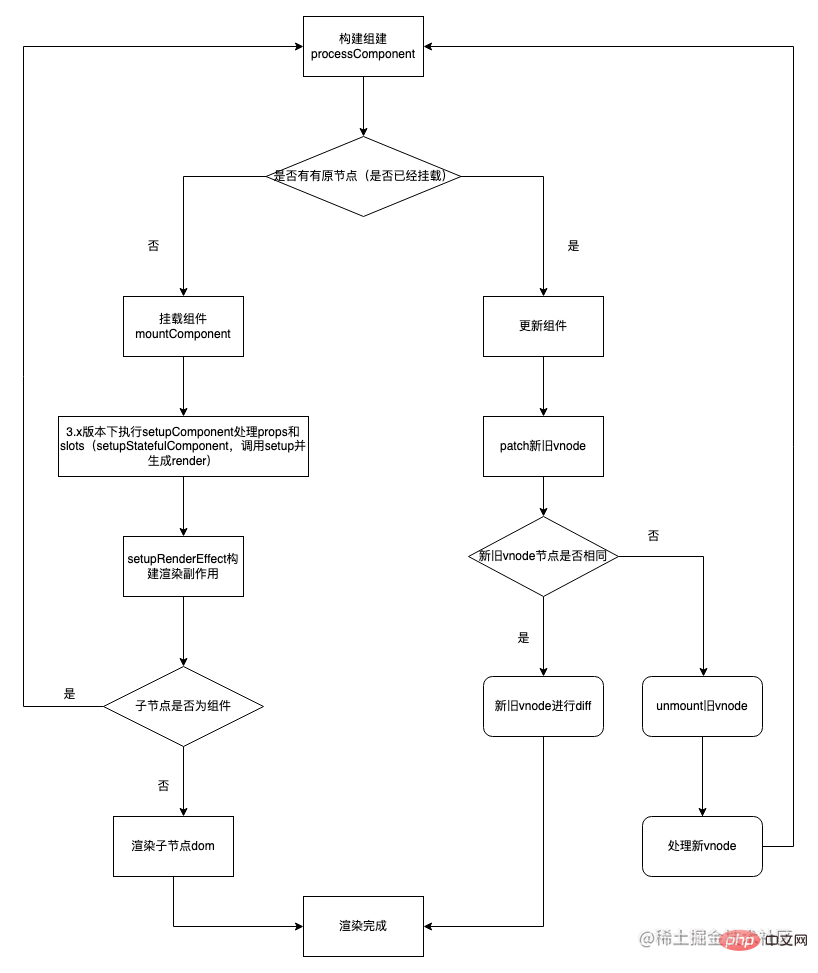 所以在 KeepAlive 内的子组件在 mount 和 unmount 的时候会执行特定的渲染逻辑,从而不会去走挂载和销毁逻辑
具体实现(实现一个小而简单的 KeepAlive)
KeepAlive 组件的属性
const KeepAliveImpl: ComponentOptions = {
  name: "KeepAlive",
  // 标识这是一个 KeepAlive 组件
  __isKeepAlive: true,
  // props
  props: {
    exclude: [String, Array, RegExp],
    include: [String, Array, RegExp],
    max: [String, Number]
  }
 }

 // isKeepAlive
 export const isKeepAlive = (vnode: VNode): boolean =>
(vnode.type as any).__isKeepAliveKeepAlive 组件的 setup 逻辑以及渲染逻辑(重点看)
// setup 接着上面的代码
// 获取到当前 KeepAlive 组件实例
const instance = getCurrentInstance()! as any;
// 拿到 ctx
const sharedContext = instance.ctx as KeepAliveContext;
// cache 缓存
// key: vnode.key | vnode.type value: vnode
const cache: Cache = new Map()
// 需要拿到某些的 renderer 操作函数,需要自己特定执行渲染和卸载逻辑
const { renderer: { p: patch, m: move, um: _unmount, o: { createElement } } } = sharedContext
// 隐藏的容器,用来存储需要隐藏的 dom
const storeageContainer = createElement('div')

// 存储当前的子组件的缓存 key
let pendingKey: CacheKey | null = null

sharedContext.activate = (vnode, container, anchor) => {
  // KeepAlive 下组件激活时执行的 move 逻辑
  move(vnode, container, anchor, 0 /* ENTER */)
}

sharedContext.deactivate = (vnode) => {
  // KeepAlive 下组件失活时执行的 move 逻辑
  move(vnode, storeageContainer, null, 1 /* LEAVE */)
}

return () => {
  // 没有子组件
  if (!slots.default) {
    return null;
  }
  const children = slots.default() as VNode[];
  const rawNode = children[0];
  let vnode = rawNode;
  const comp = vnode.type as ConcreteComponent;
  const name = comp.displayName || comp.name
  const { include, exclude } = props;
  // 没有命中的情况
  if (
    (include && (!name || !matches(include, name))) ||
    (exclude && name && matches(exclude, name))
  ) {
    // 直接渲染子组件
    return rawNode;
  }
  // 获取子组件的 vnode key
  const key = vnode.key == null ? comp : vnode.key;
  // 获取子组件缓存的 vnode
  const cachedVNode = cache.get(key);

  pendingKey = key;
  // 命中缓存
  if (cachedVNode) {
    vnode.el = cachedVNode.el;
    // 继承组件实例
    vnode.component = cachedVNode.component;
    // 在 vnode 上更新 shapeFlag,标记为 COMPONENT_KEPT_ALIVE 属性,防止渲染器重新挂载
    vnode.shapeFlag |= ShapeFlags.COMPONENT_KEPT_ALIVE
  } else {
    // 没命中将其缓存
    cache.set(pendingKey, vnode)
  }
  // 在 vnode 上更新 shapeFlag,标记为 COMPONENT_SHOULD_KEEP_ALIVE 属性,防止渲染器将组件卸载了
  vnode.shapeFlag |= ShapeFlags.COMPONENT_SHOULD_KEEP_ALIVE
  // 渲染组件 vnode
  return vnode;
}KeepAlive组件 mount 时挂载 renderer 到 ctx 上
在 KeepAlive 组件内会从 sharedContext 上的 renderer 上拿到一些方法比如 move、createElement 等
function mountComponent() {
 // ...
 if (isKeepAlive(initialVNode)) {
    ;(instance.ctx as KeepAliveContext).renderer = internals
  }
}子组件执行特定的销毁和渲染逻辑
首先从上面可以看到,在渲染 KeepAlive 组件时会对其子组件的 vnode 上增加对应的 shapeFlag 标志
比如COMPONENT_KEPT_ALIVE标志,组件挂载的时候告诉渲染器这个不需要 mount 而需要特殊处理
const processComponent = (
    n1: VNode | null,
    n2: VNode,
    container: RendererElement,
    anchor: RendererNode | null,
  ) => {
    if (n1 == null) {
      // 在 KeepAlive 组件渲染时会对子组件增加 COMPONENT_KEPT_ALIVE 标志
      // 挂载子组件时会判断是否 COMPONENT_KEPT_ALIVE ,如果是不会调用 mountComponent 而是直接执行 activate 方法
      if (n2.shapeFlag & ShapeFlags.COMPONENT_KEPT_ALIVE) {
        ;(parentComponent!.ctx as KeepAliveContext).activate(
          n2,
          container,
          anchor
        )
      }
      // ...
    }
}同理COMPONENT_SHOULD_KEEP_ALIVE标志也是用来在组件卸载的时候告诉渲染器这个不需要 unmount 而需要特殊处理。
const unmount: UnmountFn = (vnode) => {
  // ...
  // 在 KeepAlive 组件渲染时会对子组件增加 COMPONENT_SHOULD_KEEP_ALIVE 标志
  // 然后在子组件卸载时并不会真实的卸载而是调用 KeepAlive 的 deactivate 方法
  if (shapeFlag & ShapeFlags.COMPONENT_SHOULD_KEEP_ALIVE) {
    ;(parentComponent!.ctx as KeepAliveContext).deactivate(vnode)
    return
  }
}如何挂载
activated和deactivated生命周期(生命周期相关可以不用重点看)
首先这两个生命周期是在 KeepAlive 组件内独特声明的,是直接导出使用的。
export function onActivated(
  hook: Function,
  target?: ComponentInternalInstance | null
) {
  // 注册 activated 的回调函数到当前的 instance 的钩子函数上
  registerKeepAliveHook(hook, LifecycleHooks.ACTIVATED, target)
}
export function onDeactivated(
  hook: Function,
  target?: ComponentInternalInstance | null
) {
  // 注册 deactivated 的回调函数到当前的 instance 的钩子函数上
  registerKeepAliveHook(hook, LifecycleHooks.DEACTIVATED, target)
}然后因为这两个生命周期会注册在 setup 里面,所以只要执行 setup 就会将两个生命周期的回调函数注册到当前的 instance 实例上
// renderer.ts
// mount 函数逻辑
const mountComponent = (initialVNode,
  container,
  anchor,
  parentComponent,
  parentSuspense,
  isSVG,
  optimized
) => {
  // ...
  const instance: ComponentInternalInstance =
    compatMountInstance ||
    (initialVNode.component = createComponentInstance(
    initialVNode,
    parentComponent,
    parentSuspense
  ))
  // 执行 setup
  setupComponent(instance)
}
// setupcomponent 处理 setup 函数值
export function setupComponent(
  instance: ComponentInternalInstance,
  isSSR = false
) {
  // ...
  const isStateful = isStatefulComponent(instance)
  // ...
  const setupResult = isStateful
    // setupStatefulComponent 函数主要功能是设置当前的 instance
    ? setupStatefulComponent(instance, isSSR)
    : undefined
  // ...
}

function setupStatefulComponent(
  instance: ComponentInternalInstance
){
  if (setup) {
    //设置当前实例
    setCurrentInstance(instance)
    // 执行组件内 setup 函数,执行 onActivated 钩子函数进行回调函数收集
    const setupResult = callWithErrorHandling(
      setup,
      instance,
      ErrorCodes.SETUP_FUNCTION,
      [__DEV__ ? shallowReadonly(instance.props) : instance.props, setupContext]
    )
    // currentInstance = null;
    unsetCurrentInstance()
  }
}最后在执行sharedContext.activate和sharedContext.deactivate的时候将注册在实例上的回调函数取出来直接执行就OK了,执行时机在 postRender 之后
sharedContext.activate = (vnode, container, anchor) => {
  // KeepAlive 下组件激活时执行的 move 逻辑
  move(vnode, container, anchor, 0 /* ENTER */)
  // 把回调推入到 postFlush 的异步任务队列中去执行
  queuePostRenderEffect(() => {
    if (instance.a) {
      // a是 activated 钩子的简称
      invokeArrayFns(instance.a)
    }
  })
}
sharedContext.activate = (vnode, container, anchor) => {
  // KeepAlive 下组件失活时执行的 move 逻辑
  move(vnode, container, anchor, 0 /* ENTER */)
  queuePostRenderEffect(() => {
    if (instance.da) {
      // da是 deactivated 钩子的简称
      invokeArrayFns(instance.da)
    }
  })
}

export const enum LifecycleHooks {
  // ... 其他生命周期声明
  DEACTIVATED = 'da',
  ACTIVATED = 'a',
}
export interface ComponentInternalInstance {
// ... 其他生命周期
[LifecycleHooks.ACTIVATED]: Function[]
[LifecycleHooks.DEACTIVATED]: Function[]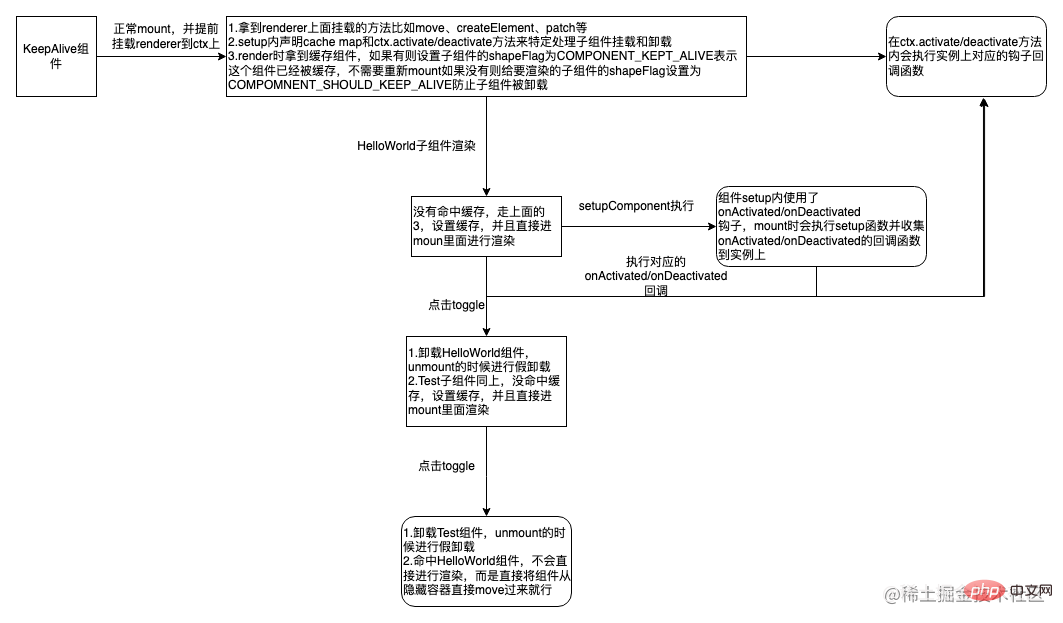
}以下是关于上述demo如何实现的简化流程图
需要注意的知识点
1、什么时候缓存
KeepAlive 组件的onMounted和onUpdated生命周期时进行缓存
2、什么时候取消缓存
缓存数量超过设置的 max 时
- 监听 include 和 exclude 修改的时候,会读取缓存中的知进行判断是否需要清除缓存
修剪缓存的时候也要 unmount(如果该缓存不是当前组件)或者 resetShapeFlag 将标志为从 KeepAlive 相关 shapeFlag 状态重置为 STATEFUL_COMPONENT 状态(如果该缓存是当前组件,但是被exclude了),当然 unmount 函数内包含 resetShapeFlag 操作
3、缓存策略
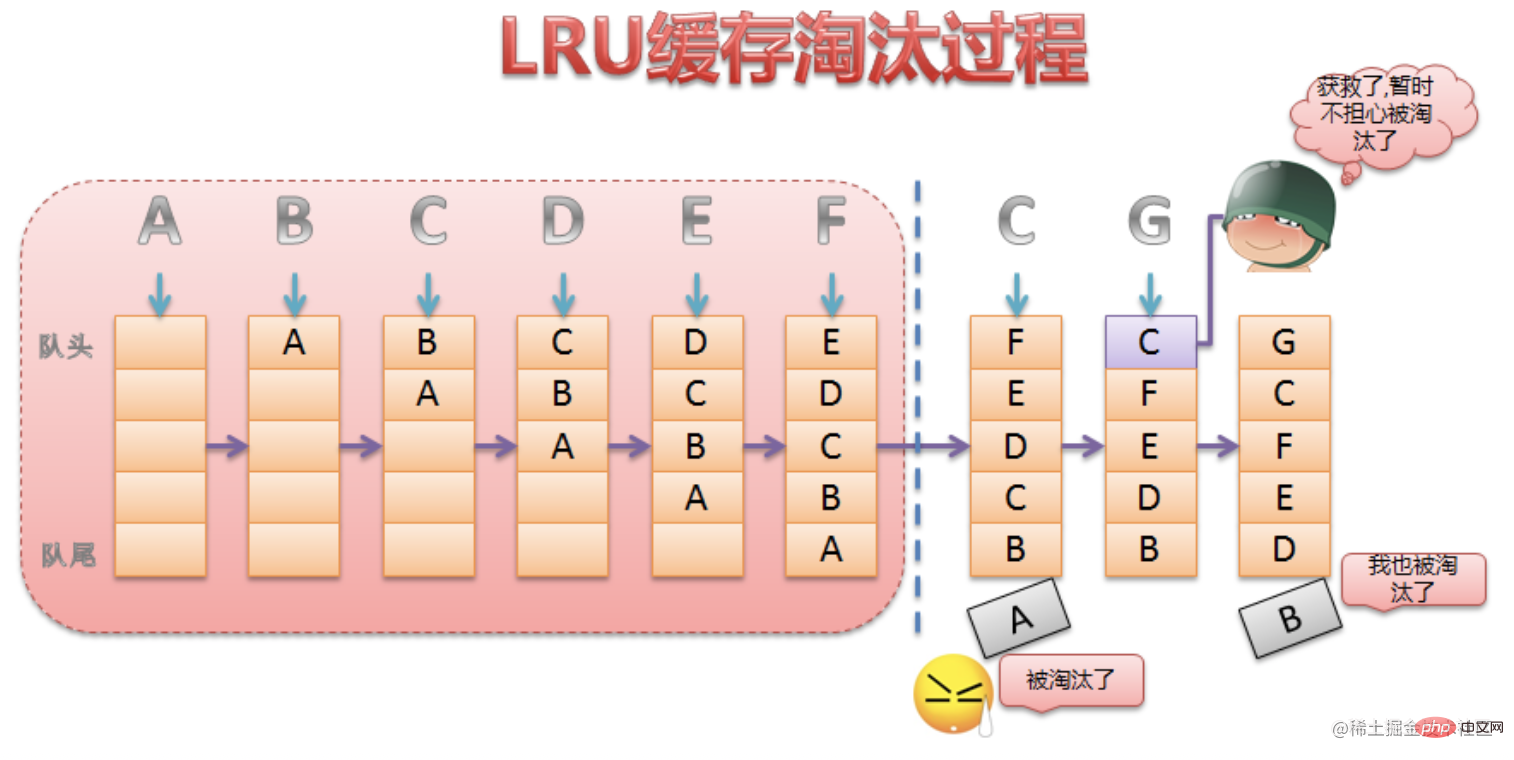
KeepAlive 组件的缓存策略是 LRU(last recently used)缓存策略
核心思想在于需要把当前访问或渲染的组件作为最新一次渲染的组件,并且该组件在缓存修剪过程中始终是安全的,即不会被修剪。
看下面的图更加直观,图片来源一篇讲keepAlive 缓存优化的文章
4、如何添加到 vue devtools 组件树上
sharedContext.activate = (vnode, container, anchor) => {
  // instance 是子组件实例
  const instance = vnode.component!
  // ...
  // dev环境下设置, 自己模拟写的
  devtools.emit('component:added', instance.appContext.app, instance.uid, instance.parent ? instance.parent.uid: undefined, instance)
  // 官方添加
  if (__DEV__ || __FEATURE_PROD_DEVTOOLS__) {
    // Update components tree
    devtoolsComponentAdded(instance)
  }
}
// 同理 sharedContext.deactivates 上也要添加,不然不会显示在组件树上5、缓存的子组件 props 更新处理
当子组件有 prop 更新时是需要重新去 patch 的,所以在 activate 的时候需要重新执行 patch 进行子组件更新
sharedContext.activate = (vnode, container, anchor) => {
  // ...
  // props 改变需要重新 patch(update)
  patch(
    instance.vnode,
    vnode,
    container,
    anchor,
    instance,
    parentSuspense,
    isSVG,
    vnode.slotScopeIds,
    optimized
  )
}以上是一文聊聊Vue中的KeepAlive组件的详细内容。更多信息请关注PHP中文网其他相关文章!

热AI工具

Undresser.AI Undress
人工智能驱动的应用程序,用于创建逼真的裸体照片

AI Clothes Remover
用于从照片中去除衣服的在线人工智能工具。

Undress AI Tool
免费脱衣服图片

Clothoff.io
AI脱衣机

AI Hentai Generator
免费生成ai无尽的。

热门文章
热工具

记事本++7.3.1
好用且免费的代码编辑器

SublimeText3汉化版
中文版,非常好用

禅工作室 13.0.1
功能强大的PHP集成开发环境

Dreamweaver CS6
视觉化网页开发工具

SublimeText3 Mac版
神级代码编辑软件(SublimeText3)
热门话题


 PHP与Vue:完美搭档的前端开发利器
Mar 16, 2024 pm 12:09 PM
PHP与Vue:完美搭档的前端开发利器
Mar 16, 2024 pm 12:09 PM
PHP与Vue:完美搭档的前端开发利器在当今互联网高速发展的时代,前端开发变得愈发重要。随着用户对网站和应用的体验要求越来越高,前端开发人员需要使用更加高效和灵活的工具来创建响应式和交互式的界面。PHP和Vue.js作为前端开发领域的两个重要技术,搭配起来可以称得上是完美的利器。本文将探讨PHP和Vue的结合,以及详细的代码示例,帮助读者更好地理解和应用这两
 前端面试官常问的问题
Mar 19, 2024 pm 02:24 PM
前端面试官常问的问题
Mar 19, 2024 pm 02:24 PM
在前端开发面试中,常见问题涵盖广泛,包括HTML/CSS基础、JavaScript基础、框架和库、项目经验、算法和数据结构、性能优化、跨域请求、前端工程化、设计模式以及新技术和趋势。面试官的问题旨在评估候选人的技术技能、项目经验以及对行业趋势的理解。因此,应试者应充分准备这些方面,以展现自己的能力和专业知识。
 Django是前端还是后端?一探究竟!
Jan 19, 2024 am 08:37 AM
Django是前端还是后端?一探究竟!
Jan 19, 2024 am 08:37 AM
Django是一个Python编写的web应用框架,它强调快速开发和干净方法。尽管Django是一个web框架,但是要回答Django是前端还是后端这个问题,需要深入理解前后端的概念。前端是指用户直接和交互的界面,后端是指服务器端的程序,他们通过HTTP协议进行数据的交互。在前端和后端分离的情况下,前后端程序可以独立开发,分别实现业务逻辑和交互效果,数据的交
 C#开发经验分享:前端与后端协同开发技巧
Nov 23, 2023 am 10:13 AM
C#开发经验分享:前端与后端协同开发技巧
Nov 23, 2023 am 10:13 AM
作为一名C#开发者,我们的开发工作通常包括前端和后端的开发,而随着技术的发展和项目的复杂性提高,前端与后端协同开发也变得越来越重要和复杂。本文将分享一些前端与后端协同开发的技巧,以帮助C#开发者更高效地完成开发工作。确定好接口规范前后端的协同开发离不开API接口的交互。要保证前后端协同开发顺利进行,最重要的是定义好接口规范。接口规范涉及到接口的命
 Go语言前端技术探秘:前端开发新视野
Mar 28, 2024 pm 01:06 PM
Go语言前端技术探秘:前端开发新视野
Mar 28, 2024 pm 01:06 PM
Go语言作为一种快速、高效的编程语言,在后端开发领域广受欢迎。然而,很少有人将Go语言与前端开发联系起来。事实上,使用Go语言进行前端开发不仅可以提高效率,还能为开发者带来全新的视野。本文将探讨使用Go语言进行前端开发的可能性,并提供具体的代码示例,帮助读者更好地了解这一领域。在传统的前端开发中,通常会使用JavaScript、HTML和CSS来构建用户界面
 前端怎么实现即时通讯
Oct 09, 2023 pm 02:47 PM
前端怎么实现即时通讯
Oct 09, 2023 pm 02:47 PM
实现即时通讯的方法有WebSocket、Long Polling、Server-Sent Events、WebRTC等等。详细介绍:1、WebSocket,它可以在客户端和服务器之间建立持久连接,实现实时的双向通信,前端可以使用 WebSocket API来创建WebSocket连接,并通过发送和接收消息来实现即时通讯;2、Long Polling,是一种模拟实时通信的技术等等
 Golang与前端技术结合:探讨Golang如何在前端领域发挥作用
Mar 19, 2024 pm 06:15 PM
Golang与前端技术结合:探讨Golang如何在前端领域发挥作用
Mar 19, 2024 pm 06:15 PM
Golang与前端技术结合:探讨Golang如何在前端领域发挥作用,需要具体代码示例随着互联网和移动应用的快速发展,前端技术也愈发重要。而在这个领域中,Golang作为一门强大的后端编程语言,也可以发挥重要作用。本文将探讨Golang如何与前端技术结合,以及通过具体的代码示例来展示其在前端领域的潜力。Golang在前端领域的作用作为一门高效、简洁且易于学习的
 Django:前端和后端开发都能搞定的神奇框架!
Jan 19, 2024 am 08:52 AM
Django:前端和后端开发都能搞定的神奇框架!
Jan 19, 2024 am 08:52 AM
Django:前端和后端开发都能搞定的神奇框架!Django是一个高效、可扩展的Web应用程序框架。它能够支持多种Web开发模式,包括MVC和MTV,可以轻松地开发出高质量的Web应用程序。Django不仅支持后端开发,还能够快速构建出前端的界面,通过模板语言,实现灵活的视图展示。Django把前端开发和后端开发融合成了一种无缝的整合,让开发人员不必专门学习
