聊聊Node中的url模块和querystring模块

url模块和querystring模块是非常重要的两个URL处理模块。在做node服务端的开发时会经常用到。
url
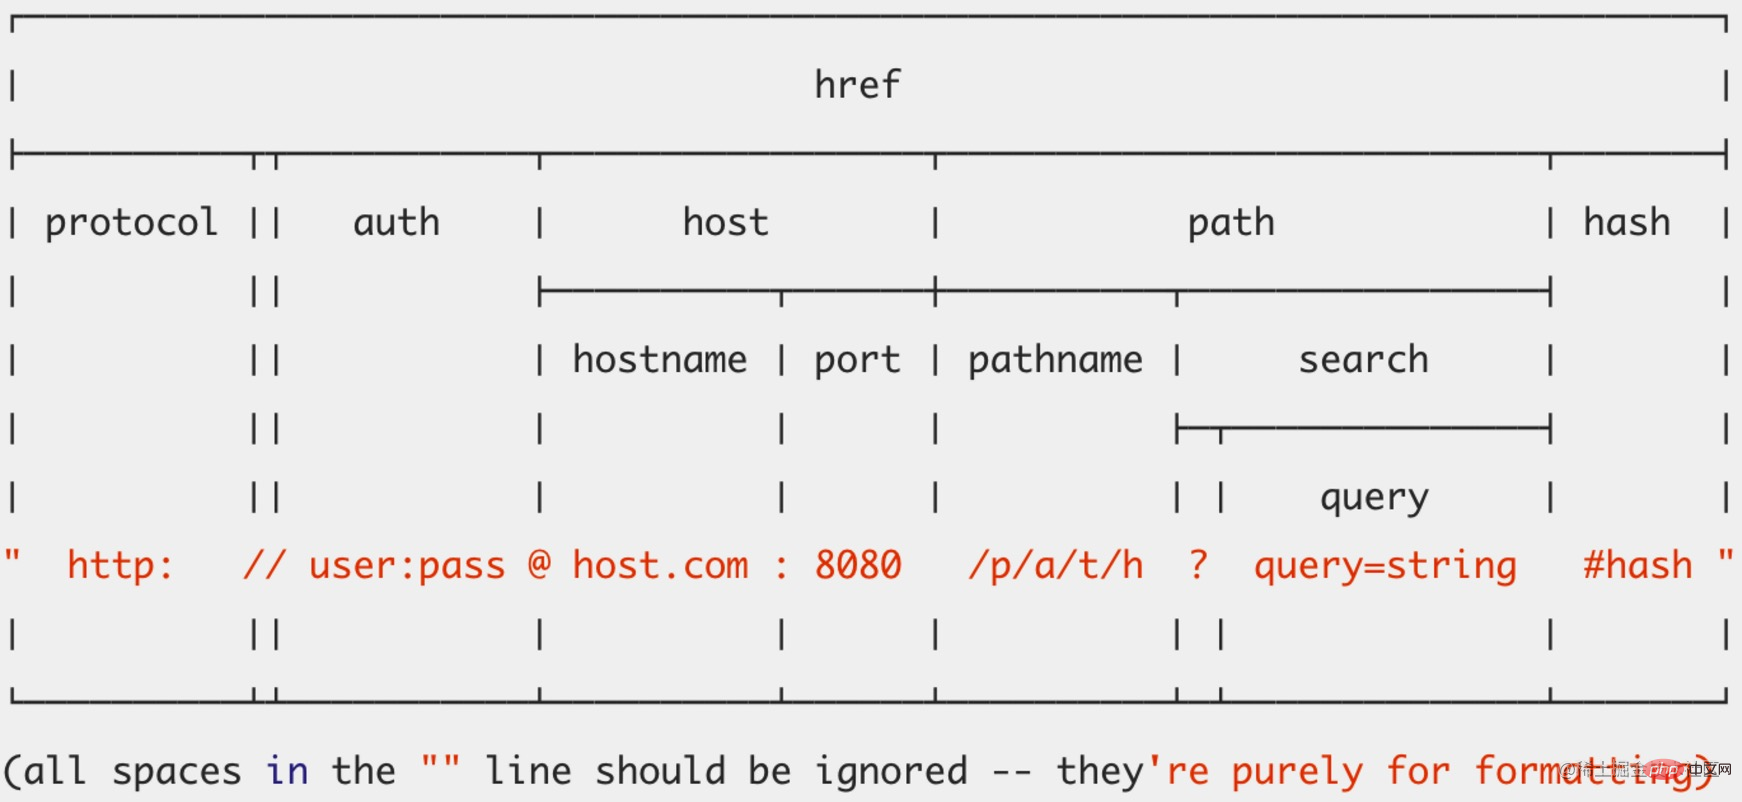
在介绍url模块之前我们先来一张图,看懂了这张图对于url这个模块你就基本上没什么问题了。

我们来解释下各自的含义
- protocol:协议,需要注意的是包含了
:,并且是小写的。【相关教程推荐:nodejs视频教程、编程教学】 - slashes:如果
:后面跟了两个//,那么为true。 - auth:认证信息,如果有密码,为
usrname:passwd,如果没有,则为usrname。注意,这里区分大小写。 - host:主机名。注意包含了端口,比如
ke.qq.com:8080,并且是小写的。 - hostname:主机名,不包含端口,并且是小写的。
- port: 端口号。
- path:路径部分,包含search部分。
- pathname:路径部分,不包含search部分。
- search:查询字符串,注意,包含了
?,此外,值是没有经过decode的。 - query:字符串 或者 对象。如果是字符串,则是
search去掉?,其余一样;如果是对象,那么是decode过的。 - hash:哈希部分,注意包含了
#。 - href:原始的地址。不过需要注意的是,
protocol、host会被转成小写字母。
下面我们来讲解下它的三个常用方法
parse(urlString, parseQueryString, slashesDenoteHost)
该方法将url字符串,解析成object,便于开发者进行操作。
const url = require("url");

const str = "http://user:password@randy.com:8080/index.html?nick=%E4%B8%AD%E6%96%87#part=1";

const obj = url.parse(str);
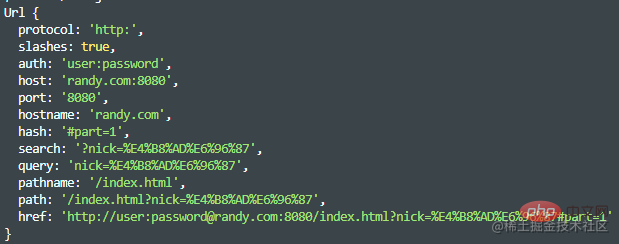
console.log(obj);
输出

该方法还支持传递另外两个参数,parseQueryString和slashesDenoteHos
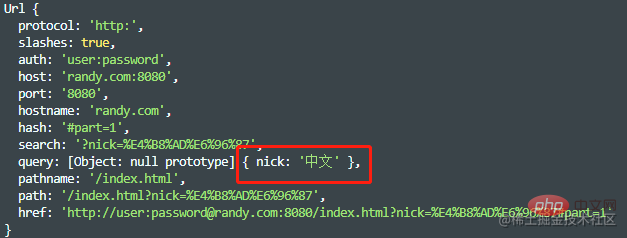
parseQueryString:(默认为false)如为false,则urlObject.query为未解析的字符串,比如nick=%E4%B8%AD%E6%96%87,且对应的值不会decode;如果parseQueryString为true,则urlObject.query为object,比如{ nick: '中文' },且值会被`decode;
const url = require("url");

const str = "http://user:password@randy.com:8080/index.html?nick=%E4%B8%AD%E6%96%87#part=1";

const obj2 = url.parse(str, true);
console.log(obj2);

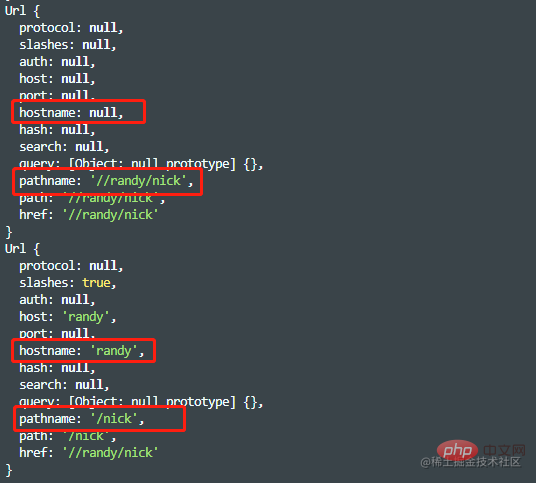
slashesDenoteHos:(默认为false)如果为true,那么类似//randy/nick里的randy就会被认为是hostname;如果为false,则randy被认为是pathname的一部分。
光看起来可能不太理解这句话的含义,下面笔者举个例子我相信你们就明白了。
const str2 = "//randy/nick";

const obj3 = url.parse(str2, true, false);
console.log(obj3);
const obj4 = url.parse(str2, true, true);
console.log(obj4);

format(urlObject)
这个方法就是parse的反向操作。将对象转成url字符串。
const pathObj = {
  protocol: "http:",
  slashes: true,
  auth: "user:password",
  host: "randy.com:8080",
  port: "8080",
  hostname: "randy.com",
  hash: "#part=1",
  search: "?nick=%E4%B8%AD%E6%96%87",
  query: "nick=%E4%B8%AD%E6%96%87",
  pathname: "/index.html",
  path: "/index.html?nick=%E4%B8%AD%E6%96%87",
  href: "http://user:password@randy.com:8080/index.html?nick=%E4%B8%AD%E6%96%87#part=1",
};

console.log(url.format(pathObj)); // http://user:password@randy.com:8080/index.html?nick=%E4%B8%AD%E6%96%87#part=1resolve(from, to)
该方法用于解析相对于基本URL的目标URL。
console.log(url.resolve("/one/two/three", "four")); // /one/two/four
console.log(url.resolve("http://example.com/", "/one")); // http://example.com/one
console.log(url.resolve("http://example.com/one", "/two")); // http://example.com/two
console.log(url.resolve("http://example.com/one/ddd/ddd/ddd", "./two")); // http://example.com/one/ddd/ddd/two
console.log(url.resolve("http://example.com/one/ddd/ddd/ddd", "../two")); // http://example.com/one/ddd/two
console.log(url.resolve("http://example.com/one/ddd/ddd/ddd", ".../two")); // http://example.com/one/ddd/ddd/.../two
querystring
querystring这个模块,也是用来做url查询参数的解析。这里我们重点分析下它的parse和stringify两个方法。
parse(str, sep, eq, options)
parse是将查询字符串转成对象类型,并且也会decode。
const querystring = require("querystring");

const str = "nick=randy&age=24&nick2=%E4%B8%AD%E6%96%87";
const obj = querystring.parse(str);
console.log(obj); // { nick: 'randy', age: '24', nick2: '中文' }下面我们再来看看它的第二和第三个参数。其实相当于可以替换&、=为自定义字符,下面笔者举个例子就很快明白了。
const str1 = "name-randy|country-cn";
const obj1 = querystring.parse(str1);
console.log(obj1); // { 'name-randy|country-cn': '' }
const obj2 = querystring.parse(str1, "|", "-");
console.log(obj2); // { name: 'randy', country: 'cn' }相当于把&替换成了|,把=替换成了-。笔者感觉配到这种情况应该不多。
stringify(obj, sep, eq, options)
这个方法就是上面parse的反向操作。下面咱们直接上例子
const obj3 = {
  nick: "randy",
  age: "24",
};
const str4 = querystring.stringify(obj3);
console.log(str4); // nick=randy&age=24这个方法也是支持自定义分割符的。
const obj5 = {
  name: "randy",
  country: "cn",
};
const str6 = querystring.stringify(obj5, "|", "-");
console.log(str6); // name-randy|country-c更多node相关知识,请访问:nodejs 教程!
以上是聊聊Node中的url模块和querystring模块的详细内容。更多信息请关注PHP中文网其他相关文章!

热AI工具

Undresser.AI Undress
人工智能驱动的应用程序,用于创建逼真的裸体照片

AI Clothes Remover
用于从照片中去除衣服的在线人工智能工具。

Undress AI Tool
免费脱衣服图片

Clothoff.io
AI脱衣机

AI Hentai Generator
免费生成ai无尽的。

热门文章

热工具

记事本++7.3.1
好用且免费的代码编辑器

SublimeText3汉化版
中文版,非常好用

禅工作室 13.0.1
功能强大的PHP集成开发环境

Dreamweaver CS6
视觉化网页开发工具

SublimeText3 Mac版
神级代码编辑软件(SublimeText3)

热门话题
 PHP与Vue:完美搭档的前端开发利器
Mar 16, 2024 pm 12:09 PM
PHP与Vue:完美搭档的前端开发利器在当今互联网高速发展的时代,前端开发变得愈发重要。随着用户对网站和应用的体验要求越来越高,前端开发人员需要使用更加高效和灵活的工具来创建响应式和交互式的界面。PHP和Vue.js作为前端开发领域的两个重要技术,搭配起来可以称得上是完美的利器。本文将探讨PHP和Vue的结合,以及详细的代码示例,帮助读者更好地理解和应用这两
 前端面试官常问的问题
Mar 19, 2024 pm 02:24 PM
在前端开发面试中,常见问题涵盖广泛,包括HTML/CSS基础、JavaScript基础、框架和库、项目经验、算法和数据结构、性能优化、跨域请求、前端工程化、设计模式以及新技术和趋势。面试官的问题旨在评估候选人的技术技能、项目经验以及对行业趋势的理解。因此,应试者应充分准备这些方面,以展现自己的能力和专业知识。
 Django是前端还是后端?一探究竟!
Jan 19, 2024 am 08:37 AM
Django是一个Python编写的web应用框架,它强调快速开发和干净方法。尽管Django是一个web框架,但是要回答Django是前端还是后端这个问题,需要深入理解前后端的概念。前端是指用户直接和交互的界面,后端是指服务器端的程序,他们通过HTTP协议进行数据的交互。在前端和后端分离的情况下,前后端程序可以独立开发,分别实现业务逻辑和交互效果,数据的交
 C#开发经验分享:前端与后端协同开发技巧
Nov 23, 2023 am 10:13 AM
作为一名C#开发者,我们的开发工作通常包括前端和后端的开发,而随着技术的发展和项目的复杂性提高,前端与后端协同开发也变得越来越重要和复杂。本文将分享一些前端与后端协同开发的技巧,以帮助C#开发者更高效地完成开发工作。确定好接口规范前后端的协同开发离不开API接口的交互。要保证前后端协同开发顺利进行,最重要的是定义好接口规范。接口规范涉及到接口的命
 golang框架面试题集锦
Jun 02, 2024 pm 09:37 PM
Go框架是一组扩展Go内置库的组件,提供预制功能(例如Web开发和数据库操作)。流行的Go框架包括Gin(Web开发)、GORM(数据库操作)和RESTful(API管理)。中间件是HTTP请求处理链中的拦截器模式,用于在不修改处理程序的情况下添加身份验证或请求日志记录等功能。Session管理通过存储用户数据来保持会话状态,可以使用gorilla/sessions管理session。
 Go语言前端技术探秘:前端开发新视野
Mar 28, 2024 pm 01:06 PM
Go语言作为一种快速、高效的编程语言,在后端开发领域广受欢迎。然而,很少有人将Go语言与前端开发联系起来。事实上,使用Go语言进行前端开发不仅可以提高效率,还能为开发者带来全新的视野。本文将探讨使用Go语言进行前端开发的可能性,并提供具体的代码示例,帮助读者更好地了解这一领域。在传统的前端开发中,通常会使用JavaScript、HTML和CSS来构建用户界面
 Java JPA 面试题精选:检验你的持久化框架掌握程度
Feb 19, 2024 pm 09:12 PM
什么是JPA?它与JDBC有什么区别?JPA(JavaPersistenceapi)是一个用于对象关系映射(ORM)的标准接口,它允许Java开发者使用熟悉的Java对象来操作数据库,而无需编写直接针对数据库的sql查询。而JDBC(JavaDatabaseConnectivity)是Java用于连接数据库的标准API,它需要开发者使用SQL语句来操作数据库。JPA将JDBC封装起来,为对象-关系映射提供了更方便、更高级别的API,简化了数据访问操作。在JPA中,什么是实体(Entity)?实体
 前端怎么实现即时通讯
Oct 09, 2023 pm 02:47 PM
实现即时通讯的方法有WebSocket、Long Polling、Server-Sent Events、WebRTC等等。详细介绍:1、WebSocket,它可以在客户端和服务器之间建立持久连接,实现实时的双向通信,前端可以使用 WebSocket API来创建WebSocket连接,并通过发送和接收消息来实现即时通讯;2、Long Polling,是一种模拟实时通信的技术等等


