

Python深度学习18-生成式深度学习之DeepDream

DeepDream简介
DeepDream是一种艺术性的图像修改技术,主要是基于训练好的卷积神经网络CNN进行图片的生成。
在生成图片时,神经网络是冻结的,也就是网络的权重不再更新,只需要更新输入的图片。常用的预训练卷积网络包括Google的Inception、VGG网络和ResNet网络等。
DeePDream的基本步骤:
- 获取输入图片
- 将图片输入网络,得到所希望可视化的神经元的输出值
- 计算神经元输出值对图片各像素的梯度
- 使用梯度下降不断更新图片
重复第2、3、4步,直到满足所设定的条件
下面是使用Keras实现DeepDream的大致过程:
用Keras实现DeepDream
获取测试图片
In [1]:
# ---------------
from tensorflow import keras
import matplotlib.pyplot as plt
%matplotlib inline

base_image_path = keras.utils.get_file(
"coast.jpg",
origin="https://img-datasets.s3.amazonaws.com/coast.jpg")

plt.axis("off")
plt.imshow(keras.utils.load_img(base_image_path))
plt.show()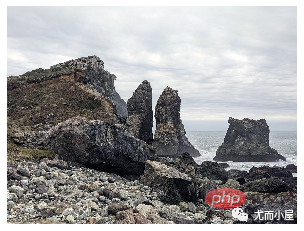
上面是Keras自带的一张海岸线的图片。下面就是对这张图进行变化。
准备预训练模型InceptionV3
In [2]:
# 使用Inception V3实现
from keras.applications import inception_v3

# 使用预训练的ImageNet权重来加载模型
model = inception_v3.InceptionV3(weights="imagenet", # 构建不包含全连接层的Inceptino
 include_top=False)
Downloading data from https://storage.googleapis.com/tensorflow/keras-applications/inception_v3/inception_v3_weights_tf_dim_ordering_tf_kernels_notop.h5
87916544/87910968 [==============================] - 74s 1us/step
87924736/87910968 [==============================] - 74s 1us/step
In [3]:
model.summary()

设置DeepDream配置
In [4]:
# 层的名称 + 系数:该层对需要最大化的损失的贡献大小

layer_settings = {"mixed4":1.0,
"mixed5":1.5,
"mixed6":2.0,
"mixed7":2.5}

outputs_dict = dict(
[
(layer.name, layer.output) # 层的名字 + 该层的输出
for layer in [model.get_layer(name) for name in layer_settings.keys()]
]
)

outputs_dictOut[4]:
{'mixed4': <KerasTensor: shape=(None, None, None, 768) dtype=float32 (created by layer 'mixed4')>,
 'mixed5': <KerasTensor: shape=(None, None, None, 768) dtype=float32 (created by layer 'mixed5')>,
 'mixed6': <KerasTensor: shape=(None, None, None, 768) dtype=float32 (created by layer 'mixed6')>,
'mixed7': <KerasTensor: shape=(None, None, None, 768) dtype=float32 (created by layer 'mixed7')>}In [5]:
# 特征提取

feature_extractor = keras.Model(inputs=model.inputs, outputs=outputs_dict)
feature_extractor
Out[5]:
<keras.engine.functional.Functional at 0x15b5ff0d0>
计算损失
In [6]:
def compute_loss(image):
features = feature_extractor(image)# 特征提取
loss = tf.zeros(shape=())# 损失初始化

for name in features.keys():# 遍历层
coeff = layer_settings[name] # 某个层的系数
activation = features[name]# 某个层的激活函数
#为了避免出现边界伪影,损失中仅包含非边界的像素
loss += coeff * tf.reduce_mean(tf.square(activation[:, 2:-2, 2:-2, :])) # 将该层的L2范数添加到loss中;
return loss
梯度上升过程
In [7]:
import tensorflow as tf

@tf.function
def gradient_ascent_step(image, lr): # lr--->learning_rate学习率
with tf.GradientTape() as tape:
tape.watch(image)
loss = compute_loss(image)# 调用计算损失方法
grads = tape.gradient(loss, image)# 梯度更新
grads = tf.math.l2_normalize(grads)
image += lr * grads
return loss, image

def gradient_ascent_loop(image, iterations, lr, max_loss=None):
for i in range(iterations):
loss, image = gradient_ascent_step(image, lr)
if max_loss is not None and loss > max_loss:
break
print(f"第{i}步的损失值是{loss:.2f}")

return image图片生成
np.expand_dims用法(个人添加)
In [8]:
import numpy as np

array = np.array([[1,2,3],
[4,5,6]]
)
array
Out[8]:
array([[1, 2, 3],
 [4, 5, 6]])
In [9]:
array.shape
Out[9]:
(2, 3)
In [10]:
array1 = np.expand_dims(array,axis=0)
array1
Out[10]:
array([[[1, 2, 3],
[4, 5, 6]]])
In [11]:
array1.shape
Out[11]:
(1, 2, 3)
In [12]:
array2 = np.expand_dims(array,axis=1)
array2
Out[12]:
array([[[1, 2, 3]],

 [[4, 5, 6]]])
In [13]:
array2.shape
Out[13]:
(2, 1, 3)
In [14]:
array3 = np.expand_dims(array,axis=-1)
array3
Out[14]:
array([[[1],
[2],
[3]],

 [[4],
[5],
[6]]])
In [15]:
array3.shape
Out[15]:
(2, 3, 1)
np.clip功能(个人添加)
np.clip(
array,
min(array),
max(array),
out=None):
In [16]:
array = np.array([1,2,3,4,5,6])

np.clip(array, 2, 5)# 输出长度和原数组相同
Out[16]:
array([2, 2, 3, 4, 5, 5])
In [17]:
array = np.arange(18).reshape((6,3))
array
Out[17]:
array([[ 0,1,2],
 [ 3,4,5],
 [ 6,7,8],
 [ 9, 10, 11],
 [12, 13, 14],
 [15, 16, 17]])
In [18]:
np.clip(array, 5, 15)
Out[18]:
array([[ 5,5,5],
 [ 5,5,5],
 [ 6,7,8],
 [ 9, 10, 11],
 [12, 13, 14],
 [15, 15, 15]])
参数设置
In [19]:
step = 20.#梯度上升的步长
num_octave = 3# 运行梯度上升的尺度个数
octave_scale = 1.4# 两个尺度间的比例大小
iterations = 30# 在每个尺度上运行梯度上升的步数
max_loss = 15.# 损失值若大于15,则中断梯度上升过程
图片预处理
In [20]:
import numpy as np

def preprocess_image(image_path):# 预处理
img = keras.utils.load_img(image_path)# 导入图片
img = keras.utils.img_to_array(img)# 转成数组
img = np.expand_dims(img, axis=0)# 增加数组维度;见上面解释(x,y) ---->(1,x,y)
img = keras.applications.inception_v3.preprocess_input(img)
return img


def deprocess_image(img):# 图片压缩处理
img = img.reshape((img.shape[1], img.shape[2], 3))
img /= 2.0
img += 0.5
img *= 255.
# np.clip:截断功能,保证数组中的取值在0-255之间
img = np.clip(img, 0, 255).astype("uint8")
return img生成图片
In [21]:
# step = 20.#梯度上升的步长
# num_octave = 3# 运行梯度上升的尺度个数
# octave_scale = 1.4# 两个尺度间的比例大小
# iterations = 30# 在每个尺度上运行梯度上升的步数
# max_loss = 15.0# 损失值若大于15,则中断梯度上升过程

original_img = preprocess_image(base_image_path)# 预处理函数
original_shape = original_img.shape[1:3]

print(original_img.shape)# 四维图像
print(original_shape)# 第2和3维度的值
(1, 900, 1200, 3)
(900, 1200)
In [22]:
successive_shapes = [original_shape]

for i in range(1, num_octave):
shape = tuple([int(dim / (octave_scale ** i)) for dim in original_shape])
successive_shapes.append(shape)
successive_shapes = successive_shapes[::-1]# 翻转

shrunk_original_img = tf.image.resize(original_img, successive_shapes[0])

img = tf.identity(original_img)
for i, shape in enumerate(successive_shapes):
print(f"Processing octave {i} with shape {shape}")
# resize
img = tf.image.resize(img, shape)
img = gradient_ascent_loop(# 梯度上升函数调用
img,
iteratinotallow=iterations,
lr=step,
max_loss=max_loss
)
# resize
upscaled_shrunk_original_img = tf.image.resize(shrunk_original_img, shape)
same_size_original = tf.image.resize(original_img, shape)

lost_detail = same_size_original - upscaled_shrunk_original_img
img += lost_detail
shrunk_original_img = tf.image.resize(original_img, shape)

keras.utils.save_img("dream.png", deprocess_image(img.numpy()))结果为:
Processing octave 0 with shape (459, 612)
第0步的损失值是0.80
第1步的损失值是1.07
第2步的损失值是1.44
第3步的损失值是1.82
......
第26步的损失值是11.44
第27步的损失值是11.72
第28步的损失值是12.03
第29步的损失值是12.49
同时在本地生成了新图片,看下效果:
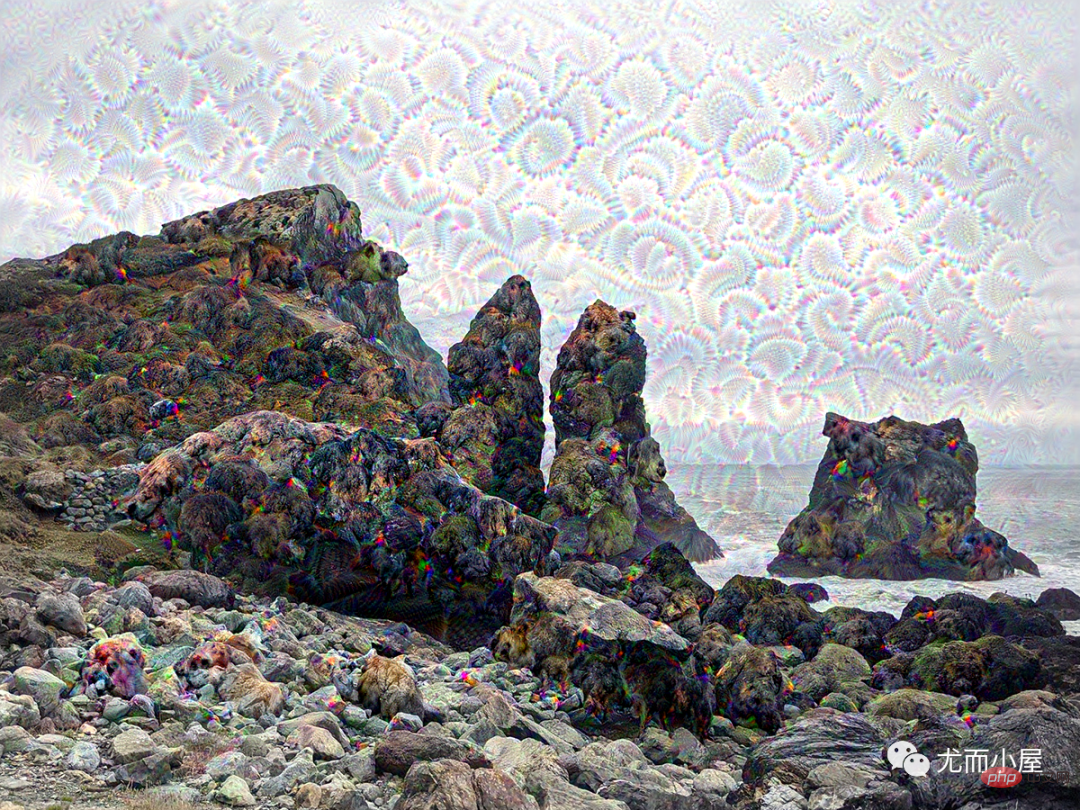
再看一眼原图:相对比之下,新图有点梦幻的味道!

以上是Python深度学习18-生成式深度学习之DeepDream的详细内容。更多信息请关注PHP中文网其他相关文章!

热AI工具

Undresser.AI Undress
人工智能驱动的应用程序,用于创建逼真的裸体照片

AI Clothes Remover
用于从照片中去除衣服的在线人工智能工具。

Undress AI Tool
免费脱衣服图片

Clothoff.io
AI脱衣机

Video Face Swap
使用我们完全免费的人工智能换脸工具轻松在任何视频中换脸!

热门文章
热工具

记事本++7.3.1
好用且免费的代码编辑器

SublimeText3汉化版
中文版,非常好用

禅工作室 13.0.1
功能强大的PHP集成开发环境

Dreamweaver CS6
视觉化网页开发工具

SublimeText3 Mac版
神级代码编辑软件(SublimeText3)
热门话题


 在PHP和Python之间进行选择:指南
Apr 18, 2025 am 12:24 AM
在PHP和Python之间进行选择:指南
Apr 18, 2025 am 12:24 AM
PHP适合网页开发和快速原型开发,Python适用于数据科学和机器学习。1.PHP用于动态网页开发,语法简单,适合快速开发。2.Python语法简洁,适用于多领域,库生态系统强大。
 PHP和Python:解释了不同的范例
Apr 18, 2025 am 12:26 AM
PHP和Python:解释了不同的范例
Apr 18, 2025 am 12:26 AM
PHP主要是过程式编程,但也支持面向对象编程(OOP);Python支持多种范式,包括OOP、函数式和过程式编程。PHP适合web开发,Python适用于多种应用,如数据分析和机器学习。
 vs code 可以在 Windows 8 中运行吗
Apr 15, 2025 pm 07:24 PM
vs code 可以在 Windows 8 中运行吗
Apr 15, 2025 pm 07:24 PM
VS Code可以在Windows 8上运行,但体验可能不佳。首先确保系统已更新到最新补丁,然后下载与系统架构匹配的VS Code安装包,按照提示安装。安装后,注意某些扩展程序可能与Windows 8不兼容,需要寻找替代扩展或在虚拟机中使用更新的Windows系统。安装必要的扩展,检查是否正常工作。尽管VS Code在Windows 8上可行,但建议升级到更新的Windows系统以获得更好的开发体验和安全保障。
 visual studio code 可以用于 python 吗
Apr 15, 2025 pm 08:18 PM
visual studio code 可以用于 python 吗
Apr 15, 2025 pm 08:18 PM
VS Code 可用于编写 Python,并提供许多功能,使其成为开发 Python 应用程序的理想工具。它允许用户:安装 Python 扩展,以获得代码补全、语法高亮和调试等功能。使用调试器逐步跟踪代码,查找和修复错误。集成 Git,进行版本控制。使用代码格式化工具,保持代码一致性。使用 Linting 工具,提前发现潜在问题。
 vscode 扩展是否是恶意的
Apr 15, 2025 pm 07:57 PM
vscode 扩展是否是恶意的
Apr 15, 2025 pm 07:57 PM
VS Code 扩展存在恶意风险,例如隐藏恶意代码、利用漏洞、伪装成合法扩展。识别恶意扩展的方法包括:检查发布者、阅读评论、检查代码、谨慎安装。安全措施还包括:安全意识、良好习惯、定期更新和杀毒软件。
 vscode怎么在终端运行程序
Apr 15, 2025 pm 06:42 PM
vscode怎么在终端运行程序
Apr 15, 2025 pm 06:42 PM
在 VS Code 中,可以通过以下步骤在终端运行程序:准备代码和打开集成终端确保代码目录与终端工作目录一致根据编程语言选择运行命令(如 Python 的 python your_file_name.py)检查是否成功运行并解决错误利用调试器提升调试效率
 Python vs. JavaScript:学习曲线和易用性
Apr 16, 2025 am 12:12 AM
Python vs. JavaScript:学习曲线和易用性
Apr 16, 2025 am 12:12 AM
Python更适合初学者,学习曲线平缓,语法简洁;JavaScript适合前端开发,学习曲线较陡,语法灵活。1.Python语法直观,适用于数据科学和后端开发。2.JavaScript灵活,广泛用于前端和服务器端编程。
 vscode 可以用于 mac 吗
Apr 15, 2025 pm 07:36 PM
vscode 可以用于 mac 吗
Apr 15, 2025 pm 07:36 PM
VS Code 可以在 Mac 上使用。它具有强大的扩展功能、Git 集成、终端和调试器,同时还提供了丰富的设置选项。但是,对于特别大型项目或专业性较强的开发,VS Code 可能会有性能或功能限制。
