

使用Python+Turtle库绘制蜘蛛侠的步骤

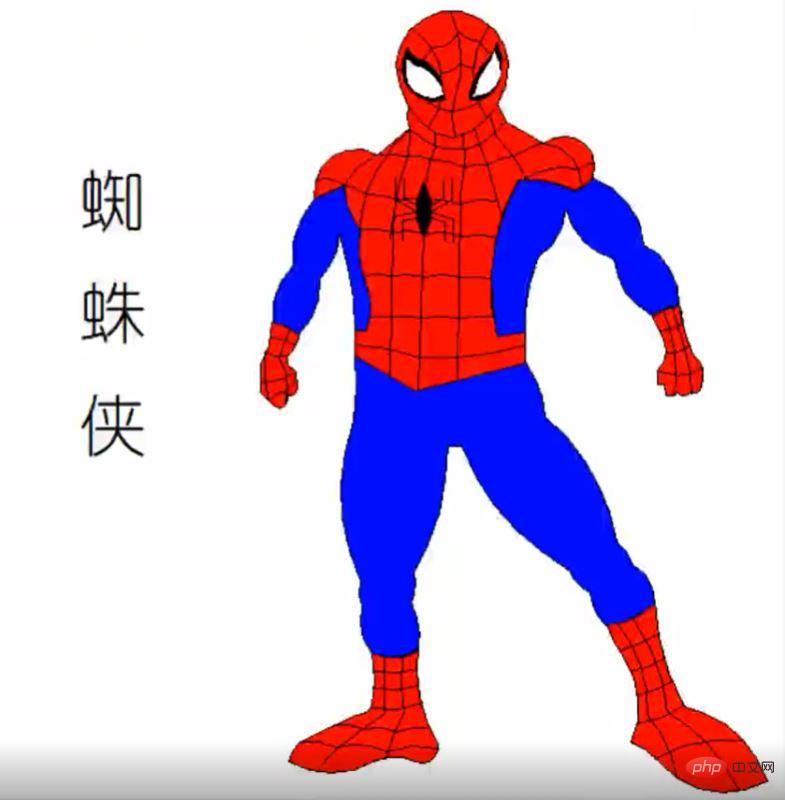
一、效果展示
在介绍代码之前,先来看下本文的实现效果。
Pinstaller(Python打包为exe文件)
之前自己把 Python 文件打包成 exe 的时候,折腾了很久,本文将详细地讲述如何快速生成在不安装 Python 的电脑上也能执行的文件
1. 在 prompt 中运行 pip install pyinstaller , 安装 pyinstaller 库
2. 在 prompt 中运行 where pyinstaller

3. 找到待打包文件存放的路径
把要打包的文件放到找到的路径
C:\Users\Administrator\Anaconda3\Scripts 中 (我的路径是这个,你就按照第二步的路径)
4. 调用 cmd 窗口
把待打包文件放在
C:\Users\Administrator\Anaconda3 \Scripts 目录下,在该文件夹中按shift+鼠标右键 , 点击 在此处打开命令窗口 调用 cmd
5. 在 cmd 中输入 pyinstaller -F 文件名
例子:打包 Python 绘制皮卡丘的视频,在cmd中输入 pyinstaller -F pkq_1.py
即可生成普通图标的exe可执行文件。
6. 生成 exe 文件
可以在路径
C:\Users\Administrator\Anaconda3\Scripts 下的 dist 文件夹中找到打包好的exe文件(即不用安装 Python 也可以运行的文件)。
这样生成的文件图标是标准固定格式,如果想生成特定特定形状的图标需要用第7点中的语句。
7. 生成自定义形状的图标,在cmd中输入:pyinstaller -i ico路径 -F xxxxx.py
例子: 打包 Python 绘制皮卡丘视频的py文件,在cmd中输入 (注: 我把ico图标和待打包文件放到一个文件夹下了, 所以直接输入了ico的名字)
pyinstaller -i pikaqiu2.ico -F pkq_1.py
生成图标是皮卡丘形状的exe文件。
二、代码详解
Python绘制蜘蛛侠的原理是:应用turtle库绘制身体的不同部位。
1.导入库
首先导入本文需要加载的库,如果你有些库还没有安装,导致运行代码时报错,可以在Anaconda Prompt中用pip方法安装。
# -*- coding: UTF-8 -*-
'''
代码用途 :画蜘蛛侠
作者     :阿黎逸阳
博客     :  https://blog.csdn.net/qq_32532663/article/details/106176609
'''
import os
import pygame
import turtle as t
本文应用到的库较少,只应用了os、pygame和turtle三个库。
os库可以设置文件读取的位置。
pygame库是为了绘制过程更有趣,在绘图过程中添加了背景音乐。
turtle库是绘图库,相当于给你一支画笔,你可以在画布上用数学逻辑控制的代码完成绘图。
2.播放音乐
接着应用pygame库播放背景音乐,本文的音乐是《Sunflower》。
os.chdir(r'F:\公众号\56.蜘蛛侠')
#播放音乐
print('播放音乐')
pygame.mixer.init()
pygame.mixer.music.load("Cope - Sunflower (Original Version).mp3")
pygame.mixer.music.set_volume(0.5)
pygame.mixer.music.play(1, 10)这一部分的代码和整体代码是剥离的,可以选泽在最开始放上该代码,也可以直接删除。
如果选择播放音乐,需要在代码music.load函数中把你想放音乐的电脑本地存放地址填进去。
有部分朋友对这一块有疑问,填充格式可参考如下图片:
3.定义画蜘蛛侠上半身的函数
然后设置画板的大小,并定义绘制蜘蛛侠上半身的函数。
t.title('阿黎逸阳的代码公众号')
t.speed(10)
#t.screensize(1000, 800)
t.setup(startx=0, starty = 0, width=800, height = 600)
def up_body():
    #画头
    t.penup()
    t.goto(60, 200)
    t.pendown()
    t.pensize(1)
    t.color('black', 'red')
    t.begin_fill()
    t.setheading(60)
    t.circle(60, 30)
    t.left(4)
    t.circle(40, 173)
    t.left(4)
    t.circle(60, 30)
    #画脖子
    t.setheading(260)
    t.circle(30, 29)
    #画肩膀
    t.setheading(220)
    t.forward(30)
    #画手上肌肉
    t.setheading(150)
    t.circle(30, 130)
    #画胸部的内部线
    t.setheading(30)
    t.circle(-100, 13)
    t.setheading(270)
    t.circle(50, 40)
    t.setheading(255)
    t.circle(55, 40)
    t.circle(-40, 50)
    #画腰部的外横线
    t.setheading(0)
    t.forward(-7)
    t.setheading(270)
    t.forward(18)
    #画腰线
    t.setheading(-30)
    t.forward(50)
    t.setheading(15)
    t.forward(80)
    t.setheading(90)
    t.forward(22)
    #重复的地方
    #画衣服内轮廓
    t.setheading(190)
    t.forward(20)
    t.setheading(103)
    t.circle(-160, 41)
    #画手内轮廓
    t.setheading(5)
    t.circle(-80, 30)
    t.setheading(20)
    t.circle(30, 30)
    #重复的地方
    #手臂上肌肉
    t.setheading(70)
    t.circle(22, 150)
    t.setheading(150)
    t.forward(30)
    t.setheading(120)
    t.forward(15)
t.end_fill()关键代码详解:
t.pensize(width):设置画笔的尺寸。
t.color(color):设置画笔的颜色。
t.penup():抬起画笔,一般用于另起一个地方绘图使用。
t.goto(x,y):画笔去到某个位置,参数为(x,y),对应去到的横坐标和纵坐标。
t.pendown():放下画笔,一般和penup组合使用。
t.left(degree):画笔向左转多少度,括号里表示度数。
t.right(degree):画笔向右转多少度,括号里表示度数。
t.circle(radius,extent,steps):radius指半径,若为正,半径在小乌龟左侧radius远的地方,若为负,半径在小乌龟右侧radius远的地方;extent指弧度;steps指阶数。
画外轮廓的关键是:通过调节circle函数中的半径和弧度来调节曲线的弧度,从而使得蜘蛛侠的轮廓比较流畅。
4.定义画左手和右手的函数
接着定义画左手和右手的函数。
def left_hand():
    #画左手臂
    #画胸部的内部线
    t.penup()
    t.goto(-69, 134)
    t.color('black', 'blue')
    t.pendown()
    t.begin_fill()
    t.setheading(30)
    t.circle(-100, 13)
    t.setheading(270)
    t.circle(50, 40)
    t.setheading(255)
    t.circle(55, 40)
    t.circle(-40, 50)
    #画腰部的外横线
    t.setheading(0)
    t.forward(-8)
    t.setheading(90)
    t.circle(220, 18)
    t.setheading(-90)
    t.circle(-40, 50)
    t.setheading(-85)
    t.circle(-50, 50)
    t.setheading(135)
    t.circle(30, 40)
    t.setheading(95)
    t.circle(-50, 50)
    t.setheading(98)
    t.circle(-60, 51)
    t.end_fill()
def right_hand():
    #画右手臂
    #画衣服内轮廓
    t.penup()
    t.goto(80, 39)
    t.color('black', 'blue')
    t.pendown()
    t.begin_fill()
    t.setheading(190)
    t.forward(20)
    t.setheading(103)
    t.circle(-160, 41)
    #画手内轮廓
    t.setheading(5)
    t.circle(-80, 30)
    t.setheading(20)
    t.circle(30, 30)
    t.setheading(-20)
    t.circle(-55, 65)
    t.setheading(-30)
    t.circle(-50, 60)
    t.setheading(180)
    t.circle(30, 40)
    t.setheading(154)
    t.circle(-48, 60)
    t.setheading(164)
    t.circle(-50, 60)
    t.setheading(-90)
    t.circle(-40, 60)
    t.left(40)
    t.circle(150, 23)
    t.end_fill()
def left_wrist():
    #画左手腕
    t.penup()
    t.goto(-81, 37)
    t.color('black', 'red')
    t.pendown()
    t.begin_fill()
    t.setheading(135)
    t.circle(30, 40)
    t.setheading(-90)
    t.circle(-60, 30)
    t.setheading(-90)
    t.forward(20)
    t.setheading(-45)
    t.forward(12)
    t.circle(6, 180)
    t.setheading(-50)
    t.circle(5, 160)
    t.setheading(95)
    t.forward(10)
    t.setheading(135)
    t.forward(8)
    t.setheading(95)
    t.forward(6)
    t.setheading(35)
    t.circle(30, 10)
    t.left(10)
    t.circle(30, 27)
    t.end_fill()
    #画手腕上的线
    #横线
    #第一条横线
    t.penup()
    t.goto(-84, 30)
    t.color('black')
    t.pendown()
    t.setheading(145)
    t.circle(30, 36)
    #第二条横线
    t.penup()
    t.goto(-90, 22)
    t.color('black')
    t.pendown()
    t.setheading(185)
    t.circle(-30, 31)
    #第三条横线
    t.penup()
    t.goto(-83, 10)
    t.color('black')
    t.pendown()
    t.setheading(210)
    t.circle(-50, 31)
    #第四条横线
    t.penup()
    t.goto(-102, -10)
    t.color('black')
    t.pendown()
    t.setheading(50)
    t.circle(-20, 41)
    t.setheading(55)
    t.circle(-90, 8)
    #第一条竖线
    t.penup()
    t.goto(-105, 24)
    t.color('black')
    t.pendown()
    t.setheading(-95)
    t.circle(100, 20)
    #第二条竖线
    t.penup()
    t.goto(-87, 42)
    t.color('black')
    t.pendown()
    t.setheading(-110)
    t.forward(22)
    t.setheading(-63)
    t.circle(-50, 40)
def right_wrist():
    #画右手腕
    t.penup()
    t.goto(189, 57)
    t.color('black', 'red')
    t.pendown()
    t.begin_fill()
    t.setheading(180)
    t.circle(30, 40)
    t.setheading(-55)
    t.circle(-100, 10)
    t.circle(-20, 70)
    t.setheading(-90)
    t.forward(10)
    t.setheading(-0)
    t.forward(5)
    t.setheading(-85)
    t.forward(8)
    t.setheading(-20)
    t.circle(8, 60)
    t.setheading(-35)
    t.circle(8, 70)
    t.setheading(-15)
    t.circle(6, 70)
    t.setheading(60)
    t.circle(20, 80)
    t.setheading(115)
    t.circle(-100, 20)
    t.end_fill()
    #画第一条横线
    t.goto(191, 45)
    t.color('black')
    t.pendown()
    t.setheading(215)
    t.circle(-30, 34)
    #画第二条横线
    t.penup()
    t.goto(197, 29)
    t.color('black')
    t.pendown()
    t.setheading(215)
    t.circle(-30, 37)
    #画第三条横线
    t.penup()
    t.goto(174, 11)
    t.color('black')
    t.pendown()
    t.setheading(-0)
    t.circle(-30, 27)
    t.setheading(20)
    t.circle(-20, 27)
    t.setheading(40)
    t.circle(-30, 23)
    #画第一条竖线
    t.penup()
    t.goto(178, 55)
    t.color('black')
    t.pendown()
    t.setheading(-70)
    t.circle(-200, 9)
    t.setheading(-82)
    t.circle(-100, 18)
    #画第二条竖线
    t.penup()
    t.goto(185, 55)
    t.color('black')
    t.pendown()
    t.setheading(-70)
    t.circle(-200, 8)
    t.setheading(-68)
t.circle(-80, 25)5.定义画蜘蛛的函数
接着定义画蜘蛛的函数。
def spider():
    #画蜘蛛
    t.penup()
    t.goto(8, 146)
    t.color('black')
    t.pendown()
    t.begin_fill()
    t.setheading(-120)
    t.circle(40, 60)
    t.setheading(60)
    t.circle(40,60)
    t.end_fill()
    #画蜘蛛的脚
    #右边的脚1
    t.penup()
    t.goto(13, 129)
    t.color('black')
    t.pendown()
    t.setheading(30)
    t.forward(10)
    t.setheading(90)
    t.forward(15)
    #右边的脚2
    t.penup()
    t.goto(14, 125)
    t.color('black')
    t.pendown()
    t.setheading(30)
    t.forward(16)
    t.setheading(90)
    t.forward(17)
    #右边的脚3
    t.penup()
    t.goto(14, 124)
    t.color('black')
    t.pendown()
    t.setheading(-20)
    t.forward(16)
    t.setheading(-90)
    t.forward(17)
    #右边的脚4
    t.penup()
    t.goto(14, 120)
    t.color('black')
    t.pendown()
    t.setheading(-20)
    t.forward(10)
    t.setheading(-90)
    t.forward(15)
    #画蜘蛛的脚
    #左边的脚1
    t.penup()
    t.goto(3, 129)
    t.color('black')
    t.pendown()
    t.setheading(150)
    t.forward(10)
    t.setheading(90)
    t.forward(15)
    #右边的脚2
    t.penup()
    t.goto(2, 125)
    t.color('black')
    t.pendown()
    t.setheading(150)
    t.forward(16)
    t.setheading(90)
    t.forward(17)
    #右边的脚3
    t.penup()
    t.goto(2, 124)
    t.color('black')
    t.pendown()
    t.setheading(-170)
    t.forward(16)
    t.setheading(-99)
    t.forward(17)
    #右边的脚4
    t.penup()
    t.goto(3, 120)
    t.color('black')
    t.pendown()
    t.setheading(-170)
    t.forward(10)
    t.setheading(-90)
t.forward(15)6.调用函数绘制图形
最后调用函数绘制图形。
print('绘制上半身外轮廓')
up_body()
print('绘制右手')
right_hand()
print('绘制左手')
left_hand()
print('绘制左拳头')
left_wrist()
print('绘制右拳头')
right_wrist()
print('绘制蜘蛛')
spider()
以上是使用Python+Turtle库绘制蜘蛛侠的步骤的详细内容。更多信息请关注PHP中文网其他相关文章!

热AI工具

Undresser.AI Undress
人工智能驱动的应用程序,用于创建逼真的裸体照片

AI Clothes Remover
用于从照片中去除衣服的在线人工智能工具。

Undress AI Tool
免费脱衣服图片

Clothoff.io
AI脱衣机

AI Hentai Generator
免费生成ai无尽的。

热门文章
热工具

记事本++7.3.1
好用且免费的代码编辑器

SublimeText3汉化版
中文版,非常好用

禅工作室 13.0.1
功能强大的PHP集成开发环境

Dreamweaver CS6
视觉化网页开发工具

SublimeText3 Mac版
神级代码编辑软件(SublimeText3)
热门话题


 PHP和Python:代码示例和比较
Apr 15, 2025 am 12:07 AM
PHP和Python:代码示例和比较
Apr 15, 2025 am 12:07 AM
PHP和Python各有优劣,选择取决于项目需求和个人偏好。1.PHP适合快速开发和维护大型Web应用。2.Python在数据科学和机器学习领域占据主导地位。
 Python vs. JavaScript:社区,图书馆和资源
Apr 15, 2025 am 12:16 AM
Python vs. JavaScript:社区,图书馆和资源
Apr 15, 2025 am 12:16 AM
Python和JavaScript在社区、库和资源方面的对比各有优劣。1)Python社区友好,适合初学者,但前端开发资源不如JavaScript丰富。2)Python在数据科学和机器学习库方面强大,JavaScript则在前端开发库和框架上更胜一筹。3)两者的学习资源都丰富,但Python适合从官方文档开始,JavaScript则以MDNWebDocs为佳。选择应基于项目需求和个人兴趣。
 docker原理详解
Apr 14, 2025 pm 11:57 PM
docker原理详解
Apr 14, 2025 pm 11:57 PM
Docker利用Linux内核特性,提供高效、隔离的应用运行环境。其工作原理如下:1. 镜像作为只读模板,包含运行应用所需的一切;2. 联合文件系统(UnionFS)层叠多个文件系统,只存储差异部分,节省空间并加快速度;3. 守护进程管理镜像和容器,客户端用于交互;4. Namespaces和cgroups实现容器隔离和资源限制;5. 多种网络模式支持容器互联。理解这些核心概念,才能更好地利用Docker。
 CentOS上PyTorch版本怎么选
Apr 14, 2025 pm 06:51 PM
CentOS上PyTorch版本怎么选
Apr 14, 2025 pm 06:51 PM
在CentOS系统上安装PyTorch,需要仔细选择合适的版本,并考虑以下几个关键因素:一、系统环境兼容性:操作系统:建议使用CentOS7或更高版本。CUDA与cuDNN:PyTorch版本与CUDA版本密切相关。例如,PyTorch1.9.0需要CUDA11.1,而PyTorch2.0.1则需要CUDA11.3。cuDNN版本也必须与CUDA版本匹配。选择PyTorch版本前,务必确认已安装兼容的CUDA和cuDNN版本。Python版本:PyTorch官方支
 vscode怎么在终端运行程序
Apr 15, 2025 pm 06:42 PM
vscode怎么在终端运行程序
Apr 15, 2025 pm 06:42 PM
在 VS Code 中,可以通过以下步骤在终端运行程序:准备代码和打开集成终端确保代码目录与终端工作目录一致根据编程语言选择运行命令(如 Python 的 python your_file_name.py)检查是否成功运行并解决错误利用调试器提升调试效率
 Python:自动化,脚本和任务管理
Apr 16, 2025 am 12:14 AM
Python:自动化,脚本和任务管理
Apr 16, 2025 am 12:14 AM
Python在自动化、脚本编写和任务管理中表现出色。1)自动化:通过标准库如os、shutil实现文件备份。2)脚本编写:使用psutil库监控系统资源。3)任务管理:利用schedule库调度任务。Python的易用性和丰富库支持使其在这些领域中成为首选工具。
 vscode 扩展是否是恶意的
Apr 15, 2025 pm 07:57 PM
vscode 扩展是否是恶意的
Apr 15, 2025 pm 07:57 PM
VS Code 扩展存在恶意风险,例如隐藏恶意代码、利用漏洞、伪装成合法扩展。识别恶意扩展的方法包括:检查发布者、阅读评论、检查代码、谨慎安装。安全措施还包括:安全意识、良好习惯、定期更新和杀毒软件。
 centos如何安装nginx
Apr 14, 2025 pm 08:06 PM
centos如何安装nginx
Apr 14, 2025 pm 08:06 PM
CentOS 安装 Nginx 需要遵循以下步骤:安装依赖包,如开发工具、pcre-devel 和 openssl-devel。下载 Nginx 源码包,解压后编译安装,并指定安装路径为 /usr/local/nginx。创建 Nginx 用户和用户组,并设置权限。修改配置文件 nginx.conf,配置监听端口和域名/IP 地址。启动 Nginx 服务。需要注意常见的错误,如依赖问题、端口冲突和配置文件错误。性能优化需要根据具体情况调整,如开启缓存和调整 worker 进程数量。
