

Springboot怎么通过配置WebMvcConfig处理Cors非同源访问跨域问题

关于Cors跨域的问题,前端有代理和jsonp的常用方式解决这种非同源的访问拒绝策略,什么是同源?即域名一致端口一致但是端口下访问的接口api不同的两种或者几种的互相访问叫做同源访问,但是若是接口不一致或者域名不一致(这里泛指IP不一致),那么对应的就属于非同源访问,浏览器会拒绝发出请求,直接回复404,有时候我也见过恢复202的就是发出去了但是被后端的Mvc处理hander链给拒绝了。那么配置MVC是后端处理Cors问题的一种解决思路。
之前学习过MVC的处理链路,从一次请求发过来到回复数据总共11次处理:
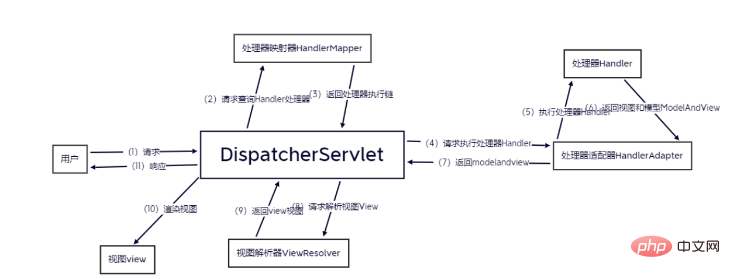
请求发送到服务器端时是由我们的MVC进行处理的,而统一调配任务流程的则是我们的请求分发器,注意这里请求到处理器之后回去寻找处理器适配器(符合校验处理的请求才能被允许例如接口含有的合法api,以及跨域原则),之前我们的微信小程序开发过程中是没有考虑跨域问题的,原因是我们知道小程序的请求处理都是由微信后台进行分发处理的,也就是在微信的后台时就做了前端的跨域处理,大概是采用动态代理的方式解决了小程序的跨域。
那么我们先看看MVC的配置接口 WebMvcConfigurer 的源代码:
public interface WebMvcConfigurer {
    default void configurePathMatch(PathMatchConfigurer configurer) {
    }
    default void configureContentNegotiation(ContentNegotiationConfigurer configurer) {
    }
    default void configureAsyncSupport(AsyncSupportConfigurer configurer) {
    }
    default void configureDefaultServletHandling(DefaultServletHandlerConfigurer configurer) {
    }
    default void addFormatters(FormatterRegistry registry) {
    }
    default void addInterceptors(InterceptorRegistry registry) {
    }
    default void addResourceHandlers(ResourceHandlerRegistry registry) {
    }
    default void addCorsMappings(CorsRegistry registry) {
    }
    default void addViewControllers(ViewControllerRegistry registry) {
    }
    default void configureViewResolvers(ViewResolverRegistry registry) {
    }
    default void addArgumentResolvers(List<HandlerMethodArgumentResolver> resolvers) {
    }
    default void addReturnValueHandlers(List<HandlerMethodReturnValueHandler> handlers) {
    }
    default void configureMessageConverters(List<HttpMessageConverter<?>> converters) {
    }
    default void extendMessageConverters(List<HttpMessageConverter<?>> converters) {
    }
    default void configureHandlerExceptionResolvers(List<HandlerExceptionResolver> resolvers) {
    }
    default void extendHandlerExceptionResolvers(List<HandlerExceptionResolver> resolvers) {
    }
    @Nullable
    default Validator getValidator() {
        return null;
    }
    @Nullable
    default MessageCodesResolver getMessageCodesResolver() {
        return null;
    }
}它的内部是具备一些处理器解析器以及映射的添加与配置的方法的,那么我们要解决Cros跨域问题就是要考虑addCorsMappings 配置Cros映射,所以我们点进去看看这注册Cros的 CorsRegistry 的源码:
public class CorsRegistry {
    private final List<CorsRegistration> registrations = new ArrayList();
    public CorsRegistry() {
    }
    public CorsRegistration addMapping(String pathPattern) {
        CorsRegistration registration = new CorsRegistration(pathPattern);
        this.registrations.add(registration);
        return registration;
    }
    protected Map<String, CorsConfiguration> getCorsConfigurations() {
        Map<String, CorsConfiguration> configs = CollectionUtils.newLinkedHashMap(this.registrations.size());
        Iterator var2 = this.registrations.iterator();
        while(var2.hasNext()) {
            CorsRegistration registration = (CorsRegistration)var2.next();
            configs.put(registration.getPathPattern(), registration.getCorsConfiguration());
        }
        return configs;
    }
}从上述代码中不难发现,内部有一个不可改变的 CorsRegistration 数组链表,以及增加映射的方法,主要还是看看它具备的元素 CorsRegistration 含有什么配置项:
public class CorsRegistration {
    private final String pathPattern;
    private CorsConfiguration config;
    public CorsRegistration(String pathPattern) {
        this.pathPattern = pathPattern;
        this.config = (new CorsConfiguration()).applyPermitDefaultValues();
    }
    public CorsRegistration allowedOrigins(String... origins) {
        this.config.setAllowedOrigins(Arrays.asList(origins));
        return this;
    }
    public CorsRegistration allowedOriginPatterns(String... patterns) {
        this.config.setAllowedOriginPatterns(Arrays.asList(patterns));
        return this;
    }
    public CorsRegistration allowedMethods(String... methods) {
        this.config.setAllowedMethods(Arrays.asList(methods));
        return this;
    }
    public CorsRegistration allowedHeaders(String... headers) {
        this.config.setAllowedHeaders(Arrays.asList(headers));
        return this;
    }
    public CorsRegistration exposedHeaders(String... headers) {
        this.config.setExposedHeaders(Arrays.asList(headers));
        return this;
    }
    public CorsRegistration allowCredentials(boolean allowCredentials) {
        this.config.setAllowCredentials(allowCredentials);
        return this;
    }
    public CorsRegistration maxAge(long maxAge) {
        this.config.setMaxAge(maxAge);
        return this;
    }
    public CorsRegistration combine(CorsConfiguration other) {
        this.config = this.config.combine(other);
        return this;
    }
    protected String getPathPattern() {
        return this.pathPattern;
    }
    protected CorsConfiguration getCorsConfiguration() {
        return this.config;
    }
}我们可以发现内部是具备允许放行:请求头,请求路径,请求方法,请求源策略的方法的,所以我们在这里的 重写addCorsMappings方法配置一个 CorsRegistry 添加相应的路径方法与请求策略放行不就可以解决跨域的问题了?
我们写一个WebMvcConfig配置类实现刚刚研究的WebMvcConfigurer接口重写addCrosMappings配置CrosRegistry即可(或者在api与Controller控制类上打上@CrossOrigin注解也可以解决问题(注解默认放行所有来源的请求)):
/**
 * 配置前端跨域访问请求
 */
@Configuration
public class WbMvcConfig implements WebMvcConfigurer {
    @Override
    public void addCorsMappings(CorsRegistry registry) {
       registry.addMapping("/**")
               .allowedHeaders("Content-Type","X-Request-With","Access-Control-Request-Method","Access-Control-Request-Headers","token")
               .allowedMethods("*")
               .allowedOriginPatterns("*")
               /*注意当这个配置为真是我们不能将允许源设置为*而是将源路径设置为*即可*/
               .allowCredentials(true);
    }
    @Bean
    public FormContentFilter httpPutFormContentFilter(){
        return new FormContentFilter();
    }
}我们利用axios写一个简单的请求发送按钮:
    <input type="button" value="get" class="get">
    <script>
        document.querySelector(".get").onclick = function () {
            // 跨域一般是是后端解决的事情
            axios.get("http://127.0.0.1:8080/all").then(
                function (response) {
                    console.log(response)
                }
            )
        }
</script>再用SpringBoot写一个简单的controller的api:
@RestController
public class testController {
    @Autowired
    private ProductServiceImpl productService;
    @GetMapping("/all")
    @ResponseBody
    public List<Product> all() {
        Page<Product> page = productService.page(1L);
        List<Product> productList = new LinkedList<>();
        productList.add(page.getRecords().iterator().next());
        return productList;
    }
}这里我们在浏览器打开5050端口下的这个html文件就可以点击按钮访问接口了:
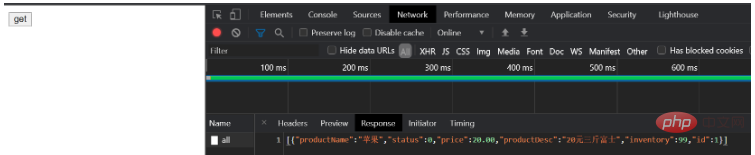
这里可以看到请求访问数据成功了!
以上是Springboot怎么通过配置WebMvcConfig处理Cors非同源访问跨域问题的详细内容。更多信息请关注PHP中文网其他相关文章!

热AI工具

Undresser.AI Undress
人工智能驱动的应用程序,用于创建逼真的裸体照片

AI Clothes Remover
用于从照片中去除衣服的在线人工智能工具。

Undress AI Tool
免费脱衣服图片

Clothoff.io
AI脱衣机

AI Hentai Generator
免费生成ai无尽的。

热门文章
热工具

记事本++7.3.1
好用且免费的代码编辑器

SublimeText3汉化版
中文版,非常好用

禅工作室 13.0.1
功能强大的PHP集成开发环境

Dreamweaver CS6
视觉化网页开发工具

SublimeText3 Mac版
神级代码编辑软件(SublimeText3)
热门话题


 Springboot怎么集成Jasypt实现配置文件加密
Jun 01, 2023 am 08:55 AM
Springboot怎么集成Jasypt实现配置文件加密
Jun 01, 2023 am 08:55 AM
Jasypt介绍Jasypt是一个java库,它允许开发员以最少的努力为他/她的项目添加基本的加密功能,并且不需要对加密工作原理有深入的了解用于单向和双向加密的高安全性、基于标准的加密技术。加密密码,文本,数字,二进制文件...适合集成到基于Spring的应用程序中,开放API,用于任何JCE提供程序...添加如下依赖:com.github.ulisesbocchiojasypt-spring-boot-starter2.1.1Jasypt好处保护我们的系统安全,即使代码泄露,也可以保证数据源的
 SpringBoot怎么集成Redisson实现延迟队列
May 30, 2023 pm 02:40 PM
SpringBoot怎么集成Redisson实现延迟队列
May 30, 2023 pm 02:40 PM
使用场景1、下单成功,30分钟未支付。支付超时,自动取消订单2、订单签收,签收后7天未进行评价。订单超时未评价,系统默认好评3、下单成功,商家5分钟未接单,订单取消4、配送超时,推送短信提醒……对于延时比较长的场景、实时性不高的场景,我们可以采用任务调度的方式定时轮询处理。如:xxl-job今天我们采
 怎么在SpringBoot中使用Redis实现分布式锁
Jun 03, 2023 am 08:16 AM
怎么在SpringBoot中使用Redis实现分布式锁
Jun 03, 2023 am 08:16 AM
一、Redis实现分布式锁原理为什么需要分布式锁在聊分布式锁之前,有必要先解释一下,为什么需要分布式锁。与分布式锁相对就的是单机锁,我们在写多线程程序时,避免同时操作一个共享变量产生数据问题,通常会使用一把锁来互斥以保证共享变量的正确性,其使用范围是在同一个进程中。如果换做是多个进程,需要同时操作一个共享资源,如何互斥呢?现在的业务应用通常是微服务架构,这也意味着一个应用会部署多个进程,多个进程如果需要修改MySQL中的同一行记录,为了避免操作乱序导致脏数据,此时就需要引入分布式锁了。想要实现分
 springboot读取文件打成jar包后访问不到怎么解决
Jun 03, 2023 pm 04:38 PM
springboot读取文件打成jar包后访问不到怎么解决
Jun 03, 2023 pm 04:38 PM
springboot读取文件,打成jar包后访问不到最新开发出现一种情况,springboot打成jar包后读取不到文件,原因是打包之后,文件的虚拟路径是无效的,只能通过流去读取。文件在resources下publicvoidtest(){Listnames=newArrayList();InputStreamReaderread=null;try{ClassPathResourceresource=newClassPathResource("name.txt");Input
 Springboot+Mybatis-plus不使用SQL语句进行多表添加怎么实现
Jun 02, 2023 am 11:07 AM
Springboot+Mybatis-plus不使用SQL语句进行多表添加怎么实现
Jun 02, 2023 am 11:07 AM
在Springboot+Mybatis-plus不使用SQL语句进行多表添加操作我所遇到的问题准备工作在测试环境下模拟思维分解一下:创建出一个带有参数的BrandDTO对象模拟对后台传递参数我所遇到的问题我们都知道,在我们使用Mybatis-plus中进行多表操作是极其困难的,如果你不使用Mybatis-plus-join这一类的工具,你只能去配置对应的Mapper.xml文件,配置又臭又长的ResultMap,然后再去写对应的sql语句,这种方法虽然看上去很麻烦,但具有很高的灵活性,可以让我们
 SpringBoot与SpringMVC的比较及差别分析
Dec 29, 2023 am 11:02 AM
SpringBoot与SpringMVC的比较及差别分析
Dec 29, 2023 am 11:02 AM
SpringBoot和SpringMVC都是Java开发中常用的框架,但它们之间有一些明显的差异。本文将探究这两个框架的特点和用途,并对它们的差异进行比较。首先,我们来了解一下SpringBoot。SpringBoot是由Pivotal团队开发的,它旨在简化基于Spring框架的应用程序的创建和部署。它提供了一种快速、轻量级的方式来构建独立的、可执行
 SpringBoot怎么自定义Redis实现缓存序列化
Jun 03, 2023 am 11:32 AM
SpringBoot怎么自定义Redis实现缓存序列化
Jun 03, 2023 am 11:32 AM
1、自定义RedisTemplate1.1、RedisAPI默认序列化机制基于API的Redis缓存实现是使用RedisTemplate模板进行数据缓存操作的,这里打开RedisTemplate类,查看该类的源码信息publicclassRedisTemplateextendsRedisAccessorimplementsRedisOperations,BeanClassLoaderAware{//声明了key、value的各种序列化方式,初始值为空@NullableprivateRedisSe
 springboot怎么获取application.yml里值
Jun 03, 2023 pm 06:43 PM
springboot怎么获取application.yml里值
Jun 03, 2023 pm 06:43 PM
在项目中,很多时候需要用到一些配置信息,这些信息在测试环境和生产环境下可能会有不同的配置,后面根据实际业务情况有可能还需要再做修改。我们不能将这些配置在代码中写死,最好是写到配置文件中,比如可以把这些信息写到application.yml文件中。那么,怎么在代码里获取或者使用这个地址呢?有2个方法。方法一:我们可以通过@Value注解的${key}即可获取配置文件(application.yml)中和key对应的value值,这个方法适用于微服务比较少的情形方法二:在实际项目中,遇到业务繁琐,逻
