

Node.js怎么配置使用Nginx服务器

流程图
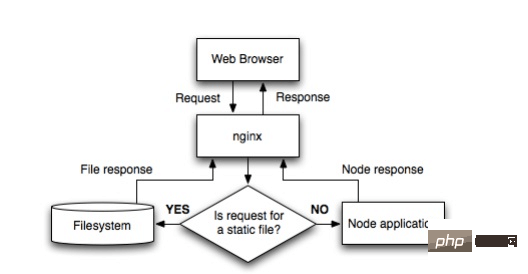
nginx配置如下:
 http {
  proxy_cache_path /var/cache/nginx levels=1:2 keys_zone=one:8m max_size=3000m inactive=600m;
  proxy_temp_path /var/tmp;
  include    mime.types;
  default_type application/octet-stream;
  sendfile    on;
  keepalive_timeout 65;

  gzip on;
  gzip_comp_level 6;
  gzip_vary on;
  gzip_min_length 1000;
  gzip_proxied any;
  gzip_types text/plain text/html text/css application/json application/x-javascript text/xml application/xml application/xml+rss text/javascript;
  gzip_buffers 16 8k;

  ssl_certificate /some/location/sillyfacesociety.com.bundle.crt;
  ssl_certificate_key /some/location/sillyfacesociety.com.key;
  ssl_protocols    sslv3 tlsv1;
  ssl_ciphers high:!anull:!md5;

  upstream silly_face_society_upstream {
   server 127.0.0.1:61337;
   server 127.0.0.1:61338;
   keepalive 64;
  }

  server {
   listen 80;
   listen 443 ssl;

   server_name sillyfacesociety.com;
   return 301 $scheme://www.sillyfacesociety.com$request_uri;
  }

  server {
    listen 80;
    listen 443 ssl;

    server_name www.sillyfacesociety.com;

    error_page 502 /errors/502.html;

    location ~ ^/(images/|img/|javascript/|js/|css/|stylesheets/|flash/|media/|static/|robots.txt|humans.txt|favicon.ico) {
     root /usr/local/silly_face_society/node/public;
     access_log off;
     expires max;
    }

    location /errors {
     internal;
     alias /usr/local/silly_face_society/node/public/errors;
    }

    location / {
     proxy_redirect off;
     proxy_set_header  x-real-ip      $remote_addr;
     proxy_set_header  x-forwarded-for $proxy_add_x_forwarded_for;
     proxy_set_header  x-forwarded-proto $scheme;
     proxy_set_header  host          $http_host;
     proxy_set_header  x-nginx-proxy  true;
     proxy_set_header  connection "";
     proxy_http_version 1.1;
     proxy_cache one;
     proxy_cache_key sfs$request_uri$scheme;
     proxy_pass     http://silly_face_society_upstream;
    }
  }
}配置段说明
http {
  ...
  upstream silly_face_society_upstream {
   server 127.0.0.1:61337;
   server 127.0.0.1:61338;
   keepalive 64;
  }
  ...
}nginx负载均衡多个nodo.js实例。keepalive 64 指示nginx在任何时候保持最少64个http/ 1.1连接到代理服务器。如果有更多的流量nginx将打开更多的连接。
http {
  ...
  server {
    ...
    location / {
     proxy_redirect off;
     proxy_set_header  x-real-ip      $remote_addr;
     proxy_set_header  x-forwarded-for $proxy_add_x_forwarded_for;
     proxy_set_header  host          $http_host;
     proxy_set_header  x-nginx-proxy  true;
     ...
     proxy_set_header  connection "";
     proxy_http_version 1.1;
     proxy_pass     http://silly_face_society_upstream;
    }
    ...
  }
}将符合哪些的请求发送到代理上。nginx的匹配规则可以取看看前面的文章。
nginx处理静态内容
http {
  ...
  server {
    ...
    location ~ ^/(images/|img/|javascript/|js/|css/|stylesheets/|flash/|media/|static/|robots.txt|humans.txt|favicon.ico) {
     root /usr/local/silly_face_society/node/public;
     access_log off;
     expires max;
    }
    ...
  }
}设置缓存
http {
  ...
  proxy_cache_path /var/cache/nginx levels=1:2 keys_zone=one:8m max_size=3000m inactive=600m;
  proxy_temp_path /var/tmp;
  ...
}


http {
 server {
   ...
   location / {
     ...
     proxy_cache one;
     proxy_cache_key sfs$request_uri$scheme;
     ...
   }
   ...
 }
}缓存是通过http头部来控制的。
helloworld
试验一下,我们来写个helloworld.js
var http = require('http');


http.createserver(function (request, response) {

 response.writehead(200, {'content-type': 'text/plain'});
 response.end('hello world\n');
}).listen(61337);


console.log('server running at http://127.0.0.1:61337/');然后用node helloworld.js指令开启,这样跑在本地的机子的nodejs的程序就算开起来了,占用的是8000端口,可自己修改。
此时确定在nginx的vhost.conf里面的设置应有:
server {
  listen 80;
  server_name jb51.net.jb51.net;
  location / {
  proxy_pass http://127.0.0.1:61337;
  }
}将网站域名设置好,然后端口设置为80,最后proxy_pass设置为http://127.0.0.1:61337,将所有从jb51.net:80的请求传递到nodejs程序去。
重启nginx、访问域名,就可以了看到helloworld了。
虽然node.js本身就可以做服务器是没错啦,比如welcome.js里面设置为80端口就可以了。
但是一个机子跑多个网站,其他网站又是用别的服务器,在80端口已经被占用的情况下,是可以用代理到别的端口来处理的。
以上是Node.js怎么配置使用Nginx服务器的详细内容。更多信息请关注PHP中文网其他相关文章!

热AI工具

Undresser.AI Undress
人工智能驱动的应用程序,用于创建逼真的裸体照片

AI Clothes Remover
用于从照片中去除衣服的在线人工智能工具。

Undress AI Tool
免费脱衣服图片

Clothoff.io
AI脱衣机

AI Hentai Generator
免费生成ai无尽的。

热门文章
热工具

记事本++7.3.1
好用且免费的代码编辑器

SublimeText3汉化版
中文版,非常好用

禅工作室 13.0.1
功能强大的PHP集成开发环境

Dreamweaver CS6
视觉化网页开发工具

SublimeText3 Mac版
神级代码编辑软件(SublimeText3)
热门话题


 怎么查看nginx是否启动
Apr 14, 2025 pm 01:03 PM
怎么查看nginx是否启动
Apr 14, 2025 pm 01:03 PM
确认 Nginx 是否启动的方法:1. 使用命令行:systemctl status nginx(Linux/Unix)、netstat -ano | findstr 80(Windows);2. 检查端口 80 是否开放;3. 查看系统日志中 Nginx 启动消息;4. 使用第三方工具,如 Nagios、Zabbix、Icinga。
 nginx怎么配置云服务器域名
Apr 14, 2025 pm 12:18 PM
nginx怎么配置云服务器域名
Apr 14, 2025 pm 12:18 PM
在云服务器上配置 Nginx 域名的方法:创建 A 记录,指向云服务器的公共 IP 地址。在 Nginx 配置文件中添加虚拟主机块,指定侦听端口、域名和网站根目录。重启 Nginx 以应用更改。访问域名测试配置。其他注意事项:安装 SSL 证书启用 HTTPS、确保防火墙允许 80 端口流量、等待 DNS 解析生效。
 linux怎么启动nginx
Apr 14, 2025 pm 12:51 PM
linux怎么启动nginx
Apr 14, 2025 pm 12:51 PM
在 Linux 中启动 Nginx 的步骤:检查 Nginx 是否已安装。使用 systemctl start nginx 启动 Nginx 服务。使用 systemctl enable nginx 启用在系统启动时自动启动 Nginx。使用 systemctl status nginx 验证启动是否成功。在 Web 浏览器中访问 http://localhost 查看默认欢迎页面。
 怎么启动nginx服务器
Apr 14, 2025 pm 12:27 PM
怎么启动nginx服务器
Apr 14, 2025 pm 12:27 PM
启动 Nginx 服务器需要按照不同操作系统采取不同的步骤:Linux/Unix 系统:安装 Nginx 软件包(例如使用 apt-get 或 yum)。使用 systemctl 启动 Nginx 服务(例如 sudo systemctl start nginx)。Windows 系统:下载并安装 Windows 二进制文件。使用 nginx.exe 可执行文件启动 Nginx(例如 nginx.exe -c conf\nginx.conf)。无论使用哪种操作系统,您都可以通过访问服务器 IP
 linux怎么查看nginx是否启动
Apr 14, 2025 pm 12:48 PM
linux怎么查看nginx是否启动
Apr 14, 2025 pm 12:48 PM
在 Linux 中,使用以下命令检查 Nginx 是否已启动:systemctl status nginx根据命令输出进行判断:如果显示 "Active: active (running)",则 Nginx 已启动。如果显示 "Active: inactive (dead)",则 Nginx 已停止。
 nginx在windows中怎么配置
Apr 14, 2025 pm 12:57 PM
nginx在windows中怎么配置
Apr 14, 2025 pm 12:57 PM
如何在 Windows 中配置 Nginx?安装 Nginx 并创建虚拟主机配置。修改主配置文件并包含虚拟主机配置。启动或重新加载 Nginx。测试配置并查看网站。选择性启用 SSL 并配置 SSL 证书。选择性设置防火墙允许 80 和 443 端口流量。
 nginx403怎么解决
Apr 14, 2025 am 10:33 AM
nginx403怎么解决
Apr 14, 2025 am 10:33 AM
如何解决 Nginx 403 Forbidden 错误?检查文件或目录权限;2. 检查 .htaccess 文件;3. 检查 Nginx 配置文件;4. 重启 Nginx。其他可能原因还包括防火墙规则、SELinux 设置或应用程序问题。
 怎么解决nginx跨域问题
Apr 14, 2025 am 10:15 AM
怎么解决nginx跨域问题
Apr 14, 2025 am 10:15 AM
解决 Nginx 跨域问题有两种方法:修改跨域响应头:添加指令以允许跨域请求,指定允许的方法和头,以及设置缓存时间。使用 CORS 模块:启用模块并配置 CORS 规则,允许跨域请求、方法、头和设置缓存时间。
