

Nginx服务优化的方法

Nginx服务优化可以从隐藏版本号、更改用户与组、配置网页缓存时间、日志切割、设置连接超时这几个方面进行优化。
1.隐藏版本号
在生产环境中需要隐藏Nginx的版本号,以避免泄露Nginx的版本,使×××者不能针对特定版本进行×××。查看Nginx的版本在CentOS中使用命令curl -I http://172.16.10.10/即可。
[[email protected] ~]# curl -I http://172.16.10.10/ HTTP/1.1 200 OK Server: nginx/1.12.0 #Nginx版本信息 Date: Fri, 29 Jun 2018 08:52:27 GMT Content-Type: text/html Content-Length: 483 Last-Modified: Fri, 29 Jun 2018 06:56:20 GMT Connection: keep-alive ETag: "5b35d814-1e3" Accept-Ranges: bytes<br>
隐藏版本号有两种方式,一种是修改Nginx的源码文件,指定不显示版本号,第二种是修改Nginx的主配置文件。
修改主配置文件的方式如下:
将Nginx的配置文件中的server_tokens选项值设置为off,如没有该配置项,加上即可。
[[email protected] ~]# vim /usr/local/nginx/conf/nginx.conf ........... #省略内容 http { include mime.types; default_type application/octet-stream; server_tokens off; #关闭版本号 ............ #省略内容<br>[[email protected] ~]# nginx -t #测试配置文件 nginx: the configuration file /usr/local/nginx/conf/nginx.conf syntax is ok nginx: configuration file /usr/local/nginx/conf/nginx.conf test is successful<br>
再次访问网址,只显示Nginx,版本号已经隐藏。
[[email protected] ~]# service nginx restart #重新启动nginx服务 [[email protected] ~]# curl -I http://172.16.10.10/ HTTP/1.1 200 OK Server: nginx #nginx隐藏了版本号 Date: Fri, 29 Jun 2018 09:09:36 GMT Content-Type: text/html Content-Length: 483 Last-Modified: Fri, 29 Jun 2018 06:56:20 GMT Connection: keep-alive ETag: "5b35d814-1e3" Accept-Ranges: bytes<br>
Nginx的源码文件包含了版本信息,可以随意设置,然后重新编译安装,就会隐藏版本信息。
[[email protected] ~]# vim /opt/nginx-1.12.0/src/core/nginx.h #编辑源码文件 #define NGINX_VERSION "1.1.1" #修改版本号 #define NGINX_VER "IIS" NGINX_VERSION #修改服务器类型<br>
重新编译安装
[[email protected] ~]# cd /opt/nginx-1.12.0/ [[email protected] nginx-1.12.0]#./configure --prefix=/usr/local/nginx --user=nginx --group=nginx --with-http_stub_status_module && make && make install<br>
再次访问网址,只显示修改之后的版本信息。
[[email protected] nginx-1.12.0]# service nginx restart #重启nginx服务 [[email protected] nginx-1.12.0]# curl -I http://172.16.10.10/HTTP/1.1 200 OK Server: IIS1.1.1 #nginx的版本信息 Date: Fri, 29 Jun 2018 09:30:09 GMT Content-Type: text/html Content-Length: 483 Last-Modified: Fri, 29 Jun 2018 06:56:20 GMT Connection: keep-alive ETag: "5b35d814-1e3" Accept-Ranges: bytes<br>
2.修改用户和组
Nginx运行时进程需要有用户与组的支持,用以实现对网站文件读取时进行访问控制。主进程由root创建,子进程由指定的用户与组创建。Nginx默认使用nobody用户账号与组账号,一般要修改。
(1)编译Nginx时指定用户与组,就是配置nginx时,在./configure后面指定用户与组的参数。
[[email protected] ~]# cd /opt/nginx-1.12.0/ [[email protected] nginx-1.12.0]#./configure --prefix=/usr/local/nginx --user=nginx #指定用户名是nginx --group=nginx #指定组名是nginx --with- && make && make install<br>
(2)修改Nginx配置文件nginx.conf指定用户与组。
[[email protected] ~]# vim /usr/local/nginx/conf/nginx.conf user nginx nginx; #修改用户为nginx,组为nginx<br>
重启nginx查看进程运行情况,主进程由root账户创建,子进程由nginx创建。
[[email protected] ~]# ps aux | grep nginx root 14923 0.0 0.0 20540 624 ? Ss 17:30 0:00 nginx: master process /usr/local/nginx/sbin/nginx #主进程由root创建 nginx 14925 0.0 0.1 22984 1412 ? S 17:30 0:00 nginx: worker process #子进程由nginx创建 root 19344 0.0 0.0 112720 984 pts/0 R+ 17:47 0:00 grep --color=auto nginx<br>
3.配置网页缓存时间
当Nginx将网页数据返回给客户端后,可设置缓存时间,方便日后进行相同内容请求是直接返回,避免重复请求,加快访问速度,一般只针对静态资源进行设置,对动态网页不用设置缓存时间。 操作步骤如下所示:
(1)以图片作为缓存对象,将game.jpg放到Nginx的网站目录下。
[[email protected] ~]# cd /usr/local/nginx/html/ #Nginx的网站目录 [[email protected] html]# ls 50x.html error.png game.jpg index.html test.html<br>
(2)访问http://172.16.10.10/game.jpg, 再用Fidder工具抓包,查看响应报文,没有图片的缓存信息。
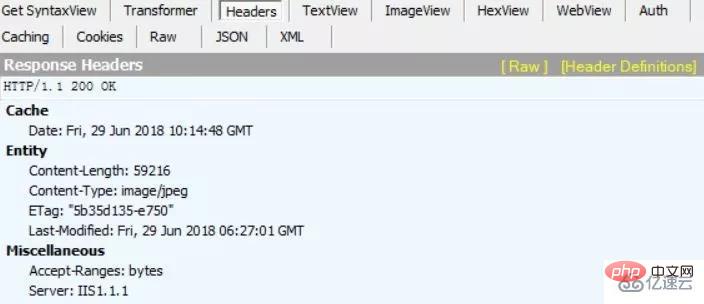
(3)修改配置文件,在新的location段加入expire参数,指定缓存时间,1d表示一天。
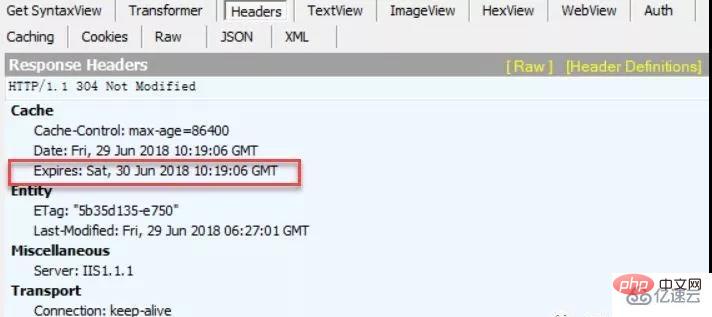
[[email protected] ~]# vim /usr/local/nginx/conf/nginx.conf location ~\.(gif|jpg|jepg|png|bmp|ico)$ { #加入新的location root html; expires 1d; #指定缓存时间 }<br>(4)重启nginx服务,访问网址抓包,响应报文中含有Expire参数,表示缓存的时间。
[email protected] ~]# service nginx restart<br>
[
以上是Nginx服务优化的方法的详细内容。更多信息请关注PHP中文网其他相关文章!

热AI工具

Undresser.AI Undress
人工智能驱动的应用程序,用于创建逼真的裸体照片

AI Clothes Remover
用于从照片中去除衣服的在线人工智能工具。

Undress AI Tool
免费脱衣服图片

Clothoff.io
AI脱衣机

Video Face Swap
使用我们完全免费的人工智能换脸工具轻松在任何视频中换脸!

热门文章
热工具

记事本++7.3.1
好用且免费的代码编辑器

SublimeText3汉化版
中文版,非常好用

禅工作室 13.0.1
功能强大的PHP集成开发环境

Dreamweaver CS6
视觉化网页开发工具

SublimeText3 Mac版
神级代码编辑软件(SublimeText3)
热门话题
 7649
7649
 15
1392
52
91
11
73
19
36
110
15
1392
52
91
11
73
19
36
110

 nginx怎么配置云服务器域名
Apr 14, 2025 pm 12:18 PM
nginx怎么配置云服务器域名
Apr 14, 2025 pm 12:18 PM
在云服务器上配置 Nginx 域名的方法:创建 A 记录,指向云服务器的公共 IP 地址。在 Nginx 配置文件中添加虚拟主机块,指定侦听端口、域名和网站根目录。重启 Nginx 以应用更改。访问域名测试配置。其他注意事项:安装 SSL 证书启用 HTTPS、确保防火墙允许 80 端口流量、等待 DNS 解析生效。
 nginx怎么查版本
Apr 14, 2025 am 11:57 AM
nginx怎么查版本
Apr 14, 2025 am 11:57 AM
可以查询 Nginx 版本的方法有:使用 nginx -v 命令;查看 nginx.conf 文件中的 version 指令;打开 Nginx 错误页,查看页面的标题。
 怎么启动nginx服务器
Apr 14, 2025 pm 12:27 PM
怎么启动nginx服务器
Apr 14, 2025 pm 12:27 PM
启动 Nginx 服务器需要按照不同操作系统采取不同的步骤:Linux/Unix 系统:安装 Nginx 软件包(例如使用 apt-get 或 yum)。使用 systemctl 启动 Nginx 服务(例如 sudo systemctl start nginx)。Windows 系统:下载并安装 Windows 二进制文件。使用 nginx.exe 可执行文件启动 Nginx(例如 nginx.exe -c conf\nginx.conf)。无论使用哪种操作系统,您都可以通过访问服务器 IP
 docker容器名称怎么查
Apr 15, 2025 pm 12:21 PM
docker容器名称怎么查
Apr 15, 2025 pm 12:21 PM
可以通过以下步骤查询 Docker 容器名称:列出所有容器(docker ps)。筛选容器列表(使用 grep 命令)。获取容器名称(位于 "NAMES" 列中)。
 nginx在windows中怎么配置
Apr 14, 2025 pm 12:57 PM
nginx在windows中怎么配置
Apr 14, 2025 pm 12:57 PM
如何在 Windows 中配置 Nginx?安装 Nginx 并创建虚拟主机配置。修改主配置文件并包含虚拟主机配置。启动或重新加载 Nginx。测试配置并查看网站。选择性启用 SSL 并配置 SSL 证书。选择性设置防火墙允许 80 和 443 端口流量。
 怎么查看nginx是否启动
Apr 14, 2025 pm 01:03 PM
怎么查看nginx是否启动
Apr 14, 2025 pm 01:03 PM
确认 Nginx 是否启动的方法:1. 使用命令行:systemctl status nginx(Linux/Unix)、netstat -ano | findstr 80(Windows);2. 检查端口 80 是否开放;3. 查看系统日志中 Nginx 启动消息;4. 使用第三方工具,如 Nagios、Zabbix、Icinga。
 docker怎么启动容器
Apr 15, 2025 pm 12:27 PM
docker怎么启动容器
Apr 15, 2025 pm 12:27 PM
Docker 容器启动步骤:拉取容器镜像:运行 "docker pull [镜像名称]"。创建容器:使用 "docker create [选项] [镜像名称] [命令和参数]"。启动容器:执行 "docker start [容器名称或 ID]"。检查容器状态:通过 "docker ps" 验证容器是否正在运行。
 nginx怎么运行apache
Apr 14, 2025 pm 12:33 PM
nginx怎么运行apache
Apr 14, 2025 pm 12:33 PM
要让 Nginx 运行 Apache,需要:1. 安装 Nginx 和 Apache;2. 配置 Nginx 代理;3. 启动 Nginx 和 Apache;4. 测试配置,确保访问域名后能看到 Apache 内容。另外,需要注意端口号匹配、虚拟主机配置和 SSL/TLS 设置等其他事项。
