

nginx proxy_pass反向代理配置实例分析

下面举个小实例说明下:
centos7系统库中默认是没有nginx的rpm包的,所以我们自己需要先更新下rpm依赖库
1)使用yum安装nginx需要包括nginx的库,安装nginx的库
[root@localhost ~]# rpm -uvh http://nginx.org/packages/centos/7/noarch/rpms/nginx-release-centos-7-0.el7.ngx.noarch.rpm
2)使用下面命令安装nginx
[root@localhost ~]# yum install nginx
3)nginx配置
[root@localhost ~]# cd /etc/nginx/conf.d/
[root@localhost conf.d]# cat test.conf
server {
listen 80;
server_name localhost;
location / {
root /var/www/html;
index index.html;
}
}

[root@localhost conf.d]# cat /var/www/html/index.html
this is page of test!!!!4)启动nginx
[root@localhost ~]# service nginx start //或者使用 systemctl start nginx.service
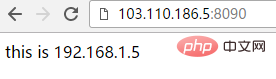
5)测试访问(103.110.186.23是192.168.1.23机器的外网ip)
[root@localhost conf.d]# curl http://192.168.1.23
this is page of test!!!!
看看下面几种情况:分别用http://192.168.1.23/proxy/index.html进行访问测试
为了方便测试,先在另一台机器192.168.1.5上部署一个8090端口的nginx,配置如下:
[root@bastion-idc ~]# cat /usr/local/nginx/conf/vhosts/haha.conf
server {
listen 8090;
server_name localhost;
location / {
root /var/www/html;
index index.html;
}
}
[root@bastion-idc ~]# cat /var/www/html/index.html
this is 192.168.1.5
[root@bastion-idc ~]# /usr/local/nginx/sbin/nginx -s reload测试访问(103.110.186.5是192.168.1.5的外网ip):
[root@bastion-idc ~]# curl http://192.168.1.5:8090
this is 192.168.1.5
192.168.1.23作为nginx反向代理机器,nginx配置如下:
1)第一种情况:
[root@localhost conf.d]# cat test.conf
server {
listen 80;
server_name localhost;
location / {
root /var/www/html;
index index.html;
}

location /proxy/ {
 proxy_pass http://192.168.1.5:8090/;
}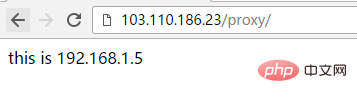
}这样,访问http://192.168.1.23/proxy/就会被代理到http://192.168.1.5:8090/。p匹配的proxy目录不需要存在根目录/var/www/html里面
注意,终端里如果访问http://192.168.1.23/proxy(即后面不带"/"),则会访问失败!因为proxy_pass配置的url后面加了"/"
[root@localhost conf.d]# curl http://192.168.1.23/proxy/
this is 192.168.1.5
[root@localhost conf.d]# curl http://192.168.1.23/proxy
<html>
<head><title>301 moved permanently</title></head>
<body bgcolor="white">
<center><h1>301 moved permanently</h1></center>
<hr><center>nginx/1.10.3</center>
</body>
</html>
页面访问http://103.110.186.23/proxy的时候,会自动加上"/”(同理是由于proxy_pass配置的url后面加了"/"),并反代到http://103.110.186.5:8090的结果
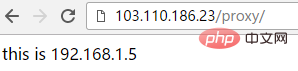
2)第二种情况,proxy_pass配置的url后面不加"/"
[root@localhost conf.d]# cat test.conf
server {
listen 80;
server_name localhost;
location / {
root /var/www/html;
index index.html;
}

location /proxy/ {
 proxy_pass http://192.168.1.5:8090;
}
}
[root@localhost conf.d]# service nginx restart
redirecting to /bin/systemctl restart nginx.service那么访问http://192.168.1.23/proxy或http://192.168.1.23/proxy/,都会失败!
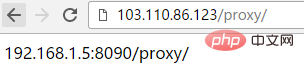
这样配置后,访问http://192.168.1.23/proxy/就会被反向代理到http://192.168.1.5:8090/proxy/
3)第三种情况
[root@localhost conf.d]# cat test.conf
server {
listen 80;
server_name localhost;
location / {
root /var/www/html;
index index.html;
}
location /proxy/ {
proxy_pass http://192.168.1.5:8090/haha/;
}
}
[root@localhost conf.d]# service nginx restart
redirecting to /bin/systemctl restart nginx.service
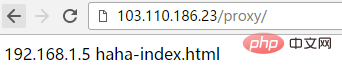
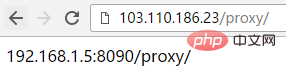
[root@localhost conf.d]# curl http://192.168.1.23/proxy/
192.168.1.5 haha-index.html这样配置的话,访问http://103.110.186.23/proxy代理到http://192.168.1.5:8090/haha/
4)第四种情况:相对于第三种配置的url不加"/"
[root@localhost conf.d]# cat test.conf
server {
listen 80;
server_name localhost;
location / {
root /var/www/html;
index index.html;
}

location /proxy/ {
 proxy_pass http://192.168.1.5:8090/haha;
}
}
[root@localhost conf.d]# service nginx restart
redirecting to /bin/systemctl restart nginx.service
[root@localhost conf.d]# curl http://192.168.1.23/proxy/index.html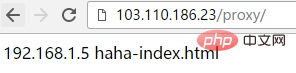
192.168.1.5 hahaindex.html上面配置后,访问http://192.168.1.23/proxy/index.html就会被代理到http://192.168.1.5:8090/hahaindex.html
同理,访问http://192.168.1.23/proxy/test.html就会被代理到http://192.168.1.5:8090/hahatest.html
[root@localhost conf.d]# curl http://192.168.1.23/proxy/index.html
192.168.1.5 hahaindex.html
注意,这种情况下,不能直接访问http://192.168.1.23/proxy/,后面就算是默认的index.html文件也要跟上,否则访问失败!

-------------------------------------------------------------------------------------
上面四种方式都是匹配的path路径后面加"/",下面说下path路径后面不带"/"的情况:
1)第一种情况,proxy_pass后面url带"/":
[root@localhost conf.d]# cat test.conf
server {
listen 80;
server_name localhost;
location / {
root /var/www/html;
index index.html;
}

location /proxy {
 proxy_pass http://192.168.1.5:8090/;
}
}
[root@localhost conf.d]# service nginx restart
redirecting to /bin/systemctl restart nginx.service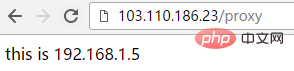
2)第二种情况,proxy_pass后面url不带"/"
[root@localhost conf.d]# cat test.conf
server {
listen 80;
server_name localhost;
location / {
root /var/www/html;
index index.html;
}

location /proxy {
 proxy_pass http://192.168.1.5:8090;
}
}
[root@localhost conf.d]# service nginx restart
redirecting to /bin/systemctl restart nginx.service
[root@localhost conf.d]#这样配置的话,访问http://103.110.186.23/proxy会自动加上"/”(即变成http://103.110.186.23/proxy/),代理到192.168.1.5:8090/proxy/
3)第三种情况
[root@localhost conf.d]# cat test.conf
server {
listen 80;
server_name localhost;
location / {
root /var/www/html;
index index.html;
}

location /proxy {
 proxy_pass http://192.168.1.5:8090/haha/;
}
}
[root@localhost conf.d]# service nginx restart
redirecting to /bin/systemctl restart nginx.service这样配置的话,访问http://103.110.186.23/proxy会自动加上"/”(即变成http://103.110.186.23/proxy/),代理到http://192.168.1.5:8090/haha/
4)第四种情况:相对于第三种配置的url不加"/"
[root@localhost conf.d]# cat test.conf
server {
listen 80;
server_name localhost;
location / {
root /var/www/html;
index index.html;
}

location /proxy {
 proxy_pass http://192.168.1.5:8090/haha;
}
}
[root@localhost conf.d]# service nginx restart
redirecting to /bin/systemctl restart nginx.service
这样配置的话,访问http://103.110.186.23/proxy,和第三种结果一样,同样被代理到http://192.168.1.5:8090/haha/
以上是nginx proxy_pass反向代理配置实例分析的详细内容。更多信息请关注PHP中文网其他相关文章!

热AI工具

Undresser.AI Undress
人工智能驱动的应用程序,用于创建逼真的裸体照片

AI Clothes Remover
用于从照片中去除衣服的在线人工智能工具。

Undress AI Tool
免费脱衣服图片

Clothoff.io
AI脱衣机

AI Hentai Generator
免费生成ai无尽的。

热门文章
热工具

记事本++7.3.1
好用且免费的代码编辑器

SublimeText3汉化版
中文版,非常好用

禅工作室 13.0.1
功能强大的PHP集成开发环境

Dreamweaver CS6
视觉化网页开发工具

SublimeText3 Mac版
神级代码编辑软件(SublimeText3)
热门话题


 nginx在windows中怎么配置
Apr 14, 2025 pm 12:57 PM
nginx在windows中怎么配置
Apr 14, 2025 pm 12:57 PM
如何在 Windows 中配置 Nginx?安装 Nginx 并创建虚拟主机配置。修改主配置文件并包含虚拟主机配置。启动或重新加载 Nginx。测试配置并查看网站。选择性启用 SSL 并配置 SSL 证书。选择性设置防火墙允许 80 和 443 端口流量。
 linux怎么查看nginx是否启动
Apr 14, 2025 pm 12:48 PM
linux怎么查看nginx是否启动
Apr 14, 2025 pm 12:48 PM
在 Linux 中,使用以下命令检查 Nginx 是否已启动:systemctl status nginx根据命令输出进行判断:如果显示 "Active: active (running)",则 Nginx 已启动。如果显示 "Active: inactive (dead)",则 Nginx 已停止。
 linux怎么启动nginx
Apr 14, 2025 pm 12:51 PM
linux怎么启动nginx
Apr 14, 2025 pm 12:51 PM
在 Linux 中启动 Nginx 的步骤:检查 Nginx 是否已安装。使用 systemctl start nginx 启动 Nginx 服务。使用 systemctl enable nginx 启用在系统启动时自动启动 Nginx。使用 systemctl status nginx 验证启动是否成功。在 Web 浏览器中访问 http://localhost 查看默认欢迎页面。
 nginx403错误怎么解决
Apr 14, 2025 pm 12:54 PM
nginx403错误怎么解决
Apr 14, 2025 pm 12:54 PM
服务器无权访问所请求的资源,导致 nginx 403 错误。解决方法包括:检查文件权限。检查 .htaccess 配置。检查 nginx 配置。配置 SELinux 权限。检查防火墙规则。排除其他原因,如浏览器问题、服务器故障或其他可能的错误。
 怎么查看nginx是否启动
Apr 14, 2025 pm 01:03 PM
怎么查看nginx是否启动
Apr 14, 2025 pm 01:03 PM
确认 Nginx 是否启动的方法:1. 使用命令行:systemctl status nginx(Linux/Unix)、netstat -ano | findstr 80(Windows);2. 检查端口 80 是否开放;3. 查看系统日志中 Nginx 启动消息;4. 使用第三方工具,如 Nagios、Zabbix、Icinga。
 怎么解决nginx跨域问题
Apr 14, 2025 am 10:15 AM
怎么解决nginx跨域问题
Apr 14, 2025 am 10:15 AM
解决 Nginx 跨域问题有两种方法:修改跨域响应头:添加指令以允许跨域请求,指定允许的方法和头,以及设置缓存时间。使用 CORS 模块:启用模块并配置 CORS 规则,允许跨域请求、方法、头和设置缓存时间。
 nginx403怎么解决
Apr 14, 2025 am 10:33 AM
nginx403怎么解决
Apr 14, 2025 am 10:33 AM
如何解决 Nginx 403 Forbidden 错误?检查文件或目录权限;2. 检查 .htaccess 文件;3. 检查 Nginx 配置文件;4. 重启 Nginx。其他可能原因还包括防火墙规则、SELinux 设置或应用程序问题。
 怎么启动nginx服务器
Apr 14, 2025 pm 12:27 PM
怎么启动nginx服务器
Apr 14, 2025 pm 12:27 PM
启动 Nginx 服务器需要按照不同操作系统采取不同的步骤:Linux/Unix 系统:安装 Nginx 软件包(例如使用 apt-get 或 yum)。使用 systemctl 启动 Nginx 服务(例如 sudo systemctl start nginx)。Windows 系统:下载并安装 Windows 二进制文件。使用 nginx.exe 可执行文件启动 Nginx(例如 nginx.exe -c conf\nginx.conf)。无论使用哪种操作系统,您都可以通过访问服务器 IP
