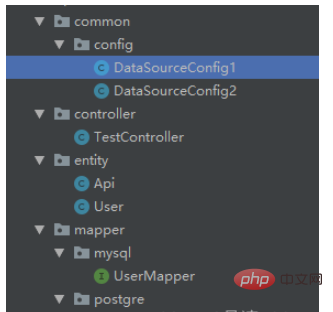
使用spring boot配置多数据源,数据源分别为postgresql、mysql
spring boot——2.5.4
druid——1.2.11
postgresql——12
mysql——8.0.16
maven——3.0
idea——2019
java package目录

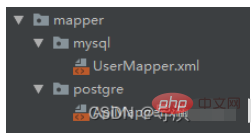
resource目录存放mapper.xml文件,按照数据源创建package

        <dependency>
            <groupId>org.springframework.boot</groupId>
            <artifactId>spring-boot-starter-data-jpa</artifactId>
        </dependency>
        <dependency>
            <groupId>org.springframework.boot</groupId>
            <artifactId>spring-boot-starter-test</artifactId>
            <scope>test</scope>
        </dependency>
        <dependency>
            <groupId>org.springframework.boot</groupId>
            <artifactId>spring-boot-starter-web</artifactId>
        </dependency>
        <!-- https://mvnrepository.com/artifact/com.alibaba/fastjson -->
        <dependency>
            <groupId>com.alibaba</groupId>
            <artifactId>fastjson</artifactId>
            <version>2.0.4</version>
        </dependency>
        <!-- https://mvnrepository.com/artifact/com.alibaba/druid-spring-boot-starter -->
        <dependency>
            <groupId>com.alibaba</groupId>
            <artifactId>druid-spring-boot-starter</artifactId>
            <version>1.2.11</version>
        </dependency>
        <dependency>
            <groupId>org.mybatis.spring.boot</groupId>
            <artifactId>mybatis-spring-boot-starter</artifactId>
            <version>1.3.2</version>
        </dependency>
        <dependency>
            <groupId>org.postgresql</groupId>
            <artifactId>postgresql</artifactId>
            <scope>runtime</scope>
        </dependency>
        <!-- MySql驱动 -->
        <dependency>
            <groupId>mysql</groupId>
            <artifactId>mysql-connector-java</artifactId>
</dependency>server:
port: 8081
spring:
datasource:
type: com.alibaba.druid.pool.DruidDataSource
druid:
web-stat-filter:
enabled: true #是否启用StatFilter默认值true
url-pattern: /*
exclusions: /druid/*,*.js,*.gif,*.jpg,*.bmp,*.png,*.css,*.ico
session-stat-enable: true
session-stat-max-count: 10
stat-view-servlet:
enabled: true #是否启用StatViewServlet默认值true
url-pattern: /druid/*
reset-enable: true
login-username: admin
login-password: admin
allow:
db1:
username: postgres
password: localhost
url: jdbc:postgresql://localhost:5432/test
driver-class-name: org.postgresql.Driver
initial-size: 5 # 初始化大小
min-idle: 5 # 最小
max-active: 100 # 最大
max-wait: 60000 # 配置获取连接等待超时的时间
validation-query: select version()
time-between-eviction-runs-millis: 60000 # 配置间隔多久才进行一次检测,检测需要关闭的空闲连接,单位是毫秒
min-evictable-idle-time-millis: 300000 # 指定一个空闲连接最少空闲多久后可被清除,单位是毫秒
filters: config,wall,stat # 配置监控统计拦截的filters,去掉后监控界面sql无法统计,'wall'用于防火墙
# 通过connectProperties属性来打开mergeSql功能;慢SQL记录
connectionProperties: druid.stat.slowSqlMillis=200;druid.stat.logSlowSql=true;config.decrypt=false
test-while-idle: true
test-on-borrow: true
test-on-return: false
# 是否缓存preparedStatement,也就是PSCache 官方建议MySQL下建议关闭 个人建议如果想用SQL防火墙 建议打开
pool-prepared-statements: true
max-pool-prepared-statement-per-connection-size: 20
db2:
username: root
password: localhost
url: jdbc:mysql://localhost:3306/springboot?characterEncoding=utf8&useUnicode=true&useSSL=false&serverTimezone=Asia/Shanghai
driver-class-name: com.mysql.cj.jdbc.Driver
initial-size: 5 # 初始化大小
min-idle: 5 # 最小
max-active: 100 # 最大
max-wait: 60000 # 配置获取连接等待超时的时间
validation-query: select 'x'
time-between-eviction-runs-millis: 60000 # 配置间隔多久才进行一次检测,检测需要关闭的空闲连接,单位是毫秒
min-evictable-idle-time-millis: 300000 # 指定一个空闲连接最少空闲多久后可被清除,单位是毫秒
filters: config,wall,stat # 配置监控统计拦截的filters,去掉后监控界面sql无法统计,'wall'用于防火墙
# 通过connectProperties属性来打开mergeSql功能;慢SQL记录
connectionProperties: druid.stat.slowSqlMillis=200;druid.stat.logSlowSql=true;config.decrypt=false
test-while-idle: true
test-on-borrow: true
test-on-return: false
# 是否缓存preparedStatement,也就是PSCache 官方建议MySQL下建议关闭 个人建议如果想用SQL防火墙 建议打开
pool-prepared-statements: true
max-pool-prepared-statement-per-connection-size: 20
mybatis:
mapper-locations: classpath:com/demo/mapper/*.xml
type-aliases-package: com.demo.entity
configuration:
log-impl:
mapUnderscoreToCamelCase: true
#showSql
logging:
level:
java.sql: debug
org.apache.ibatis: debug
com.demo.mapper: debug
config: classpath:logback-spring.xml@Configuration
@MapperScan(basePackages = "com.demo.mapper.postgre.**", sqlSessionFactoryRef = "oneSqlSessionFactory")
public class DataSourceConfig1 {
// 将这个对象放入Spring容器中
@Bean(name = "oneDataSource")
// 表示这个数据源是默认数据源
@Primary
// 读取application.properties中的配置参数映射成为一个对象
// prefix表示参数的前缀
@ConfigurationProperties(prefix = "spring.datasource.druid.db1")
public DataSource getDateSource1() {
return DataSourceBuilder.create().type(DruidDataSource.class).build();
}
@Bean(name = "oneSqlSessionFactory")
// 表示这个数据源是默认数据源
@Primary
// @Qualifier表示查找Spring容器中名字为oneDataSource的对象
public SqlSessionFactory oneSqlSessionFactory(@Qualifier("oneDataSource") DataSource datasource)
throws Exception {
SqlSessionFactoryBean bean = new SqlSessionFactoryBean();
bean.setDataSource(datasource);
bean.setMapperLocations(
// 设置mybatis的xml所在位置
new PathMatchingResourcePatternResolver().getResources("classpath*:com.demo.mapper.postgre/*.xml"));
return bean.getObject();
}
@Bean("oneSqlSessionTemplate")
// 表示这个数据源是默认数据源
@Primary
public SqlSessionTemplate oneSqlSessionTemplate(
@Qualifier("oneSqlSessionFactory") SqlSessionFactory sessionFactory) {
return new SqlSessionTemplate(sessionFactory);
}
}@Configuration
@MapperScan(basePackages = "com.demo.mapper.mysql", sqlSessionFactoryRef = "twoSqlSessionFactory")
public class DataSourceConfig2 {
// 将这个对象放入Spring容器中
@Bean(name = "twoDataSource")
// 读取application.properties中的配置参数映射成为一个对象
// prefix表示参数的前缀
@ConfigurationProperties(prefix = "spring.datasource.druid.db2")
public DataSource getDateSource1() {
return DataSourceBuilder.create().type(DruidDataSource.class).build();
}
@Bean(name = "twoSqlSessionFactory")
// 表示这个数据源是默认数据源
//@Primary
// @Qualifier表示查找Spring容器中名字为oneDataSource的对象
public SqlSessionFactory oneSqlSessionFactory(@Qualifier("twoDataSource") DataSource datasource)
throws Exception {
SqlSessionFactoryBean bean = new SqlSessionFactoryBean();
bean.setDataSource(datasource);
bean.setMapperLocations(
// 设置mybatis的xml所在位置
new PathMatchingResourcePatternResolver().getResources("classpath*:com.demo.mapper.mysql/*.xml"));
return bean.getObject();
}
@Bean("twoSqlSessionTemplate")
// 表示这个数据源是默认数据源
//@Primary
public SqlSessionTemplate oneSqlSessionTemplate(
@Qualifier("twoSqlSessionFactory") SqlSessionFactory sessionFactory) {
return new SqlSessionTemplate(sessionFactory);
}
}关键点:去除 exclude = {DataSourceAutoConfiguration.class} 及扫描 com.demo.mapper目录
@MapperScan("com.demo.mapper")
@SpringBootApplication(exclude = {DataSourceAutoConfiguration.class})
public class DemoApplication {

    public static void main(String[] args) {
        SpringApplication.run(DemoApplication .class, args);
    }
}输入地址 localhost://8081/druid,输入 admin/admin
以上是SpringBoot怎么使用druid配置多数据源的详细内容。更多信息请关注PHP中文网其他相关文章!


