

CentOS7 Docker Nginx部署及运行实例分析

1、资源准备
dockerfile文件
# "ported" by adam miller <maxamillion@fedoraproject.org> from # https://github.com/fedora-cloud/fedora-dockerfiles # # originally written for fedora-dockerfiles by # scollier <scollier@redhat.com> from centos:centos7 maintainer the centos project <cloud-ops@centos.org> run yum -y update; yum clean all run yum -y install epel-release tar ; yum clean all run yum -y install nginx ; yum clean all add nginx.conf /opt/deploy/nginx/nginx.conf run echo "daemon off;" >> /opt/deploy/nginx/nginx.conf #run curl https://git.centos.org/sources/httpd/c7/acf5cccf4afaecf3afeb18c50ae59fd5c6504910 \ # | tar -xz -c /usr/local/nginx/html \ # --strip-components=1 #run sed -i -e 's/apache/nginx/g' -e '/apache_pb.gif/d' \ # /usr/local/nginx/html/index.html expose 80 #cmd [ "/usr/local/nginx/sbin" ]
注意:路径需要在系统上面存在以及对应
nginx.conf文件
# for more information on configuration, see:
#  * official english documentation: http://nginx.org/en/docs/
#  * official russian documentation: http://nginx.org/ru/docs/

user nginx;
worker_processes 1;

error_log /usr/logs/nginx/error.log;
#error_log /var/log/nginx/error.log notice;
#error_log /var/log/nginx/error.log info;

pid    /run/nginx.pid;


events {
  worker_connections 1024;
}


http {
  include    mime.types;
  default_type application/octet-stream;

  log_format main '$remote_addr - $remote_user [$time_local] "$request" '
           '$status $body_bytes_sent "$http_referer" '
           '"$http_user_agent" "$http_x_forwarded_for"';

  access_log /usr/logs/nginx/access.log main;

  sendfile    on;
  #tcp_nopush   on;

  #keepalive_timeout 0;
  keepalive_timeout 65;

  #gzip on;

  # load modular configuration files from the /etc/nginx/conf.d directory.
  # see http://nginx.org/en/docs/ngx_core_module.html#include
  # for more information.
  #include /etc/nginx/conf.d/*.conf;

  index  index.html index.htm;

  server {
    listen    80;
    server_name localhost;
    root     /usr/share/nginx/html;

    #charset koi8-r;

    #access_log /var/log/nginx/host.access.log main;

    location / {
      autoindex on;
    }

    # redirect server error pages to the static page /40x.html
    #
    error_page 404       /404.html;
    location = /40x.html {
    }

    # redirect server error pages to the static page /50x.html
    #
    error_page  500 502 503 504 /50x.html;
    location = /50x.html {
    }

    # proxy the php scripts to apache listening on 127.0.0.1:80
    #
    #location ~ \.php$ {
    #  proxy_pass  http://127.0.0.1;
    #}

    # pass the php scripts to fastcgi server listening on 127.0.0.1:9000
    #
    #location ~ \.php$ {
    #  root      html;
    #  fastcgi_pass  127.0.0.1:9000;
    #  fastcgi_index index.php;
    #  fastcgi_param script_filename /scripts$fastcgi_script_name;
    #  include    fastcgi_params;
    #}

    # deny access to .htaccess files, if apache's document root
    # concurs with nginx's one
    #
    #location ~ /\.ht {
    #  deny all;
    #}
  }


  # another virtual host using mix of ip-, name-, and port-based configuration
  #
  #server {
  #  listen    8000;
  #  listen    somename:8080;
  #  server_name somename alias another.alias;
  #  root     html;

  #  location / {
  #  }
  #}


  # https server
  #
  #server {
  #  listen    443;
  #  server_name localhost;
  #  root     html;

  #  ssl         on;
  #  ssl_certificate   cert.pem;
  #  ssl_certificate_key cert.key;

  #  ssl_session_timeout 5m;

  #  ssl_protocols sslv2 sslv3 tlsv1;
  #  ssl_ciphers high:!anull:!md5;
  #  ssl_prefer_server_ciphers  on;

  #  location / {
  #  }
  #}

}注意:路径需要在系统上面存在以及对应
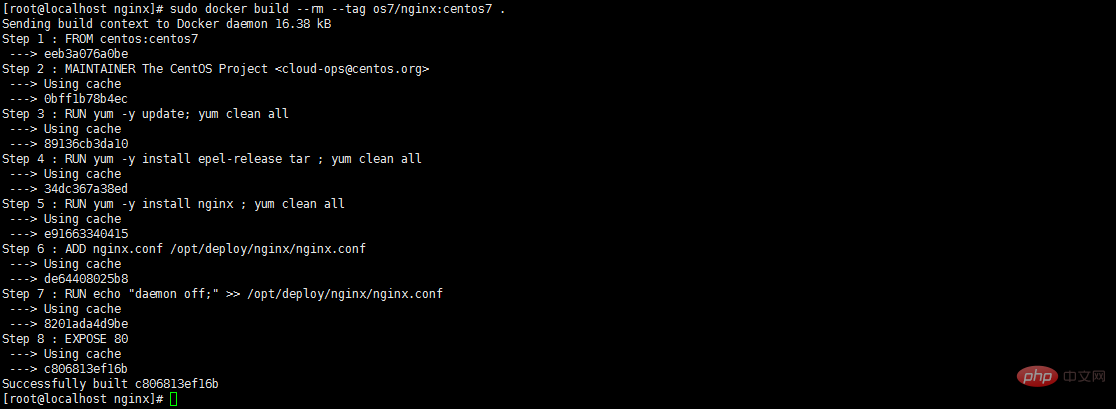
2、执行构建镜像命令
复制代码 代码如下:
[root@localhost nginx]# sudo docker build --rm --tag os7/nginx:centos7 .
执行结果截图:
3、查看镜像是否安装构建成功 docker images

4、创建容器 docker run -i -t -d -p 192.168.32.129:81:80 os7/nginx /bin/bash
注意:192.168.32.129这个ip的话,则需要在/etc/hosts中添加
192.168.32.129 localhost
5、查看容器是否创建成功并启动 docker ps

6、测试是否成功访问 curl http://192.168.32.129:81

会出现这个拒绝连接,那怎么办呢?有办法解决的,我们先进入该容器里面
7、进入容器 docker exec -i -t small_hodgkin /bin/sh

8、接着在容器里面执行(直接输入即可)
nginx
9、在容器外面执行 curl http://192.168.32.129:81

成功了。
10、再到虚拟机外面通过浏览器访问
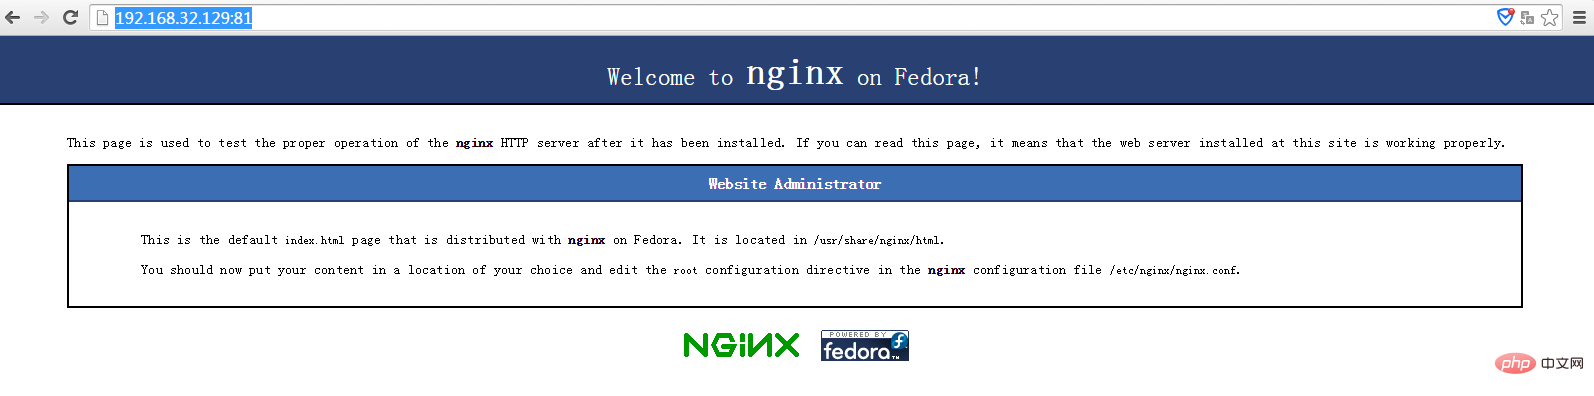
以上是CentOS7 Docker Nginx部署及运行实例分析的详细内容。更多信息请关注PHP中文网其他相关文章!

热AI工具

Undresser.AI Undress
人工智能驱动的应用程序,用于创建逼真的裸体照片

AI Clothes Remover
用于从照片中去除衣服的在线人工智能工具。

Undress AI Tool
免费脱衣服图片

Clothoff.io
AI脱衣机

Video Face Swap
使用我们完全免费的人工智能换脸工具轻松在任何视频中换脸!

热门文章
热工具

记事本++7.3.1
好用且免费的代码编辑器

SublimeText3汉化版
中文版,非常好用

禅工作室 13.0.1
功能强大的PHP集成开发环境

Dreamweaver CS6
视觉化网页开发工具

SublimeText3 Mac版
神级代码编辑软件(SublimeText3)
热门话题
 7651
7651
 15
1392
52
91
11
73
19
36
110
15
1392
52
91
11
73
19
36
110


 docker怎么退出容器
Apr 15, 2025 pm 12:15 PM
docker怎么退出容器
Apr 15, 2025 pm 12:15 PM
退出 Docker 容器的四种方法:容器终端中使用 Ctrl D 快捷键容器终端中输入 exit 命令宿主机终端中使用 docker stop <container_name> 命令宿主机终端中使用 docker kill <container_name> 命令(强制退出)
 docker内的文件怎么拷贝到外面
Apr 15, 2025 pm 12:12 PM
docker内的文件怎么拷贝到外面
Apr 15, 2025 pm 12:12 PM
Docker 中将文件拷贝到外部主机的方法:使用 docker cp 命令:执行 docker cp [选项] <容器路径> <主机路径>。使用数据卷:在主机上创建目录,在创建容器时使用 -v 参数挂载该目录到容器内,实现文件双向同步。
 docker怎么重启
Apr 15, 2025 pm 12:06 PM
docker怎么重启
Apr 15, 2025 pm 12:06 PM
重启 Docker 容器的方法:获取容器 ID(docker ps);停止容器(docker stop <container_id>);启动容器(docker start <container_id>);验证重启成功(docker ps)。其他方法:Docker Compose(docker-compose restart)或 Docker API(参考 Docker 文档)。
 怎么看docker进程
Apr 15, 2025 am 11:48 AM
怎么看docker进程
Apr 15, 2025 am 11:48 AM
Docker 进程查看方法:1. Docker CLI 命令:docker ps;2. Systemd CLI 命令:systemctl status docker;3. Docker Compose CLI 命令:docker-compose ps;4. Process Explorer(Windows);5. /proc 目录(Linux)。
 docker desktop怎么用
Apr 15, 2025 am 11:45 AM
docker desktop怎么用
Apr 15, 2025 am 11:45 AM
如何使用 Docker Desktop?Docker Desktop 是一款工具,用于在本地机器上运行 Docker 容器。其使用步骤包括:1. 安装 Docker Desktop;2. 启动 Docker Desktop;3. 创建 Docker 镜像(使用 Dockerfile);4. 构建 Docker 镜像(使用 docker build);5. 运行 Docker 容器(使用 docker run)。
 docker容器名称怎么查
Apr 15, 2025 pm 12:21 PM
docker容器名称怎么查
Apr 15, 2025 pm 12:21 PM
可以通过以下步骤查询 Docker 容器名称:列出所有容器(docker ps)。筛选容器列表(使用 grep 命令)。获取容器名称(位于 "NAMES" 列中)。
 docker镜像失败怎么办
Apr 15, 2025 am 11:21 AM
docker镜像失败怎么办
Apr 15, 2025 am 11:21 AM
Docker镜像构建失败的故障排除步骤:检查Dockerfile语法和依赖项版本。检查构建上下文中是否包含所需源代码和依赖项。查看构建日志以获取错误详细信息。使用--target选项构建分层阶段以识别失败点。确保使用最新版本的Docker引擎。使用--t [image-name]:debug模式构建镜像以调试问题。检查磁盘空间并确保足够。禁用SELinux以防止干扰构建过程。向社区平台寻求帮助,提供Dockerfile和构建日志描述以获得更具体的建议。
