

SpringBoot整合接口管理工具Swagger怎么使用

一、Swagger简介
Swagger 是一系列 RESTful API 的工具,通过 Swagger 可以获得项目的⼀种交互式文档,客户端 SDK 的自动生成等功能。
Swagger 的目标是为 REST APIs 定义一个标准的、与语⾔言无关的接口,使人和计算机在看不到源码或者看不到文档或者不能通过网络流量检测的情况下,能发现和理解各种服务的功能。当服务通过 Swagger 定义,消费者就能与远程的服务互动通过少量的实现逻辑。
二、Springboot整合swagger
使用 Spring Boot 集成 Swagger 的理念是,使用用注解来标记出需要在 API 文档中展示的信息,Swagger 会根据项目中标记的注解来生成对应的 API 文档。Swagger 被号称世界上最流行的 API 工具,它提供了 API 管理的全套解决方案,API 文档管理需要考虑的因素基本都包含,这里将讲解最常用的定制内容。
1、添加swagger坐标
Spring Boot 集成 Swagger 3 很简单,需要引入依赖并做基础配置即可。
<dependency>
    <groupId>io.springfox</groupId>
    <artifactId>springfox-boot-starter</artifactId>
    <version>3.0.0</version>
</dependency>2、Swagger Helloword 实现
2.1、创建springboot项目
在启动类上加上@EnableOpenApi 注解 启用swagger api文档功能
import org.springframework.boot.SpringApplication;
import org.springframework.boot.autoconfigure.SpringBootApplication;
import springfox.documentation.oas.annotations.EnableOpenApi;

@SpringBootApplication
@EnableOpenApi  //启动swagger api文档注解
public class SpringBootWithSwaggerApplication {
    public static void main(String[] args) {
        SpringApplication.run(SpringBootWithSwaggerApplication.class, args);
    }

}2.2、写一个接口
import org.springframework.web.bind.annotation.GetMapping;
import org.springframework.web.bind.annotation.RestController;

/**
 * @author 阿水
 * @create 2023-04-11 9:54
 */
@RestController()
public class SwaggerController {
    @GetMapping ("hello")
    public String hello(String params) {
        return "hello swagger"+" param为:"+params;
    }
}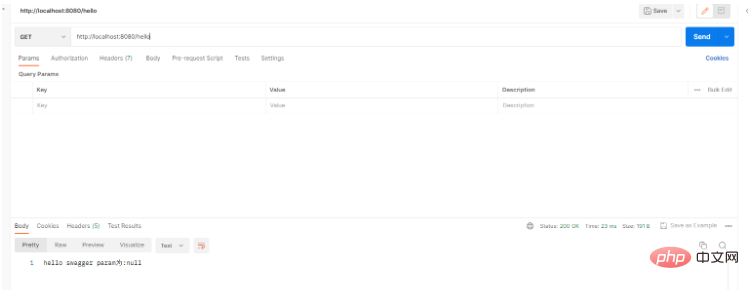
2.3、访问地址
http://localhost:8080/swagger-ui/index.html
三、常用的配置注解
Swagger 通过注解表明该接口会生成文档,包括接口名、请求方法、参数、返回信息等
1、Api 注解和 ApiOperation 注解
@Api
使用在类上,表明是swagger资源,@API拥有两个属性:value、tags。
生成的api文档会根据tags分类,直白的说就是这个controller中的所有接口生成的接口文档都会在tags这个list下;tags如果有多个值,会生成多个list,每个list都显示所有接口
value的作用类似tags,但是不能有多个值
语法:
  @Api(tags = "用户操作")
  或
@Api(tags = {"用户操作","用户操作2"})@ApiOperation
使用于在方法上,表示一个http请求的操作
语法:
    @ApiOperation(value = "",
                  notes = "",
                  response = )
属性说明:
  value:方法说明标题
  notes:方法详细描述
response:方法返回值类型案例:使用@Api和@ApiOperation生成api文档
import io.swagger.annotations.Api;
import io.swagger.annotations.ApiOperation;
import org.springframework.web.bind.annotation.GetMapping;
import org.springframework.web.bind.annotation.RestController;
/**
* @author 阿水
* @create 2023-04-11 9:54
*/
@RestController()
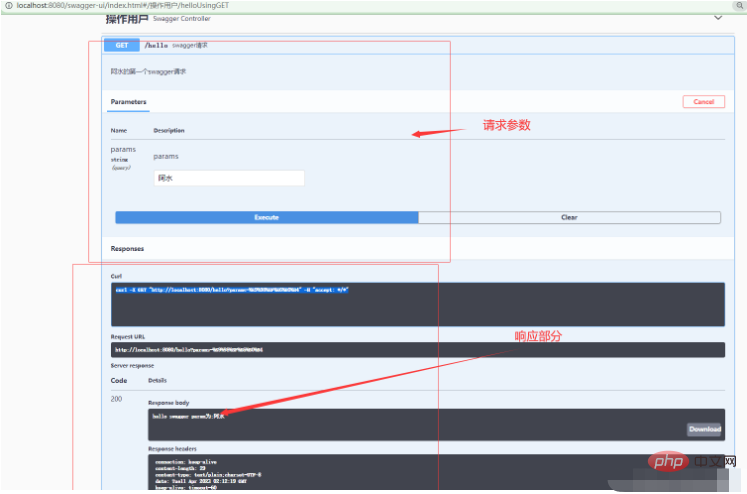
@Api(tags = {"操作用户"})
public class SwaggerController {
@GetMapping ("hello")
@ApiOperation(value = "swagger请求",notes = "阿水的第一个swagger请求",response = String.class)
public String hello(String params) {
return "hello swagger"+" param为:"+params;
}
}2、ApiImplicitParams 注解和 ApiImplicitParam
@ApiImplicitParams 注解和 @ApiImplicitParam 用于对方法中的非对象参数(参数绑定到简单类型时使用。)进行说明
语法:
@ApiImplicitParams(value = {
     @ApiImplicitParam(name="", value = "", type = "", required = true, paramType = "", defaultValue  = "")
})

属性说明:
    name:形参名称
    value:形参的说明文字
    type:形参类型
    required:该参数是否必须  true|false
    paramType: 用于描述参数是以何种方式传递到 Controller 的,它的值常见有: path, query, body 和 header
        path 表示参数是『嵌在』路径中的,它和 @PathVariable 参数注解遥相呼应;
    	query 表示参数是以 query string 的形式传递到后台的(无论是 get 请求携带在 url 中,还是 post 请求携带在请求体中),它和 @RequestParam 参数注解遥相呼应;
    	header 表示参数是『藏在』请求头中传递到后台的,它和 @RequestHeader 参数注解遥相呼应的。
    	form 不常用.
defaultValue :参数默认值注意:@ApiImplicitParam 的 name 属性要和 @RequestParam 或 @PathVariable 的 value 遥相呼应。
案例:使用@ApiImplicitParams注解和 @ApiImplicitParam 对方法参数进行说明
import io.swagger.annotations.Api;
import io.swagger.annotations.ApiImplicitParam;
import io.swagger.annotations.ApiImplicitParams;
import io.swagger.annotations.ApiOperation;
import org.springframework.web.bind.annotation.GetMapping;
import org.springframework.web.bind.annotation.RestController;
/**
* @author 阿水
* @create 2023-04-11 9:54
*/
@RestController()
@Api(tags = {"操作用户"})
public class SwaggerController {
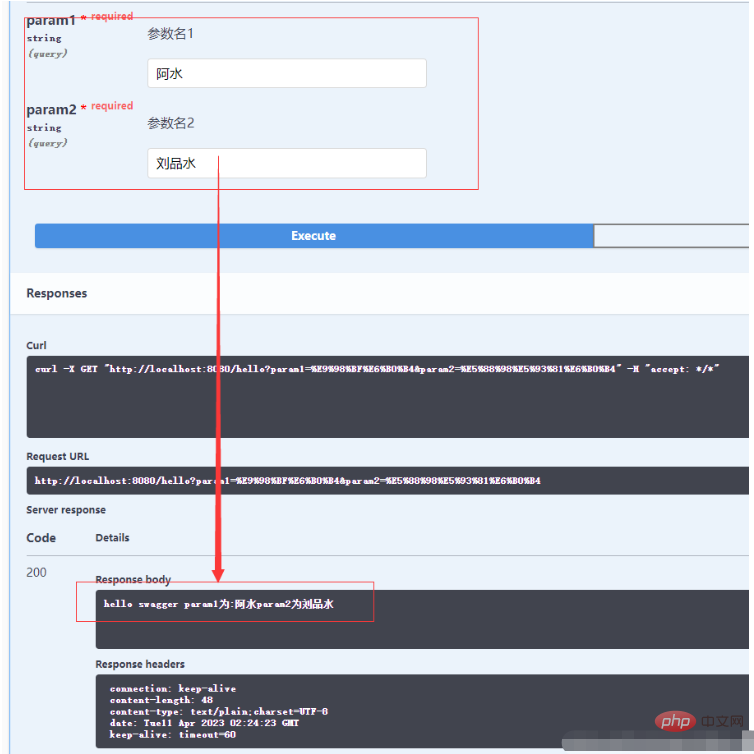
@GetMapping ("hello")
@ApiOperation(value = "swagger请求",notes = "阿水的第一个swagger请求",response = String.class)
@ApiImplicitParams(value ={
@ApiImplicitParam(name="param1",
value = "参数名1",
type = "String",
required = true,
paramType = "query",
defaultValue = "阿水所想的默认值1" ),
@ApiImplicitParam(name="param2",
value = "参数名2",
type = "String",
required = true,
paramType = "query",
defaultValue = "阿水所想的默认值2" )
})
public String hello(String param1,String param2) {
return "hello swagger"+" param1为:"+param1+"param2为"+param2;
}
}
3、ApiModel注解和 ApiModelProperty
@ApiModel
用在实体类上,表示对类进行说明,用于实体类中的参数接收说明。
@ApiModel("用户类")
@Data
public class Users {

    @ApiModelProperty(value = "编码:主键")
    private Integer id;

    @ApiModelProperty(value = "用户名")
    private String username;

    @ApiModelProperty(value = "密码")
    private String password;

}4、ApiResponse 和 ApiResponses
@ApiResponses 注解和 @ApiResponse 标注在 Controller 的方法上,用来描述 HTTP 请求的响应
/**
     * 添加用户
     *
     * @param user
     * @return
     */
    @PostMapping("/add")
    @ApiOperation(value = "添加用户",notes = "添加用户信息",response = ResponseResult.class)
    @ApiResponses({ @ApiResponse(code = 200, message = "添加成功", response = ResponseResult.class),
            	    @ApiResponse(code = 500, message = "添加失败", response = ResponseResult.class) })
    public ResponseResult<Void> addUser(@RequestBody User user) {
        //获得生成的加密盐
        user.setSalt(SaltUtils.getSalt());
        int n = userService.addUser(user);
        if (n > 0) {
            return new ResponseResult<Void>(200, "添加成功");
        }
        return new ResponseResult<Void>(500, "添加失败");
}5、创建 SwaggerConfig 配置类
在 SwaggerConfig 中添加两个方法:(其中一个方法是为另一个方法作辅助的准备工作)
api()方法使用 @Bean,在启动时初始化,返回实例 Docket(Swagger API 摘要对象),这里需要注意的是 .apis(RequestHandlerSelectors.basePackage("xxx.yyy.zzz")) 指定需要扫描的包路路径,只有此路径下的 Controller 类才会自动生成 Swagger API 文档。
import org.springframework.context.annotation.Bean;
import org.springframework.context.annotation.Configuration;
import springfox.documentation.builders.ApiInfoBuilder;
import springfox.documentation.builders.PathSelectors;
import springfox.documentation.builders.RequestHandlerSelectors;
import springfox.documentation.service.ApiInfo;
import springfox.documentation.spi.DocumentationType;
import springfox.documentation.spring.web.plugins.Docket;

/**
 * Swagger配置类
 */
@Configuration  //项目启动时加载此类
public class SwaggerConfig {
    @Bean
    public Docket api(){
        return new Docket(DocumentationType.OAS_30)
                .apiInfo(apiInfo())
                .select()
                // 此处自行修改为自己的 Controller 包路径。
                .apis(RequestHandlerSelectors.basePackage("com.lps.controller"))
                .paths(PathSelectors.any())
                .build();
    }

    public ApiInfo apiInfo(){
        return new ApiInfoBuilder()
                .title("阿水的项目接口文挡")
                .description("阿水的 Project Swagger2 UserService Interface")  //说明信息
                .termsOfServiceUrl("http://localhost:8080/swagger-ui/index.html") //文档生成的主页地址
                .version("1.0")  //文档版本
                .build();
    }
}apiInfo()方法配置相对重要一些,主要配置页面展示的基本信息包括,标题、描述、版本、服务条款等,查看 ApiInfo 类的源码还会发现支持 license 等更多的配置
四、springsecurity整合swagger
4.1,配置放行的地址
  http.authorizeRequests().antMatchers( "/swagger-ui.html",
                "/swagger-ui/*",
                "/swagger-resources/**",
                "/v2/api-docs",
                "/v3/api-docs",
                "/webjars/**").permitAll()
.anyRequest().authenticated();4.2,替换UI
上面的整个过程已经完成了,但是生成的接口文档的页面,其实很多人不太喜欢,觉得不太符合国人的使用习惯,所有又有一些大神,提供了其他的UI测试页面。这个页面的使用还是比较广泛的。
导入以下依赖、重启工程后访问地址:http://localhost:8080/doc.html
	<dependency>
        <groupId>com.github.xiaoymin</groupId>
        <artifactId>swagger-bootstrap-ui</artifactId>
        <version>1.9.6</version>
    </dependency>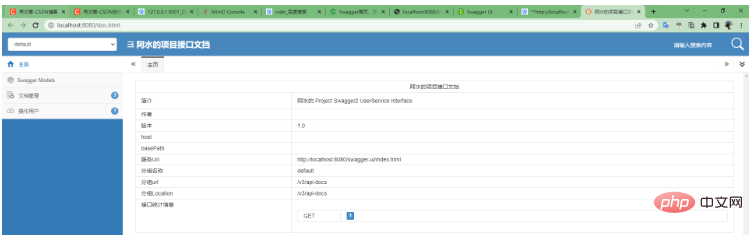
以上是SpringBoot整合接口管理工具Swagger怎么使用的详细内容。更多信息请关注PHP中文网其他相关文章!

热AI工具

Undresser.AI Undress
人工智能驱动的应用程序,用于创建逼真的裸体照片

AI Clothes Remover
用于从照片中去除衣服的在线人工智能工具。

Undress AI Tool
免费脱衣服图片

Clothoff.io
AI脱衣机

AI Hentai Generator
免费生成ai无尽的。

热门文章
热工具

记事本++7.3.1
好用且免费的代码编辑器

SublimeText3汉化版
中文版,非常好用

禅工作室 13.0.1
功能强大的PHP集成开发环境

Dreamweaver CS6
视觉化网页开发工具

SublimeText3 Mac版
神级代码编辑软件(SublimeText3)
热门话题


 Springboot怎么集成Jasypt实现配置文件加密
Jun 01, 2023 am 08:55 AM
Springboot怎么集成Jasypt实现配置文件加密
Jun 01, 2023 am 08:55 AM
Jasypt介绍Jasypt是一个java库,它允许开发员以最少的努力为他/她的项目添加基本的加密功能,并且不需要对加密工作原理有深入的了解用于单向和双向加密的高安全性、基于标准的加密技术。加密密码,文本,数字,二进制文件...适合集成到基于Spring的应用程序中,开放API,用于任何JCE提供程序...添加如下依赖:com.github.ulisesbocchiojasypt-spring-boot-starter2.1.1Jasypt好处保护我们的系统安全,即使代码泄露,也可以保证数据源的
 如何在PHP中使用Swagger生成API文档
Jun 17, 2023 am 10:40 AM
如何在PHP中使用Swagger生成API文档
Jun 17, 2023 am 10:40 AM
随着Web应用程序的不断发展,API已经成为了现代Web应用开发的标准之一。然而,随着API的数量和复杂度的增加,维护和文档化它们也变得越来越复杂。为了解决这一问题,Swagger应运而生。它是一种用于生成API文档的工具,可以让开发者更轻松地维护和文档化API,同时还提供了可视化文档和其他各种功能。在本文中,我们将讨论如何在PHP中使用Swagger生成A
 Laravel开发:如何使用Laravel Swagger生成API文档?
Jun 13, 2023 am 09:35 AM
Laravel开发:如何使用Laravel Swagger生成API文档?
Jun 13, 2023 am 09:35 AM
Laravel开发:如何使用LaravelSwagger生成API文档?在开发Web应用程序时,处理API文档往往是一项繁琐但必不可少的任务。使用Swagger可以自动生成API文档并使其可视化。在Laravel开发中,我们可以使用LaravelSwagger扩展包来轻松地生成SwaggerAPI文档。本文将指引您如何在L
 怎么在SpringBoot中使用Redis实现分布式锁
Jun 03, 2023 am 08:16 AM
怎么在SpringBoot中使用Redis实现分布式锁
Jun 03, 2023 am 08:16 AM
一、Redis实现分布式锁原理为什么需要分布式锁在聊分布式锁之前,有必要先解释一下,为什么需要分布式锁。与分布式锁相对就的是单机锁,我们在写多线程程序时,避免同时操作一个共享变量产生数据问题,通常会使用一把锁来互斥以保证共享变量的正确性,其使用范围是在同一个进程中。如果换做是多个进程,需要同时操作一个共享资源,如何互斥呢?现在的业务应用通常是微服务架构,这也意味着一个应用会部署多个进程,多个进程如果需要修改MySQL中的同一行记录,为了避免操作乱序导致脏数据,此时就需要引入分布式锁了。想要实现分
 springboot读取文件打成jar包后访问不到怎么解决
Jun 03, 2023 pm 04:38 PM
springboot读取文件打成jar包后访问不到怎么解决
Jun 03, 2023 pm 04:38 PM
springboot读取文件,打成jar包后访问不到最新开发出现一种情况,springboot打成jar包后读取不到文件,原因是打包之后,文件的虚拟路径是无效的,只能通过流去读取。文件在resources下publicvoidtest(){Listnames=newArrayList();InputStreamReaderread=null;try{ClassPathResourceresource=newClassPathResource("name.txt");Input
 Springboot+Mybatis-plus不使用SQL语句进行多表添加怎么实现
Jun 02, 2023 am 11:07 AM
Springboot+Mybatis-plus不使用SQL语句进行多表添加怎么实现
Jun 02, 2023 am 11:07 AM
在Springboot+Mybatis-plus不使用SQL语句进行多表添加操作我所遇到的问题准备工作在测试环境下模拟思维分解一下:创建出一个带有参数的BrandDTO对象模拟对后台传递参数我所遇到的问题我们都知道,在我们使用Mybatis-plus中进行多表操作是极其困难的,如果你不使用Mybatis-plus-join这一类的工具,你只能去配置对应的Mapper.xml文件,配置又臭又长的ResultMap,然后再去写对应的sql语句,这种方法虽然看上去很麻烦,但具有很高的灵活性,可以让我们
 SpringBoot与SpringMVC的比较及差别分析
Dec 29, 2023 am 11:02 AM
SpringBoot与SpringMVC的比较及差别分析
Dec 29, 2023 am 11:02 AM
SpringBoot和SpringMVC都是Java开发中常用的框架,但它们之间有一些明显的差异。本文将探究这两个框架的特点和用途,并对它们的差异进行比较。首先,我们来了解一下SpringBoot。SpringBoot是由Pivotal团队开发的,它旨在简化基于Spring框架的应用程序的创建和部署。它提供了一种快速、轻量级的方式来构建独立的、可执行
 SpringBoot怎么自定义Redis实现缓存序列化
Jun 03, 2023 am 11:32 AM
SpringBoot怎么自定义Redis实现缓存序列化
Jun 03, 2023 am 11:32 AM
1、自定义RedisTemplate1.1、RedisAPI默认序列化机制基于API的Redis缓存实现是使用RedisTemplate模板进行数据缓存操作的,这里打开RedisTemplate类,查看该类的源码信息publicclassRedisTemplateextendsRedisAccessorimplementsRedisOperations,BeanClassLoaderAware{//声明了key、value的各种序列化方式,初始值为空@NullableprivateRedisSe
