Vue.property.xxx
import Vue from "vue";
import axios from "axios";
Vue.prototype.$http= axios;
new Vue({
  router,
  store,
  render: (h) => h(App),
}).$mount("#app");this.$http.xxx();
app.config.globalProperties.xxx
import { createApp } from 'vue'
import App from './App.vue'
import ElementPlus, { ElMessage, ElMessageBox } from 'element-plus'
import 'element-plus/dist/index.css'
const app = createApp(App);
app.config.globalProperties.$messageBox = ElMessageBox;
app.config.globalProperties.$message1 = ElMessage;// 引入vue的 getCurrentInstance 方法
import { defineComponent, getCurrentInstance } from "vue";
// 获取当前组件实例
const { appContext } = getCurrentInstance();
// 打印看一下结构
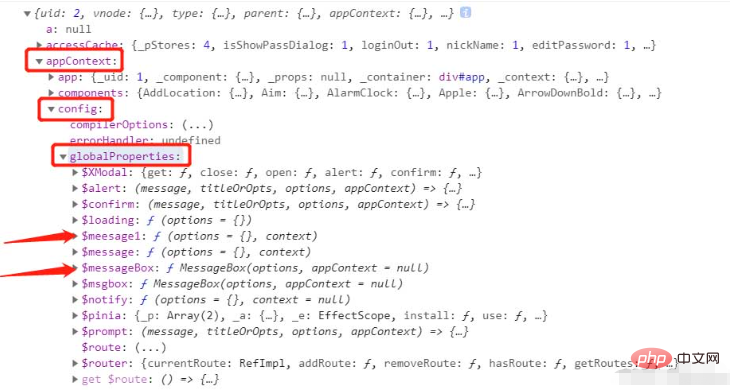
console.log(appContext)
在appContext.config.globalProperties里面已经可以看到挂载的$messageBox和$message1了,至于为什么还有一个$message
我们可以看张element plus官网的截图

可以看到这是element plus默认挂载的,我们可以直接使用,这里添加$message1只是演示,其实是可以直接使用默认挂载的。
完整使用例子
// 引入vue的 getCurrentInstance 方法
import { defineComponent, getCurrentInstance } from "vue";
// 获取当前组件实例
const { appContext } = getCurrentInstance();
const globalProxy = appContext.config.globalProperties;
export default defineComponent({
  setup() {
    // 退出登录按钮
    const loginOut = () => {
      globalProxy.$messageBox.confirm("确定退出登录吗?", "提示", {
          confirmButtonText: "确定",
          cancelButtonText: "取消",
          type: "warning",
        })
        .then(() => {
          setTimeout(() => {
            globalProxy.$message1({message: "已退出登录", type: "success"});
            localStorage.removeItem("userInfo");
            router.push("/login");
          }, 200);
        })
        .catch((e) => {
          console.log(e);
        });
    };

	 return {
	 	loginOut
 	 }
   }
})以上是vue3配置全局参数及组件的使用方法的详细内容。更多信息请关注PHP中文网其他相关文章!


