

在容器中怎么使用nginx搭建上传下载的文件服务器

一、安装nginx容器
为了让nginx支持文件上传,需要下载并运行带有nginx-upload-module模块的容器:
sudo podman pull docker.io/dimka2014/nginx-upload-with-progress-modules:latest
sudo podman -d --name nginx -p 83:80 docker.io/dimka2014/nginx-upload-with-progress-modules
该容器同时带有nginx-upload-module模块和nginx-upload-progress-module模块。
注意该容器是Alpine Linux ,没有bash,有些命令与其它发行版本的Linux不一样。
使用下面的命令进入容器:
sudo podman exec -it nginx /bin/sh
作为文件服务器, 需要显示本地时间,默认不是本地时间。通过下面一系列命令设置为本地时间:
apk update
apk add tzdata
echo "Asia/Shanghai" > /etc/timezone
rm -rf /etc/localtime
cp /usr/share/zoneinfo/Asia/Shanghai /etc/localtime
apk del tzdata
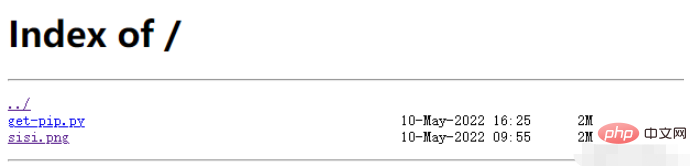
创建文件服务器的根目录:
mkdir -p /nginx/share
二、配置nginx
配置文件的路径为/etc/nginx/conf.d/default.conf,作为
server {
    ……
    charset utf-8; # 设置字符编码,避免中文乱码
    location / {
            root   /nginx/share; # 根目录
            autoindex   on;  # 开启索引功能
            autoindex_exact_size off; # 关闭计算文件确切大小(单位bytes),只显示大概大小(单位kb、mb、gb)
            autoindex_localtime on; # 显示本地时间
        }
}此时我们的文件服务就配置好了,需要使用下面的命令让配置生效:
nginx -s reload
三、支持文件上传
1. 配置nginx
上面的配置已经完成文件服务器的配置了,但是不能上传文件,想要上传文件,还需要做如下配置:
server {
    ……
    charset utf-8; # 设置字符编码,避免中文乱码
    client_max_body_size 32m;
    upload_limit_rate 1M; # 限制上传速度最大1M

    # 设置upload.html页面路由
    location = /upload.html {
            root /nginx;  # upload.html所在路径
    }

    location /upload {
            # 限制上传文件最大30MB
            upload_max_file_size 30m;
            # 设置后端处理交由@rename处理。由于nginx-upload-module模块在存储时并不是按上传的文件名存储的,所以需要自行改名。
            upload_pass @rename;
            # 指定上传文件存放目录,1表示按1位散列,将上传文件随机存到指定目录下的0、1、2、...、8、9目录中(这些目录要手动建立)
            upload_store /tmp/nginx 1;
            # 上传文件的访问权限,user:r表示用户只读,w表示可写
            upload_store_access user:r;

            # 设置传给后端处理的表单数据,包括上传的原始文件名,上传的内容类型,临时存储的路径
            upload_set_form_field $upload_field_name.name "$upload_file_name";
            upload_set_form_field $upload_field_name.content_type "$upload_content_type";
            upload_set_form_field $upload_field_name.path "$upload_tmp_path";
            upload_pass_form_field "^submit$|^description$";

            # 设置上传文件的md5值和文件大小
            upload_aggregate_form_field "${upload_field_name}_md5" "$upload_file_md5";
            upload_aggregate_form_field "${upload_field_name}_size" "$upload_file_size";

            # 如果出现下列错误码则删除上传的文件
            upload_cleanup 400 404 499 500-505;
     }

    location @rename {
            # 后端处理
            proxy_pass http://localhost:81;
    }
}上面的配置中,临时存储时是按1位散列来存储的,需要在上传目录下手动创建0~9几个目录。
 mkdir -p /tmp/nginx
 cd /tmp/nginx
 mkdir 1 2 3 4 5 6 7 8 9 0
 chown nginx:root . -R
2. 添加upload.html
<!DOCTYPE html PUBLIC "-//W3C//DTD XHTML 1.0 Transitional//EN" "http://www.w3.org/TR/xhtml1/DTD/xhtml1-transitional.dtd">
<html xmlns="http://www.w3.org/1999/xhtml">
<head>
<title>上传</title>
</head>
<body>
<meta http-equiv="Content-Type" content="text/html; charset=utf-8" />
<form name="upload" method="POST" enctype="multipart/form-data" action="upload">
<input type="file" name="file"/>
<input type="submit" name="submit" value="上传"/>
</form>
</body>
</html>
3. 添加后面的处理服务
需要先安装python及所需的库
apk add python3
pip3 install bottle
pip3 install shutilwhich
python服务源码:
#!/usr/bin/python3
# -*- coding: utf-8 -*-

from bottle import *
import shutil

@post("/upload")
def postExample():
    try:
        dt = request.forms.dict
        filenames = dt.get('file.name')
        tmp_path = dt.get("file.tmp_path")
        filepaths = dt.get("file.path")
        count = filenames.__len__()
        dir = os.path.abspath(filepaths[0])
        for i in range(count):
            print("rename %s to %s" % (tmp_path[i],  os.path.join(dir, filenames[i])))
            target = os.path.join(dir, filenames[i])
            shutil.move(tmp_path[i], target)
            shutil.chown(target, "nginx", "root") # 由于shutil.move不会保持用户归属,所以需要显示修改,否则访问时会报403无访问权限
    except Exception as e:
        print("Exception:%s" % e)
        redirect("50x.html") # 如果是在容器中部署的nginx且映射了不同的端口,需要指定IP,端口
    redirect('/') # 如果是在容器中部署的nginx且映射了不同的端口,需要指定IP,端口

run(host='localhost', port=81)四、获取上传进度
1.修改配置
# 开辟一个空间proxied来存储跟踪上传的信息1MB
upload_progress proxied 1m;
server {
    ……
    location ^~ /progress {
        # 报告上传的信息
        report_uploads proxied;
    }
    location /upload {
        ...
        # 上传完成后,仍然保存上传信息5s
        track_uploads proxied 5s;
    }
}2. 修改上传页面
<form id="upload" enctype="multipart/form-data" action="/upload" method="post" onsubmit="openProgressBar(); return true;">
<input name="file" type="file" label="fileupload" />
<input type="submit" value="Upload File" />
</form>
<div>
<div id="progress" >
<div id="progressbar" > </div>
</div>
<div id="tp">(progress)</div>
</div>
<script type="text/javascript">
var interval = null;
var uuid = "";
function openProgressBar() {
for (var i = 0; i < 32; i++) {
uuid += Math.floor(Math.random() * 16).toString(16);
}
document.getElementById("upload").action = "/upload?X-Progress-ID=" + uuid;
/* 每隔一秒查询一下上传进度 */
interval = window.setInterval(function () {
fetch(uuid);
}, 1000);
}
function fetch(uuid) {
var req = new XMLHttpRequest();
req.open("GET", "/progress", 1);
req.setRequestHeader("X-Progress-ID", uuid);
req.onreadystatechange = function () {
if (req.readyState == 4) {
if (req.status == 200) {
var upload = eval(req.responseText);
document.getElementById('tp').innerHTML = upload.state;
/* 更新进度条 */
if (upload.state == 'done' || upload.state == 'uploading') {
var bar = document.getElementById('progressbar');
var w = 400 * upload.received / upload.size;
bar.style.width = w + 'px';
}
/* 上传完成,不再查询进度 */
if (upload.state == 'done') {
window.clearTimeout(interval);
}
if (upload.state == 'error') {
window.clearTimeout(interval);
alert('something wrong');
}
}
}
}
req.send(null);
}
</script>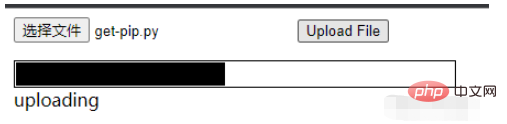
以上是在容器中怎么使用nginx搭建上传下载的文件服务器的详细内容。更多信息请关注PHP中文网其他相关文章!

热AI工具

Undresser.AI Undress
人工智能驱动的应用程序,用于创建逼真的裸体照片

AI Clothes Remover
用于从照片中去除衣服的在线人工智能工具。

Undress AI Tool
免费脱衣服图片

Clothoff.io
AI脱衣机

AI Hentai Generator
免费生成ai无尽的。

热门文章
热工具

记事本++7.3.1
好用且免费的代码编辑器

SublimeText3汉化版
中文版,非常好用

禅工作室 13.0.1
功能强大的PHP集成开发环境

Dreamweaver CS6
视觉化网页开发工具

SublimeText3 Mac版
神级代码编辑软件(SublimeText3)
热门话题


 怎么查看nginx是否启动
Apr 14, 2025 pm 01:03 PM
怎么查看nginx是否启动
Apr 14, 2025 pm 01:03 PM
确认 Nginx 是否启动的方法:1. 使用命令行:systemctl status nginx(Linux/Unix)、netstat -ano | findstr 80(Windows);2. 检查端口 80 是否开放;3. 查看系统日志中 Nginx 启动消息;4. 使用第三方工具,如 Nagios、Zabbix、Icinga。
 linux怎么查看nginx是否启动
Apr 14, 2025 pm 12:48 PM
linux怎么查看nginx是否启动
Apr 14, 2025 pm 12:48 PM
在 Linux 中,使用以下命令检查 Nginx 是否已启动:systemctl status nginx根据命令输出进行判断:如果显示 "Active: active (running)",则 Nginx 已启动。如果显示 "Active: inactive (dead)",则 Nginx 已停止。
 nginx在windows中怎么配置
Apr 14, 2025 pm 12:57 PM
nginx在windows中怎么配置
Apr 14, 2025 pm 12:57 PM
如何在 Windows 中配置 Nginx?安装 Nginx 并创建虚拟主机配置。修改主配置文件并包含虚拟主机配置。启动或重新加载 Nginx。测试配置并查看网站。选择性启用 SSL 并配置 SSL 证书。选择性设置防火墙允许 80 和 443 端口流量。
 linux怎么启动nginx
Apr 14, 2025 pm 12:51 PM
linux怎么启动nginx
Apr 14, 2025 pm 12:51 PM
在 Linux 中启动 Nginx 的步骤:检查 Nginx 是否已安装。使用 systemctl start nginx 启动 Nginx 服务。使用 systemctl enable nginx 启用在系统启动时自动启动 Nginx。使用 systemctl status nginx 验证启动是否成功。在 Web 浏览器中访问 http://localhost 查看默认欢迎页面。
 怎么启动nginx服务器
Apr 14, 2025 pm 12:27 PM
怎么启动nginx服务器
Apr 14, 2025 pm 12:27 PM
启动 Nginx 服务器需要按照不同操作系统采取不同的步骤:Linux/Unix 系统:安装 Nginx 软件包(例如使用 apt-get 或 yum)。使用 systemctl 启动 Nginx 服务(例如 sudo systemctl start nginx)。Windows 系统:下载并安装 Windows 二进制文件。使用 nginx.exe 可执行文件启动 Nginx(例如 nginx.exe -c conf\nginx.conf)。无论使用哪种操作系统,您都可以通过访问服务器 IP
 nginx403怎么解决
Apr 14, 2025 am 10:33 AM
nginx403怎么解决
Apr 14, 2025 am 10:33 AM
如何解决 Nginx 403 Forbidden 错误?检查文件或目录权限;2. 检查 .htaccess 文件;3. 检查 Nginx 配置文件;4. 重启 Nginx。其他可能原因还包括防火墙规则、SELinux 设置或应用程序问题。
 nginx403错误怎么解决
Apr 14, 2025 pm 12:54 PM
nginx403错误怎么解决
Apr 14, 2025 pm 12:54 PM
服务器无权访问所请求的资源,导致 nginx 403 错误。解决方法包括:检查文件权限。检查 .htaccess 配置。检查 nginx 配置。配置 SELinux 权限。检查防火墙规则。排除其他原因,如浏览器问题、服务器故障或其他可能的错误。
 怎么解决nginx跨域问题
Apr 14, 2025 am 10:15 AM
怎么解决nginx跨域问题
Apr 14, 2025 am 10:15 AM
解决 Nginx 跨域问题有两种方法:修改跨域响应头:添加指令以允许跨域请求,指定允许的方法和头,以及设置缓存时间。使用 CORS 模块:启用模块并配置 CORS 规则,允许跨域请求、方法、头和设置缓存时间。
