

怎么使用WebSocket+SpringBoot+Vue搭建简易网页聊天室

一、数据库搭建
很简单的一个user表,加两个用户admin和wskh

二、后端搭建
2.1 引入关键依赖
<dependency>
    <groupId>org.springframework.boot</groupId>
    <artifactId>spring-boot-starter-websocket</artifactId>
</dependency>2.2 WebSocket配置类
WebSocketConfig的作用是:开启WebSocket监听
import org.springframework.context.annotation.Bean;
import org.springframework.context.annotation.Configuration;
import org.springframework.web.socket.server.standard.ServerEndpointExporter;

/**
* @Author:WSKH
* @ClassName:WebSocketConfig
* @ClassType:配置类
* @Description:WebSocket配置类
* @Date:2022/1/25/12:21
* @Email:1187560563@qq.com
* @Blog:https://blog.csdn.net/weixin_51545953?type=blog
*/

@Configuration
public class WebSocketConfig {
    /** * 开启webSocket * @return */
    @Bean
    public ServerEndpointExporter serverEndpointExporter() {
        return new ServerEndpointExporter();
    }
}WebSocketServer里写了一些事件,如发送消息事件,建立连接事件,关闭连接事件等
import com.wskh.chatroom.util.FastJsonUtils;
import org.slf4j.Logger;
import org.slf4j.LoggerFactory;
import org.springframework.stereotype.Component;

import javax.websocket.*;
import javax.websocket.server.PathParam;
import javax.websocket.server.ServerEndpoint;
import java.io.EOFException;
import java.io.IOException;
import java.util.concurrent.ConcurrentHashMap;

@ServerEndpoint("/websocket/{sid}")
@Component
public class WebSocketServer {
    private static final Logger log = LoggerFactory.getLogger(WebSocketServer.class);

    private static int onlineCount = 0;

    private static ConcurrentHashMap<String,WebSocketServer> webSocketServerMap = new ConcurrentHashMap<>();

    private Session session;

    private String sid;


    @OnOpen
    public void onOpen(Session session, @PathParam("sid") String sid) {
        this.sid = sid;
        this.session = session;
        webSocketServerMap.put(sid, this);
        addOnlineCount();
        log.info("有新窗口开始监听:"+sid+",当前在线人数为" + getOnlineCount());
        try {
            sendInfo("openSuccess:"+webSocketServerMap.keySet());
        } catch (IOException e) {
            e.printStackTrace();
        }
    }

    @OnClose
    public void onClose() {
        webSocketServerMap.remove(sid);
        subOnlineCount();
        log.info("有一连接关闭!当前在线人数为" + getOnlineCount());
        try {
            sendInfo("openSuccess:"+webSocketServerMap.keySet());
        } catch (IOException e) {
            e.printStackTrace();
        }
    }

    @OnMessage
    public void onMessage(String message) throws IOException {
        if("ping".equals(message)) {
            sendInfo(sid, "pong");
        }
        if(message.contains(":")) {
            String[] split = message.split(":");
            sendInfo(split[0], "receivedMessage:"+sid+":"+split[1]);
        }
    }

    @OnError
    public void onError(Session session, Throwable error) {
        if(error instanceof EOFException) {
            return;
        }
        if(error instanceof IOException && error.getMessage().contains("已建立的连接")) {
            return;
        }
        log.error("发生错误", error);
    }

    /**
     * 实现服务器主动推送
     */
    public void sendMessage(String message) throws IOException {
        synchronized (session) {
            this.session.getBasicRemote().sendText(message);
        }
    }

    public static void sendObject(Object obj) throws IOException {
        sendInfo(FastJsonUtils.convertObjectToJSON(obj));
    }

    public static void sendInfo(String sid,String message) throws IOException {
        WebSocketServer socketServer = webSocketServerMap.get(sid);
        if(socketServer != null) {
            socketServer.sendMessage(message);
        }
    }

    public static void sendInfo(String message) throws IOException {
        for(String sid : webSocketServerMap.keySet()) {
            webSocketServerMap.get(sid).sendMessage(message);
        }
    }

    public static void sendInfoByUserId(Long userId,Object message) throws IOException {
        for(String sid : webSocketServerMap.keySet()) {
            String[] sids =  sid.split("id");
            if(sids.length == 2) {
                String id = sids[1];
                if(userId.equals(Long.parseLong(id))) {
                    webSocketServerMap.get(sid).sendMessage(FastJsonUtils.convertObjectToJSON(message));
                }
            }
        }
    }

    public static Session getWebSocketSession(String sid) {
        if(webSocketServerMap.containsKey(sid)) {
            return webSocketServerMap.get(sid).session;
        }
        return null;
    }

    public static synchronized void addOnlineCount() {
        onlineCount++;
    }

    public static synchronized void subOnlineCount() {
        onlineCount--;
    }

    public static synchronized int getOnlineCount() {
        return onlineCount;
    }
}2.3 配置跨域
import org.springframework.context.annotation.Configuration;
import org.springframework.web.servlet.config.annotation.CorsRegistry;
import org.springframework.web.servlet.config.annotation.WebMvcConfigurerAdapter;

@Configuration
public class WebMvcConfig extends WebMvcConfigurerAdapter {

    @Override
    // 跨域配置
    public void addCorsMappings(CorsRegistry registry) {
        registry.addMapping("/**")
                .allowedOrigins("*")
                .allowedMethods("POST", "GET", "PUT", "OPTIONS", "DELETE")
                .maxAge(3600)
                .allowCredentials(true);
    }

}2.4 发送消息的控制类
/**
 * @Author:WSKH
 * @ClassName:MsgController
 * @ClassType:控制类
 * @Description:信息控制类
 * @Date:2022/1/25/12:47
 * @Email:1187560563@qq.com
 * @Blog:https://blog.csdn.net/weixin_51545953?type=blog
 */
@ApiModel("信息控制类")
@RestController
@RequestMapping("/chatroom/msg")
public class MsgController {
    @ApiOperation("发送信息方法")
    @PostMapping("/sendMsg")
    public R sendMsg(String msg) throws IOException {
        WebSocketServer.sendInfo(msg);
        return R.ok().message("发送成功");
    }
}至此,后端部分大体配置完毕。
三、前端搭建
本文使用vue-admin-template-master模板进行聊天室的前端搭建
3.1 自定义文件websocket.js
将下面文件放在api文件夹下
//websocket.js
import Vue from 'vue'

// 1、用于保存WebSocket 实例对象
export const WebSocketHandle = undefined

// 2、外部根据具体登录地址实例化WebSocket 然后回传保存WebSocket
export const WebsocketINI = function(websocketinstance) {
  this.WebSocketHandle = websocketinstance
  this.WebSocketHandle.onmessage = OnMessage
}

// 3、为实例化的WebSocket绑定消息接收事件:同时用于回调外部各个vue页面绑定的消息事件
// 主要使用WebSocket.WebSocketOnMsgEvent_CallBack才能访问  this.WebSocketOnMsgEvent_CallBack 无法访问很诡异
const OnMessage = function(msg) {
  // 1、消息打印
  // console.log('收到消息:', msg)

  // 2、如果外部回调函数未绑定 结束操作
  if (!WebSocket.WebSocketOnMsgEvent_CallBack) {
    console.log(WebSocket.WebSocketOnMsgEvent_CallBack)
    return
  }

  // 3、调用外部函数
  WebSocket.WebSocketOnMsgEvent_CallBack(msg)
}

// 4、全局存放外部页面绑定onmessage消息回调函数:注意使用的是var
export const WebSocketOnMsgEvent_CallBack = undefined

// 5、外部通过此绑定方法 来传入的onmessage消息回调函数
export const WebSocketBandMsgReceivedEvent = function(receiveevent) {
  WebSocket.WebSocketOnMsgEvent_CallBack = receiveevent
}

// 6、封装一个直接发送消息的方法:
export const Send = function(msg) {
  if (!this.WebSocketHandle || this.WebSocketHandle.readyState !== 1) {
    // 未创建连接 或者连接断开 无法发送消息
    return
  }
  this.WebSocketHandle.send(msg)// 发送消息
}

// 7、导出配置
const WebSocket = {
  WebSocketHandle,
  WebsocketINI,
  WebSocketBandMsgReceivedEvent,
  Send,
  WebSocketOnMsgEvent_CallBack
}

// 8、全局绑定WebSocket
Vue.prototype.$WebSocket = WebSocket3.2 main.js中全局引入websocket
import '@/utils/websocket' // 全局引入 WebSocket 通讯组件
3.3 App.vue中声明websocket对象
App.vue
<template>
<div id="app">
<router-view />
</div>
</template>
<script>
import {getInfo} from './api/login.js';
import {getToken} from './utils/auth.js'
export default {
name: 'App',
mounted() {
// 每3秒检测一次websocket连接状态 未连接 则尝试连接 尽量保证网站启动的时候 WebSocket都能正常长连接
setInterval(this.WebSocket_StatusCheck, 3000)
// 绑定消息回调事件
this.$WebSocket.WebSocketBandMsgReceivedEvent(this.WebSocket_OnMesage)
// 初始化当前用户信息
this.token = getToken()
getInfo(this.token).then((rep)=>{
console.log(rep)
this.userName = rep.data.name
}).catch((error)=>{
console.log(error)
})
},
data(){
return{
}
},
methods: {
// 实际消息回调事件
WebSocket_OnMesage(msg) {
console.log('收到服务器消息:', msg.data)
console.log(msg)
let chatDiv = document.getElementById("chatDiv")
let newH3 = document.createElement("div")
if(msg.data.indexOf('openSuccess')>=0){
// 忽略连接成功消息提示
}else{
if(msg.data.indexOf(this.userName)==0){
// 说明是自己发的消息,应该靠右边悬浮
newH3.innerHTML = "<div style='width:100%;text-align: right;'><h4 style=''>"+msg.data+"</h4></div>"
}else{
newH3.innerHTML = "<div style='width:100%;text-align: left;'><h4 style=''>"+msg.data+"</h4></div>"
}
}
chatDiv.appendChild(newH3)
},
// 1、WebSocket连接状态检测:
WebSocket_StatusCheck() {
if (!this.$WebSocket.WebSocketHandle || this.$WebSocket.WebSocketHandle.readyState !== 1) {
console.log('Websocket连接中断,尝试重新连接:')
this.WebSocketINI()
}
},
// 2、WebSocket初始化:
async WebSocketINI() {
// 1、浏览器是否支持WebSocket检测
if (!('WebSocket' in window)) {
console.log('您的浏览器不支持WebSocket!')
return
}
let DEFAULT_URL = "ws://" + '127.0.0.1:8002' + '/websocket/' + new Date().getTime()
// 3、创建Websocket连接
const tmpWebsocket = new WebSocket(DEFAULT_URL)
// 4、全局保存WebSocket操作句柄:main.js 全局引用
this.$WebSocket.WebsocketINI(tmpWebsocket)
// 5、WebSocket连接成功提示
tmpWebsocket.onopen = function(e) {
console.log('webcoket连接成功')
}
//6、连接失败提示
tmpWebsocket.onclose = function(e) {
console.log('webcoket连接关闭:', e)
}
}
}
}
</script>3.4 聊天室界面.vue
<template>
<div>
<div >聊天内容:</div>
<div id="chatDiv">
</div>
<div >聊天输入框:</div>
<el-input v-model="text">
</el-input>
<el-button @click="sendMsg">点击发送</el-button>
</div>
</template>
<script>
import {getInfo} from '../../api/login.js';
import {getToken} from '../../utils/auth.js'
import msgApi from '../../api/msg.js'
export default {
mounted() {
//
this.token = getToken()
getInfo(this.token).then((rep)=>{
console.log(rep)
this.userName = rep.data.name
}).catch((error)=>{
console.log(error)
})
},
data() {
return {
text: "",
token:"",
userName:"",
}
},
methods: {
sendMsg(){
let msg = this.userName+":"+this.text
msgApi.sendMsg(msg).then((rep)=>{
}).catch((error)=>{
})
this.text = ""
}
}
}
</script>
<style scoped="true">
.selfMsg{
float: right;
}
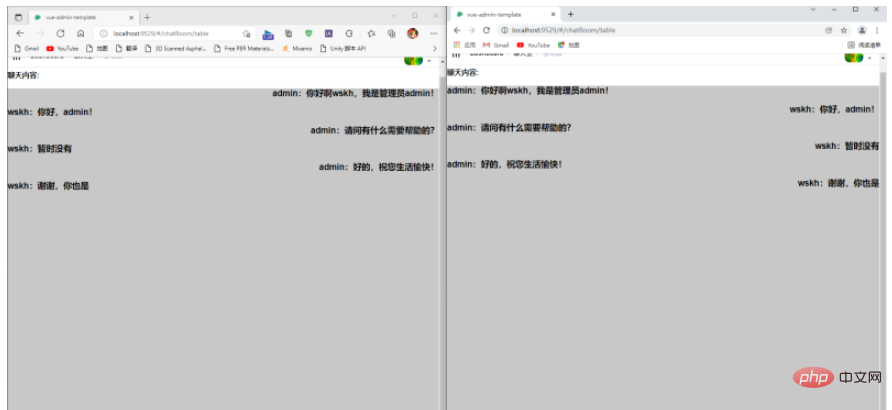
</style>3.5 最终效果
用两个不同的浏览器,分别登录admin账号和wskh账号进行聊天测试,效果如下(左边为admin):
以上是怎么使用WebSocket+SpringBoot+Vue搭建简易网页聊天室的详细内容。更多信息请关注PHP中文网其他相关文章!

热AI工具

Undresser.AI Undress
人工智能驱动的应用程序,用于创建逼真的裸体照片

AI Clothes Remover
用于从照片中去除衣服的在线人工智能工具。

Undress AI Tool
免费脱衣服图片

Clothoff.io
AI脱衣机

AI Hentai Generator
免费生成ai无尽的。

热门文章
热工具

记事本++7.3.1
好用且免费的代码编辑器

SublimeText3汉化版
中文版,非常好用

禅工作室 13.0.1
功能强大的PHP集成开发环境

Dreamweaver CS6
视觉化网页开发工具

SublimeText3 Mac版
神级代码编辑软件(SublimeText3)
热门话题


 vue.js怎么引用js文件
Apr 07, 2025 pm 11:27 PM
vue.js怎么引用js文件
Apr 07, 2025 pm 11:27 PM
在 Vue.js 中引用 JS 文件的方法有三种:直接使用 <script> 标签指定路径;利用 mounted() 生命周期钩子动态导入;通过 Vuex 状态管理库进行导入。
 vue中的watch怎么用
Apr 07, 2025 pm 11:36 PM
vue中的watch怎么用
Apr 07, 2025 pm 11:36 PM
Vue.js 中的 watch 选项允许开发者监听特定数据的变化。当数据发生变化时,watch 会触发一个回调函数,用于执行更新视图或其他任务。其配置选项包括 immediate,用于指定是否立即执行回调,以及 deep,用于指定是否递归监听对象或数组的更改。
 vue中怎么用bootstrap
Apr 07, 2025 pm 11:33 PM
vue中怎么用bootstrap
Apr 07, 2025 pm 11:33 PM
在 Vue.js 中使用 Bootstrap 分为五个步骤:安装 Bootstrap。在 main.js 中导入 Bootstrap。直接在模板中使用 Bootstrap 组件。可选:自定义样式。可选:使用插件。
 vue懒加载什么意思
Apr 07, 2025 pm 11:54 PM
vue懒加载什么意思
Apr 07, 2025 pm 11:54 PM
在 Vue.js 中,懒加载允许根据需要动态加载组件或资源,从而减少初始页面加载时间并提高性能。具体实现方法包括使用 <keep-alive> 和 <component is> 组件。需要注意的是,懒加载可能会导致 FOUC(闪屏)问题,并且应该仅对需要懒加载的组件使用,以避免不必要的性能开销。
 vue怎么给按钮添加函数
Apr 08, 2025 am 08:51 AM
vue怎么给按钮添加函数
Apr 08, 2025 am 08:51 AM
可以通过以下步骤为 Vue 按钮添加函数:将 HTML 模板中的按钮绑定到一个方法。在 Vue 实例中定义该方法并编写函数逻辑。
 Vue 实现跑马灯/文字滚动效果
Apr 07, 2025 pm 10:51 PM
Vue 实现跑马灯/文字滚动效果
Apr 07, 2025 pm 10:51 PM
在 Vue 中实现跑马灯/文字滚动效果,可以使用 CSS 动画或第三方库。本文介绍了使用 CSS 动画的方法:创建滚动文本,用 <div> 包裹文本。定义 CSS 动画,设置 overflow: hidden、width 和 animation。定义关键帧,设置动画开始和结束时的 transform: translateX()。调整动画属性,如持续时间、滚动速度和方向。
 怎样查询vue的版本
Apr 07, 2025 pm 11:24 PM
怎样查询vue的版本
Apr 07, 2025 pm 11:24 PM
可以通过以下方法查询 Vue 版本:使用 Vue Devtools 在浏览器的控制台中查看“Vue”选项卡。使用 npm 运行“npm list -g vue”命令。在 package.json 文件的“dependencies”对象中查找 Vue 项。对于 Vue CLI 项目,运行“vue --version”命令。检查 HTML 文件中引用 Vue 文件的 <script> 标签中的版本信息。
 vue返回上一页的方法
Apr 07, 2025 pm 11:30 PM
vue返回上一页的方法
Apr 07, 2025 pm 11:30 PM
Vue.js 返回上一页有四种方法:$router.go(-1)$router.back()使用 <router-link to="/"> 组件window.history.back(),方法选择取决于场景。
