

vue2与vue3中的生命周期执行顺序有什么区别

vue2与vue3中生命周期执行顺序区别
生命周期比较
vue2中执行顺序
beforeCreate=>created=>beforeMount=>mounted=>beforeUpdate=>updated=>beforeDestroy=>destroyedvue3中执行顺序
setup=>onBeforeMount=>onMounted=>onBeforeUpdate=>onUpdated=>onBeforeUnmount=>onUnmounted
对应关系
vue2->vue3
beforeCreate->setupcreated->setupbeforeMount->onBeforeMountmounted->onMountedbeforeUpdate->onBeforeUpdateupdated->onUpdatedbeforeDestroy->onBeforeUnmountdestroyed->onUnmounted
其中 vue3中的setup相当于vue2中beforeCreate 与created 但是的执行在beforeCreate 与created之前,所以setup无法使用 data 和 methods 中的数据和方法,即无法操作this,setup中的this等于 undefined,又因为setup中创建的变量与方法最后都要通过return返回出去,所以setup中的程序只能是同步的,而不能是异步,除非return 后面只接受一个异步对象,对象返回setup内定义的变量与方法,然后父组件使用Suspense标签包裹异步组件;
vue3中 如果要使用vue2的beforeDestroy与destroyed需要把名称分别改为beforeUnmount,unmounted
如果vue3中同时使用了vue2的写法,vue3的写法会优先执行;
简单例子说明
父组件App.vue
<template>
  <h2>App父级组件</h2>
  <button @click="childShow = !childShow">切换child子组件的显示</button>
  <hr />
  <child v-if="childShow" />
</template>
<script lang="ts">
import { defineComponent, reactive, ref } from "vue";
//引入子组件
import child from "./components/child.vue";
export default defineComponent({
  name: "App",
  components: {
    child,
  },
  setup() {
    const childShow = ref(true);
    return {
      childShow,
    };
  },
});
</script><style>
* {
margin: 0;
padding: 0;
}
</style>子组件child.vue
<template>
  <h3>child 子级组件</h3>
  <h4>{{ name }}</h4>
  <button @click="updateName">更新name</button>
</template>
<script lang="ts">
import {
  defineComponent,
  onBeforeMount,
  onMounted,
  onBeforeUpdate,
  onUpdated,
  onBeforeUnmount,
  onUnmounted,
  ref,
} from "vue";
export default defineComponent({
  name: "child",
  //vue2中的生命周期钩子
  beforeCreate() {
    console.log("vue2 中的生命周期 beforeCreate");
  },
  created() {
    console.log("vue2 中的生命周期 created");
  },
  beforeMount() {
    console.log("vue2 中的生命周期 beforeMount");
  },
  mounted() {
    console.log("vue2 中的生命周期 mounted");
  },
  beforeUpdate() {
    console.log("vue2 中的生命周期 beforeUpdate");
  },
  updated() {
    console.log("vue2 中的生命周期 updated");
  },
  // vue2中的 beforeDestroy与 destroyed已经改名 无法使用
  beforeUnmount() {
    console.log("vue2 中的生命周期 beforeDestroy(beforeUnmount)");
  },
  unmounted() {
    console.log("vue2 中的生命周期 destroyed(unmounted)");
  },
  setup() {
    console.log("vue3中的setup");
    const name = ref("hhh");
    const updateName = () => {
      name.value += "6……6………6";
    };
    onBeforeMount(() => {
      console.log("vue3 中的生命周期 onBeforeMount");
    });
    onMounted(() => {
      console.log("vue3 中的生命周期 onMounted");
    });
    onBeforeUpdate(() => {
      console.log("vue3 中的生命周期 onBeforeUpdate");
    });
    onUpdated(() => {
      console.log("vue3 中的生命周期 onUpdated");
    });
    onBeforeUnmount(() => {
      console.log("vue3 中的生命周期 onBeforeUnmount");
    });
    onUnmounted(() => {
      console.log("vue3 中的生命周期 onUnmounted");
    });
    return {
      name,
      updateName,
    };
  },
});
</script>运行起来的显示效果
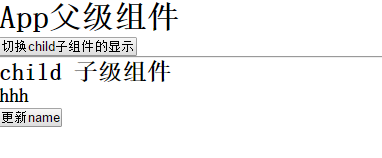
进入页面 按f12 打开调试 刷新页面
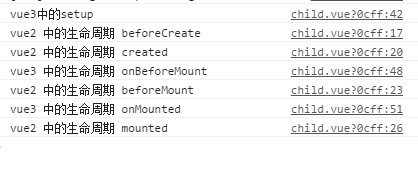
可以看出vue3中
setup执行在beforeCreate与created前面;onBeforeMount执行在beforeMount前面;onMounted执行在mounted前面;
点击 更新name
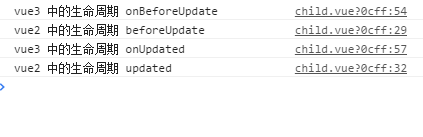
可以看出vue3中
onBeforeUpdate执行在beforeUpdate前面;onUpdated执行在updated前面;点击 切换child子组件的显示
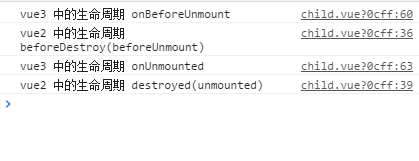
可以看出vue3中
onBeforeUnmount执行在beforeDestroy前面;onUnmounted执行在destroyed前面;
三种情况下的生命周期执行顺序
生命周期:在创建一个vue实例时,会经历一系列的初始化过程(Vue实例从创建到销毁的过程),这个过程就是vue的生命周期。
Vue提供给开发者的一系列的回调函数,方便我们添加自定义的逻辑,Vue的生命周期从创建到销毁,重要的节点挂载数据更新。
创建阶段 beforeCreate、created
挂载渲染页面阶段 beforeMount、mounted
更新阶段 beforeUpdate、updated
卸载阶段 beforeDestory、destoryed
1、单页面下生命周期顺序
献上一波代码,看下各周期钩子函数的执行顺序:
<!DOCTYPE html>
<html lang="en">
<head>
<meta charset="UTF-8">
<meta name="viewport" content="width=device-width, initial-scale=1.0">
<meta http-equiv="X-UA-Compatible" content="ie=edge">
<title>vue生命周期学习</title>
<script src="https://cdn.bootcss.com/vue/2.4.2/vue.js"></script>
</head>
<body>
<div id="app">
<h2>{{message}}</h2>
</div>
</body>
<script>
var vm = new Vue({
el: '#app',
data: {
message: 'Vue的生命周期'
},
beforeCreate: function() {
console.group('------beforeCreate创建前状态------');
console.log("%c%s", "color:red" , "el : " + this.$el); //undefined
console.log("%c%s", "color:red","data : " + this.$data); //undefined
console.log("%c%s", "color:red","message: " + this.message)
},
created: function() {
console.group('------created创建完毕状态------');
console.log("%c%s", "color:red","el : " + this.$el); //undefined
console.log("%c%s", "color:red","data : " + this.$data); //已被初始化
console.log("%c%s", "color:red","message: " + this.message); //已被初始化
},
beforeMount: function() {
console.group('------beforeMount挂载前状态------');
console.log("%c%s", "color:red","el : " + (this.$el)); //已被初始化
console.log(this.$el);
console.log("%c%s", "color:red","data : " + this.$data); //已被初始化
console.log("%c%s", "color:red","message: " + this.message); //已被初始化
},
mounted: function() {
console.group('------mounted 挂载结束状态------');
console.log("%c%s", "color:red","el : " + this.$el); //已被初始化
console.log(this.$el);
console.log("%c%s", "color:red","data : " + this.$data); //已被初始化
console.log("%c%s", "color:red","message: " + this.message); //已被初始化
},
beforeUpdate: function () {
console.group('beforeUpdate 更新前状态===============》');
console.log("%c%s", "color:red","el : " + this.$el.innerHTML);
console.log(this.$el);
console.log("%c%s", "color:red","data : " + this.$data);
console.log("%c%s", "color:red","message: " + this.message);
},
updated: function () {
console.group('updated 更新完成状态===============》');
console.log("%c%s", "color:red","el : " + this.$el.innerHTML);
console.log(this.$el);
console.log("%c%s", "color:red","data : " + this.$data);
console.log("%c%s", "color:red","message: " + this.message);
},
beforeDestroy: function () {
console.group('beforeDestroy 销毁前状态===============》');
console.log("%c%s", "color:red","el : " + this.$el);
console.log(this.$el);
console.log("%c%s", "color:red","data : " + this.$data);
console.log("%c%s", "color:red","message: " + this.message);
},
destroyed: function () {
console.group('destroyed 销毁完成状态===============》');
console.log("%c%s", "color:red","el : " + this.$el);
console.log(this.$el);
console.log("%c%s", "color:red","data : " + this.$data);
console.log("%c%s", "color:red","message: " + this.message)
}
})
</script>
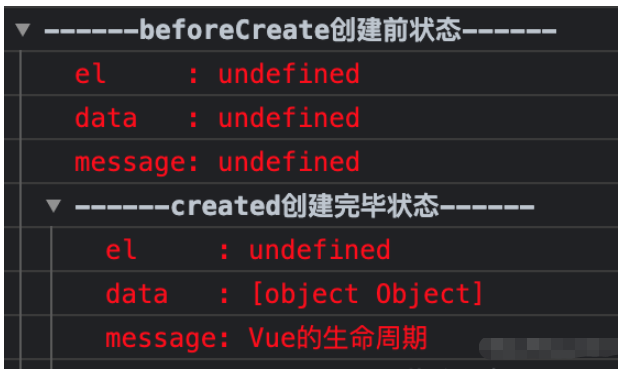
</html>(1)创建阶段:初始化事件,进行数据的观测
new Vue({}) 创建一个空的实例对象,这个对象上只有生命周期函数和一些默认事件
在beforeCreate时,$el和data都未初始化
created 执行,完成了对data的初始化,通过编译将 template 模板转换成渲染函数( render ) ,执行渲染函数就可以得到一个虚拟节点树(内存中)
如果有模板文件,则编译成渲染函数;如果没有,则使用外部 HTML 作为模板进行渲染。综合排名优先级:render函数选项 > template选项 > outer HTML.
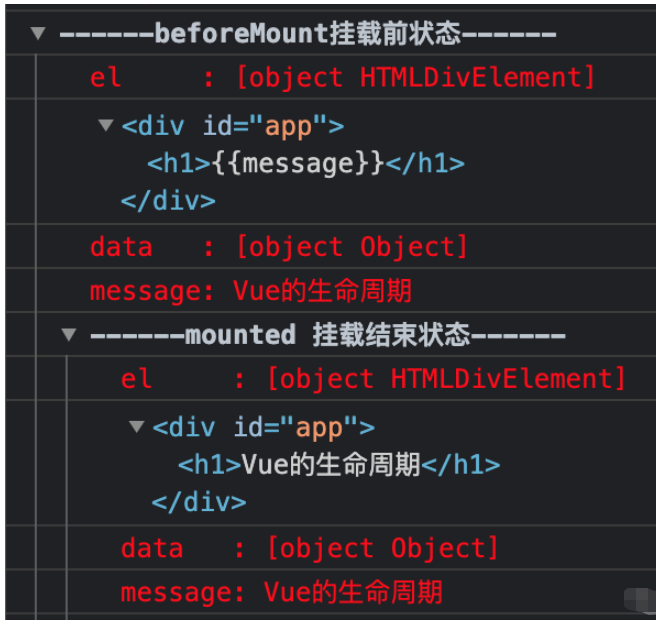
(2)挂载阶段
为vue实例添加$el成员,替换挂载的DOM成员
其中在beforeMount时,初始化el和data,但el和data,但el和data,但el还是使用{{message}}进行占位
mounted执行时,将message的值进行渲染
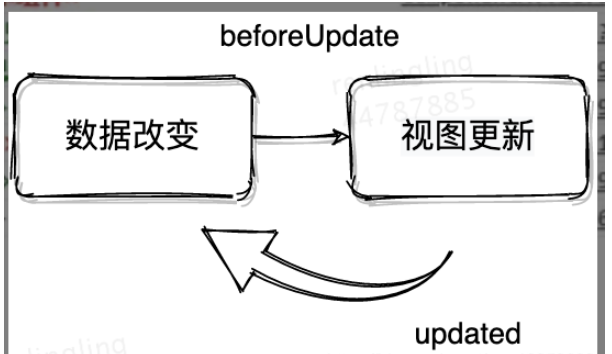
(3)更新阶段:触发对应组件的重新渲染
data 被改变时触发生命周期函数 beforeUpdate 执行,data是最新的,页面还未更新(旧的页面)
根据最新的 data 重新渲染虚拟 DOM,并挂载到页面上,完成 Model 到 View 的更新
updated 执行,此时 data 和页面都是最新的

(4)销毁阶段
beforeDestroy钩子函数在实例销毁之前调用。在这一步,实例仍然完全可用。
destroyed钩子函数在Vue 实例销毁后调用。一旦调用,Vue 实例所绑定的所有内容都将被解绑,包括事件监听器,同时所有子实例都将被销毁。
2、父子、兄弟组件的生命周期顺序
<template>
	<div class="father">
		<component-A class="son_A"></component-A>
		<component-B class="son_B"></component-B>
	</div>
</template>
// script部分同上代码,不多写了。
主要可以从以下几种情况分析:
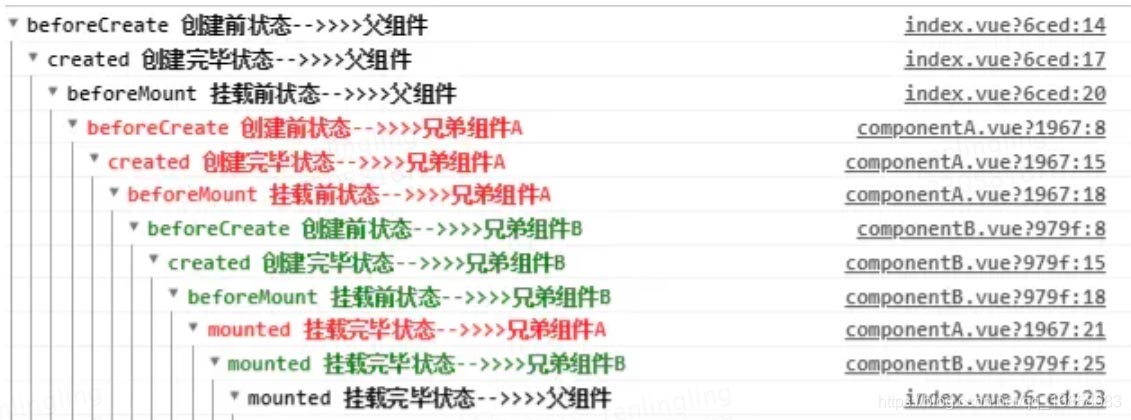
(1)创建过程:
父beforeCreate->父created->父beforeMount->子beforeCreate->子created->子beforeMount->子mounted->父mounted
(2)组件的内部更新:
子组件的内部更新过程是:子beforeUpdate->子updated
同理父组件的内部更新过程也是:父beforeUpdate->父updated
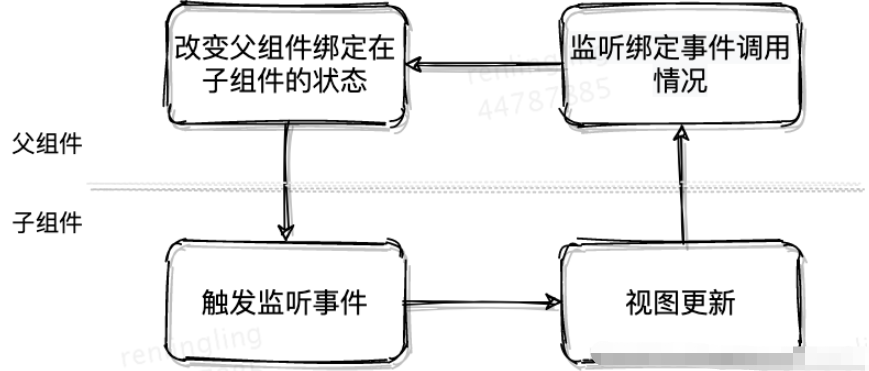
(3)组件之间的更新:
当子组件使用emit修改父组件状态时,刚好这个状态又绑定在子组件的props上,更新过程是:父beforeUpdate->子beforeUpdate->子updated->父updated
(4)父子组件销毁:
父组件被销毁时子组件也同时被销毁,销毁的钩子过程是:父beforeDestroy->子beforeDestroy->子destroyed->父destroyed

父子组件完整的生命周期图如下所示:
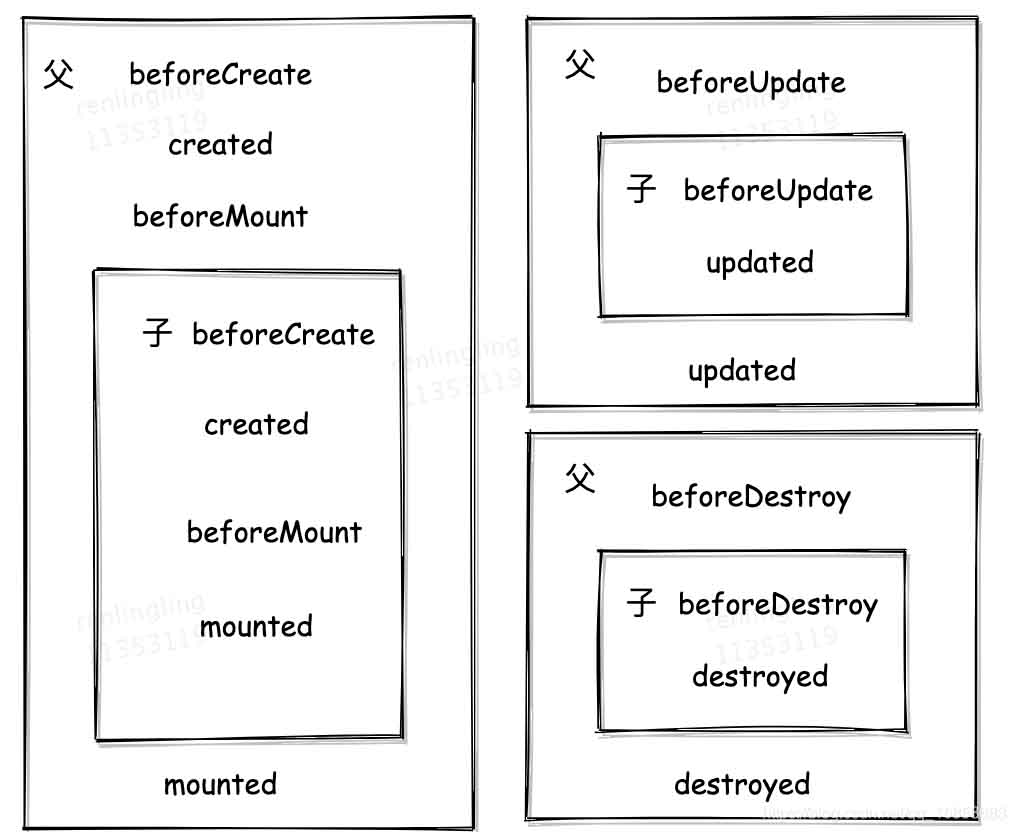
从上图可以看出,在父兄子组件挂载前,各组件的实例已经初始化完成。
子组件挂载完成后,父组件还未挂载。因此,在父组件的mounted钩子中获取API数据时,子组件的mounted钩子无法获取到该数据。
仔细看看父子组件生命周期钩子的执行顺序,会发现created这个钩子是按照从外内顺序执行,所以回显场景的解决方案是:在created中发起请求获取数据,依次在子组件的created中会接收到这个数据。
无论嵌套多少层,Vue父子组件的生命周期钩子执行顺序都是从外到内再从内到外。
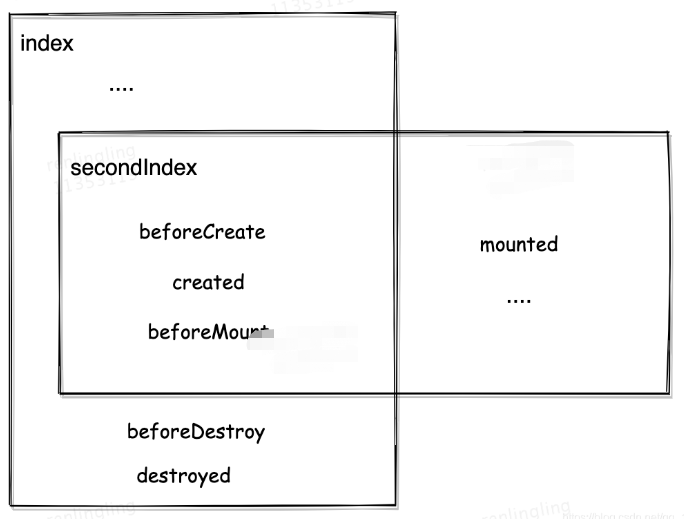
3、不同页面跳转时各页面生命周期的执行顺序
跳转不同页面和part2是相同的原理,从第一个页面(index)跳转到下一个页面(secondIndex)时,回先初始化secondIndex,之后在执行index页面的销毁阶段,最后secondIndex挂载完成.

以上是vue2与vue3中的生命周期执行顺序有什么区别的详细内容。更多信息请关注PHP中文网其他相关文章!

热AI工具

Undresser.AI Undress
人工智能驱动的应用程序,用于创建逼真的裸体照片

AI Clothes Remover
用于从照片中去除衣服的在线人工智能工具。

Undress AI Tool
免费脱衣服图片

Clothoff.io
AI脱衣机

AI Hentai Generator
免费生成ai无尽的。

热门文章
热工具

记事本++7.3.1
好用且免费的代码编辑器

SublimeText3汉化版
中文版,非常好用

禅工作室 13.0.1
功能强大的PHP集成开发环境

Dreamweaver CS6
视觉化网页开发工具

SublimeText3 Mac版
神级代码编辑软件(SublimeText3)
热门话题


 vue3+vite:src使用require动态导入图片报错怎么解决
May 21, 2023 pm 03:16 PM
vue3+vite:src使用require动态导入图片报错怎么解决
May 21, 2023 pm 03:16 PM
vue3+vite:src使用require动态导入图片报错和解决方法vue3+vite动态的导入多张图片vue3如果使用的是typescript开发,就会出现require引入图片报错,requireisnotdefined不能像使用vue2这样imgUrl:require(’…/assets/test.png’)导入,是因为typescript不支持require所以用import导入,下面介绍如何解决:使用awaitimport
 vue3项目中怎么使用tinymce
May 19, 2023 pm 08:40 PM
vue3项目中怎么使用tinymce
May 19, 2023 pm 08:40 PM
tinymce是一个功能齐全的富文本编辑器插件,但在vue中引入tinymce并不像别的Vue富文本插件一样那么顺利,tinymce本身并不适配Vue,还需要引入@tinymce/tinymce-vue,并且它是国外的富文本插件,没有通过中文版本,需要在其官网下载翻译包(可能需要翻墙)。1、安装相关依赖npminstalltinymce-Snpminstall@tinymce/tinymce-vue-S2、下载中文包3.引入皮肤和汉化包在项目public文件夹下新建tinymce文件夹,将下载的
 Vue3怎么解析markdown并实现代码高亮显示
May 20, 2023 pm 04:16 PM
Vue3怎么解析markdown并实现代码高亮显示
May 20, 2023 pm 04:16 PM
Vue实现博客前端,需要实现markdown的解析,如果有代码则需要实现代码的高亮。Vue的markdown解析库有很多,如markdown-it、vue-markdown-loader、marked、vue-markdown等。这些库都大同小异。这里选用的是marked,代码高亮的库选用的是highlight.js。具体实现步骤如下:一、安装依赖库在vue项目下打开命令窗口,并输入以下命令npminstallmarked-save//marked用于将markdown转换成htmlnpmins
 Vue3如何实现刷新页面局部内容
May 26, 2023 pm 05:31 PM
Vue3如何实现刷新页面局部内容
May 26, 2023 pm 05:31 PM
想要实现页面的局部刷新,我们只需要实现局部组件(dom)的重新渲染。在Vue中,想要实现这一效果最简便的方式方法就是使用v-if指令。在Vue2中我们除了使用v-if指令让局部dom的重新渲染,也可以新建一个空白组件,需要刷新局部页面时跳转至这个空白组件页面,然后在空白组件内的beforeRouteEnter守卫中又跳转回原来的页面。如下图所示,如何在Vue3.X中实现点击刷新按钮实现红框范围内的dom重新加载,并展示对应的加载状态。由于Vue3.X中scriptsetup语法中组件内守卫只有o
 Vue3中怎么实现选取头像并裁剪
May 29, 2023 am 10:22 AM
Vue3中怎么实现选取头像并裁剪
May 29, 2023 am 10:22 AM
最终效果安装VueCropper组件yarnaddvue-cropper@next上面的安装值针对Vue3的,如果时Vue2或者想使用其他的方式引用,请访问它的npm官方地址:官方教程。在组件中引用使用时也很简单,只需要引入对应的组件和它的样式文件,我这里没有在全局引用,只在我的组件文件中引入import{userInfoByRequest}from'../js/api'import{VueCropper}from'vue-cropper&
 vue3项目打包发布到服务器后访问页面显示空白怎么解决
May 17, 2023 am 08:19 AM
vue3项目打包发布到服务器后访问页面显示空白怎么解决
May 17, 2023 am 08:19 AM
vue3项目打包发布到服务器后访问页面显示空白1、处理vue.config.js文件中的publicPath处理如下:const{defineConfig}=require('@vue/cli-service')module.exports=defineConfig({publicPath:process.env.NODE_ENV==='production'?'./':'/&
 Vue3复用组件怎么使用
May 20, 2023 pm 07:25 PM
Vue3复用组件怎么使用
May 20, 2023 pm 07:25 PM
前言无论是vue还是react,当遇到多处重复代码的时候,我们都会想着如何复用这些代码,而不是一个文件里充斥着一堆冗余代码。实际上,vue和react都可以通过抽组件的方式来达到复用,但如果遇到一些很小的代码片段,你又不想抽到另外一个文件的情况下,相比而言,react可以在相同文件里面声明对应的小组件,或者通过renderfunction来实现,如:constDemo:FC=({msg})=>{returndemomsgis{msg}}constApp:FC=()=>{return(
 怎么使用vue3+ts+axios+pinia实现无感刷新
May 25, 2023 pm 03:37 PM
怎么使用vue3+ts+axios+pinia实现无感刷新
May 25, 2023 pm 03:37 PM
vue3+ts+axios+pinia实现无感刷新1.先在项目中下载aiXos和pinianpmipinia--savenpminstallaxios--save2.封装axios请求-----下载js-cookienpmiJS-cookie-s//引入aixosimporttype{AxiosRequestConfig,AxiosResponse}from"axios";importaxiosfrom'axios';import{ElMess
