

nginx代理模块怎么使用

nginx 代理模块
说明:代理模块的指令有很多我这里只讲解重要的proxy_pass,想了解更多代理指令请参考官方中文文档。
这个模块可以转发请求到其他的服务器。http/1.0无法使用keepalive(后端服务器将为每个请求创建并且删除连接)。nginx为浏览器发送http/1.1并为后端服务器发送http/1.0,这样浏览器就可以为浏览器处理keepalive。
如下例:
location / {
 proxy_pass    http://localhost:8000;
 proxy_set_header x-real-ip $remote_addr;
}注意,当使用http proxy模块(甚至fastcgi),所有的连接请求在发送到后端服务器之前nginx将缓存它们,因此,在测量从后端传送的数据时,它的进度显示可能不正确。
实验拓扑:
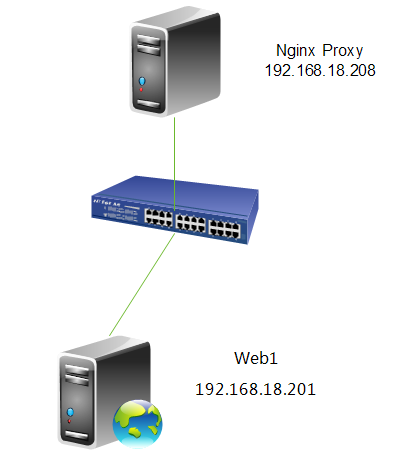
7.配置http反向代理
[root@nginx ~]# cd /etc/nginx/
[root@nginx nginx]# cp nginx.conf nginx.conf.bak #备份一个原配置文件
[root@nginx nginx]# vim nginx.conf
location / {
        proxy_pass   http://192.168.18.201;
}指令说明:proxy_pass
语法:proxy_pass url
默认值:no
使用字段:location, location中的if字段
这个指令设置被代理服务器的地址和被映射的uri,地址可以使用主机名或ip加端口号的形式,例如:proxy_pass http://localhost:8000/uri/;
8.重新加载一下配置文件
[root@nginx ~]# service nginx reload
nginx: the configuration file /etc/nginx/nginx.conf syntax is ok
nginx: configuration file /etc/nginx/nginx.conf test is successful
重新载入 nginx:                      [确定]
9.测试一下
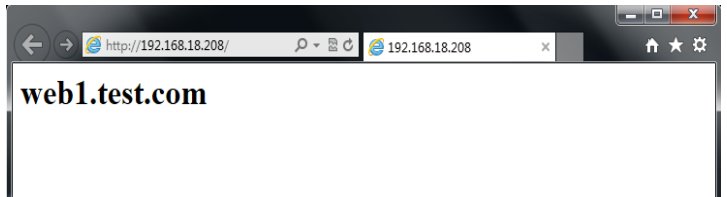
注,大家可以看到,当我们访问192.168.18.208时,被代理重新定向到web1上。
10.查看一下web服务器日志
[root@web1 ~]# tail /var/log/httpd/access_log
192.168.18.208 - - [04/sep/2013:00:14:20 +0800] "get /favicon.ico http/1.0" 404 289 "-" "mozilla/5.0 (windows nt 6.1; wow64) applewebkit/537.36 (khtml, like gecko) chrome/28.0.1500.95 safari/537.36"
192.168.18.208 - - [04/sep/2013:00:14:20 +0800] "get / http/1.0" 200 23 "-" "mozilla/5.0 (windows nt 6.1; wow64) applewebkit/537.36 (khtml, like gecko) chrome/28.0.1500.95 safari/537.36"
192.168.18.208 - - [04/sep/2013:00:14:20 +0800] "get /favicon.ico http/1.0" 404 289 "-" "mozilla/5.0 (windows nt 6.1; wow64) applewebkit/537.36 (khtml, like gecko) chrome/28.0.1500.95 safari/537.36"
192.168.18.138 - - [04/sep/2013:00:14:45 +0800] "get / http/1.1" 200 23 "-" "mozilla/5.0 (windows nt 6.1; wow64) applewebkit/537.36 (khtml, like gecko) chrome/28.0.1500.95 safari/537.36"
192.168.18.138 - - [04/sep/2013:00:14:48 +0800] "get /favicon.ico http/1.1" 404 289 "-" "mozilla/5.0 (windows nt 6.1; wow64) applewebkit/537.36 (khtml, like gecko) chrome/28.0.1500.95 safari/537.36"
192.168.18.208 - - [04/sep/2013:00:14:55 +0800] "get /favicon.ico http/1.0" 404 289 "-" "mozilla/5.0 (windows nt 6.1; wow64) applewebkit/537.36 (khtml, like gecko) chrome/28.0.1500.95 safari/537.36"
192.168.18.208 - - [04/sep/2013:00:15:05 +0800] "get /favicon.ico http/1.0" 404 289 "-" "mozilla/5.0 (windows nt 6.1; wow64) applewebkit/537.36 (khtml, like gecko) chrome/28.0.1500.95 safari/537.36"
192.168.18.208 - - [04/sep/2013:00:15:13 +0800] "get /favicon.ico http/1.0" 404 289 "-" "mozilla/5.0 (windows nt 6.1; wow64) applewebkit/537.36 (khtml, like gecko) chrome/28.0.1500.95 safari/537.36"
192.168.18.208 - - [04/sep/2013:00:15:16 +0800] "get / http/1.0" 200 23 "-" "mozilla/5.0 (windows nt 6.1; wow64) applewebkit/537.36 (khtml, like gecko) chrome/28.0.1500.95 safari/537.36"
192.168.18.208 - - [04/sep/2013:00:15:16 +0800] "get /favicon.ico http/1.0" 404 289 "-" "mozilla/5.0 (windows nt 6.1; wow64) applewebkit/537.36 (khtml, like gecko) chrome/28.0.1500.95 safari/537.36"
注,大家可以看到我们这里的客户的ip全是,nginx代理服务器的ip,并不是真实客户端的ip。下面我们修改一下,让日志的ip显示真实的客户端的ip。
11.修改nginx配置文件
location / {
    proxy_pass   http://192.168.18.201;
    proxy_set_header x-real-ip $remote_addr; #加上这一行
}指令说明:proxy_set_header
语法:proxy_set_header header value
默认值: host and connection
使用字段:http, server, location
这个指令允许将发送到被代理服务器的请求头重新定义或者增加一些字段。这个值可以是一个文本,变量或者它们的组合。proxy_set_header在指定的字段中没有定义时会从它的上级字段继承。
12.重新加载一下配置文件
[root@nginx ~]# service nginx reload
nginx: the configuration file /etc/nginx/nginx.conf syntax is ok
nginx: configuration file /etc/nginx/nginx.conf test is successful
重新载入 nginx:                      [确定]
13.测试并查看日志
[root@web1 ~]# tail /var/log/httpd/access_log
192.168.18.208 - - [03/sep/2013:16:26:18 +0800] "get / http/1.0" 200 23 "-" "mozilla/5.0 (compatible; msie 10.0; windows nt 6.1; wow64; trident/6.0)"
192.168.18.208 - - [03/sep/2013:16:26:18 +0800] "get / http/1.0" 200 23 "-" "mozilla/5.0 (compatible; msie 10.0; windows nt 6.1; wow64; trident/6.0)"
192.168.18.208 - - [03/sep/2013:16:26:18 +0800] "get / http/1.0" 200 23 "-" "mozilla/5.0 (compatible; msie 10.0; windows nt 6.1; wow64; trident/6.0)"
192.168.18.208 - - [03/sep/2013:16:26:18 +0800] "get / http/1.0" 200 23 "-" "mozilla/5.0 (compatible; msie 10.0; windows nt 6.1; wow64; trident/6.0)"
192.168.18.208 - - [03/sep/2013:16:26:18 +0800] "get / http/1.0" 200 23 "-" "mozilla/5.0 (compatible; msie 10.0; windows nt 6.1; wow64; trident/6.0)"
192.168.18.208 - - [03/sep/2013:16:26:18 +0800] "get / http/1.0" 200 23 "-" "mozilla/5.0 (compatible; msie 10.0; windows nt 6.1; wow64; trident/6.0)"
192.168.18.208 - - [03/sep/2013:16:26:18 +0800] "get / http/1.0" 200 23 "-" "mozilla/5.0 (compatible; msie 10.0; windows nt 6.1; wow64; trident/6.0)"
192.168.18.208 - - [03/sep/2013:16:26:18 +0800] "get / http/1.0" 200 23 "-" "mozilla/5.0 (compatible; msie 10.0; windows nt 6.1; wow64; trident/6.0)"
192.168.18.208 - - [03/sep/2013:16:26:18 +0800] "get / http/1.0" 200 23 "-" "mozilla/5.0 (compatible; msie 10.0; windows nt 6.1; wow64; trident/6.0)"
192.168.18.208 - - [03/sep/2013:16:26:18 +0800] "get / http/1.0" 200 23 "-" "mozilla/5.0 (compatible; msie 10.0; windows nt 6.1; wow64; trident/6.0)"
注,大家可以看到日志记录的还是代理的ip,没有显示真实客户端的ip,为什么呢?我们来看一下httpd的配置文件。
14.查看并修改httpd配置文件
[root@web1 ~]# vim /etc/httpd/conf/httpd.conf

注,大家可以这里记录日志的参数还是%h,下面我们修改一下参数。

注,这是修改后的参数,将h%修改为%{x-real-ip}i,好的下面我们再来测试一下。
15.重启并测试
[root@web1 ~]# service httpd restart
停止 httpd:                        [确定]
正在启动 httpd:                      [确定]
[root@web1 ~]# tail /var/log/httpd/access_log
192.168.18.138 - - [03/sep/2013:17:09:14 +0800] "get / http/1.0" 200 23 "-" "mozilla/5.0 (compatible; msie 10.0; windows nt 6.1; wow64; trident/6.0)"
192.168.18.138 - - [03/sep/2013:17:09:14 +0800] "get / http/1.0" 200 23 "-" "mozilla/5.0 (compatible; msie 10.0; windows nt 6.1; wow64; trident/6.0)"
192.168.18.138 - - [03/sep/2013:17:09:15 +0800] "get / http/1.0" 200 23 "-" "mozilla/5.0 (compatible; msie 10.0; windows nt 6.1; wow64; trident/6.0)"
192.168.18.138 - - [03/sep/2013:17:09:15 +0800] "get / http/1.0" 200 23 "-" "mozilla/5.0 (compatible; msie 10.0; windows nt 6.1; wow64; trident/6.0)"
192.168.18.138 - - [03/sep/2013:17:09:15 +0800] "get / http/1.0" 200 23 "-" "mozilla/5.0 (compatible; msie 10.0; windows nt 6.1; wow64; trident/6.0)"
192.168.18.138 - - [03/sep/2013:17:09:15 +0800] "get / http/1.0" 200 23 "-" "mozilla/5.0 (compatible; msie 10.0; windows nt 6.1; wow64; trident/6.0)"
192.168.18.138 - - [03/sep/2013:17:09:15 +0800] "get / http/1.0" 200 23 "-" "mozilla/5.0 (compatible; msie 10.0; windows nt 6.1; wow64; trident/6.0)"
192.168.18.138 - - [03/sep/2013:17:09:15 +0800] "get / http/1.0" 200 23 "-" "mozilla/5.0 (compatible; msie 10.0; windows nt 6.1; wow64; trident/6.0)"
192.168.18.138 - - [03/sep/2013:17:09:15 +0800] "get / http/1.0" 200 23 "-" "mozilla/5.0 (compatible; msie 10.0; windows nt 6.1; wow64; trident/6.0)"
192.168.18.138 - - [03/sep/2013:17:09:15 +0800] "get / http/1.0" 200 23 "-" "mozilla/5.0 (compatible; msie 10.0; windows nt 6.1; wow64; trident/6.0)"
注,大家可以看到现在的日志里记录的ip地址就是真实的客户端地址了。
以上是nginx代理模块怎么使用的详细内容。更多信息请关注PHP中文网其他相关文章!

热AI工具

Undresser.AI Undress
人工智能驱动的应用程序,用于创建逼真的裸体照片

AI Clothes Remover
用于从照片中去除衣服的在线人工智能工具。

Undress AI Tool
免费脱衣服图片

Clothoff.io
AI脱衣机

Video Face Swap
使用我们完全免费的人工智能换脸工具轻松在任何视频中换脸!

热门文章
热工具

记事本++7.3.1
好用且免费的代码编辑器

SublimeText3汉化版
中文版,非常好用

禅工作室 13.0.1
功能强大的PHP集成开发环境

Dreamweaver CS6
视觉化网页开发工具

SublimeText3 Mac版
神级代码编辑软件(SublimeText3)
热门话题


 nginx怎么配置云服务器域名
Apr 14, 2025 pm 12:18 PM
nginx怎么配置云服务器域名
Apr 14, 2025 pm 12:18 PM
在云服务器上配置 Nginx 域名的方法:创建 A 记录,指向云服务器的公共 IP 地址。在 Nginx 配置文件中添加虚拟主机块,指定侦听端口、域名和网站根目录。重启 Nginx 以应用更改。访问域名测试配置。其他注意事项:安装 SSL 证书启用 HTTPS、确保防火墙允许 80 端口流量、等待 DNS 解析生效。
 nginx怎么查版本
Apr 14, 2025 am 11:57 AM
nginx怎么查版本
Apr 14, 2025 am 11:57 AM
可以查询 Nginx 版本的方法有:使用 nginx -v 命令;查看 nginx.conf 文件中的 version 指令;打开 Nginx 错误页,查看页面的标题。
 怎么启动nginx服务器
Apr 14, 2025 pm 12:27 PM
怎么启动nginx服务器
Apr 14, 2025 pm 12:27 PM
启动 Nginx 服务器需要按照不同操作系统采取不同的步骤:Linux/Unix 系统:安装 Nginx 软件包(例如使用 apt-get 或 yum)。使用 systemctl 启动 Nginx 服务(例如 sudo systemctl start nginx)。Windows 系统:下载并安装 Windows 二进制文件。使用 nginx.exe 可执行文件启动 Nginx(例如 nginx.exe -c conf\nginx.conf)。无论使用哪种操作系统,您都可以通过访问服务器 IP
 docker容器名称怎么查
Apr 15, 2025 pm 12:21 PM
docker容器名称怎么查
Apr 15, 2025 pm 12:21 PM
可以通过以下步骤查询 Docker 容器名称:列出所有容器(docker ps)。筛选容器列表(使用 grep 命令)。获取容器名称(位于 "NAMES" 列中)。
 nginx在windows中怎么配置
Apr 14, 2025 pm 12:57 PM
nginx在windows中怎么配置
Apr 14, 2025 pm 12:57 PM
如何在 Windows 中配置 Nginx?安装 Nginx 并创建虚拟主机配置。修改主配置文件并包含虚拟主机配置。启动或重新加载 Nginx。测试配置并查看网站。选择性启用 SSL 并配置 SSL 证书。选择性设置防火墙允许 80 和 443 端口流量。
 怎么查看nginx是否启动
Apr 14, 2025 pm 01:03 PM
怎么查看nginx是否启动
Apr 14, 2025 pm 01:03 PM
确认 Nginx 是否启动的方法:1. 使用命令行:systemctl status nginx(Linux/Unix)、netstat -ano | findstr 80(Windows);2. 检查端口 80 是否开放;3. 查看系统日志中 Nginx 启动消息;4. 使用第三方工具,如 Nagios、Zabbix、Icinga。
 docker怎么启动容器
Apr 15, 2025 pm 12:27 PM
docker怎么启动容器
Apr 15, 2025 pm 12:27 PM
Docker 容器启动步骤:拉取容器镜像:运行 "docker pull [镜像名称]"。创建容器:使用 "docker create [选项] [镜像名称] [命令和参数]"。启动容器:执行 "docker start [容器名称或 ID]"。检查容器状态:通过 "docker ps" 验证容器是否正在运行。
 nginx怎么运行apache
Apr 14, 2025 pm 12:33 PM
nginx怎么运行apache
Apr 14, 2025 pm 12:33 PM
要让 Nginx 运行 Apache,需要:1. 安装 Nginx 和 Apache;2. 配置 Nginx 代理;3. 启动 Nginx 和 Apache;4. 测试配置,确保访问域名后能看到 Apache 内容。另外,需要注意端口号匹配、虚拟主机配置和 SSL/TLS 设置等其他事项。
