

web.xml SpringBoot打包可执行Jar运行SpringMVC的方法是什么

部署到webapps目录启动
本文使用的Spring版本为Spring6,SpringBoot版本为3,JDK为17,可能会和之前有细微不同,但整体流程差不太大。
如果部署应用到tomcat webapps目录下面启动,则需要在项目中配置web.xml文件
web.xml文件
配置Spring应用上下文
<context-param>
    <param-name>contextConfigLocation</param-name>
    <param-value>/WEB-INF/spring/application-context.xml</param-value>
</context-param>
<listener>
    <listener-class>org.springframework.web.context.ContextLoaderListener</listener-class>
</listener>context-param
在Web应用程序的上下文范围内,可以使用context-param标签来设置初始化参数。这些参数可以在整个Web应用程序中使用,并且可以通过ServletContext对象的getInitParameter()方法获取。
ContextLoaderListener
ContextLoaderListener实现了ServletContextListener接口,这个接口是tomcat留给应用程序初始化上下文环境的接口,用于在Web应用程序启动时加载ApplicationContext。
ServletContextListener有两个默认方法
// 在所有的servlet和filter初始化之前被调用
default public void contextInitialized(ServletContextEvent sce) {
}
// 在所有的servlet和filter销毁之后被调用
default public void contextDestroyed(ServletContextEvent sce) {
}ContextLoaderListener还继承了ContextLoader类,所有的context操作都在此类进行。
ContextLoaderListener实现contextInitialized方法,然后调用父类ContextLoader的initWebApplicationContext方法,把ServletContext传进去。
@Override
public void contextInitialized(ServletContextEvent event) {
   initWebApplicationContext(event.getServletContext());
}初始化Spring Context。
initWebApplicationContext方法关键代码
...
if (this.context == null) {
    // 创建ApplicationContext
    this.context = createWebApplicationContext(servletContext);
}
...
// 刷新ApplicationContext
configureAndRefreshWebApplicationContext(cwac, servletContext);
...
// 将当前ApplicationContext添加到ServletContext的属性中,后面有用再说
// String ROOT_WEB_APPLICATION_CONTEXT_ATTRIBUTE = WebApplicationContext.class.getName() + ".ROOT";
servletContext.setAttribute(WebApplicationContext.ROOT_WEB_APPLICATION_CONTEXT_ATTRIBUTE, this.context);
...创建ApplicationContext
在createWebApplicationContext方法中,先调用determineContextClass方法确定使用哪个ApplicationContext,找到之后,实例化。
determineContextClass这个方法,主要是确定使用的ApplicationContext,首先从web.xml中加载,如果用户有定义,直接使用用户自定义的。
String contextClassName = servletContext.getInitParameter(CONTEXT_CLASS_PARAM);
web.xml中配置如下,
<context-param>
    <param-name>contextClass</param-name>
    <param-value>com.xxx.XxxContext</param-value>
</context-param>如果没有配置,则使用Spring默认的XmlWebApplicationContext类。
这个类在ContextLoader同路径包下面的ContextLoader.properties文件中定义。
org.springframework.web.context.WebApplicationContext=org.springframework.web.context.support.XmlWebApplicationContext
配置和刷新ApplicationContext
configureAndRefreshWebApplicationContext关键代码
protected void configureAndRefreshWebApplicationContext(ConfigurableWebApplicationContext wac,ServletContext sc) {
    // ...
    // 获取web.xml中配置的contextConfigLocation参数
    String configLocationParam = sc.getInitParameter(CONFIG_LOCATION_PARAM);
    if (configLocationParam != null) {
        wac.setConfigLocation(configLocationParam);
    }
    // ...
    // 刷新上下文
    wac.refresh();
}至此Tomcat已经启动Spring环境了,后续就是Spring的初始化流程,这里不再叙述。
初始化DispatcherServlet
<servlet>
    <servlet-name>dispatcher</servlet-name>
    <servlet-class>org.springframework.web.servlet.DispatcherServlet</servlet-class>
    <init-param>
       <param-name>contextConfigLocation</param-name>
       <param-value>/WEB-INF/spring/dispatcher-servlet.xml</param-value>
    </init-param>
    <load-on-startup>1</load-on-startup>
</servlet>
<servlet-mapping>
    <servlet-name>dispatcher</servlet-name>
    <url-pattern>/</url-pattern>
</servlet-mapping>此处的contextConfigLocation属于DispatcherServlet的父类FrameworkServlet,主要用来加载SpringMVC相关的配置,示例如下:
<beans xmlns="http://www.springframework.org/schema/beans"
    xmlns:context="http://www.springframework.org/schema/context"
    xmlns:mvc="http://www.springframework.org/schema/mvc"
    xmlns:xsi="http://www.w3.org/2001/XMLSchema-instance"
    xsi:schemaLocation="
        http://www.springframework.org/schema/beans
        http://www.springframework.org/schema/beans/spring-beans-4.3.xsd
        http://www.springframework.org/schema/context
        http://www.springframework.org/schema/context/spring-context-4.3.xsd
        http://www.springframework.org/schema/mvc
        http://www.springframework.org/schema/mvc/spring-mvc-4.3.xsd">
    <!-- 扫描控制器和其他组件 -->
    <context:component-scan base-package="com.example.controller" />
    <!-- 配置视图解析器 -->
    <bean class="org.springframework.web.servlet.view.InternalResourceViewResolver">
        <property name="prefix" value="/WEB-INF/views/" />
        <property name="suffix" value=".jsp" />
    </bean>
    <!-- 启用Spring MVC注解支持 -->
    <mvc:annotation-driven />
</beans>DispatcherServlet类图
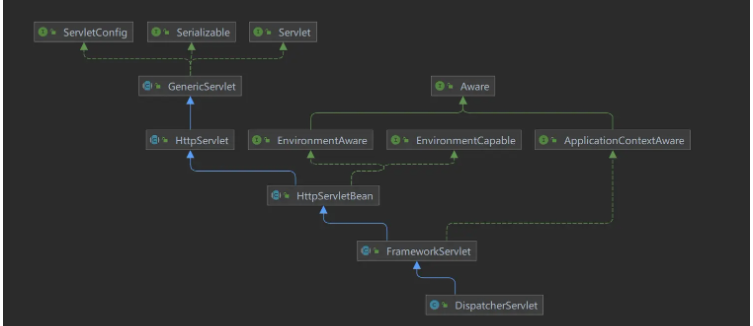
可以看到DispatcherServlet实现了Servlet接口,Servlet接口中有init方法,SpringMVC的配置就是在初始化的时候被加载的。
关键代码在HttpServletBean.init()和FrameworkServlet.initServletBean()方法中。
HttpServletBean.init()
public final void init() throws ServletException {
   // Set bean properties from init parameters.
   PropertyValues pvs = new ServletConfigPropertyValues(getServletConfig(), this.requiredProperties);
   if (!pvs.isEmpty()) {
      try {
         BeanWrapper bw = PropertyAccessorFactory.forBeanPropertyAccess(this);
         ResourceLoader resourceLoader = new ServletContextResourceLoader(getServletContext());
         bw.registerCustomEditor(Resource.class, new ResourceEditor(resourceLoader, getEnvironment()));
         initBeanWrapper(bw);
         bw.setPropertyValues(pvs, true);
      }
      catch (BeansException ex) {
         if (logger.isErrorEnabled()) {
            logger.error("Failed to set bean properties on servlet '" + getServletName() + "'", ex);
         }
         throw ex;
      }
   }
   // Let subclasses do whatever initialization they like.
   initServletBean();
}FrameworkServlet.initServletBean()
protected final void initServletBean() throws ServletException {
    ...
    // 在这里初始化ApplicationContext
    this.webApplicationContext = initWebApplicationContext();
    // 初始化servlet
    initFrameworkServlet();
}FrameworkServlet.initWebApplicationContext()
protected WebApplicationContext initWebApplicationContext() {
    // 此处获取根容器,就是Spring初始化的XmlWebApplicationContext,
    // 在上面把它添加到了ServletContext的属性中,标记根容器,这里把它获取出来
    // String ROOT_WEB_APPLICATION_CONTEXT_ATTRIBUTE = WebApplicationContext.class.getName() + ".ROOT";
    // servletContext.getAttribute(WebApplicationContext.ROOT_WEB_APPLICATION_CONTEXT_ATTRIBUTE);
   WebApplicationContext rootContext =
         WebApplicationContextUtils.getWebApplicationContext(getServletContext());
   WebApplicationContext wac = null;
   // 此时webApplicationContext还是null,因为DispatchServlet是被tomcat创建的,需要无参构造器
   // 构造器中没有设置webApplicationContext的代码,所以此时webApplicationContext还是null
   // 注意:在SpringBoot使用嵌入式Tomcat时,这个webApplicationContext不为null,因为FrameworkServlet还
   // 实现了ApplicationContextAware接口,所以当SpringBoot的上下文准备好之后,会回调setApplicationContext方法
   // 注入ApplicationContext,后面在细说
   if (this.webApplicationContext != null) {
      // A context instance was injected at construction time -> use it
      wac = this.webApplicationContext;
      if (wac instanceof ConfigurableWebApplicationContext cwac && !cwac.isActive()) {
         // The context has not yet been refreshed -> provide services such as
         // setting the parent context, setting the application context id, etc
         if (cwac.getParent() == null) {
            // The context instance was injected without an explicit parent -> set
            // the root application context (if any; may be null) as the parent
            cwac.setParent(rootContext);
         }
         configureAndRefreshWebApplicationContext(cwac);
      }
   }
   if (wac == null) {
      // No context instance was injected at construction time -> see if one
      // has been registered in the servlet context. If one exists, it is assumed
      // that the parent context (if any) has already been set and that the
      // user has performed any initialization such as setting the context id
      // 此处主要是获取web.xml配置的WebApplicationContext
      // 可以通过设置参数contextAttribute来设置加载SpringMVC的ApplicationContext
      // 比如下面这样。除非项目中有多个WebApplicationContext,需要使用其他WebApplicationContext才会用到
      // 一般都是null
      // <context-param>
      //    <param-name>contextAttribute</param-name>
      //    <param-value>myWebApplicationContext</param-value>
      // </context-param>
      wac = findWebApplicationContext();
   }
   if (wac == null) {
      // 现在进入到创建SpringMVC的ApplicationContext流程
      // 也就是加载contextConfigLocation定义的xml文件
      // No context instance is defined for this servlet -> create a local one
      wac = createWebApplicationContext(rootContext);
   }
   if (!this.refreshEventReceived) {
      // Either the context is not a ConfigurableApplicationContext with refresh
      // support or the context injected at construction time had already been
      // refreshed -> trigger initial onRefresh manually here.
      synchronized (this.onRefreshMonitor) {
         // 初始化策略对象
         // 比如:HandlerMapping,HandlerAdapter,ViewResolver等等
         onRefresh(wac);
      }
   }
   if (this.publishContext) {
      // Publish the context as a servlet context attribute.
      String attrName = getServletContextAttributeName();
      getServletContext().setAttribute(attrName, wac);
   }
   return wac;
}protected WebApplicationContext createWebApplicationContext(@Nullable ApplicationContext parent) {
// SpringMVC所使用的contextClass,可以在<servlet>标签下设置
// <init-param>
// <param-name>contextClass</param-name>
// <param-value>org.springframework.web.context.support.XmlWebApplicationContext</param-value>
// </init-param>
// 默认为XmlWebApplicationContext
Class<?> contextClass = getContextClass();
if (!ConfigurableWebApplicationContext.class.isAssignableFrom(contextClass)) {
throw new ApplicationContextException(
"Fatal initialization error in servlet with name '" + getServletName() +
"': custom WebApplicationContext class [" + contextClass.getName() +
"] is not of type ConfigurableWebApplicationContext");
}
// 实例化ApplicationContext
ConfigurableWebApplicationContext wac =
(ConfigurableWebApplicationContext) BeanUtils.instantiateClass(contextClass);
// 设置环境参数
wac.setEnvironment(getEnvironment());
// 设置父容器为Spring的ApplicationContext
wac.setParent(parent);
// 获取SpringMVC的contextConfigLocation文件
String configLocation = getContextConfigLocation();
if (configLocation != null) {
wac.setConfigLocation(configLocation);
}
// 配置并刷新ApplicationContext
configureAndRefreshWebApplicationContext(wac);
return wac;
}DispatchServlet初始化完成
为什么需要父子容器
父子容器的作用主要是划分框架边界和实现bean的复用。
在J2EE三层架构中,在service层我们一般使用Spring框架,而在web层则有多种选择,如Spring MVC、Struts等。为了让web层能够使用service层的bean,我们需要将service层的容器作为web层容器的父容器,这样就可以实现框架的整合。
父子容器的作用在于,当我们尝试从子容器(Servlet WebApplicationContext)中获取一个bean时,如果找不到,则会委派给父容器(Root WebApplicationContext)进行查找。重复定义相同的bean在各个子容器中被避免,从而提高了代码的复用性和可维护性。
接收请求
请求先进入doService,然后调用doDispatch进行处理。
doDispatch关键代码
...
// 首先根据当前请求HttpServletRequest,遍历所有的HandlerMapping执行handle方法,返回可用的HandlerExecutionChain对象。
mappedHandler = getHandler(processedRequest);
// 然后根据handler获取支持的适配器
HandlerAdapter ha = getHandlerAdapter(mappedHandler.getHandler());
// 执行HandlerInterceptor.preHandle,在controller的方法被调用前执行
if (!mappedHandler.applyPreHandle(processedRequest, response)) {
    return;
}
// 执行controller方法
mv = ha.handle(processedRequest, response, mappedHandler.getHandler());
// 执行HandlerInterceptor.postHandle,在controller的方法被调用后执行
mappedHandler.applyPostHandle(processedRequest, response, mv);
// 渲染结果到视图
processDispatchResult(processedRequest, response, mappedHandler, mv, dispatchException);HandlerMapping是request与handler object之间的映射,它能根据request找到对应的handler。handler object可以是任意类型,比如@Controller注解的类,或者实现了Controller接口的类,或者实现了HttpRequestHandler接口的类等。
HandlerExecutionChain是handler执行链,它包装了handler object和一组HandlerInterceptor。HandlerInterceptor是拦截器,它可以在handler执行前后进行一些额外的操作,比如权限检查,日志记录等。
HandlerAdapter是handler的适配器,它能处理不同类型的handler object,并调用其对应的方法,返回ModelAndView对象。HandlerAdapter可以根据handler object的类型,进行参数绑定,返回值处理等操作。
HandlerInterceptor使用
定义一个拦截器类,实现HandlerInterceptor接口或者继承HandlerInterceptorAdapter类,重写preHandle,postHandle和afterCompletion三个方法。
在preHandle方法中,可以获取请求和响应对象,进行预处理,比如检查请求头中的token,或者判断请求的url是否有权限访问等。如果返回true,则继续执行后续的拦截器或者处理器;如果返回false,则中断请求,不再执行后续的拦截器或者处理器。
在postHandle方法中,可以获取请求和响应对象,以及处理器返回的ModelAndView对象,进行后处理,比如修改模型数据或者视图信息等。只有在preHandle方法返回true并且处理器成功执行后,该方法才会被调用。
在afterCompletion方法中,可以获取请求和响应对象,以及处理器抛出的异常对象(如果有的话),进行清理资源或者异常处理等。只有当preHandle方法返回true时,无论处理器是否成功执行,该方法才会被调用。
在SpringMVC配置文件中,需注册拦截器类并指定拦截的URL模式。可以注册多个拦截器,并指定顺序。拦截器会按照顺序执行preHandle方法,然后按照逆序执行postHandle和afterCompletion方法。
HandlerInterceptor和Filter的区别
HandlerInterceptor利用Java反射机制实现,而Filter则通过函数回调方式实现。HandlerInterceptor可以利用Spring的AOP技术,实现更灵活的拦截逻辑,而Filter只能在请求前后进行简单的处理。
HandlerInterceptor不依赖于Servlet容器,而Filter依赖于Servlet容器。HandlerInterceptor是SpringMVC框架提供的,可以在任何情况下使用,而Filter是Servlet规范的一部分,只能在Web应用中使用。
HandlerInterceptor的执行由SpringMVC框架控制,而Filter的执行由Servlet容器控制。HandlerInterceptor可以通过IoC容器来管理,可以注入其他的Bean,而Filter则需要在web.xml中配置,或者使用@WebFilter注解,并且需要@ServletComponentScan扫描。
HandlerInterceptor只能拦截DispatcherServlet处理的请求,而Filter可以拦截任何请求。HandlerInterceptor只能对Controller方法进行拦截,而Filter可以对静态资源、JSP页面等进行拦截。
HandlerInterceptor有三个方法:preHandle,postHandle和afterCompletion,分别在请求处理前后和视图渲染前后执行,而Filter只有一个方法:doFilter,在请求处理前后执行。
处理controller返回结果
对于被controller方法,使用的适配器是RequestMappingHandlerAdapter,在handlerAdapter.handle方法执行时,会去执行对应的controller方法,处理controller方法返回的结果。
invocableMethod.invokeAndHandle(webRequest, mavContainer);
ServletInvocableHandlerMethod.invokeAndHandle
// 执行controller方法
Object returnValue = invokeForRequest(webRequest, mavContainer, providedArgs);
...
// 处理返回数据,会判断是不是有@ResponseBody注解,如果有,会使用RequestResponseBodyMethodProcessor来处理返回值
// 然后会解析请求头等等,判断应该返回什么类型的数据,然后使用对应的HttpMessageConverter写入输出流
this.returnValueHandlers.handleReturnValue(
returnValue, getReturnValueType(returnValue), mavContainer, webRequest);SpringBoot Jar启动
SpringBoot使用嵌入式Servlet容器启动应用,有Tomcat,Jetty,Undertow。
选择Servlet容器
SpringBoot默认使用Tomcat,可以在配置文件中看出。
<dependency>
    <groupId>org.springframework.boot</groupId>
    <artifactId>spring-boot-starter-web</artifactId>
</dependency>web模块自动引入了tomcat
<dependency>
  <groupId>org.springframework.boot</groupId>
  <artifactId>spring-boot-starter-tomcat</artifactId>
</dependency>
如果不使用Tomcat可以排除,引入其他服务器。
<dependency>
  <groupId>org.springframework.boot</groupId>
  <artifactId>spring-boot-starter-web</artifactId>
  <!-- 剔除Tomcat -->
  <exclusions>
    <exclusion>
      <artifactId>spring-boot-starter-tomcat</artifactId>
      <groupId>org.springframework.boot</groupId>
    </exclusion>
  </exclusions>
</dependency>
<!-- 使用jetty -->
<dependency>
  <groupId>org.springframework.boot</groupId>
  <artifactId>spring-boot-starter-jetty</artifactId>
</dependency>如果没有排除Tomcat,直接引入其他服务器,比如下面。
<dependency>
  <groupId>org.springframework.boot</groupId>
  <artifactId>spring-boot-starter-web</artifactId>
  <!-- 没有排除Tomcat -->
</dependency>
<!-- 引入jetty -->
<dependency>
  <groupId>org.springframework.boot</groupId>
  <artifactId>spring-boot-starter-jetty</artifactId>
</dependency>
如果项目中同时引入了Tomcat和其他服务器的依赖,那么SpringBoot会按照以下顺序来选择启动的服务器。
Tomcat > Jetty > Undertow
也就是说,如果有Tomcat,就优先使用Tomcat,如果没有Tomcat,就看有没有Jetty,如果有Jetty,就使用Jetty,以此类推。这个顺序是在SpringBoot的ServletWebServerFactoryConfiguration类中定义的。
// 只展示必要代码
class ServletWebServerFactoryConfiguration {
   // 当Servlet、Tomcat、UpgradeProtocol类在类路径存在时
   // 并且ServletWebServerFactory类存在,则会创建tomcatServletWebServerFactory bean。
   @ConditionalOnClass({ Servlet.class, Tomcat.class, UpgradeProtocol.class })
   @ConditionalOnMissingBean(value = ServletWebServerFactory.class, search = SearchStrategy.CURRENT)
   static class EmbeddedTomcat {
      @Bean
      TomcatServletWebServerFactory tomcatServletWebServerFactory(
         ... 代码省略
      }
   }
   // 当Servlet、Server、WebAppContext类在类路径存在时
   // 并且ServletWebServerFactory类型的Bean不存在时,则会创建JettyServletWebServerFactory bean。
   // ServletWebServerFactory是TomcatServletWebServerFactory、JettyServletWebServerFactory、
   // UndertowServletWebServerFactory的父类
   // 所以如果Tomcat被引入,上面的tomcatServletWebServerFactory就会被创建,这里的条件就不满足,不会被创建。
   @ConditionalOnClass({ Servlet.class, Server.class, Loader.class, WebAppContext.class })
   @ConditionalOnMissingBean(value = ServletWebServerFactory.class, search = SearchStrategy.CURRENT)
   static class EmbeddedJetty {
      @Bean
      JettyServletWebServerFactory JettyServletWebServerFactory(
         ... 代码省略
      }
   }
   // 分析同上
   @ConditionalOnClass({ Servlet.class, Undertow.class, SslClientAuthMode.class })
   @ConditionalOnMissingBean(value = ServletWebServerFactory.class, search = SearchStrategy.CURRENT)
   static class EmbeddedUndertow {
      @Bean
      UndertowServletWebServerFactory undertowServletWebServerFactory(
        ... 代码省略
      }
}下面继续以Tomcat为例
Tomcat配置、启动
Tomcat是在Spring容器启动的时候启动的
SpringApplication.run方法
首先创建一个ConfigurableApplicationContext对象,并调用其refresh()方法,这个对象一般是AnnotationConfigServletWebServerApplicationContext。
context = createApplicationContext();
-> refreshContext(context);
-> refresh(context);
-> applicationContext.refresh();
refresh()方法会调用其父类ServletWebServerApplicationContext的refresh()方法,在父类的refresh()中再次调用父类AbstractApplicationContext的refresh()方法,主要在onRefresh阶段,会进行服务器的配置。
... refresh()代码简略
// 这里会初始化Tomcat配置
onRefresh();
// 这里会启动Tomcat
finishRefresh();
...
回到ServletWebServerApplicationContext类的onRefresh()方法,会调用createWebServer()方法,创建web服务器。
protected void onRefresh() {
   super.onRefresh();
   try {
      // 创建服务器
      createWebServer();
   }
   catch (Throwable ex) {
      throw new ApplicationContextException("Unable to start web server", ex);
   }
}private void createWebServer() {
... 代码简略
// 获取工厂类,这里获取的就是在配置类中生效的那一个,这里为TomcatServletWebServerFactory
ServletWebServerFactory factory = getWebServerFactory();
createWebServer.tag("factory", factory.getClass().toString());
// 获取服务器
this.webServer = factory.getWebServer(getSelfInitializer());
}TomcatServletWebServerFactory.getWebServer
public WebServer getWebServer(ServletContextInitializer... initializers) {
   if (this.disableMBeanRegistry) {
      Registry.disableRegistry();
   }
   Tomcat tomcat = new Tomcat();
   File baseDir = (this.baseDirectory != null) ? this.baseDirectory : createTempDir("tomcat");
   tomcat.setBaseDir(baseDir.getAbsolutePath());
   for (LifecycleListener listener : this.serverLifecycleListeners) {
      tomcat.getServer().addLifecycleListener(listener);
   }
   // 设置Connector,对应与Tomcat Server.xml 中的<Connector></Connector>
   Connector connector = new Connector(this.protocol);
   connector.setThrowOnFailure(true);
   // 对应于Server.xml 中
   // <Service name="Catalina">
   //   <Connector port="8080" protocol="HTTP/1.1"
   //     connectionTimeout="20000"
   //     redirectPort="8443" relaxedQueryChars="[|]"/>
   // </Service>
   tomcat.getService().addConnector(connector);
   customizeConnector(connector);
   tomcat.setConnector(connector);
   tomcat.getHost().setAutoDeploy(false);
   configureEngine(tomcat.getEngine());
   for (Connector additionalConnector : this.additionalTomcatConnectors) {
      tomcat.getService().addConnector(additionalConnector);
   }
   // 准备好Context组件
   prepareContext(tomcat.getHost(), initializers);
   return getTomcatWebServer(tomcat);
}// 创建Tomcat服务器
protected TomcatWebServer getTomcatWebServer(Tomcat tomcat) {
return new TomcatWebServer(tomcat, getPort() >= 0, getShutdown());
}至此,Tomcat配置已经初始化完成,准备启动。
在finishRefresh()方法中,会启动Tomcat
getLifecycleProcessor().onRefresh();
> DefaultLifecycleProcessor.startBeans(true);
> LifecycleGroup::start
> doStart(this.lifecycleBeans, member.name, this.autoStartupOnly);
> bean.start();
> WebServerStartStopLifecycle.start
> TomcatWebServer.start();
private void startBeans(boolean autoStartupOnly) {
   Map<String, Lifecycle> lifecycleBeans = getLifecycleBeans();
   Map<Integer, LifecycleGroup> phases = new TreeMap<>();
   lifecycleBeans.forEach((beanName, bean) -> {
      if (!autoStartupOnly || (bean instanceof SmartLifecycle smartLifecycle && smartLifecycle.isAutoStartup())) {
         int phase = getPhase(bean);
         phases.computeIfAbsent(
               phase,
               p -> new LifecycleGroup(phase, this.timeoutPerShutdownPhase, lifecycleBeans, autoStartupOnly)
         ).add(beanName, bean);
      }
   });
   if (!phases.isEmpty()) {
      phases.values().forEach(LifecycleGroup::start);
   }
}public void start() {
this.webServer.start();
this.running = true;
this.applicationContext
.publishEvent(new ServletWebServerInitializedEvent(this.webServer, this.applicationContext));
}DispatchServlet配置
ServletContextInitializer
在prepareContext方法中,有一个方法configureContext
configureContext(context, initializersToUse);
configureContext方法,在这里面创建了一个TomcatStarter对象,这个类实现了ServletContainerInitializer接口,所以在容器启动过程中会被调用。
TomcatStarter starter = new TomcatStarter(initializers);
context.addServletContainerInitializer(starter, NO_CLASSES);
initializers是Spring自己定义的初始化接口ServletContextInitializer,传入TomcatStarter之后,在onStartup方法中循环调用onStartup方法。
public void onStartup(Set<Class<?>> classes, ServletContext servletContext) throws ServletException {
   try {
      for (ServletContextInitializer initializer : this.initializers) {
         initializer.onStartup(servletContext);
      }
   }
   ...
}需要注意的是,这里的initializers有些传过来的时候是一个函数式接口,在上面的factory.getWebServer(getSelfInitializer());这里传进来的,就是一个函数式接口
private org.springframework.boot.web.servlet.ServletContextInitializer getSelfInitializer() {
   return this::selfInitialize;
}实际调用在下面这个方法
private void selfInitialize(ServletContext servletContext) throws ServletException {
   prepareWebApplicationContext(servletContext);
   registerApplicationScope(servletContext);
   WebApplicationContextUtils.registerEnvironmentBeans(getBeanFactory(), servletContext);
   for (ServletContextInitializer beans : getServletContextInitializerBeans()) {
      beans.onStartup(servletContext);
   }
}在此处绕过所有ServletContextInitializer,随后执行它们的onStartup方法。
其中有一个DispatcherServletRegistrationBean,这个类实现了ServletContextInitializer接口,主要是用来添加DispatchServlet。
DispatcherServletAutoConfiguration配置类中有DispatcherServlet,DispatcherServletRegistrationBean两个Bean。
protected static class DispatcherServletRegistrationConfiguration {
   @Bean(name = DEFAULT_DISPATCHER_SERVLET_REGISTRATION_BEAN_NAME)
   @ConditionalOnBean(value = DispatcherServlet.class, name = DEFAULT_DISPATCHER_SERVLET_BEAN_NAME)
   public DispatcherServletRegistrationBean dispatcherServletRegistration(DispatcherServlet dispatcherServlet,
         WebMvcProperties webMvcProperties, ObjectProvider<MultipartConfigElement> multipartConfig) {
      // 创建DispatcherServletRegistrationBean,并把dispatcherServlet传进去
      DispatcherServletRegistrationBean registration = new DispatcherServletRegistrationBean(dispatcherServlet,
            webMvcProperties.getServlet().getPath());
      registration.setName(DEFAULT_DISPATCHER_SERVLET_BEAN_NAME);
      registration.setLoadOnStartup(webMvcProperties.getServlet().getLoadOnStartup());
      multipartConfig.ifAvailable(registration::setMultipartConfig);
      return registration;
   }
}
protected static class DispatcherServletConfiguration {
    @Bean(name = DEFAULT_DISPATCHER_SERVLET_BEAN_NAME)
    public DispatcherServlet dispatcherServlet(WebMvcProperties webMvcProperties) {
        // 创建DispatcherServlet
        DispatcherServlet dispatcherServlet = new DispatcherServlet();
        dispatcherServlet.setDispatchOptionsRequest(webMvcProperties.isDispatchOptionsRequest());
        dispatcherServlet.setDispatchTraceRequest(webMvcProperties.isDispatchTraceRequest());
        dispatcherServlet.setThrowExceptionIfNoHandlerFound(webMvcProperties.isThrowExceptionIfNoHandlerFound());
        dispatcherServlet.setPublishEvents(webMvcProperties.isPublishRequestHandledEvents());
        dispatcherServlet.setEnableLoggingRequestDetails(webMvcProperties.isLogRequestDetails());
        return dispatcherServlet;
    }
}ServletContextInitializer.onStartup方法由子类RegistrationBean实现
public final void onStartup(ServletContext servletContext) throws ServletException {
    String description = getDescription();
    if (!isEnabled()) {
        logger.info(StringUtils.capitalize(description) + " was not registered (disabled)");
        return;
    }
    // register是一个抽象方法,由子类DynamicRegistrationBean实现
    register(description, servletContext);
}
protected abstract void register(String description, ServletContext servletContext);DynamicRegistrationBean.register
protected final void register(String description, ServletContext servletContext) {
   // addRegistration是一个抽象方法,由子类ServletRegistrationBean实现
   D registration = addRegistration(description, servletContext);
   if (registration == null) {
      logger.info(StringUtils.capitalize(description) + " was not registered (possibly already registered?)");
      return;
   }
   // Servlet被添加到Context后,这里对Servlet进行配置,如拦截路径
   configure(registration);
}
protected abstract D addRegistration(String description, ServletContext servletContext);ServletRegistrationBean.addRegistration,作用类似下面
<servlet>
    <servlet-name>dispatcher</servlet-name>
    <servlet-class>org.springframework.web.servlet.DispatcherServlet</servlet-class>
</servlet>protected ServletRegistration.Dynamic addRegistration(String description, ServletContext servletContext) {
String name = getServletName();
// 添加Servlet到Context中,这里的servlet就是DispatchServlet。
return servletContext.addServlet(name, this.servlet);
}ServletRegistrationBean.configure,作用类似下面
<servlet-mapping>
    <servlet-name>dispatcher</servlet-name>
    <url-pattern>/</url-pattern>
</servlet-mapping>protected void configure(ServletRegistration.Dynamic registration) {
super.configure(registration);
String[] urlMapping = StringUtils.toStringArray(this.urlMappings);
if (urlMapping.length == 0 && this.alwaysMapUrl) {
// DEFAULT_MAPPINGS默是“/”
urlMapping = DEFAULT_MAPPINGS;
}
if (!ObjectUtils.isEmpty(urlMapping)) {
// 设置mapping
registration.addMapping(urlMapping);
}
registration.setLoadOnStartup(this.loadOnStartup);
if (this.multipartConfig != null) {
registration.setMultipartConfig(this.multipartConfig);
}
}至此,DispatchServlet已配置好,后续流程和web.xml配置调用流程基本相同。
FrameworkServlet.initWebApplicationContext()
protected WebApplicationContext initWebApplicationContext() {
    // 此处获取根容器,就是Spring初始化的XmlWebApplicationContext,
    // 在上面把它添加到了ServletContext的属性中,标记根容器,这里把它获取出来
    // String ROOT_WEB_APPLICATION_CONTEXT_ATTRIBUTE = WebApplicationContext.class.getName() + ".ROOT";
    // servletContext.getAttribute(WebApplicationContext.ROOT_WEB_APPLICATION_CONTEXT_ATTRIBUTE);
    // ===========上面为使用web.xml时的分析,下面为SpringBoot嵌入式Tomcat分析============
    // 同样是获取根容器,不过一般为AnnotationConfigServletWebServerApplicationContext
   WebApplicationContext rootContext =
         WebApplicationContextUtils.getWebApplicationContext(getServletContext());
   WebApplicationContext wac = null;
   // 此时webApplicationContext还是null,因为DispatchServlet是被tomcat创建的,需要无参构造器
   // 构造器中没有设置webApplicationContext的代码,所以此时webApplicationContext还是null
   // ===========上面为使用web.xml时的分析,下面为SpringBoot嵌入式Tomcat分析============
   // 注意:在SpringBoot使用嵌入式Tomcat时,这个webApplicationContext不为null,因为FrameworkServlet还
   // 实现了ApplicationContextAware接口,所以当SpringBoot的上下文准备好之后,会回调setApplicationContext方法
   // 注入ApplicationContext,后面在细说
   if (this.webApplicationContext != null) {
      // A context instance was injected at construction time -> use it
      wac = this.webApplicationContext;
      if (wac instanceof ConfigurableWebApplicationContext cwac && !cwac.isActive()) {
         // The context has not yet been refreshed -> provide services such as
         // setting the parent context, setting the application context id, etc
         if (cwac.getParent() == null) {
            // The context instance was injected without an explicit parent -> set
            // the root application context (if any; may be null) as the parent
            cwac.setParent(rootContext);
         }
         configureAndRefreshWebApplicationContext(cwac);
      }
   }
   if (wac == null) {
      // No context instance was injected at construction time -> see if one
      // has been registered in the servlet context. If one exists, it is assumed
      // that the parent context (if any) has already been set and that the
      // user has performed any initialization such as setting the context id
      // 此处主要是获取web.xml配置的WebApplicationContext
      // 可以通过设置参数contextAttribute来设置加载SpringMVC的ApplicationContext
      // 比如下面这样。除非项目中有多个WebApplicationContext,需要使用其他WebApplicationContext才会用到
      // 一般都是null
      // <context-param>
      //    <param-name>contextAttribute</param-name>
      //    <param-value>myWebApplicationContext</param-value>
      // </context-param>
      // ===========上面为使用web.xml时的分析,下面为SpringBoot嵌入式Tomcat分析
      // 因为wac此时不为null,这里不会进入
      wac = findWebApplicationContext();
   }
   if (wac == null) {
      // 现在进入到创建SpringMVC的ApplicationContext流程
      // 也就是加载contextConfigLocation定义的xml文件
      // ===========上面为使用web.xml时的分析,下面为SpringBoot嵌入式Tomcat分析
      // 因为wac此时不为null,这里不会进入,所以没有SpringMVC的容器,也就是没有父子容器之分,SpringBoot项目中只有一个容器
      // No context instance is defined for this servlet -> create a local one
      wac = createWebApplicationContext(rootContext);
   }
   if (!this.refreshEventReceived) {
      // Either the context is not a ConfigurableApplicationContext with refresh
      // support or the context injected at construction time had already been
      // refreshed -> trigger initial onRefresh manually here.
      synchronized (this.onRefreshMonitor) {
         // 初始化策略对象
         // 比如:HandlerMapping,HandlerAdapter,ViewResolver等等
         onRefresh(wac);
      }
   }
   if (this.publishContext) {
      // Publish the context as a servlet context attribute.
      String attrName = getServletContextAttributeName();
      getServletContext().setAttribute(attrName, wac);
   }
   return wac;
}以上是web.xml SpringBoot打包可执行Jar运行SpringMVC的方法是什么的详细内容。更多信息请关注PHP中文网其他相关文章!

热AI工具

Undresser.AI Undress
人工智能驱动的应用程序,用于创建逼真的裸体照片

AI Clothes Remover
用于从照片中去除衣服的在线人工智能工具。

Undress AI Tool
免费脱衣服图片

Clothoff.io
AI脱衣机

Video Face Swap
使用我们完全免费的人工智能换脸工具轻松在任何视频中换脸!

热门文章
热工具

记事本++7.3.1
好用且免费的代码编辑器

SublimeText3汉化版
中文版,非常好用

禅工作室 13.0.1
功能强大的PHP集成开发环境

Dreamweaver CS6
视觉化网页开发工具

SublimeText3 Mac版
神级代码编辑软件(SublimeText3)
热门话题


 如何在 Linux 中运行 jar 文件
Feb 20, 2024 am 10:40 AM
如何在 Linux 中运行 jar 文件
Feb 20, 2024 am 10:40 AM
运行JAR文件的先决条件在Linux系统上运行JAR文件需要安装Java运行时环境(JRE),它是执行Java应用程序所需的基本组件,包括Java虚拟机(JVM)、核心类库等。许多主流Linux发行版,如Ubuntu、Debian、Fedora、openSUSE等,都提供了JRE包的软件库,方便用户进行安装。后文将详细介绍在流行的发行版上安装JRE的步骤。设置完JRE后,可以根据个人喜好选择使用命令行终端或图形用户界面来启动JAR文件。您的选择可能取决于对Linuxshell的熟悉程度和个人偏好
 Springboot怎么集成Jasypt实现配置文件加密
Jun 01, 2023 am 08:55 AM
Springboot怎么集成Jasypt实现配置文件加密
Jun 01, 2023 am 08:55 AM
Jasypt介绍Jasypt是一个java库,它允许开发员以最少的努力为他/她的项目添加基本的加密功能,并且不需要对加密工作原理有深入的了解用于单向和双向加密的高安全性、基于标准的加密技术。加密密码,文本,数字,二进制文件...适合集成到基于Spring的应用程序中,开放API,用于任何JCE提供程序...添加如下依赖:com.github.ulisesbocchiojasypt-spring-boot-starter2.1.1Jasypt好处保护我们的系统安全,即使代码泄露,也可以保证数据源的
 SpringBoot怎么集成Redisson实现延迟队列
May 30, 2023 pm 02:40 PM
SpringBoot怎么集成Redisson实现延迟队列
May 30, 2023 pm 02:40 PM
使用场景1、下单成功,30分钟未支付。支付超时,自动取消订单2、订单签收,签收后7天未进行评价。订单超时未评价,系统默认好评3、下单成功,商家5分钟未接单,订单取消4、配送超时,推送短信提醒……对于延时比较长的场景、实时性不高的场景,我们可以采用任务调度的方式定时轮询处理。如:xxl-job今天我们采
 怎么在SpringBoot中使用Redis实现分布式锁
Jun 03, 2023 am 08:16 AM
怎么在SpringBoot中使用Redis实现分布式锁
Jun 03, 2023 am 08:16 AM
一、Redis实现分布式锁原理为什么需要分布式锁在聊分布式锁之前,有必要先解释一下,为什么需要分布式锁。与分布式锁相对就的是单机锁,我们在写多线程程序时,避免同时操作一个共享变量产生数据问题,通常会使用一把锁来互斥以保证共享变量的正确性,其使用范围是在同一个进程中。如果换做是多个进程,需要同时操作一个共享资源,如何互斥呢?现在的业务应用通常是微服务架构,这也意味着一个应用会部署多个进程,多个进程如果需要修改MySQL中的同一行记录,为了避免操作乱序导致脏数据,此时就需要引入分布式锁了。想要实现分
 springboot读取文件打成jar包后访问不到怎么解决
Jun 03, 2023 pm 04:38 PM
springboot读取文件打成jar包后访问不到怎么解决
Jun 03, 2023 pm 04:38 PM
springboot读取文件,打成jar包后访问不到最新开发出现一种情况,springboot打成jar包后读取不到文件,原因是打包之后,文件的虚拟路径是无效的,只能通过流去读取。文件在resources下publicvoidtest(){Listnames=newArrayList();InputStreamReaderread=null;try{ClassPathResourceresource=newClassPathResource("name.txt");Input
 Springboot+Mybatis-plus不使用SQL语句进行多表添加怎么实现
Jun 02, 2023 am 11:07 AM
Springboot+Mybatis-plus不使用SQL语句进行多表添加怎么实现
Jun 02, 2023 am 11:07 AM
在Springboot+Mybatis-plus不使用SQL语句进行多表添加操作我所遇到的问题准备工作在测试环境下模拟思维分解一下:创建出一个带有参数的BrandDTO对象模拟对后台传递参数我所遇到的问题我们都知道,在我们使用Mybatis-plus中进行多表操作是极其困难的,如果你不使用Mybatis-plus-join这一类的工具,你只能去配置对应的Mapper.xml文件,配置又臭又长的ResultMap,然后再去写对应的sql语句,这种方法虽然看上去很麻烦,但具有很高的灵活性,可以让我们
 SpringBoot与SpringMVC的比较及差别分析
Dec 29, 2023 am 11:02 AM
SpringBoot与SpringMVC的比较及差别分析
Dec 29, 2023 am 11:02 AM
SpringBoot和SpringMVC都是Java开发中常用的框架,但它们之间有一些明显的差异。本文将探究这两个框架的特点和用途,并对它们的差异进行比较。首先,我们来了解一下SpringBoot。SpringBoot是由Pivotal团队开发的,它旨在简化基于Spring框架的应用程序的创建和部署。它提供了一种快速、轻量级的方式来构建独立的、可执行
 SpringBoot怎么自定义Redis实现缓存序列化
Jun 03, 2023 am 11:32 AM
SpringBoot怎么自定义Redis实现缓存序列化
Jun 03, 2023 am 11:32 AM
1、自定义RedisTemplate1.1、RedisAPI默认序列化机制基于API的Redis缓存实现是使用RedisTemplate模板进行数据缓存操作的,这里打开RedisTemplate类,查看该类的源码信息publicclassRedisTemplateextendsRedisAccessorimplementsRedisOperations,BeanClassLoaderAware{//声明了key、value的各种序列化方式,初始值为空@NullableprivateRedisSe
