

基于python怎么实现单目三维重建

一、单目三维重建概述
尽管客观世界的物体是三维的,但我们获取的图像为二维,但是我们可以从这些二维图像中感知目标的三维信息。三维重建技术是以一定的方式处理图像进而得到计算机能够识别的三维信息,由此对目标进行分析。而单目三维重建则是根据单个摄像头的运动来模拟双目视觉,从而获得物体在空间中的三维视觉信息,其中,单目即指单个摄像头。
二、实现过程
在对物体进行单目三维重建的过程中,相关运行环境如下:
matplotlib 3.3.4
numpy 1.19.5
opencv-contrib-python 3.4.2.16
opencv-python 3.4.2.16
pillow 8.2.0
python 3.6.2
其重建主要包含以下步骤:
(1)相机的标定
(2)图像特征提取及匹配
(3)三维重建
接下来,我们来详细看下每个步骤的具体实现:
(1)相机的标定
在我们日常生活中有很多相机,如手机上的相机、数码相机及功能模块型相机等等,每一个相机的参数都是不同的,即相机拍出的照片的分辨率、模式等。假设我们在进行物体三维重建的时候,事先并不知道我们相机的矩阵参数,那么,我们就应当计算出相机的矩阵参数,这一个步骤就叫做相机的标定。相机标定的相关原理我就不介绍了,网上很多人都讲解的挺详细的。其标定的具体实现如下:
def camera_calibration(ImagePath):
    # 循环中断
    criteria = (cv2.TERM_CRITERIA_EPS + cv2.TERM_CRITERIA_MAX_ITER, 30, 0.001)
    # 棋盘格尺寸(棋盘格的交叉点的个数)
    row = 11
    column = 8

    objpoint = np.zeros((row * column, 3), np.float32)
    objpoint[:, :2] = np.mgrid[0:row, 0:column].T.reshape(-1, 2)

    objpoints = []  # 3d point in real world space
    imgpoints = []  # 2d points in image plane.

    batch_images = glob.glob(ImagePath + '/*.jpg')
    for i, fname in enumerate(batch_images):
        img = cv2.imread(batch_images[i])
        imgGray = cv2.cvtColor(img, cv2.COLOR_BGR2GRAY)
        # find chess board corners
        ret, corners = cv2.findChessboardCorners(imgGray, (row, column), None)
        # if found, add object points, image points (after refining them)
        if ret:
            objpoints.append(objpoint)
            corners2 = cv2.cornerSubPix(imgGray, corners, (11, 11), (-1, -1), criteria)
            imgpoints.append(corners2)
            # Draw and display the corners
            img = cv2.drawChessboardCorners(img, (row, column), corners2, ret)
            cv2.imwrite('Checkerboard_Image/Temp_JPG/Temp_' + str(i) + '.jpg', img)

    print("成功提取:", len(batch_images), "张图片角点!")
ret, mtx, dist, rvecs, tvecs = cv2.calibrateCamera(objpoints, imgpoints, imgGray.shape[::-1], None, None)其中,cv2.calibrateCamera函数求出的mtx矩阵即为K矩阵。
当修改好相应参数并完成标定后,我们可以输出棋盘格的角点图片来看看是否已成功提取棋盘格的角点,输出角点图如下:

图1:棋盘格角点提取
(2)图像特征提取及匹配
在整个三维重建的过程中,这一步是最为关键的,也是最为复杂的一步,图片特征提取的好坏决定了你最后的重建效果。
在图片特征点提取算法中,有三种算法较为常用,分别为:SIFT算法、SURF算法以及ORB算法。通过综合分析对比,我们在这一步中采取SURF算法来对图片的特征点进行提取。三种算法的特征点提取效果对比如果大家感兴趣可以去网上搜来看下,在此就不逐一对比了。具体实现如下:
def epipolar_geometric(Images_Path, K):
    IMG = glob.glob(Images_Path)
    img1, img2 = cv2.imread(IMG[0]), cv2.imread(IMG[1])
    img1_gray = cv2.cvtColor(img1, cv2.COLOR_BGR2GRAY)
    img2_gray = cv2.cvtColor(img2, cv2.COLOR_BGR2GRAY)

    # Initiate SURF detector
    SURF = cv2.xfeatures2d_SURF.create()

    # compute keypoint & descriptions
    keypoint1, descriptor1 = SURF.detectAndCompute(img1_gray, None)
    keypoint2, descriptor2 = SURF.detectAndCompute(img2_gray, None)
    print("角点数量:", len(keypoint1), len(keypoint2))

    # Find point matches
    bf = cv2.BFMatcher(cv2.NORM_L2, crossCheck=True)
    matches = bf.match(descriptor1, descriptor2)
    print("匹配点数量:", len(matches))

    src_pts = np.asarray([keypoint1[m.queryIdx].pt for m in matches])
    dst_pts = np.asarray([keypoint2[m.trainIdx].pt for m in matches])
    # plot
    knn_image = cv2.drawMatches(img1_gray, keypoint1, img2_gray, keypoint2, matches[:-1], None, flags=2)
    image_ = Image.fromarray(np.uint8(knn_image))
    image_.save("MatchesImage.jpg")

    # Constrain matches to fit homography
    retval, mask = cv2.findHomography(src_pts, dst_pts, cv2.RANSAC, 100.0)

    # We select only inlier points
    points1 = src_pts[mask.ravel() == 1]
points2 = dst_pts[mask.ravel() == 1]找到的特征点如下:
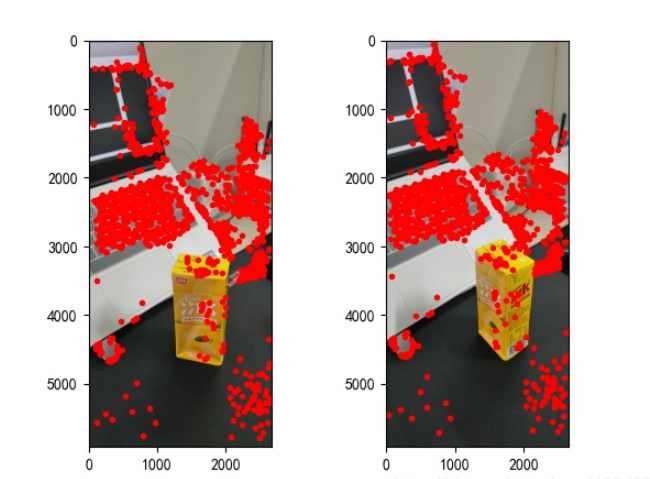
图2:特征点提取
(3)三维重建
我们找到图片的特征点并相互匹配后,则可以开始进行三维重建了,具体实现如下:
points1 = cart2hom(points1.T)
points2 = cart2hom(points2.T)
# plot
fig, ax = plt.subplots(1, 2)
ax[0].autoscale_view('tight')
ax[0].imshow(cv2.cvtColor(img1, cv2.COLOR_BGR2RGB))
ax[0].plot(points1[0], points1[1], 'r.')
ax[1].autoscale_view('tight')
ax[1].imshow(cv2.cvtColor(img2, cv2.COLOR_BGR2RGB))
ax[1].plot(points2[0], points2[1], 'r.')
plt.savefig('MatchesPoints.jpg')
fig.show()
#

points1n = np.dot(np.linalg.inv(K), points1)
points2n = np.dot(np.linalg.inv(K), points2)
E = compute_essential_normalized(points1n, points2n)
print('Computed essential matrix:', (-E / E[0][1]))

P1 = np.array([[1, 0, 0, 0], [0, 1, 0, 0], [0, 0, 1, 0]])
P2s = compute_P_from_essential(E)

ind = -1
for i, P2 in enumerate(P2s):
    # Find the correct camera parameters
    d1 = reconstruct_one_point(points1n[:, 0], points2n[:, 0], P1, P2)
    # Convert P2 from camera view to world view
    P2_homogenous = np.linalg.inv(np.vstack([P2, [0, 0, 0, 1]]))
    d2 = np.dot(P2_homogenous[:3, :4], d1)
    if d1[2] > 0 and d2[2] > 0:
        ind = i

P2 = np.linalg.inv(np.vstack([P2s[ind], [0, 0, 0, 1]]))[:3, :4]
Points3D = linear_triangulation(points1n, points2n, P1, P2)

fig = plt.figure()
fig.suptitle('3D reconstructed', fontsize=16)
ax = fig.gca(projection='3d')
ax.plot(Points3D[0], Points3D[1], Points3D[2], 'b.')
ax.set_xlabel('x axis')
ax.set_ylabel('y axis')
ax.set_zlabel('z axis')
ax.view_init(elev=135, azim=90)
plt.savefig('Reconstruction.jpg')
plt.show()其重建效果如下(效果一般):
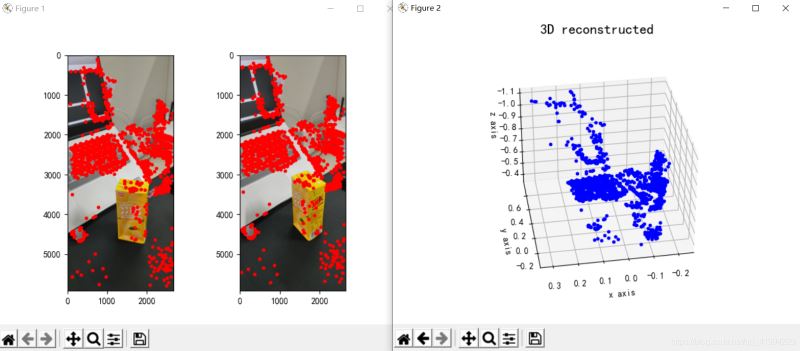
图3:三维重建
三、结论
从重建的结果来看,单目三维重建效果一般,我认为可能与这几方面因素有关:
(1)图片拍摄形式。如果是进行单目三维重建任务,在拍摄图片时最好保持平行移动相机,且最好正面拍摄,即不要斜着拍或特异角度进行拍摄;
(2)拍摄时周边环境干扰。选取拍摄的地点最好保持单一,减少无关物体的干扰;
(3)拍摄光源问题。选取的拍照场地要保证合适的亮度(具体情况要试才知道你们的光源是否达标),还有就是移动相机的时候也要保证前一时刻和此时刻的光源一致性。
事实上,单目三维重建的表现通常较差,即使在各方面条件都最佳的情况下,所得到的重建效果也不十分出色。或者我们可以考虑采用双目三维重建,双目三维重建效果肯定是要比单目的效果好的,在实现是也就麻烦一(亿)点点,哈哈。其实操作并不复杂,最麻烦的部分是要拍摄和标定两个相机,其他方面都相对容易。
四、代码
import cv2
import json
import numpy as np
import glob
from PIL import Image
import matplotlib.pyplot as plt
plt.rcParams['font.sans-serif'] = ['SimHei']
plt.rcParams['axes.unicode_minus'] = False


def cart2hom(arr):
    """ Convert catesian to homogenous points by appending a row of 1s
    :param arr: array of shape (num_dimension x num_points)
    :returns: array of shape ((num_dimension+1) x num_points)
    """
    if arr.ndim == 1:
        return np.hstack([arr, 1])
    return np.asarray(np.vstack([arr, np.ones(arr.shape[1])]))


def compute_P_from_essential(E):
    """ Compute the second camera matrix (assuming P1 = [I 0])
        from an essential matrix. E = [t]R
    :returns: list of 4 possible camera matrices.
    """
    U, S, V = np.linalg.svd(E)

    # Ensure rotation matrix are right-handed with positive determinant
    if np.linalg.det(np.dot(U, V)) < 0:
        V = -V

    # create 4 possible camera matrices (Hartley p 258)
    W = np.array([[0, -1, 0], [1, 0, 0], [0, 0, 1]])
    P2s = [np.vstack((np.dot(U, np.dot(W, V)).T, U[:, 2])).T,
           np.vstack((np.dot(U, np.dot(W, V)).T, -U[:, 2])).T,
           np.vstack((np.dot(U, np.dot(W.T, V)).T, U[:, 2])).T,
           np.vstack((np.dot(U, np.dot(W.T, V)).T, -U[:, 2])).T]

    return P2s


def correspondence_matrix(p1, p2):
    p1x, p1y = p1[:2]
    p2x, p2y = p2[:2]

    return np.array([
        p1x * p2x, p1x * p2y, p1x,
        p1y * p2x, p1y * p2y, p1y,
        p2x, p2y, np.ones(len(p1x))
    ]).T

    return np.array([
        p2x * p1x, p2x * p1y, p2x,
        p2y * p1x, p2y * p1y, p2y,
        p1x, p1y, np.ones(len(p1x))
    ]).T


def scale_and_translate_points(points):
    """ Scale and translate image points so that centroid of the points
        are at the origin and avg distance to the origin is equal to sqrt(2).
    :param points: array of homogenous point (3 x n)
    :returns: array of same input shape and its normalization matrix
    """
    x = points[0]
    y = points[1]
    center = points.mean(axis=1)  # mean of each row
    cx = x - center[0]  # center the points
    cy = y - center[1]
    dist = np.sqrt(np.power(cx, 2) + np.power(cy, 2))
    scale = np.sqrt(2) / dist.mean()
    norm3d = np.array([
        [scale, 0, -scale * center[0]],
        [0, scale, -scale * center[1]],
        [0, 0, 1]
    ])

    return np.dot(norm3d, points), norm3d


def compute_image_to_image_matrix(x1, x2, compute_essential=False):
    """ Compute the fundamental or essential matrix from corresponding points
        (x1, x2 3*n arrays) using the 8 point algorithm.
        Each row in the A matrix below is constructed as
        [x'*x, x'*y, x', y'*x, y'*y, y', x, y, 1]
    """
    A = correspondence_matrix(x1, x2)
    # compute linear least square solution
    U, S, V = np.linalg.svd(A)
    F = V[-1].reshape(3, 3)

    # constrain F. Make rank 2 by zeroing out last singular value
    U, S, V = np.linalg.svd(F)
    S[-1] = 0
    if compute_essential:
        S = [1, 1, 0]  # Force rank 2 and equal eigenvalues
    F = np.dot(U, np.dot(np.diag(S), V))

    return F


def compute_normalized_image_to_image_matrix(p1, p2, compute_essential=False):
    """ Computes the fundamental or essential matrix from corresponding points
        using the normalized 8 point algorithm.
    :input p1, p2: corresponding points with shape 3 x n
    :returns: fundamental or essential matrix with shape 3 x 3
    """
    n = p1.shape[1]
    if p2.shape[1] != n:
        raise ValueError('Number of points do not match.')

    # preprocess image coordinates
    p1n, T1 = scale_and_translate_points(p1)
    p2n, T2 = scale_and_translate_points(p2)

    # compute F or E with the coordinates
    F = compute_image_to_image_matrix(p1n, p2n, compute_essential)

    # reverse preprocessing of coordinates
    # We know that P1' E P2 = 0
    F = np.dot(T1.T, np.dot(F, T2))

    return F / F[2, 2]


def compute_fundamental_normalized(p1, p2):
    return compute_normalized_image_to_image_matrix(p1, p2)


def compute_essential_normalized(p1, p2):
    return compute_normalized_image_to_image_matrix(p1, p2, compute_essential=True)


def skew(x):
    """ Create a skew symmetric matrix *A* from a 3d vector *x*.
        Property: np.cross(A, v) == np.dot(x, v)
    :param x: 3d vector
    :returns: 3 x 3 skew symmetric matrix from *x*
    """
    return np.array([
        [0, -x[2], x[1]],
        [x[2], 0, -x[0]],
        [-x[1], x[0], 0]
    ])


def reconstruct_one_point(pt1, pt2, m1, m2):
    """
        pt1 and m1 * X are parallel and cross product = 0
        pt1 x m1 * X  =  pt2 x m2 * X  =  0
    """
    A = np.vstack([
        np.dot(skew(pt1), m1),
        np.dot(skew(pt2), m2)
    ])
    U, S, V = np.linalg.svd(A)
    P = np.ravel(V[-1, :4])

    return P / P[3]


def linear_triangulation(p1, p2, m1, m2):
    """
    Linear triangulation (Hartley ch 12.2 pg 312) to find the 3D point X
    where p1 = m1 * X and p2 = m2 * X. Solve AX = 0.
    :param p1, p2: 2D points in homo. or catesian coordinates. Shape (3 x n)
    :param m1, m2: Camera matrices associated with p1 and p2. Shape (3 x 4)
    :returns: 4 x n homogenous 3d triangulated points
    """
    num_points = p1.shape[1]
    res = np.ones((4, num_points))

    for i in range(num_points):
        A = np.asarray([
            (p1[0, i] * m1[2, :] - m1[0, :]),
            (p1[1, i] * m1[2, :] - m1[1, :]),
            (p2[0, i] * m2[2, :] - m2[0, :]),
            (p2[1, i] * m2[2, :] - m2[1, :])
        ])

        _, _, V = np.linalg.svd(A)
        X = V[-1, :4]
        res[:, i] = X / X[3]

    return res


def writetofile(dict, path):
    for index, item in enumerate(dict):
        dict[item] = np.array(dict[item])
        dict[item] = dict[item].tolist()
    js = json.dumps(dict)
    with open(path, 'w') as f:
        f.write(js)
        print("参数已成功保存到文件")


def readfromfile(path):
    with open(path, 'r') as f:
        js = f.read()
        mydict = json.loads(js)
    print("参数读取成功")
    return mydict


def camera_calibration(SaveParamPath, ImagePath):
    # 循环中断
    criteria = (cv2.TERM_CRITERIA_EPS + cv2.TERM_CRITERIA_MAX_ITER, 30, 0.001)
    # 棋盘格尺寸
    row = 11
    column = 8
    objpoint = np.zeros((row * column, 3), np.float32)
    objpoint[:, :2] = np.mgrid[0:row, 0:column].T.reshape(-1, 2)

    objpoints = []  # 3d point in real world space
    imgpoints = []  # 2d points in image plane.
    batch_images = glob.glob(ImagePath + '/*.jpg')
    for i, fname in enumerate(batch_images):
        img = cv2.imread(batch_images[i])
        imgGray = cv2.cvtColor(img, cv2.COLOR_BGR2GRAY)
        # find chess board corners
        ret, corners = cv2.findChessboardCorners(imgGray, (row, column), None)
        # if found, add object points, image points (after refining them)
        if ret:
            objpoints.append(objpoint)
            corners2 = cv2.cornerSubPix(imgGray, corners, (11, 11), (-1, -1), criteria)
            imgpoints.append(corners2)
            # Draw and display the corners
            img = cv2.drawChessboardCorners(img, (row, column), corners2, ret)
            cv2.imwrite('Checkerboard_Image/Temp_JPG/Temp_' + str(i) + '.jpg', img)
    print("成功提取:", len(batch_images), "张图片角点!")
    ret, mtx, dist, rvecs, tvecs = cv2.calibrateCamera(objpoints, imgpoints, imgGray.shape[::-1], None, None)
    dict = {'ret': ret, 'mtx': mtx, 'dist': dist, 'rvecs': rvecs, 'tvecs': tvecs}
    writetofile(dict, SaveParamPath)

    meanError = 0
    for i in range(len(objpoints)):
        imgpoints2, _ = cv2.projectPoints(objpoints[i], rvecs[i], tvecs[i], mtx, dist)
        error = cv2.norm(imgpoints[i], imgpoints2, cv2.NORM_L2) / len(imgpoints2)
        meanError += error
    print("total error: ", meanError / len(objpoints))


def epipolar_geometric(Images_Path, K):
    IMG = glob.glob(Images_Path)
    img1, img2 = cv2.imread(IMG[0]), cv2.imread(IMG[1])
    img1_gray = cv2.cvtColor(img1, cv2.COLOR_BGR2GRAY)
    img2_gray = cv2.cvtColor(img2, cv2.COLOR_BGR2GRAY)

    # Initiate SURF detector
    SURF = cv2.xfeatures2d_SURF.create()

    # compute keypoint & descriptions
    keypoint1, descriptor1 = SURF.detectAndCompute(img1_gray, None)
    keypoint2, descriptor2 = SURF.detectAndCompute(img2_gray, None)
    print("角点数量:", len(keypoint1), len(keypoint2))

    # Find point matches
    bf = cv2.BFMatcher(cv2.NORM_L2, crossCheck=True)
    matches = bf.match(descriptor1, descriptor2)
    print("匹配点数量:", len(matches))

    src_pts = np.asarray([keypoint1[m.queryIdx].pt for m in matches])
    dst_pts = np.asarray([keypoint2[m.trainIdx].pt for m in matches])
    # plot
    knn_image = cv2.drawMatches(img1_gray, keypoint1, img2_gray, keypoint2, matches[:-1], None, flags=2)
    image_ = Image.fromarray(np.uint8(knn_image))
    image_.save("MatchesImage.jpg")

    # Constrain matches to fit homography
    retval, mask = cv2.findHomography(src_pts, dst_pts, cv2.RANSAC, 100.0)

    # We select only inlier points
    points1 = src_pts[mask.ravel() == 1]
    points2 = dst_pts[mask.ravel() == 1]

    points1 = cart2hom(points1.T)
    points2 = cart2hom(points2.T)
    # plot
    fig, ax = plt.subplots(1, 2)
    ax[0].autoscale_view('tight')
    ax[0].imshow(cv2.cvtColor(img1, cv2.COLOR_BGR2RGB))
    ax[0].plot(points1[0], points1[1], 'r.')
    ax[1].autoscale_view('tight')
    ax[1].imshow(cv2.cvtColor(img2, cv2.COLOR_BGR2RGB))
    ax[1].plot(points2[0], points2[1], 'r.')
    plt.savefig('MatchesPoints.jpg')
    fig.show()
    #

    points1n = np.dot(np.linalg.inv(K), points1)
    points2n = np.dot(np.linalg.inv(K), points2)
    E = compute_essential_normalized(points1n, points2n)
    print('Computed essential matrix:', (-E / E[0][1]))

    P1 = np.array([[1, 0, 0, 0], [0, 1, 0, 0], [0, 0, 1, 0]])
    P2s = compute_P_from_essential(E)

    ind = -1
    for i, P2 in enumerate(P2s):
        # Find the correct camera parameters
        d1 = reconstruct_one_point(points1n[:, 0], points2n[:, 0], P1, P2)
        # Convert P2 from camera view to world view
        P2_homogenous = np.linalg.inv(np.vstack([P2, [0, 0, 0, 1]]))
        d2 = np.dot(P2_homogenous[:3, :4], d1)
        if d1[2] > 0 and d2[2] > 0:
            ind = i

    P2 = np.linalg.inv(np.vstack([P2s[ind], [0, 0, 0, 1]]))[:3, :4]
    Points3D = linear_triangulation(points1n, points2n, P1, P2)

    return Points3D


def main():
    CameraParam_Path = 'CameraParam.txt'
    CheckerboardImage_Path = 'Checkerboard_Image'
    Images_Path = 'SubstitutionCalibration_Image/*.jpg'

    # 计算相机参数
    camera_calibration(CameraParam_Path, CheckerboardImage_Path)
    # 读取相机参数
    config = readfromfile(CameraParam_Path)
    K = np.array(config['mtx'])
    # 计算3D点
    Points3D = epipolar_geometric(Images_Path, K)
    # 重建3D点
    fig = plt.figure()
    fig.suptitle('3D reconstructed', fontsize=16)
    ax = fig.gca(projection='3d')
    ax.plot(Points3D[0], Points3D[1], Points3D[2], 'b.')
    ax.set_xlabel('x axis')
    ax.set_ylabel('y axis')
    ax.set_zlabel('z axis')
    ax.view_init(elev=135, azim=90)
    plt.savefig('Reconstruction.jpg')
    plt.show()


if __name__ == '__main__':
main()以上是基于python怎么实现单目三维重建的详细内容。更多信息请关注PHP中文网其他相关文章!

热AI工具

Undresser.AI Undress
人工智能驱动的应用程序,用于创建逼真的裸体照片

AI Clothes Remover
用于从照片中去除衣服的在线人工智能工具。

Undress AI Tool
免费脱衣服图片

Clothoff.io
AI脱衣机

AI Hentai Generator
免费生成ai无尽的。

热门文章
热工具

记事本++7.3.1
好用且免费的代码编辑器

SublimeText3汉化版
中文版,非常好用

禅工作室 13.0.1
功能强大的PHP集成开发环境

Dreamweaver CS6
视觉化网页开发工具

SublimeText3 Mac版
神级代码编辑软件(SublimeText3)
热门话题


 PS一直显示正在载入是什么原因?
Apr 06, 2025 pm 06:39 PM
PS一直显示正在载入是什么原因?
Apr 06, 2025 pm 06:39 PM
PS“正在载入”问题是由资源访问或处理问题引起的:硬盘读取速度慢或有坏道:使用CrystalDiskInfo检查硬盘健康状况并更换有问题的硬盘。内存不足:升级内存以满足PS对高分辨率图片和复杂图层处理的需求。显卡驱动程序过时或损坏:更新驱动程序以优化PS和显卡之间的通信。文件路径过长或文件名有特殊字符:使用简短的路径和避免使用特殊字符。PS自身问题:重新安装或修复PS安装程序。
 PS启动时一直显示正在载入如何解决?
Apr 06, 2025 pm 06:36 PM
PS启动时一直显示正在载入如何解决?
Apr 06, 2025 pm 06:36 PM
PS启动时卡在“正在载入”可能是由于各种原因造成的:禁用损坏或冲突的插件。删除或重命名损坏的配置文件。关闭不必要的程序或升级内存,避免内存不足。升级到固态硬盘,加快硬盘读取速度。重装PS修复损坏的系统文件或安装包问题。查看错误日志分析启动过程中的错误信息。
 PS打开文件时一直显示正在载入如何解决?
Apr 06, 2025 pm 06:33 PM
PS打开文件时一直显示正在载入如何解决?
Apr 06, 2025 pm 06:33 PM
PS打开文件时出现“正在载入”卡顿,原因可能包括:文件过大或损坏、内存不足、硬盘速度慢、显卡驱动问题、PS版本或插件冲突。解决方法依次为:检查文件大小和完整性、增加内存、升级硬盘、更新显卡驱动、卸载或禁用可疑插件、重装PS。通过逐步排查,并善用PS的性能设置,养成良好的文件管理习惯,可以有效解决该问题。
 PS执行操作时一直显示正在载入如何解决?
Apr 06, 2025 pm 06:30 PM
PS执行操作时一直显示正在载入如何解决?
Apr 06, 2025 pm 06:30 PM
PS卡在“正在载入”?解决方法包括:检查电脑配置(内存、硬盘、处理器)、清理硬盘碎片、更新显卡驱动、调整PS设置、重新安装PS,以及养成良好的编程习惯。
 mysql安装后怎么使用
Apr 08, 2025 am 11:48 AM
mysql安装后怎么使用
Apr 08, 2025 am 11:48 AM
文章介绍了MySQL数据库的上手操作。首先,需安装MySQL客户端,如MySQLWorkbench或命令行客户端。1.使用mysql-uroot-p命令连接服务器,并使用root账户密码登录;2.使用CREATEDATABASE创建数据库,USE选择数据库;3.使用CREATETABLE创建表,定义字段及数据类型;4.使用INSERTINTO插入数据,SELECT查询数据,UPDATE更新数据,DELETE删除数据。熟练掌握这些步骤,并学习处理常见问题和优化数据库性能,才能高效使用MySQL。
 PS羽化如何控制过渡的柔和度?
Apr 06, 2025 pm 07:33 PM
PS羽化如何控制过渡的柔和度?
Apr 06, 2025 pm 07:33 PM
羽化控制的关键在于理解其渐变本质。PS本身不提供直接控制渐变曲线的选项,但你可以通过多次羽化、配合蒙版、精细选区,灵活调整半径和渐变柔和度,实现自然过渡效果。
 mysql安装后怎么优化数据库性能
Apr 08, 2025 am 11:36 AM
mysql安装后怎么优化数据库性能
Apr 08, 2025 am 11:36 AM
MySQL性能优化需从安装配置、索引及查询优化、监控与调优三个方面入手。1.安装后需根据服务器配置调整my.cnf文件,例如innodb_buffer_pool_size参数,并关闭query_cache_size;2.创建合适的索引,避免索引过多,并优化查询语句,例如使用EXPLAIN命令分析执行计划;3.利用MySQL自带监控工具(SHOWPROCESSLIST,SHOWSTATUS)监控数据库运行状况,定期备份和整理数据库。通过这些步骤,持续优化,才能提升MySQL数据库性能。
 PS卡在载入界面怎么办?
Apr 06, 2025 pm 06:54 PM
PS卡在载入界面怎么办?
Apr 06, 2025 pm 06:54 PM
PS卡在载入界面可能是由软件自身(文件损坏或插件冲突)、系统环境(驱动过时或系统文件损坏)或硬件(硬盘损坏或内存条故障)问题造成的。首先检查计算机资源是否充足,关闭后台程序释放内存和CPU资源。修复PS安装或检查插件是否存在兼容性问题。更新或回退PS版本。检查显卡驱动并更新,运行系统文件检查。若排除上述问题,则可以尝试硬盘检测和内存测试。
