

CentOS 7中怎么使用cPanel配置Nginx反向代理

cPanel是当前世上功能最强大,最容易使用,最受用户欢迎的虚拟主机控制系统,很多国外主机主机都使用这套控制面板。

首先,我们需要安装 EPEL 库来启动这个进程
第一步: 安装 EPEL 库
root@server1 [/usr]# yum -y install epel-releaseLoaded plugins: fastestmirror, tsflags, universal-hooks
Loading mirror speeds from cached hostfile
* EA4: 66.23.237.210
* base: mirrors.linode.com
* extras: mirrors.linode.com
* updates: mirrors.linode.com
Resolving Dependencies
--> Running transaction check
---> Package epel-release.noarch 0:7-5 will be installed
--> Finished Dependency Resolution

Dependencies Resolved

========================================================================================
   Package Arch Version Repository Size
========================================================================================
Installing:
epel-release noarch 7-5 extras 14 k
第二步: 安装 nDeploy 的 CentOS RPM 库
可以安装 nDeploy 的 CentOS RPM 库来安装我们所需的 nDeploy Web 类软件和 Nginx 插件
root@server1 [/usr]# yum -y install http://rpm.piserve.com/nDeploy-release-centos-1.0-1.noarch.rpmLoaded plugins: fastestmirror, tsflags, universal-hooks
nDeploy-release-centos-1.0-1.noarch.rpm | 1.7 kB 00:00:00
Examining /var/tmp/yum-root-ei5tWJ/nDeploy-release-centos-1.0-1.noarch.rpm: nDeploy-release-centos-1.0-1.noarch
Marking /var/tmp/yum-root-ei5tWJ/nDeploy-release-centos-1.0-1.noarch.rpm to be installed
Resolving Dependencies
--> Running transaction check
---> Package nDeploy-release-centos.noarch 0:1.0-1 will be installed
--> Finished Dependency Resolution

Dependencies Resolved

========================================================================================
Package Arch Version Repository Size
========================================================================================
Installing:
nDeploy-release-centos noarch 1.0-1 /nDeploy-release-centos-1.0-1.noarch 110
第三步:安装 nDeploy 和 Nginx nDeploy 插件
root@server1 [/usr]# yum --enablerepo=ndeploy install nginx-nDeploy nDeployLoaded plugins: fastestmirror, tsflags, universal-hooks
epel/x86_64/metalink | 9.9 kB 00:00:00
epel | 4.3 kB 00:00:00
ndeploy | 2.9 kB 00:00:00
(1/4): ndeploy/7/x86_64/primary_db | 14 kB 00:00:00
(2/4): epel/x86_64/group_gz | 169 kB 00:00:00
(3/4): epel/x86_64/primary_db | 3.7 MB 00:00:02

Dependencies Resolved

========================================================================================
Package Arch Version Repository Size
========================================================================================
Installing:
nDeploy noarch 2.0-11.el7 ndeploy 80 k
nginx-nDeploy x86_64 1.8.0-34.el7 ndeploy 36 M
Installing for dependencies:
PyYAML x86_64 3.10-11.el7 base 153 k
libevent x86_64 2.0.21-4.el7 base 214 k
memcached x86_64 1.4.15-9.el7 base 84 k
python-inotify noarch 0.9.4-4.el7 base 49 k
python-lxml x86_64 3.2.1-4.el7 base 758 k

Transaction Summary
========================================================================================
Install 2 Packages (+5 Dependent packages)
我们在自己的服务器上安装了 Nginx 插件,按照以上步骤完成了安装。现在我们可以配置 Nginx 作为反向代理和为已有的 cPanel 用户账户创建虚拟主机,为此我们可以运行如下脚本。
第四步:启动 Nginx 作为默认的前端 Web 服务器,并创建默认的配置文件
root@server1 [/usr]# /opt/nDeploy/scripts/cpanel-nDeploy-setup.sh enableModifying apache http and https port in cpanel

httpd restarted successfully.
Created symlink from /etc/systemd/system/multi-user.target.wants/nginx.service to /usr/lib/systemd/system/nginx.service.
Created symlink from /etc/systemd/system/multi-user.target.wants/ndeploy_watcher.service to /usr/lib/systemd/system/ndeploy_watcher.service.
Created symlink from /etc/systemd/system/multi-user.target.wants/ndeploy_backends.service to /usr/lib/systemd/system/ndeploy_backends.service.
ConfGen:: saheetha
ConfGen:: satest
你可以看到这个脚本将修改 Apache 的端口从 80 到另一个端口来让 Nginx 作为前端 Web 服务器,并为现有的 cPanel 用户创建虚拟主机配置文件。一旦完成,确认 Apache 和 Nginx 的状态。
Apache 状态:
root@server1 [/var/run/httpd]# systemctl status httpd● httpd.service - Apache Web Server
Loaded: loaded (/usr/lib/systemd/system/httpd.service; enabled; vendor preset: disabled)
Active: active (running) since Mon 2016-01-18 06:34:23 UTC; 12s ago
Process: 25606 ExecStart=/usr/sbin/apachectl start (code=exited, status=0/SUCCESS)
Main PID: 24760 (httpd)
CGroup: /system.slice/httpd.service
‣ 24760 /usr/local/apache/bin/httpd -k start

Jan 18 06:34:23 server1.centos7-test.com systemd[1]: Starting Apache Web Server...
Jan 18 06:34:23 server1.centos7-test.com apachectl[25606]: httpd (pid 24760) already running
Jan 18 06:34:23 server1.centos7-test.com systemd[1]: Started Apache Web Server.
Nginx 状态:
root@server1 [~]# systemctl status nginx● nginx.service - nginx-nDeploy - high performance web server
Loaded: loaded (/usr/lib/systemd/system/nginx.service; enabled; vendor preset: disabled)
Active: active (running) since Sun 2016-01-17 17:18:29 UTC; 13h ago
Docs: http://nginx.org/en/docs/
Main PID: 3833 (nginx)
CGroup: /system.slice/nginx.service
├─ 3833 nginx: master process /usr/sbin/nginx -c /etc/nginx/nginx.conf
├─25473 nginx: worker process
├─25474 nginx: worker process
└─25475 nginx: cache manager process

Jan 17 17:18:29 server1.centos7-test.com systemd[1]: Starting nginx-nDeploy - high performance web server...
Jan 17 17:18:29 server1.centos7-test.com nginx[3804]: nginx: the configuration file /etc/nginx/nginx.conf syntax is ok
Jan 17 17:18:29 server1.centos7-test.com nginx[3804]: nginx: configuration file /etc/nginx/nginx.conf test is successful
Jan 17 17:18:29 server1.centos7-test.com systemd[1]: Started nginx-nDeploy - high performance web server.
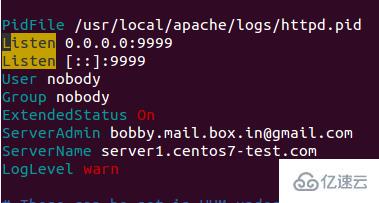
Nginx 作为前端服务器运行在 80 端口,Apache 配置被更改为监听 http 端口 9999 和 https 端口 4430。请看他们的情况:
root@server1 [/usr/local/src]# netstat -plan | grep httpdtcp 0 0 0.0.0.0:4430 0.0.0.0:* LISTEN 17270/httpd
tcp 0 0 0.0.0.0:9999 0.0.0.0:* LISTEN 17270/httpd
tcp6 0 0 :::4430 :::* LISTEN 17270/httpd
tcp6 0 0 :::9999 :::* LISTEN 17270/httpd
root@server1 [/usr/local/src]# netstat -plan | grep nginxtcp 0 0 127.0.0.1:80 0.0.0.0:* LISTEN 17802/nginx: master
tcp 0 0 45.79.183.73:80 0.0.0.0:* LISTEN 17802/nginx: master
为已有用户创建的虚拟主机的配置文件在 “/etc/nginx/sites-enabled”。 这个文件路径包含了 Nginx 主要配置文件。
root@server1 [/etc/nginx/sites-enabled]# ll | grep .conf-rw-r--r-- 1 root root 311 Jan 17 09:02 saheetha.com.conf-rw-r--r-- 1 root root 336 Jan 17 09:02 saheethastest.com.conf
一个域名的示例虚拟主机:
server {

listen 45.79.183.73:80;#CPIPVSIX:80;# ServerNamesserver_name saheetha.com www.saheetha.com;
access_log /usr/local/apache/domlogs/saheetha.com main;
access_log /usr/local/apache/domlogs/saheetha.com-bytes_log bytes_log;

include /etc/nginx/sites-enabled/saheetha.com.include;
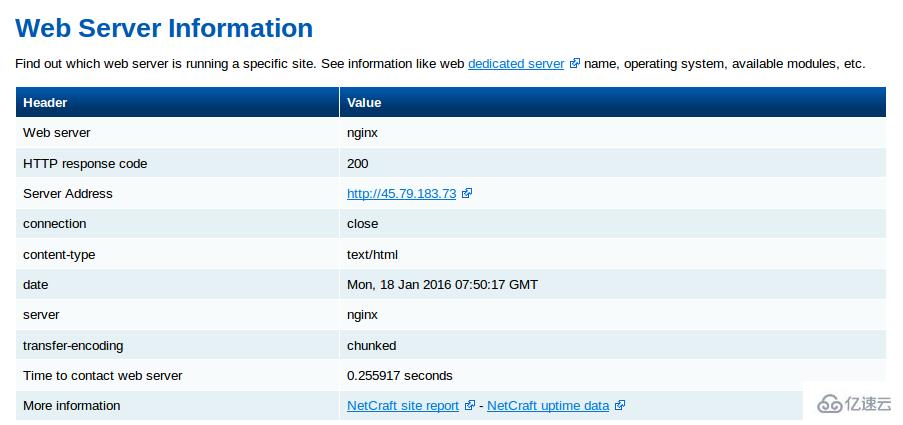
}我们可以启动浏览器查看网站来确定 Web 服务器的工作状态。安装后,请阅读服务器上的 web 服务信息。
root@server1 [/home]# ip a | grep -i eth03: eth0:  mtu 1500 qdisc pfifo_fast state UP qlen 1000
inet 45.79.183.73/24 brd 45.79.183.255 scope global dynamic eth0
root@server1 [/home]# nginx -vnginx version: nginx/1.8.0
对该句话进行重写,可得到:对于在 cPanel 中新创建的所有账户,Nginx 将会为它们创建虚拟主机。通过这些简单的的步骤,我们能够在一台 CentOS 7 / cPanel 的服务器上配置 Nginx 作为反向代理。
Nginx 作为反向代理的优势
便于安装和配置。
效率高、性能好。
防止 Ddos 攻击。
支持使用 .htaccess 作为 PHP 的重写规则。
以上是CentOS 7中怎么使用cPanel配置Nginx反向代理的详细内容。更多信息请关注PHP中文网其他相关文章!

热AI工具

Undresser.AI Undress
人工智能驱动的应用程序,用于创建逼真的裸体照片

AI Clothes Remover
用于从照片中去除衣服的在线人工智能工具。

Undress AI Tool
免费脱衣服图片

Clothoff.io
AI脱衣机

Video Face Swap
使用我们完全免费的人工智能换脸工具轻松在任何视频中换脸!

热门文章
热工具

记事本++7.3.1
好用且免费的代码编辑器

SublimeText3汉化版
中文版,非常好用

禅工作室 13.0.1
功能强大的PHP集成开发环境

Dreamweaver CS6
视觉化网页开发工具

SublimeText3 Mac版
神级代码编辑软件(SublimeText3)


 怎样优化CentOS HDFS配置
Apr 14, 2025 pm 07:15 PM
怎样优化CentOS HDFS配置
Apr 14, 2025 pm 07:15 PM
提升CentOS上HDFS性能:全方位优化指南优化CentOS上的HDFS(Hadoop分布式文件系统)需要综合考虑硬件、系统配置和网络设置等多个方面。本文提供一系列优化策略,助您提升HDFS性能。一、硬件升级与选型资源扩容:尽可能增加服务器的CPU、内存和存储容量。高性能硬件:采用高性能网卡和交换机,提升网络吞吐量。二、系统配置精调内核参数调整:修改/etc/sysctl.conf文件,优化TCP连接数、文件句柄数和内存管理等内核参数。例如,调整TCP连接状态和缓冲区大小
 docker容器名称怎么查
Apr 15, 2025 pm 12:21 PM
docker容器名称怎么查
Apr 15, 2025 pm 12:21 PM
可以通过以下步骤查询 Docker 容器名称:列出所有容器(docker ps)。筛选容器列表(使用 grep 命令)。获取容器名称(位于 "NAMES" 列中)。
 Centos停止维护2024
Apr 14, 2025 pm 08:39 PM
Centos停止维护2024
Apr 14, 2025 pm 08:39 PM
CentOS将于2024年停止维护,原因是其上游发行版RHEL 8已停止维护。该停更将影响CentOS 8系统,使其无法继续接收更新。用户应规划迁移,建议选项包括CentOS Stream、AlmaLinux和Rocky Linux,以保持系统安全和稳定。
 centos关机命令行
Apr 14, 2025 pm 09:12 PM
centos关机命令行
Apr 14, 2025 pm 09:12 PM
CentOS 关机命令为 shutdown,语法为 shutdown [选项] 时间 [信息]。选项包括:-h 立即停止系统;-P 关机后关电源;-r 重新启动;-t 等待时间。时间可指定为立即 (now)、分钟数 ( minutes) 或特定时间 (hh:mm)。可添加信息在系统消息中显示。
 docker怎么启动容器
Apr 15, 2025 pm 12:27 PM
docker怎么启动容器
Apr 15, 2025 pm 12:27 PM
Docker 容器启动步骤:拉取容器镜像:运行 "docker pull [镜像名称]"。创建容器:使用 "docker create [选项] [镜像名称] [命令和参数]"。启动容器:执行 "docker start [容器名称或 ID]"。检查容器状态:通过 "docker ps" 验证容器是否正在运行。
 如何检查CentOS HDFS配置
Apr 14, 2025 pm 07:21 PM
如何检查CentOS HDFS配置
Apr 14, 2025 pm 07:21 PM
检查CentOS系统中HDFS配置的完整指南本文将指导您如何有效地检查CentOS系统上HDFS的配置和运行状态。以下步骤将帮助您全面了解HDFS的设置和运行情况。验证Hadoop环境变量:首先,确认Hadoop环境变量已正确设置。在终端执行以下命令,验证Hadoop是否已正确安装并配置:hadoopversion检查HDFS配置文件:HDFS的核心配置文件位于/etc/hadoop/conf/目录下,其中core-site.xml和hdfs-site.xml至关重要。使用
 centos安装mysql
Apr 14, 2025 pm 08:09 PM
centos安装mysql
Apr 14, 2025 pm 08:09 PM
在 CentOS 上安装 MySQL 涉及以下步骤:添加合适的 MySQL yum 源。执行 yum install mysql-server 命令以安装 MySQL 服务器。使用 mysql_secure_installation 命令进行安全设置,例如设置 root 用户密码。根据需要自定义 MySQL 配置文件。调整 MySQL 参数和优化数据库以提升性能。
 centos配置ip地址
Apr 14, 2025 pm 09:06 PM
centos配置ip地址
Apr 14, 2025 pm 09:06 PM
CentOS 中配置 IP 地址的步骤:查看当前网络配置:ip addr编辑网络配置文件:sudo vi /etc/sysconfig/network-scripts/ifcfg-eth0更改 IP 地址:编辑 IPADDR= 行更改子网掩码和网关(可选):编辑 NETMASK= 和 GATEWAY= 行重启网络服务:sudo systemctl restart network验证 IP 地址:ip addr
