

怎么使用Spring Boot+Vue实现Socket通知推送

Spring Boot端
第一步,引入依赖
首先我们需要引入WebSocket所需的依赖,以及处理输出格式的依赖
<!--格式转换-->
<!-- https://mvnrepository.com/artifact/com.alibaba/fastjson -->
<dependency>
   <groupId>com.alibaba</groupId>
   <artifactId>fastjson</artifactId>
   <version>1.2.73</version>
</dependency>
<!--WebSocket依赖-->
<dependency>
    <groupId>org.springframework.boot</groupId>
    <artifactId>spring-boot-starter-websocket</artifactId>
</dependency>第二步,创建WebSocket配置类
import org.springframework.context.annotation.Bean;
import org.springframework.context.annotation.Configuration;
import org.springframework.web.socket.server.standard.ServerEndpointExporter;

/**
 * @author: tjp
 * @create: 2023-04-03 09:58
 * @Description: WebSocket配置
 */
@Configuration
public class WebSocketConfig {
    @Bean
    public ServerEndpointExporter serverEndpointExporter() {
        return new ServerEndpointExporter();
    }

}第三步,创建WebSocket服务
这一步我们通过userId作为标识符,区分系统中对应的用户,后续也可基于此,进行其他的操作步骤。
import com.alibaba.fastjson.JSON;
import com.alibaba.fastjson.JSONObject;
import com.alibaba.excel.util.StringUtils;
import lombok.extern.slf4j.Slf4j;
import org.springframework.stereotype.Component;

import javax.websocket.*;
import javax.websocket.server.PathParam;
import javax.websocket.server.ServerEndpoint;
import java.io.IOException;
import java.util.HashMap;
import java.util.Iterator;
import java.util.concurrent.ConcurrentHashMap;

/**
 * @author: tjp
 * @create: 2023-04-03 13:55
 * @Description: WebSocket服务
 */

@ServerEndpoint("/websocket/{userId}")
@Slf4j
@Component
public class WebSocketServer {
    /**
     * 静态变量,用来记录当前在线连接数。应该把它设计成线程安全的。
     */
    private static int onlineCount = 0;
    /**
     * concurrent包的线程安全Set,用来存放每个客户端对应的MyWebSocket对象。
     */
    private static ConcurrentHashMap<String, WebSocketServer> webSocketMap = new ConcurrentHashMap<>();
    /**
     * 与某个客户端的连接会话,需要通过它来给客户端发送数据
     */
    private Session session;
    /**
     * 接收userId
     */
    private String userId = "";

    /**
     * 连接建立成功调用的方法
     */
    @OnOpen
    public void onOpen(Session session, @PathParam("userId") String userId) {
        this.session = session;
        this.userId = userId;
        if (webSocketMap.containsKey(userId)) {
            webSocketMap.remove(userId);
            //加入set中
        } else {
            webSocketMap.put(userId, this);
            //加入set中
            addOnlineCount();
            //在线数加1
        }

        log.info("用户连接:" + userId + ",当前在线人数为:" + getOnlineCount());

        try {
            HashMap<Object, Object> map = new HashMap<>();
            map.put("key", "连接成功");
            sendMessage(JSON.toJSONString(map));
        } catch (IOException e) {
            log.error("用户:" + userId + ",网络异常!!!!!!");
        }
    }


    /**
     * 连接关闭调用的方法
     */
    @OnClose
    public void onClose() {
        if (webSocketMap.containsKey(userId)) {
            webSocketMap.remove(userId);
            //从set中删除
            subOnlineCount();
        }
        log.info("用户退出:" + userId + ",当前在线人数为:" + getOnlineCount());
    }

    /**
     * 收到客户端消息后调用的方法
     *
     * @param message 客户端发送过来的消息
     */
    @OnMessage
    public void onMessage(String message, Session session) {
        log.info("用户消息:" + userId + ",报文:" + message);
        //可以群发消息
        //消息保存到数据库、redis
        if (StringUtils.isNotBlank(message)) {
            try {
                //解析发送的报文
                JSONObject jsonObject = JSONObject.parseObject(message);
                //追加发送人(防止串改)
                jsonObject.put("fromUserId", this.userId);
                String fromUserId = jsonObject.getString("fromUserId");
                //传送给对应toUserId用户的websocket
                if (StringUtils.isNotBlank(fromUserId) && webSocketMap.containsKey(fromUserId)) {
                    webSocketMap.get(fromUserId).sendMessage(jsonObject.toJSONString());
                    //自定义-业务处理

//                    DeviceLocalThread.paramData.put(jsonObject.getString("group"),jsonObject.toJSONString());
                } else {
                    log.error("请求的userId:" + fromUserId + "不在该服务器上");
                    //否则不在这个服务器上,发送到mysql或者redis
                }
            } catch (Exception e) {
                e.printStackTrace();
            }
        }
    }

    /**
     * 发生错误时候
     *
     * @param session
     * @param error
     */
    @OnError
    public void onError(Session session, Throwable error) {
        log.error("用户错误:" + this.userId + ",原因:" + error.getMessage());
        error.printStackTrace();
    }

    /**
     * 实现服务器主动推送
     */
    public void sendMessage(String message) throws IOException {
        //加入线程锁
        synchronized (session) {
            try {
                //同步发送信息
                this.session.getBasicRemote().sendText(message);
            } catch (IOException e) {
                log.error("服务器推送失败:" + e.getMessage());
            }
        }
    }


    /**
     * 发送自定义消息
     * */
    /**
     * 发送自定义消息
     *
     * @param message  发送的信息
     * @param toUserId 如果为null默认发送所有
     * @throws IOException
     */
    public static void sendInfo(String message, String toUserId) throws IOException {
        //如果userId为空,向所有群体发送
        if (StringUtils.isEmpty(toUserId)) {
            //向所有用户发送信息
            Iterator<String> itera = webSocketMap.keySet().iterator();
            while (itera.hasNext()) {
                String keys = itera.next();
                WebSocketServer item = webSocketMap.get(keys);
                item.sendMessage(message);
            }
        }
        //如果不为空,则发送指定用户信息
        else if (webSocketMap.containsKey(toUserId)) {
            WebSocketServer item = webSocketMap.get(toUserId);
            item.sendMessage(message);
        } else {
            log.error("请求的userId:" + toUserId + "不在该服务器上");
        }
    }

    public static synchronized int getOnlineCount() {
        return onlineCount;
    }

    public static synchronized void addOnlineCount() {
        WebSocketServer.onlineCount++;
    }

    public static synchronized void subOnlineCount() {
        WebSocketServer.onlineCount--;
    }

    public static synchronized ConcurrentHashMap<String, WebSocketServer> getWebSocketMap() {
        return WebSocketServer.webSocketMap;
    }

}第四步,创建Controller进行发送测试
获取当前在线人数
import com.......WebSocketServer;

@ApiOperation(value = "获取当前在线人数")
@GetMapping("/getOnlineCount")
public Integer getOnlineCount() {
    return WebSocketServer.getOnlineCount();
}通过接口,向前端用户推送消息
import com.......WebSocketServer;
import org.springframework.web.bind.annotation.GetMapping;
import org.springframework.web.bind.annotation.RequestMapping;
import org.springframework.web.bind.annotation.RestController;
import java.io.IOException;
/**
* @author: tjp
* @create: 2023-04-03 13:57
* @Description: 测试
*/
@RestController
@RequestMapping("/news")
public class NewsController {
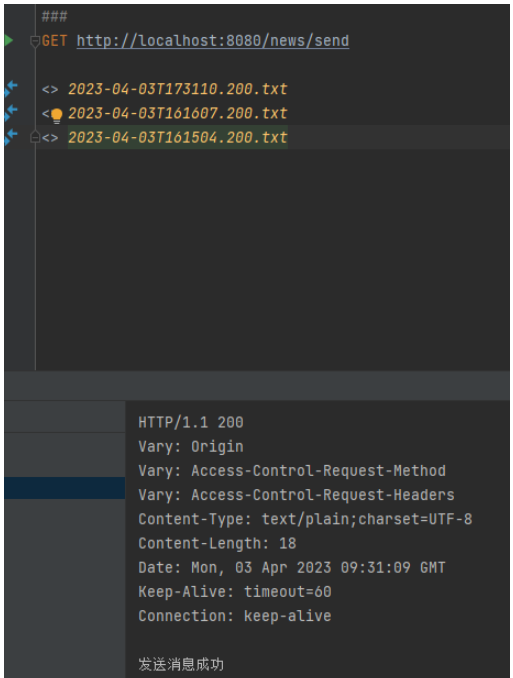
@GetMapping("/send")
public String send() {
try {
WebSocketServer.sendInfo("这是websocket发送过来的消息!", "需要推送的用户的编号");
} catch (IOException e) {
throw new RuntimeException(e);
}
return "发送消息成功";
}
}Vue端
第一步,创建连接工具类
创建工具类websocket.js,这里的userId就是用来作为标识符的userId
/**
* @author: tjp
* @create: 2023-04-03 11:22
* @Description: Socket客户端
*/
export class WebSocketClient {
constructor(userId) {
this.userId = userId;
this.websocket = null;
this.timeout = 10000; // 心跳超时时间,单位ms
this.timeoutObj = null; // 心跳定时器
this.serverTimeoutObj = null; // 服务器超时定时器
this.lockReconnect = false; // 避免重复连接
this.timeoutnum = null; // 重连延迟定时器
}
// 初始化WebSocket连接
initWebSocket() {
let wsUrl = `ws://127.0.0.1:8080/websocket/${this.userId}`;
this.websocket = new WebSocket(wsUrl);
this.websocket.onopen = this.websocketonopen.bind(this);
this.websocket.onerror = this.websocketonerror.bind(this);
this.websocket.onmessage = this.setOnmessageMessage.bind(this);
this.websocket.onclose = this.websocketclose.bind(this);
// 监听窗口关闭事件,当窗口关闭时,主动去关闭websocket连接,防止连接还没断开就关闭窗口,server端会抛异常。
window.onbeforeunload = this.websocketclose.bind(this);
}
// 启动心跳
start() {
console.log('start');
// 清除延时器
this.timeoutObj && clearTimeout(this.timeoutObj);
this.serverTimeoutObj && clearTimeout(this.serverTimeoutObj);
/*// 向服务器发送心跳消息
let actions = { "test": "12345" };
this.websocket && this.websocket.readyState == 1 && this.websocket.send(JSON.stringify(actions));
// 启动心跳定时器
this.timeoutObj = setTimeout(() => {
this.start();
// 定义一个延时器等待服务器响应,若超时,则关闭连接,重新请求server建立socket连接
this.serverTimeoutObj = setTimeout(() => {
this.websocket.close();
}, this.timeout)
}, this.timeout)*/
}
// 重置心跳
reset() {
// 清除时间
clearTimeout(this.timeoutObj);
clearTimeout(this.serverTimeoutObj);
// 重启心跳
this.start();
}
// 重新连接
reconnect() {
if (this.lockReconnect) return;
this.lockReconnect = true;
// 没连接上会一直重连,设置延迟避免请求过多
this.timeoutnum && clearTimeout(this.timeoutnum);
this.timeoutnum = setTimeout(() => {
this.initWebSocket();
this.lockReconnect = false;
}, 5000)
}
// 处理收到的消息
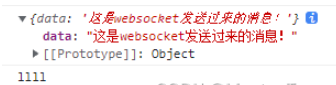
async setOnmessageMessage(event) {
console.log(event.data, '获得消息');
// 重置心跳
// this.reset();
// 自定义全局监听事件
window.dispatchEvent(new CustomEvent('onmessageWS', {
detail: {
data: event.data
}
}))
// //发现消息进入 开始处理前端触发逻辑
// if (event.data === 'success' || event.data === 'heartBath') return
}
// WebSocket连接成功回调
websocketonopen() {
// 开启心跳
this.start();
console.log("WebSocket连接成功!!!" + new Date() + "----" + this.websocket.readyState);
clearInterval(this.otimer);//停止
}
// WebSocket连接错误回调
websocketonerror(e) {
console.log("WebSocket连接发生错误" + e);
}
// WebSocket连接关闭回调
websocketclose(e) {
this.websocket.close();
clearTimeout(this.timeoutObj);
clearTimeout(this.serverTimeoutObj);
console.log("websocketcloe关闭连接")
}
// 关闭WebSocket连接
closeWebSocket() {
this.websocket.close();
console.log("closeWebSocket关闭连接")
}
// 监听窗口关闭事件
onbeforeunload() {
this.closeWebSocket();
}
}第二步,建立连接
在任意你想建立连接的页面中建立Socket连接
比如,在用户点击登录按钮之后
在这里可以使用原型,创建连接对象,并启动连接
<script>
import Vue from "vue";
import {WebSocketClient} from "@/utils/websocket";
......
......
methods:{
handleLogin() {
this.$refs.loginForm.validate(valid => {
if (valid) {
this.loading = true
this.$store.dispatch('user/login', this.loginForm).then(() => {
this.$router.push({path: this.redirect || '/'})
this.loading = false
/*-----------在此处放入原型中------------*/
Vue.prototype.$WebSocketClientInstance = new WebSocketClient('t');
Vue.prototype.$WebSocketClientInstance.initWebSocket()
/*-----------------end------------*/
}).catch(() => {
this.loading = false
})
} else {
this.$message({message: '请填写正确格式的用户名或密码', type: 'error'})
return false
}
})
}
}
.....
.....
</script>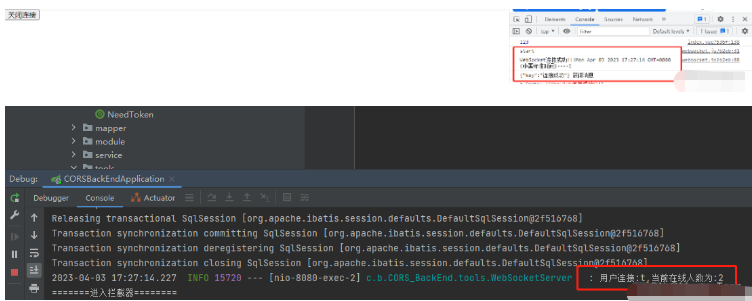
第三步,监听服务器发送过来的消息
在你想监听的页面,使用监听器进行监听
<script>
....
....
mounted() {
// 添加socket通知监听
window.addEventListener('onmessageWS', this.getSocketData)
},
methods: {
// 收到消息处理
getSocketData(res) {
console.log(res.detail)
console.log("llll")
},
}
....
....
</script>这个时候,你就可以通过后端的接口进行发送了
搞个测试
第四步,关闭连接
搞个按钮
<template>
  <div>
    <button @click="closeConnect">关闭连接</button>
  </div>
</template>

<script>
import {WebSocketClient} from "@/utils/websocket";
import Vue from "vue";

export default {
  methods: {
    closeConnect() {
      console.dir(Vue.prototype)
      Vue.prototype.$WebSocketClientInstance.closeWebSocket();
    },
  }
}
</script>
以上是怎么使用Spring Boot+Vue实现Socket通知推送的详细内容。更多信息请关注PHP中文网其他相关文章!

热AI工具

Undresser.AI Undress
人工智能驱动的应用程序,用于创建逼真的裸体照片

AI Clothes Remover
用于从照片中去除衣服的在线人工智能工具。

Undress AI Tool
免费脱衣服图片

Clothoff.io
AI脱衣机

AI Hentai Generator
免费生成ai无尽的。

热门文章
热工具

记事本++7.3.1
好用且免费的代码编辑器

SublimeText3汉化版
中文版,非常好用

禅工作室 13.0.1
功能强大的PHP集成开发环境

Dreamweaver CS6
视觉化网页开发工具

SublimeText3 Mac版
神级代码编辑软件(SublimeText3)
热门话题


 vue.js怎么引用js文件
Apr 07, 2025 pm 11:27 PM
vue.js怎么引用js文件
Apr 07, 2025 pm 11:27 PM
在 Vue.js 中引用 JS 文件的方法有三种:直接使用 <script> 标签指定路径;利用 mounted() 生命周期钩子动态导入;通过 Vuex 状态管理库进行导入。
 vue中的watch怎么用
Apr 07, 2025 pm 11:36 PM
vue中的watch怎么用
Apr 07, 2025 pm 11:36 PM
Vue.js 中的 watch 选项允许开发者监听特定数据的变化。当数据发生变化时,watch 会触发一个回调函数,用于执行更新视图或其他任务。其配置选项包括 immediate,用于指定是否立即执行回调,以及 deep,用于指定是否递归监听对象或数组的更改。
 vue怎么给按钮添加函数
Apr 08, 2025 am 08:51 AM
vue怎么给按钮添加函数
Apr 08, 2025 am 08:51 AM
可以通过以下步骤为 Vue 按钮添加函数:将 HTML 模板中的按钮绑定到一个方法。在 Vue 实例中定义该方法并编写函数逻辑。
 vue中怎么用bootstrap
Apr 07, 2025 pm 11:33 PM
vue中怎么用bootstrap
Apr 07, 2025 pm 11:33 PM
在 Vue.js 中使用 Bootstrap 分为五个步骤:安装 Bootstrap。在 main.js 中导入 Bootstrap。直接在模板中使用 Bootstrap 组件。可选:自定义样式。可选:使用插件。
 vue返回上一页的方法
Apr 07, 2025 pm 11:30 PM
vue返回上一页的方法
Apr 07, 2025 pm 11:30 PM
Vue.js 返回上一页有四种方法:$router.go(-1)$router.back()使用 <router-link to="/"> 组件window.history.back(),方法选择取决于场景。
 Vue 实现跑马灯/文字滚动效果
Apr 07, 2025 pm 10:51 PM
Vue 实现跑马灯/文字滚动效果
Apr 07, 2025 pm 10:51 PM
在 Vue 中实现跑马灯/文字滚动效果,可以使用 CSS 动画或第三方库。本文介绍了使用 CSS 动画的方法:创建滚动文本,用 <div> 包裹文本。定义 CSS 动画,设置 overflow: hidden、width 和 animation。定义关键帧,设置动画开始和结束时的 transform: translateX()。调整动画属性,如持续时间、滚动速度和方向。
 vue懒加载什么意思
Apr 07, 2025 pm 11:54 PM
vue懒加载什么意思
Apr 07, 2025 pm 11:54 PM
在 Vue.js 中,懒加载允许根据需要动态加载组件或资源,从而减少初始页面加载时间并提高性能。具体实现方法包括使用 <keep-alive> 和 <component is> 组件。需要注意的是,懒加载可能会导致 FOUC(闪屏)问题,并且应该仅对需要懒加载的组件使用,以避免不必要的性能开销。
 怎样查询vue的版本
Apr 07, 2025 pm 11:24 PM
怎样查询vue的版本
Apr 07, 2025 pm 11:24 PM
可以通过以下方法查询 Vue 版本:使用 Vue Devtools 在浏览器的控制台中查看“Vue”选项卡。使用 npm 运行“npm list -g vue”命令。在 package.json 文件的“dependencies”对象中查找 Vue 项。对于 Vue CLI 项目,运行“vue --version”命令。检查 HTML 文件中引用 Vue 文件的 <script> 标签中的版本信息。
