

Java后端开发:基于OAuth2构建安全的API

OAuth2是现代应用程序中广泛使用的身份验证和授权协议之一。它允许用户授权第三方应用程序访问其资源,同时保护用户敏感信息不被泄露。在本文中,我们将介绍如何使用Java后端开发基于OAuth2构建安全的API。
- 什么是OAuth2?
OAuth2是一种流行的授权协议,旨在解决应用程序间授权问题。它允许用户授权第三方应用程序访问其资源,例如谷歌云端硬盘或Facebook账户,同时保护用户凭据不被泄露。OAuth2中包含4种角色:资源拥有者、客户端、授权服务器和资源服务器。资源拥有者是具有被保护资源的用户或实体;客户端是请求访问资源的应用程序;授权服务器是验证资源拥有者身份并颁发访问令牌的服务器;资源服务器是存储和提供资源的服务器。OAuth2通过授权服务器发出令牌,客户端使用令牌向资源服务器请求资源。
- OAuth2流程
OAuth2流程包含以下步骤:
- 客户端向授权服务器发出请求,并包含其标识符和重定向URI。
- 授权服务器验证客户端身份,并要求资源拥有者授权客户端访问其资源。
- 资源拥有者授权客户端访问其资源。
- 授权服务器发出访问令牌给客户端。
- 客户端使用访问令牌向资源服务器请求访问资源。
- 资源服务器验证访问令牌是否有效,并提供资源。
- 基于OAuth2构建安全的API
要构建安全的API,我们需要实现以下步骤:
- 创建OAuth2服务器:我们需要创建OAuth2服务器来颁发访问令牌、验证客户端身份和授权请求。
- 配置Spring Security:Spring Security是Spring生态系统中的安全框架,用于处理身份验证和授权。我们需要为Spring Security配置OAuth2验证和授权流程。
- 创建客户端:我们需要创建客户端来请求访问资源服务器,并向OAuth2服务器获取访问令牌。
- 创建资源服务器:我们需要创建资源服务器来存储和提供受保护的资源。
- 验证访问令牌:我们需要在资源服务器中验证访问令牌是否有效,并根据令牌的范围提供相应的资源。
以下是一个基于Java和Spring框架的OAuth2示例:
- 创建OAuth2服务器:
@EnableAuthorizationServer
@Configuration
public class OAuth2AuthorizationConfig extends AuthorizationServerConfigurerAdapter {
private final PasswordEncoder passwordEncoder;
private final AuthenticationManager authenticationManager;
private final UserDetailsService userDetailsService;

@Autowired
public OAuth2AuthorizationConfig(
        PasswordEncoder passwordEncoder,
        AuthenticationManager authenticationManager,
        UserDetailsService userDetailsService
) {
    this.passwordEncoder = passwordEncoder;
    this.authenticationManager = authenticationManager;
    this.userDetailsService = userDetailsService;
}

@Override
public void configure(ClientDetailsServiceConfigurer clients) throws Exception {
    clients.inMemory()
            .withClient("client")
            .secret(passwordEncoder.encode("secret"))
            .authorizedGrantTypes("authorization_code")
            .scopes("read", "write", "trust")
            .redirectUris("http://localhost:8080/login/oauth2/code/");
}

@Override
public void configure(AuthorizationServerEndpointsConfigurer endpoints) throws Exception {
    endpoints.authenticationManager(authenticationManager)
            .userDetailsService(userDetailsService);
}}
- 配置Spring Security:
@Configuration
@EnableWebSecurity
@EnableGlobalMethodSecurity(prePostEnabled = true)
public class WebSecurityConfig extends WebSecurityConfigurerAdapter {
private final UserDetailsService userDetailsService;
private final PasswordEncoder passwordEncoder;

@Autowired
public WebSecurityConfig(
        UserDetailsService userDetailsService,
        PasswordEncoder passwordEncoder
) {
    this.userDetailsService = userDetailsService;
    this.passwordEncoder = passwordEncoder;
}

@Override
protected void configure(AuthenticationManagerBuilder auth) throws Exception {
    auth.userDetailsService(userDetailsService)
            .passwordEncoder(passwordEncoder);
}

@Override
protected void configure(HttpSecurity http) throws Exception {
    http.authorizeRequests()
            .antMatchers("/oauth/**").permitAll()
            .anyRequest().authenticated()
            .and()
            .oauth2Login();
}}
- 创建客户端:
@RestController
public class ClientController {
private final OAuth2AuthorizedClientService authorizedClientService;

@Autowired
public ClientController(OAuth2AuthorizedClientService authorizedClientService) {
    this.authorizedClientService = authorizedClientService;
}

@GetMapping("/resource")
public ResponseEntity<String> getResource(OAuth2AuthenticationToken authentication) {
    OAuth2AuthorizedClient authorizedClient = authorizedClientService.loadAuthorizedClient(
            authentication.getAuthorizedClientRegistrationId(),
            authentication.getName()
    );
    HttpHeaders headers = new HttpHeaders();
    headers.setBearerAuth(authorizedClient.getAccessToken().getTokenValue());
    HttpEntity<String> entity = new HttpEntity<>(headers);
    ResponseEntity<String> response = new RestTemplate().exchange(
            "http://localhost:8081/resource",
            HttpMethod.GET,
            entity,
            String.class
    );
    return response;
}}
- 创建资源服务器:
@RestController
public class ResourceController {
@GetMapping("/resource")
public ResponseEntity<String> getResource() {
    return ResponseEntity.ok("resource");
}}
- 验证访问令牌:
@Configuration
@EnableResourceServer
public class ResourceServerConfig extends ResourceServerConfigurerAdapter {
@Override
public void configure(HttpSecurity http) throws Exception {
    http.authorizeRequests()
            .antMatchers("/oauth/**").permitAll()
            .anyRequest().authenticated()
            .and()
            .oauth2ResourceServer()
            .jwt();
}}
- 综述
在本文中,我们介绍了OAuth2协议的流程,并提供了一个基于Java和Spring框架的示例。通过使用OAuth2,我们可以建立更安全的API,并保护用户敏感信息不被泄露。在API开发中,我们应该始终重视安全性,以保护用户数据和应用程序资源。
以上是Java后端开发:基于OAuth2构建安全的API的详细内容。更多信息请关注PHP中文网其他相关文章!

热AI工具

Undresser.AI Undress
人工智能驱动的应用程序,用于创建逼真的裸体照片

AI Clothes Remover
用于从照片中去除衣服的在线人工智能工具。

Undress AI Tool
免费脱衣服图片

Clothoff.io
AI脱衣机

AI Hentai Generator
免费生成ai无尽的。

热门文章
热工具

记事本++7.3.1
好用且免费的代码编辑器

SublimeText3汉化版
中文版,非常好用

禅工作室 13.0.1
功能强大的PHP集成开发环境

Dreamweaver CS6
视觉化网页开发工具

SublimeText3 Mac版
神级代码编辑软件(SublimeText3)
热门话题


 突破或从Java 8流返回?
Feb 07, 2025 pm 12:09 PM
突破或从Java 8流返回?
Feb 07, 2025 pm 12:09 PM
Java 8引入了Stream API,提供了一种强大且表达力丰富的处理数据集合的方式。然而,使用Stream时,一个常见问题是:如何从forEach操作中中断或返回? 传统循环允许提前中断或返回,但Stream的forEach方法并不直接支持这种方式。本文将解释原因,并探讨在Stream处理系统中实现提前终止的替代方法。 延伸阅读: Java Stream API改进 理解Stream forEach forEach方法是一个终端操作,它对Stream中的每个元素执行一个操作。它的设计意图是处

 Java程序查找胶囊的体积
Feb 07, 2025 am 11:37 AM
Java程序查找胶囊的体积
Feb 07, 2025 am 11:37 AM
胶囊是一种三维几何图形,由一个圆柱体和两端各一个半球体组成。胶囊的体积可以通过将圆柱体的体积和两端半球体的体积相加来计算。本教程将讨论如何使用不同的方法在Java中计算给定胶囊的体积。 胶囊体积公式 胶囊体积的公式如下: 胶囊体积 = 圆柱体体积 两个半球体体积 其中, r: 半球体的半径。 h: 圆柱体的高度(不包括半球体)。 例子 1 输入 半径 = 5 单位 高度 = 10 单位 输出 体积 = 1570.8 立方单位 解释 使用公式计算体积: 体积 = π × r2 × h (4
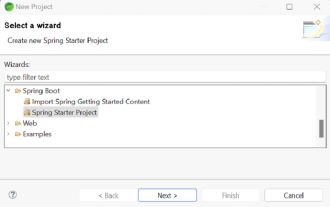 如何在Spring Tool Suite中运行第一个春季启动应用程序?
Feb 07, 2025 pm 12:11 PM
如何在Spring Tool Suite中运行第一个春季启动应用程序?
Feb 07, 2025 pm 12:11 PM
Spring Boot简化了可靠,可扩展和生产就绪的Java应用的创建,从而彻底改变了Java开发。 它的“惯例惯例”方法(春季生态系统固有的惯例),最小化手动设置
