利用HTML5绘制点线面组成的3D图形的示例_html5教程技巧
玩Canvas玩了有两三个礼拜了,平面的东西玩来玩去也就那样,所以就开始折腾3D了。
因为Canvas画布终究还是平面的,所以要有3D就得抽象出一个Z轴。然后再把3D坐标转换成2D坐标,画到画布上,再通过旋转等变换效果来产生3D感。做3D一般就是由点到线,然后由线到面。
【点】
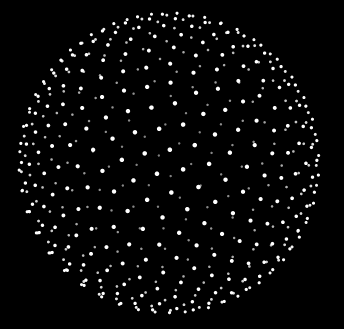
点的话,之前我有写过关于3D的博文 解析3D标签云,其实很简单 ,这篇博文虽然讲的是用div实现的3D标签云,但是追根到底产生的3D原理是一样的,就是最简单的由点构成的3D了。每一个标签就是一个点。也可以直接看这个DEMO:
3DBall
里面的总共有五百个点对象,每个点对象相应的根据他们的Z轴来改变他们的大小和透明度,再平均分布在球面上,就构成了点球体了。
【线】
如果知道怎么做点之后,线也就容易了,只要把点连起来就行了。这个没做DEMO,不过也确实不难。就循环moveTo,然后lineTo,线就出来了。
【面】
这篇博文主要讲面滴。
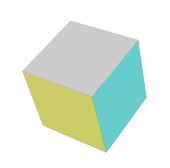
二话不说,先上个DEMO吧 :
做一个立方体,我用了三个对象:点对象,面对象,以及立方体本身一个对象:
下面这个是点对象,x,y,z是点的三维坐标,_get2d方法是把三维坐标转换到二维层面来。fallLength是焦距。
- var Vector = function(x,y,z){
- this.x = x;
- this.y = y;
- this.z = z;
- this._get2d = function(){
- var scale = fallLength/(fallLength+this.z);
- var x = centerX + this.x*scale;
- var y = centerY + this.y*scale;
- return {x:x , y:y};
- }
- }
然后是面对象:
面对象的属性页很容易理解,一个面就是一个正方形 , v1v2v3v4是面的四个顶点,zIndex这个属性很重要,是代表这个面的层级,是在最外面还是在里面,这个必须要有,这样当用canvas画的时候才能让这个面画在最前面,才不会被其他的面遮盖。zIndex的值也很容易理解,就是顶点z轴坐标的平均值,其实也就是中心点的z轴坐标。颜色就是这个面的颜色啦。
- var Face = function(vector1,vector2,vector3,vector4,color){
- this.v1 = vector1;
- this.v2 = vector2;
- this.v3 = vector3;
- this.v4 = vector4;
- this.color = color;
- this.zIndex = (this.v1.z + this.v2.z + this.v3.z + this.v4.z)/4;
- this.draw = function(){
- ctx.save();
- ctx.beginPath();
- ctx.moveTo(this.v1._get2d().x , this.v1._get2d().y);
- ctx.lineTo(this.v2._get2d().x , this.v2._get2d().y);
- ctx.lineTo(this.v3._get2d().x , this.v3._get2d().y);
- ctx.lineTo(this.v4._get2d().x , this.v4._get2d().y);
- ctx.closePath();
- // ctx.fillStyle = "rgba("+parseInt(Math.random()*255)+","+parseInt(Math.random()*255)+","+parseInt(Math.random()*255)+",0.2)";
- ctx.fillStyle = this.color;
- ctx.fill();
- }
- }
最后是立方体本身对象:
因为立方体最后要旋转,所以,立方体对象里面不仅有面对象,还要有点对象,点旋转后才会引起面的旋转。length是立方体的边长,_initVector是初始化立方体的各个顶点,_draw方法就是把所有点形成面,将面放入数组,然后对面进行排序(就是根据面里的zIndex排序),排序好后,调用每个面里的draw方法。立方体就出来了。
- var Cube = function(length){
- this.length = length;
- this.faces = [];
- this.vectors = [];
- }
- Cube.prototype = {
- _initVector:function(){
- this.vectors[0] = new Vector(-this.length/2 , -this.length/2 , this.length/2);
- this.vectors[1] = new Vector(-this.length/2 , this.length/2 , this.length/2);
- this.vectors[2] = new Vector(this.length/2 , -this.length/2 , this.length/2);
- this.vectors[3] = new Vector(this.length/2 , this.length/2 , this.length/2);
- this.vectors[4] = new Vector(this.length/2 , -this.length/2 , -this.length/2);
- this.vectors[5] = new Vector(this.length/2 , this.length/2 , -this.length/2);
- this.vectors[6] = new Vector(-this.length/2 , -this.length/2 , -this.length/2);
- this.vectors[7] = new Vector(-this.length/2 , this.length/2 , -this.length/2);
- },
- _draw:function(){
- this.faces[0] = new Face(this.vectors[0] , this.vectors[1] , this.vectors[3] , this.vectors[2] , "#6c6");
- this.faces[1] = new Face(this.vectors[2] , this.vectors[3] , this.vectors[5] , this.vectors[4] , "#6cc");
- this.faces[2] = new Face(this.vectors[4] , this.vectors[5] , this.vectors[7] , this.vectors[6] , "#cc6");
- this.faces[3] = new Face(this.vectors[6] , this.vectors[7] , this.vectors[1] , this.vectors[0] , "#c6c");
- this.faces[4] = new Face(this.vectors[1] , this.vectors[3] , this.vectors[5] , this.vectors[7] , "#666");
- this.faces[5] = new Face(this.vectors[0] , this.vectors[2] , this.vectors[4] , this.vectors[6] , "#ccc");
- this.faces.sort(function(a , b){
- return b.zIndex - a.zIndex;
- });
- this.faces.foreach(function(){
- this.draw();
- })
- }
- }
立方体做好了,接下来就可以让它动起来了。根据鼠标位置改变立方体转动的角度。rotateX和rotateY方法就是让所有点绕X轴旋转以及绕Y轴旋转。这个的原理我在之前那个博文上好像有说过。。。。如果想了解更多,可以自己去百度一下计算机图形学3D变换。绕X轴和绕Y轴是最简单的旋转矩阵了。当然,如果有兴趣的还可以去搜一下绕任意轴旋转矩阵。。。这个有点复杂,我本来想用它来做个魔方,不过遇到一些问题,暂时还没解决。好吧,扯远了。通过rotateX和rotateY两个方法可以让每个点获得下一帧的位置,在动画循环中重绘。这样,转动的立方体就做出来了。
- if("addEventListener" in window){
- window.addEventListener("mousemove" , function(event){
- var x = event.clientX - canvas.offsetLeft - centerX;
- var y = event.clientY - canvas.offsetTop - centerY;
- angleY = x*0.0001;
- angleX = y*0.0001;
- });
- }
- else {
- window.attachEvent("onmousemove" , function(event){
- var x = event.clientX - canvas.offsetLeft - centerX;
- var y = event.clientY - canvas.offsetTop - centerY;
- angleY = x*0.0001;
- angleX = y*0.0001;
- });
- }
- function rotateX(vectors){
- var cos = Math.cos(angleX);
- var sin = Math.sin(angleX);
- vectors.foreach(function(){
- var y1 = this.y * cos - this.z * sin;
- var z1 = this.z * cos + this.y * sin;
- this.y = y1;
- this.z = z1;
- });
- }
- function rotateY(vectors){
- var cos = Math.cos(angleY);
- var sin = Math.sin(angleY);
- vectors.foreach(function(){
- var x1 = this.x * cos - this.z * sin;
- var z1 = this.z * cos + this.x * sin;
- this.x = x1;
- this.z = z1;
- })
- }
- cube = new Cube(80);
- cube._initVector();
- function initAnimate(){
- cube._draw();
- animate();
- }
- function animate(){
- ctx.clearRect(0,0,canvas.width,canvas.height)
- rotateY(cube.vectors);
- rotateX(cube.vectors);
- cube._draw();
- if("requestAnimationFrame" in window){
- requestAnimationFrame(animate);
- }
- else if("webkitRequestAnimationFrame" in window){
- webkitRequestAnimationFrame(animate);
- }
- else if("msRequestAnimationFrame" in window){
- msRequestAnimationFrame(animate);
- }
- else if("mozRequestAnimationFrame" in window){
- mozRequestAnimationFrame(animate);
- }
- else {
- setTimeout(animate , 16);
- }
- }
全部代码我就不贴了,DEMO里通过控制台都可以看到。我也没引用其他什么框架之类的,直接copy下来就能用了。
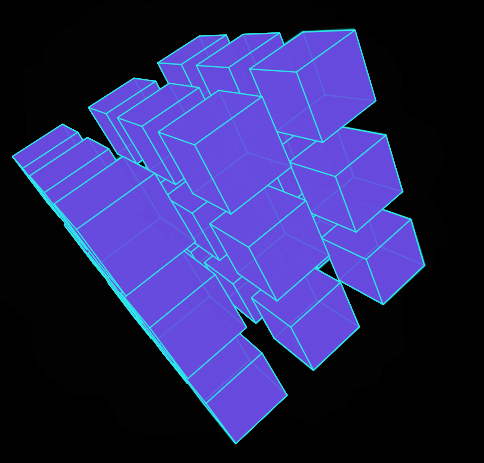
能写好转动的一个立方体后,多个立方体转动也可以做出来了。

热AI工具

Undresser.AI Undress
人工智能驱动的应用程序,用于创建逼真的裸体照片

AI Clothes Remover
用于从照片中去除衣服的在线人工智能工具。

Undress AI Tool
免费脱衣服图片

Clothoff.io
AI脱衣机

AI Hentai Generator
免费生成ai无尽的。

热门文章

热工具

记事本++7.3.1
好用且免费的代码编辑器

SublimeText3汉化版
中文版,非常好用

禅工作室 13.0.1
功能强大的PHP集成开发环境

Dreamweaver CS6
视觉化网页开发工具

SublimeText3 Mac版
神级代码编辑软件(SublimeText3)


