

Linux驱动 | debugfs接口创建
点击上方“嵌入式Linux充电站”,选择“置顶/星标公众号”

上篇介绍了procfs接口的创建,今天再介绍一种debugfs接口的创建。
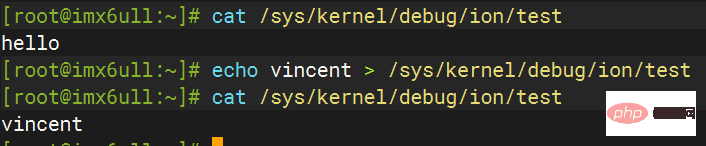
实现效果
在/sys/kernel/debug/目录下创建一个ion/test文件,通过cat、echo的方式进行读写操作:
前期准备
内核配置打开debugfs:
CONFIG_DEBUG_FS=y
挂载debugfs文件系统:
mount -t debugfs none /sys/kernel/debug
代码实现
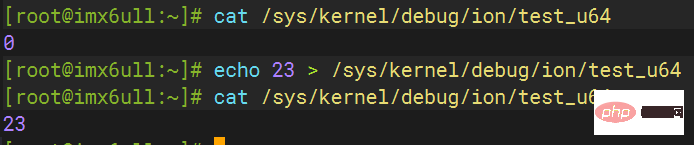
读写变量:
#include <linux/debugfs.h>
#include <linux/module.h>
#include <linux/types.h>

static struct dentry *ion_dir;
static u64 test_u64 = 0;

static int __init debugfs_init(void)
{

    //创建一个/sys/kernel/debug/ion目录
    ion_dir = debugfs_create_dir("ion", NULL);
    if (!ion_dir) {
        printk("ion_dir is null\n");
        return -1;
    }

    /* 创建/sys/kernel/debug/ion/test_u64文件 */
    debugfs_create_u64("test_u64", 0644,
                        ion_dir, &test_u64);

    return 0;
}

static void __exit debugfs_exit(void)
{
    debugfs_remove_recursive(ion_dir);
}

module_init(debugfs_init);
module_exit(debugfs_exit);
MODULE_LICENSE("GPL");运行结果:
读写字符串:
#include <linux/debugfs.h>
#include <linux/module.h>
#include <linux/fs.h>
#include <linux/uaccess.h>
#include <linux/errno.h>
#include <linux/dcache.h>
#include <linux/types.h>

static char ion_buf[512] = "hello\n";
static struct dentry *ion_dir;

static int ion_open(struct inode *inode, struct file *filp)
{
    //printk("ion open\n");
    return 0;
}

ssize_t ion_read(struct file *filp, char __user *buf, size_t count, loff_t *offp)
{
    int retval = 0;
    if ((*offp + count) > 512)
        count = 512 - *offp;

    if (copy_to_user(buf, ion_buf+*offp, count)) {
        printk("copy to user failed, count:%ld\n", count);
        retval = -EFAULT;
        goto out;
    }
    *offp += count;
    retval = count;
out:
    return retval;
}

ssize_t ion_write(struct file *filp, const char __user *buff, size_t count, loff_t *offp)
{
    int retval;

    if (*offp > 512)
        return 0;

    if (*offp + count > 512)
        count = 512 - *offp;

    if (copy_from_user(ion_buf+*offp, buff, count)) {
        printk("copy from user failed, count:%ld\n", count);
        retval = -EFAULT;
        goto out;
    }
    *offp += count;
    retval = count;
out:
    return retval;
}

struct file_operations my_fops = {
    .owner = THIS_MODULE,
    .read = ion_read,
    .write = ion_write,
    .open = ion_open,
};

static int __init debugfs_init(void)
{
    printk("INIT MODULE\n");

    //创建一个/sys/kernel/debug/ion目录
    ion_dir = debugfs_create_dir("ion", NULL);
    if (!ion_dir) {
        printk("ion_dir is null\n");
        return -1;
    }

    /* 创建/sys/kernel/debug/ion/test文件 */
    struct dentry *filent = debugfs_create_file("test", 0644, ion_dir, NULL, &my_fops);
    if (!filent) {
        printk("test file is null\n");
        return -1;
    }

    return 0;
}

static void __exit debugfs_exit(void)
{
    debugfs_remove_recursive(ion_dir);
}

module_init(debugfs_init);
module_exit(debugfs_exit);
MODULE_LICENSE("GPL");运行结果:
函数接口说明
创建目录、文件函数:
/* 创建目录 */
struct dentry *debugfs_create_dir(const char *name, struct dentry *parent);

/*创建节点 */
struct dentry *debugfs_create_file(const char *name, umode_t mode,
                                   struct dentry *parent, void *data,
const struct file_operations *fops);name:要创建的/sys/kernel/debug下的目录名
parent:父目录,用struct dentry结构体表示。如果直接在/sys/kernel/debug/下创建文件,则为NULL
创建不同大小的文件:
//创建十进制的无符号文件
void debugfs_create_u8(const char *name, umode_t mode,
                       struct dentry *parent, u8 *value);
void debugfs_create_u16(const char *name, umode_t mode,
                        struct dentry *parent, u16 *value);
void debugfs_create_u32(const char *name, umode_t mode,
                        struct dentry *parent, u32 *value);
void debugfs_create_u64(const char *name, umode_t mode,
                        struct dentry *parent, u64 *value);
//创建十六进制的无符号文件
void debugfs_create_x8(const char *name, umode_t mode,
                       struct dentry *parent, u8 *value);
void debugfs_create_x16(const char *name, umode_t mode,
                        struct dentry *parent, u16 *value);
void debugfs_create_x32(const char *name, umode_t mode,
                        struct dentry *parent, u32 *value);
void debugfs_create_x64(const char *name, umode_t mode,
struct dentry *parent, u64 *value);更详细的debugfs用法请参考官方文档:Documentation/filesystems/debugfs.txt
以上是Linux驱动 | debugfs接口创建的详细内容。更多信息请关注PHP中文网其他相关文章!

热AI工具

Undresser.AI Undress
人工智能驱动的应用程序,用于创建逼真的裸体照片

AI Clothes Remover
用于从照片中去除衣服的在线人工智能工具。

Undress AI Tool
免费脱衣服图片

Clothoff.io
AI脱衣机

AI Hentai Generator
免费生成ai无尽的。

热门文章
热工具

记事本++7.3.1
好用且免费的代码编辑器

SublimeText3汉化版
中文版,非常好用

禅工作室 13.0.1
功能强大的PHP集成开发环境

Dreamweaver CS6
视觉化网页开发工具

SublimeText3 Mac版
神级代码编辑软件(SublimeText3)
热门话题


 centos和ubuntu的区别
Apr 14, 2025 pm 09:09 PM
centos和ubuntu的区别
Apr 14, 2025 pm 09:09 PM
CentOS 和 Ubuntu 的关键差异在于:起源(CentOS 源自 Red Hat,面向企业;Ubuntu 源自 Debian,面向个人)、包管理(CentOS 使用 yum,注重稳定;Ubuntu 使用 apt,更新频率高)、支持周期(CentOS 提供 10 年支持,Ubuntu 提供 5 年 LTS 支持)、社区支持(CentOS 侧重稳定,Ubuntu 提供广泛教程和文档)、用途(CentOS 偏向服务器,Ubuntu 适用于服务器和桌面),其他差异包括安装精简度(CentOS 精
 docker desktop怎么用
Apr 15, 2025 am 11:45 AM
docker desktop怎么用
Apr 15, 2025 am 11:45 AM
如何使用 Docker Desktop?Docker Desktop 是一款工具,用于在本地机器上运行 Docker 容器。其使用步骤包括:1. 安装 Docker Desktop;2. 启动 Docker Desktop;3. 创建 Docker 镜像(使用 Dockerfile);4. 构建 Docker 镜像(使用 docker build);5. 运行 Docker 容器(使用 docker run)。
 docker原理详解
Apr 14, 2025 pm 11:57 PM
docker原理详解
Apr 14, 2025 pm 11:57 PM
Docker利用Linux内核特性,提供高效、隔离的应用运行环境。其工作原理如下:1. 镜像作为只读模板,包含运行应用所需的一切;2. 联合文件系统(UnionFS)层叠多个文件系统,只存储差异部分,节省空间并加快速度;3. 守护进程管理镜像和容器,客户端用于交互;4. Namespaces和cgroups实现容器隔离和资源限制;5. 多种网络模式支持容器互联。理解这些核心概念,才能更好地利用Docker。
 Centos停止维护2024
Apr 14, 2025 pm 08:39 PM
Centos停止维护2024
Apr 14, 2025 pm 08:39 PM
CentOS将于2024年停止维护,原因是其上游发行版RHEL 8已停止维护。该停更将影响CentOS 8系统,使其无法继续接收更新。用户应规划迁移,建议选项包括CentOS Stream、AlmaLinux和Rocky Linux,以保持系统安全和稳定。
 centos如何安装
Apr 14, 2025 pm 09:03 PM
centos如何安装
Apr 14, 2025 pm 09:03 PM
CentOS 安装步骤:下载 ISO 映像并刻录可引导媒体;启动并选择安装源;选择语言和键盘布局;配置网络;分区硬盘;设置系统时钟;创建 root 用户;选择软件包;开始安装;安装完成后重启并从硬盘启动。
 CentOS上GitLab的备份方法有哪些
Apr 14, 2025 pm 05:33 PM
CentOS上GitLab的备份方法有哪些
Apr 14, 2025 pm 05:33 PM
CentOS系统下GitLab的备份与恢复策略为了保障数据安全和可恢复性,CentOS上的GitLab提供了多种备份方法。本文将详细介绍几种常见的备份方法、配置参数以及恢复流程,帮助您建立完善的GitLab备份与恢复策略。一、手动备份利用gitlab-rakegitlab:backup:create命令即可执行手动备份。此命令会备份GitLab仓库、数据库、用户、用户组、密钥和权限等关键信息。默认备份文件存储于/var/opt/gitlab/backups目录,您可通过修改/etc/gitlab
 centos怎么挂载硬盘
Apr 14, 2025 pm 08:15 PM
centos怎么挂载硬盘
Apr 14, 2025 pm 08:15 PM
CentOS硬盘挂载分为以下步骤:确定硬盘设备名(/dev/sdX);创建挂载点(建议使用/mnt/newdisk);执行mount命令(mount /dev/sdX1 /mnt/newdisk);编辑/etc/fstab文件添加永久挂载配置;卸载设备使用umount命令,确保没有进程使用设备。
 centos停止维护后怎么办
Apr 14, 2025 pm 08:48 PM
centos停止维护后怎么办
Apr 14, 2025 pm 08:48 PM
CentOS 停止维护后,用户可以采取以下措施应对:选择兼容发行版:如 AlmaLinux、Rocky Linux、CentOS Stream。迁移到商业发行版:如 Red Hat Enterprise Linux、Oracle Linux。升级到 CentOS 9 Stream:滚动发行版,提供最新技术。选择其他 Linux 发行版:如 Ubuntu、Debian。评估容器、虚拟机或云平台等其他选项。
