

使用uniapp实现图片放大缩小功能


使用uniapp实现图片放大缩小功能
在移动应用开发中,图片显示和操作是一项常见的需求。本文将介绍如何使用uniapp实现图片放大缩小功能。
uniapp是一个基于Vue.js的跨平台应用框架,它可以通过一套代码同时生成Android和iOS应用。在uniapp中,我们可以使用uni-image组件来实现图片的显示和操作。
首先,在项目中创建一个页面用于显示图片。在该页面中,我们可以使用uni-image组件来加载和显示图片。uni-image组件支持指定图片的路径,并且可以设置图片的宽度和高度。例如,我们可以在页面中添加如下的代码:
<template>
  <view>
    <uni-image src="/static/image.jpg" width="300px" height="400px" mode="aspectFit"></uni-image>
  </view>
</template>

<script>
export default {
  data() {
    return {}
  },
}
</script>

<style scoped>
.view {
  display: flex;
  justify-content: center;
}
</style>上述代码中,我们使用uni-image组件加载了一张名为image.jpg的图片,并将宽度设置为300px,高度设置为400px。通过设置mode为aspectFit,可以保持图片的宽高比并在指定的宽高内显示图片。
接下来,我们需要实现图片的放大和缩小功能。在uniapp中,我们可以使用手势事件来实现图片的放大和缩小。
在页面中,我们可以使用<view>标签将uni-image组件包裹起来,并给该<view>标签设置一个固定的宽高。然后,我们可以给该<view>标签添加@touchstart、@touchmove和@touchend事件监听器来实现手势操作。
<template>
  <view>
    <view class="container" @touchstart="touchStart" @touchmove="touchMove" @touchend="touchEnd">
      <uni-image ref="imageRef" src="/static/image.jpg" width="300px" height="400px" mode="aspectFit"></uni-image>
    </view>
  </view>
</template>

<script>
export default {
  data() {
    return {
      startX: 0,
      startY: 0,
      scale: 1,
    }
  },
  methods: {
    touchStart(event) {
      this.startX = event.touches[0].clientX
      this.startY = event.touches[0].clientY
    },
    touchMove(event) {
      let moveX = event.touches[0].clientX - this.startX
      let moveY = event.touches[0].clientY - this.startY
      this.scale += moveY / 100
      this.startX = event.touches[0].clientX
      this.startY = event.touches[0].clientY
      this.$refs.imageRef.setScale(this.scale, this.scale)
    },
    touchEnd(event) {
      this.scale = 1
      this.$refs.imageRef.setScale(this.scale, this.scale)
    },
  },
}
</script>

<style scoped>
.view {
  display: flex;
  justify-content: center;
}

.container {
  width: 300px;
  height: 400px;
}
</style>上述代码中,我们在data中定义了startX、startY和scale三个变量,用于记录手势操作的起点坐标和图片的缩放比例。
在touchStart事件中,我们记录了手势操作的起点坐标。
在touchMove事件中,我们根据手势操作的位移计算出缩放比例,并更新scale变量。然后,根据更新后的缩放比例,调用uni-image组件的setScale方法实现图片的缩放。
在touchEnd事件中,我们将scale重置为1,恢复图片的原始大小。
最后,我们可以在页面中预览效果。通过手势操作,我们可以实现图片的放大和缩小功能。
总结:
本文介绍了如何使用uniapp实现图片放大缩小功能。通过使用uni-image组件和手势事件,我们可以很方便地实现图片的显示和操作。希望本文对你有所帮助!
以上是使用uniapp实现图片放大缩小功能的详细内容。更多信息请关注PHP中文网其他相关文章!

热AI工具

Undresser.AI Undress
人工智能驱动的应用程序,用于创建逼真的裸体照片

AI Clothes Remover
用于从照片中去除衣服的在线人工智能工具。

Undress AI Tool
免费脱衣服图片

Clothoff.io
AI脱衣机

AI Hentai Generator
免费生成ai无尽的。

热门文章
热工具

记事本++7.3.1
好用且免费的代码编辑器

SublimeText3汉化版
中文版,非常好用

禅工作室 13.0.1
功能强大的PHP集成开发环境

Dreamweaver CS6
视觉化网页开发工具

SublimeText3 Mac版
神级代码编辑软件(SublimeText3)
热门话题


 小红书发布自动保存图片怎么解决?发布自动保存图片在哪里?
Mar 22, 2024 am 08:06 AM
小红书发布自动保存图片怎么解决?发布自动保存图片在哪里?
Mar 22, 2024 am 08:06 AM
随着社交媒体的不断发展,小红书已经成为越来越多年轻人分享生活、发现美好事物的平台。许多用户在发布图片时遇到了自动保存的问题,这让他们感到十分困扰。那么,如何解决这个问题呢?一、小红书发布自动保存图片怎么解决?1.清除缓存首先,我们可以尝试清除小红书的缓存数据。步骤如下:(1)打开小红书,点击右下角的“我的”按钮;(2)在个人中心页面,找到“设置”并点击;(3)向下滚动,找到“清除缓存”选项,点击确认。清除缓存后,重新进入小红书,尝试发布图片看是否解决了自动保存的问题。2.更新小红书版本确保你的小
 抖音评论里怎么发图片?评论区图片入口在哪里?
Mar 21, 2024 pm 09:12 PM
抖音评论里怎么发图片?评论区图片入口在哪里?
Mar 21, 2024 pm 09:12 PM
随着抖音短视频的火爆,用户们在评论区互动变得更加丰富多彩。有些用户希望在评论中分享图片,以更好地表达自己的观点或情感。那么,抖音评论里怎么发图片呢?本文将为你详细解答这个问题,并为你提供一些相关的技巧和注意事项。一、抖音评论里怎么发图片?1.打开抖音:首先,你需要打开抖音APP,并登录你的账号。2.找到评论区:在浏览或发布短视频时,找到想要评论的地方,点击“评论”按钮。3.输入评论内容:在评论区输入你的评论内容。4.选择发送图片:在输入评论内容的界面,你会看到一个“图片”按钮或者“+”号按钮,点
 在 iPhone 上使图片更清晰的 6 种方法
Mar 04, 2024 pm 06:25 PM
在 iPhone 上使图片更清晰的 6 种方法
Mar 04, 2024 pm 06:25 PM
Apple最近的iPhone可以通过清晰的细节、饱和度和亮度来捕捉回忆。但有时,您可能会遇到一些问题,这些问题可能会导致图像看起来不那么清晰。尽管iPhone相机上的自动对焦已经取得了长足的进步,可以让您快速拍照,但相机在某些情况下可能会错误地对焦错误的拍摄对象,从而使照片在不需要的区域更加模糊。如果iPhone上的照片看起来失焦或总体上缺乏清晰度,以下帖子应该可以帮助您使它们更清晰。如何在iPhone上使图片更清晰[6种方法]您可以尝试使用本机的“照片”应用来清理照片。如果您需要更多功能和选项
 ppt怎么让图片一张一张出来
Mar 25, 2024 pm 04:00 PM
ppt怎么让图片一张一张出来
Mar 25, 2024 pm 04:00 PM
在PowerPoint中,让图片逐一显示是一种常用的技巧,可以通过设置动画效果来实现。本指南详细介绍了实现这一技巧的步骤,包括基本设置、图片插入、添加动画、调整动画顺序和时间。此外,还提供了高级设置和调整,例如使用触发器、调整动画速度和顺序,以及预览动画效果。通过遵循这些步骤和技巧,用户可以轻松地在PowerPoint中设置图片逐一出现,从而提升演示文稿的视觉效果并吸引观众的注意力。
 网页图片加载不出来怎么办?6种解决办法
Mar 15, 2024 am 10:30 AM
网页图片加载不出来怎么办?6种解决办法
Mar 15, 2024 am 10:30 AM
有网友发现打开浏览器网页,网页上的图片迟迟加载不出来,是怎么回事?检查过网络是正常的,那是哪里出现了问题呢?下面小编就给大家介绍一下网页图片加载不出来的六种解决方法。 网页图片加载不出来: 1、网速问题 网页显示不出图片有可能是因为电脑的网速比较慢,电脑中开启的软件比较多, 而我们访问的图片比较大,这就可能因为加载超时,导致图片显示不出来, 可以将比较占网速的软件将关掉,可以去任务管理器查看一下。 2、访问人数过多 网页显示不出图片还有可能是因为我们访问的网页,在同时间段访问的
 如何使用HTML、CSS和jQuery实现图片合并展示的高级功能
Oct 27, 2023 pm 04:36 PM
如何使用HTML、CSS和jQuery实现图片合并展示的高级功能
Oct 27, 2023 pm 04:36 PM
如何使用HTML、CSS和jQuery实现图片合并展示的高级功能概述:在网页设计中,图片展示是一个重要的环节,而图片合并展示是提高页面加载速度和提升用户体验的常用技巧之一。本文将介绍如何使用HTML、CSS和jQuery来实现图片合并展示的高级功能,并提供具体的代码示例。一、HTML布局:首先,我们需要在HTML中创建一个容器来展示合并后的图片。可以使用di
 福昕PDF阅读器如何将pdf文档转成jpg图片-福昕PDF阅读器将pdf文档转成jpg图片的方法
Mar 04, 2024 pm 05:49 PM
福昕PDF阅读器如何将pdf文档转成jpg图片-福昕PDF阅读器将pdf文档转成jpg图片的方法
Mar 04, 2024 pm 05:49 PM
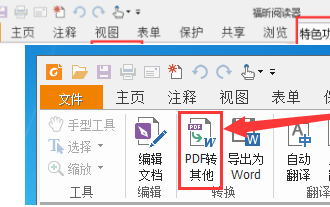
你们是不是也在使用福昕PDF阅读器软件呢?那么你们知道福昕PDF阅读器如何将pdf文档转成jpg图片吗?下面这篇文章就为大伙带来了福昕PDF阅读器将pdf文档转成jpg图片的方法,感兴趣的小伙伴们快来下文看看吧。先启动福昕PDF阅读器,接着在顶部工具栏找到“特色功能”,然后选择“PDF转其他”功能。在接下来,打开一个名为“福昕pdf在线转换”的网页。在页面上方右侧点击“登录”按钮进行登录,然后打开“PDF转图片”功能。之后点击上传按钮并将想要转换成图片的pdf文件添加进来,添加完毕后点击“开始转
 如何使用 JavaScript 实现图片的拖拽缩放功能?
Oct 27, 2023 am 09:39 AM
如何使用 JavaScript 实现图片的拖拽缩放功能?
Oct 27, 2023 am 09:39 AM
如何使用JavaScript实现图片的拖拽缩放功能?在现代web开发中,实现图片的拖拽和缩放是常见的需求。通过使用JavaScript,我们可以轻松地为图片添加拖拽和缩放功能,提供更好的用户体验。在本篇文章中,将介绍如何使用JavaScript来实现这一功能,以及附有具体的代码示例。HTML结构首先,我们需要一个基本的HTML结构来展示图片,并为图片添
