 Web Front-end
 JS Tutorial
 Understand jQuery techniques to improve your code (I personally think the jquery manual is very good)_jquery
Understand jQuery techniques to improve your code (I personally think the jquery manual is very good)_jquery

2. Test whether a jQuery wrapper set contains certain elements
If you want to test whether a jQuery wrapper set contains certain elements, you can first try to verify whether the first element exists:
if($(selector)[0]){... }
// Or like this
if($(selector).length){...}
Let’s look at this example:
//Example. If your page has the following html code
- Item X
- Item Z
...
//This if condition will return true because we have two
// input fields matching the selector, so the  code will execute
if($( '#shopping_cart_items input.in_stock')[0]){}
3. Read the latest version of jQuery from jquery.org
You can use this code to read jQuery The latest version of the code file.
You can use this method to call the latest version of the jQuery framework , of course, you can also use the following code to call the same latest version of jQuery from ajax.googleapis.com:
4. Store data
Use the data method to avoid storing data in the DOM. Some Front-end developers like to use HTML attributes to store data:
$('selector').attr('alt', 'data being stored');
//You can read the data like this later:
$('selector').attr('alt');
Using the "alt" attribute as a parameter name to store data is actually not semantic for HTML. We can use jQuery's data method to store data for an element in the page:
$('selector').data('parameter name', 'Data to be stored');
//Then get the data like this:
$('selector').data('parameter');
This data method allows you You can clearly define the data parameters yourself, which is more semantic and flexible. You can store data information in any element on the page. If you want to know more about the data() and removeData() methods, you can read the jQuery official explanation
The classic application of this method is to give the input field a default value, and then clear it when focusing:
HTML part:
JavaSript part:
$(function() {
//Take out the input field with clear class
//(Note: "clear once" is two classes clear and once)
$(' #testform input.clear').each(function(){
//Use data method to store data
$(this).data( "txt", $.trim($(this).val() ) );
}).focus(function(){
// When getting focus, determine whether the value in the field is the same as the default value. If it is the same, clear it
if ( $.trim($(this)) .val()) === $(this).data("txt") ) {
$(this).val("");
}
}).blur(function() {
// Add blur time to the field with class clear to restore the default value
// But if the class is once, ignore it
if ( $.trim($(this).val()) = == "" && !$(this).hasClass("once") ) {
//Restore saved data
$(this).val( $(this).data("txt") );
}
});
});
5. Keep the jQuery manual close at hand
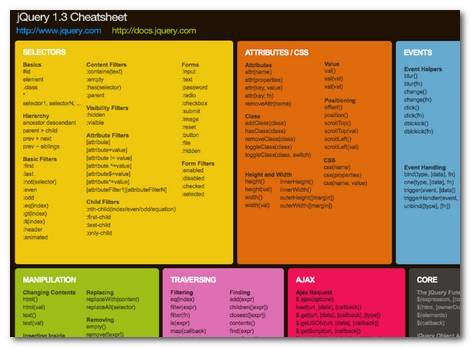
Most people have a hard time remembering all the programming details, no matter how good they are Most programmers will also be careless about a certain programming language, so printing out the relevant manuals or putting them on the desktop for reference at any time can definitely improve programming efficiency.
oscarotero jquery 1.3 (Wallpaper version)

6. Record jQuery in FireBug console
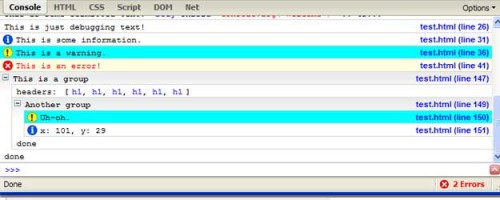
FireBug is my favorite one. One of the browser extension tools, this tool allows you to quickly understand the HTML CSS JavaScript of the current page in the visual interface, and complete instant development under this tool. As a jQuery or JavaScript developer, FireFox is also supported for logging your JavaScript code.
The easiest way to write to the FireBug console is as follows:
console.log("hello world")

You can also write some parameters the way you want:
console.log(2,4,6,8,"foo",bar)
You also You can write a small extension to log jQuery objects to the console:
jQuery.fn.log = function (msg) {
console.log("%s: %o", msg, this);
return this;
};
For this extension, you can directly use the .log() method to log the current object to the console.
$('#some_div').find('li .source > input:checkbox')
.log("sources to uncheck")
.removeAttr("checked");
7. Use ID selectors whenever possible
After using jQuery, you will find that it is quite simple to use the class attribute to select DOM elements. Despite this, it is recommended that you use class selectors as little as possible instead and use ID selectors that run faster as much as possible (using class selectors in IE browser will return a matching class packaging set after traversing the entire DOM tree). The ID selector is faster because the DOM itself has a "natural" getElementById method, but class does not. So if you use class selectors, the browser will traverse the entire DOM. If the DOM structure of your web page is complex enough, these class selectors are enough to make the page slower and slower. Let’s look at this simple HTML code:
< ;div id="main">
var main_button = $('#main .button');
var main_button = $('#main_button');
8. Make good use of jQuery chain
jQuery chain not only allows powerful operations to be written in a concise way, but also improves development efficiency because it can apply multiple commands to the package set without having to recalculate Packaging set. So you no longer have to write like this:
$('#shopping_cart_items input.text').css('background-color', 'red');
$('#shopping_cart_items input.text' ).val("text updated");
Instead you can use jQuery chain to complete the simple operation:
var input_text = $('#shopping_cart_items input.text');
input_text.css('border', '3px dashed yellow') ;
input_text.css('background-color', 'red');
input_text.val("text updated");
//same with chaining:
var input_text = $('#shopping_cart_items input.text');
input_text
.css('border', '3px dashed yellow')
.css('background-color', 'red')
.val("text updated");
[html]
9. Bind jQuery function to $(window).load event
Most jQuery examples or tutorials tell us to bind our jQuery code to the $(document).ready event. Although the $(document).ready event is OK in most cases, its parsing sequence starts when the document is ready and objects such as images in a single document are being downloaded. Therefore, using the $(document).ready event may not necessarily achieve the results we expect at certain times, such as some visual effects and animations, dragging, pre-reading hidden pictures, etc... By using the $(window).load event It's safe to wait until the entire document is ready before running your desired code.
[code]
$(window).load(function(){
// Put the code you want to run after the page is fully ready here
});
10. Use jQuery chains to limit selectors, making your code more concise and elegant
Since JavaScript supports chain structures and line breaks, your code can be written as follows. This example first moves the element up Remove one class and add another class to the same element:
$('#shopping_cart_items input.in_stock')
.removeClass('in_stock')
.addClass('3-5_days');
If you want to make it easier Practical, you can create a jQuery function that supports chain structure:
$.fn.makeNotInStock = function() {
return $(this).removeClass('in_stock').addClass('3-5_days');
}
$('#shopping_cart_items input. in_stock').makeNotInStock().log();
11. Use callback function to synchronize effects
If you want to ensure that an event or animation effect is called after another event is run , then you have to use the callback function. You can bind callback functions behind these animation effects: slideDown( speed, [callback] ) ie. $('#sliding').slideDown('slow', function(){… Click here to preview this example.
$(document).ready(function(){
// Use jQuery’s click event to change the visual effect and enable the sliding effect
$("div.button" ).click(function () {
//div.button now looks like the effect of being pressed
$(this).css({ borderStyle:"inset", cursor:"wait" });
//#sliding will now fade out and turn on the fade-in effect after completing the action
//slideup once it completes
$('#sliding').slideDown('slow', function(){
$('#sliding').slideUp('slow', function(){
//After the fade effect is completed, the CSS properties of the button will be changed
$('div.button').css ({ borderStyle:"outset", cursor:"auto" });
});
});
});
});
12 .Learn to use custom selectors
jQuery allows us to define custom selectors based on css selectors to make our code more concise:
$.expr[':'].mycustomselector= function(element, index, meta, stack){
// element- DOM element
// index - the currently traversed index in the stack value
// meta - the data element about your selector
// stack - the stack used to iterate over all elements
// returns true if the current element is included
// no Return false if the current element is included
};
// Application of custom selector:
$('.someClasses:test').doSomething();
Let's take a look at a small example below, where we use a custom selector to lock the set of elements containing the "rel" attribute:
$.expr[':'].withRel = function(element){
var $this = $(element);
/ /Only return elements whose rel attribute is not empty
return ($this.attr('rel') != '');
};
$(document).ready(function( ){
//The use of custom selectors is very simple. Like other selectors, it returns an element packaging set
//You can use the formatting method for it, such as modifying its css style as follows
$('a:withRel').css('background-color', 'green');
});
13. Preload images
Usually using JavaScript to preload images is a good way:
//Define the function to preload the image list (with parameters)
jQuery.preloadImages = function(){
//Traverse the images
for(var i = 0; i
}
}
// You can use the preload function like this
$.preloadImages("images/logo.png", "images/logo-face.png", "images/mission.png");
14. Test your code well
jQuery has a unit testing framework called QUnit. Writing tests is easy and allows you to modify your code with confidence and ensure it still works as expected. Here's how it works:
//Split the test into several Module.
module("Module B");
test("some other test", function() {
//Specify how many judgment statements need to be added to the test.
expect (2);
equals( true, false, "failing test" );
equals( true, true, "passing test" );
});

Hot AI Tools

Undresser.AI Undress
AI-powered app for creating realistic nude photos

AI Clothes Remover
Online AI tool for removing clothes from photos.

Undress AI Tool
Undress images for free

Clothoff.io
AI clothes remover

AI Hentai Generator
Generate AI Hentai for free.

Hot Article

Hot Tools

Notepad++7.3.1
Easy-to-use and free code editor

SublimeText3 Chinese version
Chinese version, very easy to use

Zend Studio 13.0.1
Powerful PHP integrated development environment

Dreamweaver CS6
Visual web development tools

SublimeText3 Mac version
God-level code editing software (SublimeText3)

Hot Topics
 Replace String Characters in JavaScript
Mar 11, 2025 am 12:07 AM
Detailed explanation of JavaScript string replacement method and FAQ This article will explore two ways to replace string characters in JavaScript: internal JavaScript code and internal HTML for web pages. Replace string inside JavaScript code The most direct way is to use the replace() method: str = str.replace("find","replace"); This method replaces only the first match. To replace all matches, use a regular expression and add the global flag g: str = str.replace(/fi
 8 Stunning jQuery Page Layout Plugins
Mar 06, 2025 am 12:48 AM
Leverage jQuery for Effortless Web Page Layouts: 8 Essential Plugins jQuery simplifies web page layout significantly. This article highlights eight powerful jQuery plugins that streamline the process, particularly useful for manual website creation
 Build Your Own AJAX Web Applications
Mar 09, 2025 am 12:11 AM
So here you are, ready to learn all about this thing called AJAX. But, what exactly is it? The term AJAX refers to a loose grouping of technologies that are used to create dynamic, interactive web content. The term AJAX, originally coined by Jesse J
 10 Mobile Cheat Sheets for Mobile Development
Mar 05, 2025 am 12:43 AM
This post compiles helpful cheat sheets, reference guides, quick recipes, and code snippets for Android, Blackberry, and iPhone app development. No developer should be without them! Touch Gesture Reference Guide (PDF) A valuable resource for desig
 Improve Your jQuery Knowledge with the Source Viewer
Mar 05, 2025 am 12:54 AM
jQuery is a great JavaScript framework. However, as with any library, sometimes it’s necessary to get under the hood to discover what’s going on. Perhaps it’s because you’re tracing a bug or are just curious about how jQuery achieves a particular UI
 10 jQuery Fun and Games Plugins
Mar 08, 2025 am 12:42 AM
10 fun jQuery game plugins to make your website more attractive and enhance user stickiness! While Flash is still the best software for developing casual web games, jQuery can also create surprising effects, and while not comparable to pure action Flash games, in some cases you can also have unexpected fun in your browser. jQuery tic toe game The "Hello world" of game programming now has a jQuery version. Source code jQuery Crazy Word Composition Game This is a fill-in-the-blank game, and it can produce some weird results due to not knowing the context of the word. Source code jQuery mine sweeping game
 How do I create and publish my own JavaScript libraries?
Mar 18, 2025 pm 03:12 PM
Article discusses creating, publishing, and maintaining JavaScript libraries, focusing on planning, development, testing, documentation, and promotion strategies.
 jQuery Parallax Tutorial - Animated Header Background
Mar 08, 2025 am 12:39 AM
This tutorial demonstrates how to create a captivating parallax background effect using jQuery. We'll build a header banner with layered images that create a stunning visual depth. The updated plugin works with jQuery 1.6.4 and later. Download the


