How to easily query pictures by name in Excel
This article brings you relevant knowledge about excel. It mainly organizes related issues on how to query pictures by name, including how to insert pictures from one worksheet to another. A worksheet, based on the picture names in column A of the data table, inserting photos from the photo table into column B of the data table in batches, etc. Let’s take a look at it together. I hope it will be helpful to everyone.
Related learning recommendations: excel tutorial
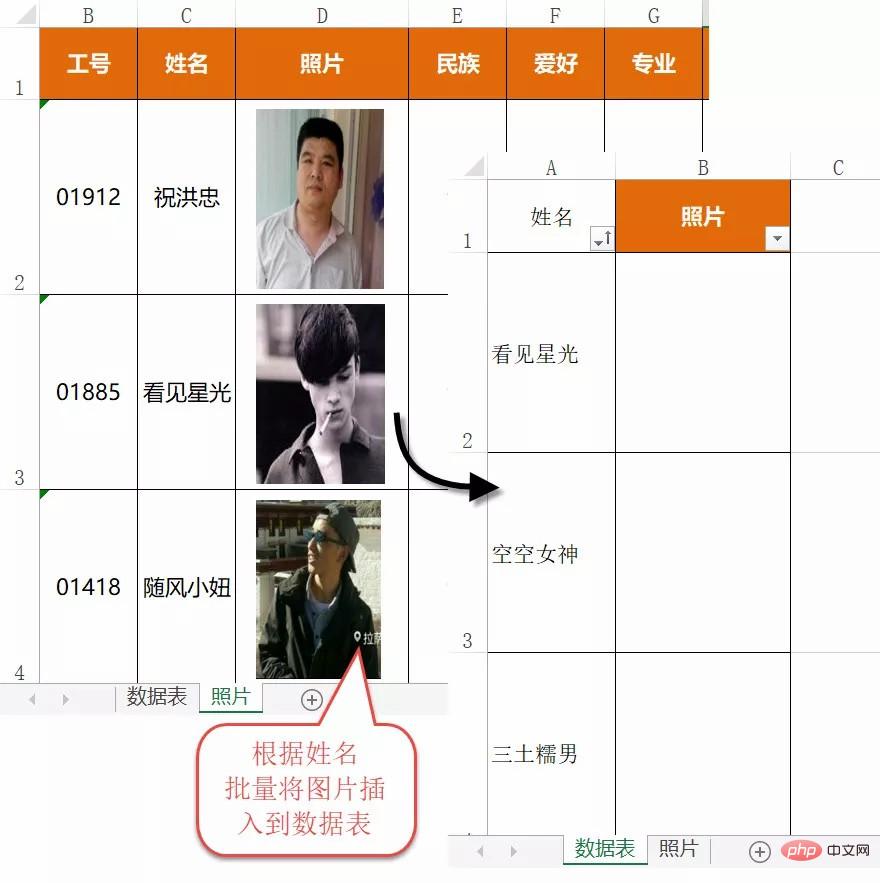
How to insert pictures from one worksheet to another worksheet? for example.
As shown below:
A workbook has two worksheets.
The worksheet that stores photos is named [Photo], and the worksheet that needs to insert pictures is named [Data].
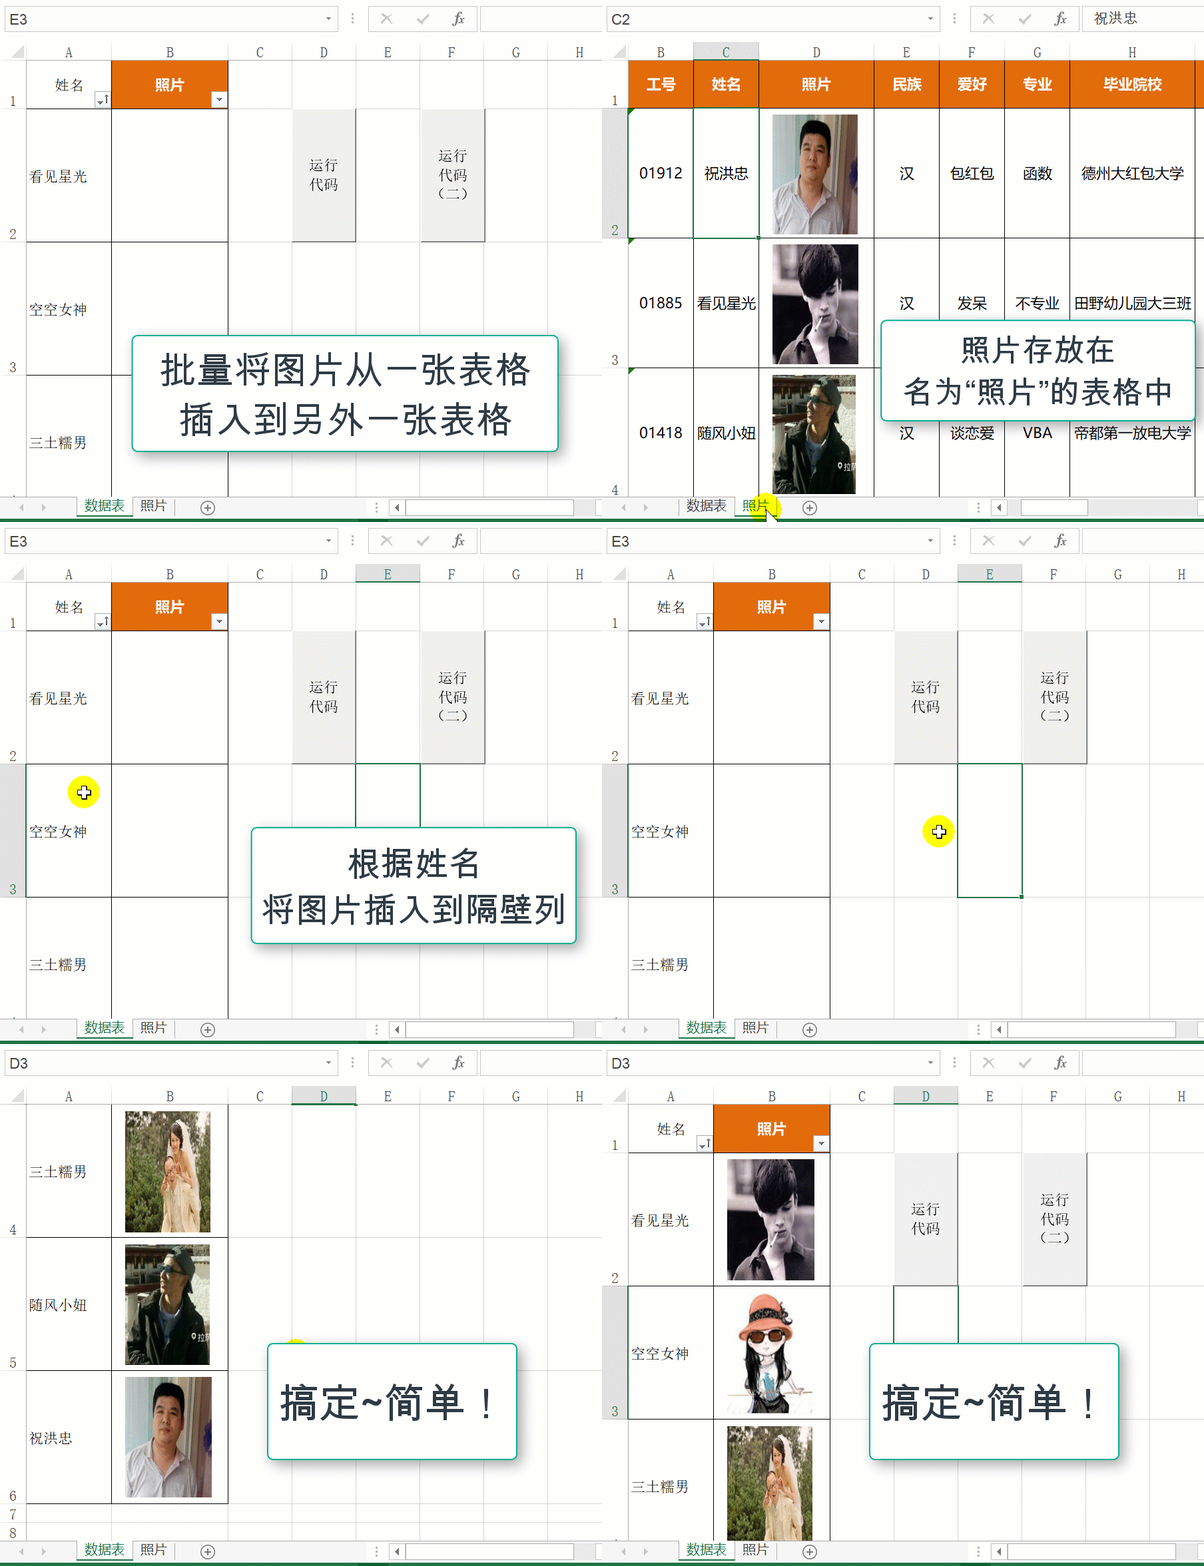
Now we need to batch insert photos from the [Photo] table into column B of the [Data] table based on the picture names in column A of the [data] table...
The sample animation is as follows :
......
To achieve such a function, 3 lines of code are actually enough.
The code is as follows:
Sub InsertPicFromSheet() Dim rngData As Range, rngPicName As Range For Each rngData In Range("a2", Cells(Rows.Count, 1).End(3)) Set rngPicName = Sheets("照片").Cells.Find(rngData.Value, , , xlWhole) '使用Find方法在照片表完整匹配姓名 If Not rngPicName Is Nothing Then rngPicName.Offset(0, 1).Copy rngData.Offset(0, 1) '如果有找到对应的姓名,则将照片复制粘贴到目标位置 Next End Sub
However...
The biggest problem with the above code is that the data table does not delete the old pictures. If the program is run repeatedly, the pictures will be Cumulatively, in order to solve this problem, we need to add two more lines of code.
The code is modified as follows:
Sub InsertPicFromSheet() Dim shp As Shape, rngData As Range, rngPicName As Range For Each shp In ActiveSheet.Shapes '删除活动工作表原有照片 If shp.Type = 13 Then shp.Delete Next For Each rngData In Range("a2", Cells(Rows.Count, 1).End(3)) Set rngPicName = Sheets("照片").Cells.Find(rngData.Value, , , xlWhole) '使用Find方法在照片表的完整匹配姓名 If Not rngPicName Is Nothing Then rngPicName.Offset(0, 1).Copy rngData.Offset(0, 1) '如果有找到对应的姓名,则将照片复制粘贴到目标位置 Next End Sub
The above code uses a one-size-fits-all approach to delete old images.
But...
Although this code is enough for friends with good VBA foundation to deal with most problems with slight modifications, for novices, it is obviously Not friendly enough...
For example...
1. The name of the photo is fixed in column A of the data table. In actuality, it is probably not column A. I am right.
2. The position where the photo is placed is fixed in the cell where the name column is moved one column to the right. In actual situation, of course, this may not be the case. What I said is still right.
3. The worksheet that stores photos is fixedly set to sheets ("photos") in the code. In actuality, this is definitely not the case. I am wise...
4. The code is not set. The size of the cell is adapted to the size of the picture, I...
The code is modified as follows:
Sub InsertPicFromSheet2() 'ExcelHome VBA编程学习与实践 by:看见星光 Dim rngData As Range, rngWhere As Range, cll As Range Dim rngPicName As Range, rngPic As Range, rngPicPaste As Range Dim shp As Shape, sht As Worksheet, bln As Boolean Dim strWhere As String, strPicName As String, strPicShtName As String Dim x, y As Long, lngYesCount As Long, lngNoCount As Long 'On Error Resume Next Set rngData = Application.InputBox("请选择应插入图片名称的单元格区域", Type:=8) '用户选择需要插入图片的名称所在单元格范围 Set rngData = Intersect(rngData.Parent.UsedRange, rngData) 'intersect语句避免用户选择整列单元格,造成无谓运算的情况 If rngData Is Nothing Then MsgBox "选择的单元格范围不存在数据!": Exit Sub strWhere = InputBox("请输入放置图片偏移的位置,例如上1、下1、左1、右1", , "右1") '用户输入图片相对单元格的偏移位置 If Len(strWhere) = 0 Then Exit Sub x = Left(strWhere, 1) '偏移的方向 If InStr("上下左右", x) = 0 Then MsgBox "你未输入偏移方位。": Exit Sub y = Val(Mid(strWhere, 2)) '偏移的值 Select Case x Case "上" Set rngWhere = rngData.Offset(-y, 0) Case "下" Set rngWhere = rngData.Offset(y, 0) Case "左" Set rngWhere = rngData.Offset(0, -y) Case "右" Set rngWhere = rngData.Offset(0, y) End Select strPicShtName = InputBox("请输入存放图片的工作表名称", , "照片") For Each sht In Worksheets If sht.Name = strPicShtName Then bln = True Next If bln <> True Then MsgBox "未找到保存图片的工作表:" & strPicShtName & vbCrLf & "程序退出。": Exit Sub Application.ScreenUpdating = False rngData.Parent.Select For Each shp In ActiveSheet.Shapes '如果旧图片存放在目标图片存放范围则删除 If Not Intersect(rngWhere, shp.TopLeftCell) Is Nothing Then shp.Delete Next x = rngWhere.Row - rngData.Row y = rngWhere.Column - rngData.Column '偏移的纵横坐标 For Each cll In rngData '遍历选择区域的每一个单元格 strPicName = cll.Text '图片名称 If Len(strPicName) Then '如果单元格存在值 Set rngPicName = Sheets(strPicShtName).Cells.Find(cll.Value, , , xlWhole) '使用Find方法在照片表完整匹配姓名 If Not rngPicName Is Nothing Then Set rngPicPaste = cll.Offset(x, y) '粘贴图片的单元格 Set rngPic = rngPicName.Offset(0, 1) '保存图片的单元格 lngYesCount = lngYesCount + 1 '累加找到结果的个数 If lngYesCount = 1 Then '设置放置图片单元格的行高和列宽,以适应图片的大小 rngPicPaste.RowHeight = rngPic.RowHeight rngPicPaste.ColumnWidth = rngPic.ColumnWidth End If rngPicName.Offset(0, 1).Copy rngPicPaste '如果有找到对应的姓名,则将照片复制粘贴到目标位置 Else lngNoCount = lngNoCount + 1 '累加未找到结果的个数 End If End If Next Application.ScreenUpdating = True MsgBox "共处理成功" & lngYesCount & "个对象,另有" & lngNoCount & "个非空单元格未找到对应的图片名称。" End Sub
The above code solves the three common problems we mentioned earlier...
Ran...Three but...
There are still some unresolved problems that may arise in practical applications...
For example...
1. How to solve the problem of pictures and Data source linkage? When the data source image changes, the data table image also changes automatically? Well, in addition to re-running the program, you can also use the activation event of the worksheet, or use activesheet.chartobjects.add...
2. How to set the size of the picture to fit the cell instead of adjusting the size of the cell Adapt to the picture?
Related learning recommendations: excel tutorial
The above is the detailed content of How to easily query pictures by name in Excel. For more information, please follow other related articles on the PHP Chinese website!

Hot AI Tools

Undresser.AI Undress
AI-powered app for creating realistic nude photos

AI Clothes Remover
Online AI tool for removing clothes from photos.

Undress AI Tool
Undress images for free

Clothoff.io
AI clothes remover

AI Hentai Generator
Generate AI Hentai for free.

Hot Article

Hot Tools

Notepad++7.3.1
Easy-to-use and free code editor

SublimeText3 Chinese version
Chinese version, very easy to use

Zend Studio 13.0.1
Powerful PHP integrated development environment

Dreamweaver CS6
Visual web development tools

SublimeText3 Mac version
God-level code editing software (SublimeText3)

Hot Topics


If when opening a file that needs to be printed, we will find that the table frame line has disappeared for some reason in the print preview. When encountering such a situation, we must deal with it in time. If this also appears in your print file If you have questions like this, then join the editor to learn the following course: What should I do if the frame line disappears when printing a table in Excel? 1. Open a file that needs to be printed, as shown in the figure below. 2. Select all required content areas, as shown in the figure below. 3. Right-click the mouse and select the "Format Cells" option, as shown in the figure below. 4. Click the “Border” option at the top of the window, as shown in the figure below. 5. Select the thin solid line pattern in the line style on the left, as shown in the figure below. 6. Select "Outer Border"

Excel is often used to process data in daily office work, and it is often necessary to use the "filter" function. When we choose to perform "filtering" in Excel, we can only filter up to two conditions for the same column. So, do you know how to filter more than 3 keywords at the same time in Excel? Next, let me demonstrate it to you. The first method is to gradually add the conditions to the filter. If you want to filter out three qualifying details at the same time, you first need to filter out one of them step by step. At the beginning, you can first filter out employees with the surname "Wang" based on the conditions. Then click [OK], and then check [Add current selection to filter] in the filter results. The steps are as follows. Similarly, perform filtering separately again

In our daily work and study, we copy Excel files from others, open them to add content or re-edit them, and then save them. Sometimes a compatibility check dialog box will appear, which is very troublesome. I don’t know Excel software. , can it be changed to normal mode? So below, the editor will bring you detailed steps to solve this problem, let us learn together. Finally, be sure to remember to save it. 1. Open a worksheet and display an additional compatibility mode in the name of the worksheet, as shown in the figure. 2. In this worksheet, after modifying the content and saving it, the dialog box of the compatibility checker always pops up. It is very troublesome to see this page, as shown in the figure. 3. Click the Office button, click Save As, and then

eWe often use Excel to make some data tables and the like. Sometimes when entering parameter values, we need to superscript or subscript a certain number. For example, mathematical formulas are often used. So how do you type the subscript in Excel? ?Let’s take a look at the detailed steps: 1. Superscript method: 1. First, enter a3 (3 is superscript) in Excel. 2. Select the number "3", right-click and select "Format Cells". 3. Click "Superscript" and then "OK". 4. Look, the effect is like this. 2. Subscript method: 1. Similar to the superscript setting method, enter "ln310" (3 is the subscript) in the cell, select the number "3", right-click and select "Format Cells". 2. Check "Subscript" and click "OK"

When processing data, sometimes we encounter data that contains various symbols such as multiples, temperatures, etc. Do you know how to set superscripts in Excel? When we use Excel to process data, if we do not set superscripts, it will make it more troublesome to enter a lot of our data. Today, the editor will bring you the specific setting method of excel superscript. 1. First, let us open the Microsoft Office Excel document on the desktop and select the text that needs to be modified into superscript, as shown in the figure. 2. Then, right-click and select the "Format Cells" option in the menu that appears after clicking, as shown in the figure. 3. Next, in the “Format Cells” dialog box that pops up automatically

Most users use Excel to process table data. In fact, Excel also has a VBA program. Apart from experts, not many users have used this function. The iif function is often used when writing in VBA. It is actually the same as if The functions of the functions are similar. Let me introduce to you the usage of the iif function. There are iif functions in SQL statements and VBA code in Excel. The iif function is similar to the IF function in the excel worksheet. It performs true and false value judgment and returns different results based on the logically calculated true and false values. IF function usage is (condition, yes, no). IF statement and IIF function in VBA. The former IF statement is a control statement that can execute different statements according to conditions. The latter

In the study of software, we are accustomed to using excel, not only because it is convenient, but also because it can meet a variety of formats needed in actual work, and excel is very flexible to use, and there is a mode that is convenient for reading. Today I brought For everyone: where to set the excel reading mode. 1. Turn on the computer, then open the Excel application and find the target data. 2. There are two ways to set the reading mode in Excel. The first one: In Excel, there are a large number of convenient processing methods distributed in the Excel layout. In the lower right corner of Excel, there is a shortcut to set the reading mode. Find the pattern of the cross mark and click it to enter the reading mode. There is a small three-dimensional mark on the right side of the cross mark.

1. Open the PPT and turn the page to the page where you need to insert the excel icon. Click the Insert tab. 2. Click [Object]. 3. The following dialog box will pop up. 4. Click [Create from file] and click [Browse]. 5. Select the excel table to be inserted. 6. Click OK and the following page will pop up. 7. Check [Show as icon]. 8. Click OK.