
perl + fastcgi + nginx搭建
nginx + fastcgi是php下最流行的一套环境了,那perl会不会也有fastcgi呢,当然有,今天来搭建下nginx下perl的fastcgi.性能方面也不亚于php,但是现在web程序php的流行程度perl无法比拟了,性能再好也枉然,但是部分小功能可以考虑使用perl的fastcgi来搞定.进入正题.
1. 准备软件环境:
nginx
perl:系统自带
fastcgi
1.2 perl安装
一般linux都有自带perl,可以不用安装,如果确实没有,请执行:
# yum install perl
1.3 perl-fastcgi安装
# cd /usr/local/src
# wget http://www.cpan.org/modules/by-module/fcgi/fcgi-0.74.tar.gz
# tar -xzvf fcgi-0.74.tar.gz
# cd fcgi-0.74
# perl makefile.pl
# make
# make install
2. nginx虚拟主机配置
server {

  listen  80;
  server_name test.jb51.net;
  #access_log /data/logs/nginx/test.jb51.net.access.log main;

  index index.html index.php index.html;
  root /data/site/test.jb51.net;

  location /
  {

  }

  location ~ \.pl$
  {
   include fastcgi_params;
   fastcgi_pass 127.0.0.1:8999;
   #fastcgi_pass unix:/var/run/jb51.net.perl.sock;
   fastcgi_index index.pl;
  }
}如果想把tcp/ip方式改为socket方式,可以修改fastcgi-wrapper.pl.
$socket = fcgi::opensocket( "127.0.0.1:8999", 10 ); #use ip sockets
改为
$socket = fcgi::opensocket( "/var/run/jb51.net.perl.sock", 10 ); #use ip sockets
3. 配置脚本
3.1 fastcgi监听脚本
文件路径:/usr/bin/fastcgi-wrapper.pl
#!/usr/bin/perl

use fcgi;
use socket;
use posix qw(setsid);

require 'syscall.ph';

&daemonize;

#this keeps the program alive or something after exec'ing perl scripts
end() { } begin() { }
*core::global::exit = sub { die "fakeexit\nrc=".shift()."\n"; };
eval q{exit};
if ($@) {
 exit unless $@ =~ /^fakeexit/;
};

&main;

sub daemonize() {
 chdir '/'     or die "can't chdir to /: $!";
 defined(my $pid = fork) or die "can't fork: $!";
 exit if $pid;
 setsid     or die "can't start a new session: $!";
 umask 0;
}

sub main {
  $socket = fcgi::opensocket( "127.0.0.1:8999", 10 ); #use ip sockets
  $request = fcgi::request( \*stdin, \*stdout, \*stderr, \%req_params, $socket );
  if ($request) { request_loop()};
   fcgi::closesocket( $socket );
}

sub request_loop {
  while( $request->accept() >= 0 ) {

   #processing any stdin input from webserver (for cgi-post actions)
   $stdin_passthrough ='';
   $req_len = 0 + $req_params{'content_length'};
   if (($req_params{'request_method'} eq 'post') && ($req_len != 0) ){
    my $bytes_read = 0;
    while ($bytes_read < $req_len) {
      my $data = '';
      my $bytes = read(stdin, $data, ($req_len - $bytes_read));
      last if ($bytes == 0 || !defined($bytes));
      $stdin_passthrough .= $data;
      $bytes_read += $bytes;
    }
   }

   #running the cgi app
   if ( (-x $req_params{script_filename}) && #can i execute this?
     (-s $req_params{script_filename}) && #is this file empty?
     (-r $req_params{script_filename})  #can i read this file?
   ){
  pipe(child_rd, parent_wr);
  my $pid = open(kid_to_read, "-|");
  unless(defined($pid)) {
   print("content-type: text/plain\r\n\r\n");
      print "error: cgi app returned no output - ";
      print "executing $req_params{script_filename} failed !\n";
   next;
  }
  if ($pid > 0) {
   close(child_rd);
   print parent_wr $stdin_passthrough;
   close(parent_wr);

   while(my $s = ) { print $s; }
   close kid_to_read;
   waitpid($pid, 0);
  } else {
     foreach $key ( keys %req_params){
      $env{$key} = $req_params{$key};
     }
     # cd to the script's local directory
     if ($req_params{script_filename} =~ /^(.*)\/[^\/]+$/) {
       chdir $1;
     }

   close(parent_wr);
   close(stdin);
   #fcntl(child_rd, f_dupfd, 0);
   syscall(&sys_dup2, fileno(child_rd), 0);
   #open(stdin, "<&child_rd");
   exec($req_params{script_filename});
   die("exec failed");
  }
   }
   else {
    print("content-type: text/plain\r\n\r\n");
    print "error: no such cgi app - $req_params{script_filename} may not ";
    print "exist or is not executable by this process.\n";
   }

  }
} 3.2 fastcgi自启动服务脚本:
文件路径:/etc/rc.d/init.d/perl-fastcgi
文件路径:/etc/rc.d/init.d/perl-fastcgi
#!/bin/sh
#
# nginx – this script starts and stops the nginx daemon
#
# chkconfig: - 85 15
# description: nginx is an http(s) server, http(s) reverse \
# proxy and imap/pop3 proxy server
# processname: nginx
# config: /opt/nginx/conf/nginx.conf
# pidfile: /opt/nginx/logs/nginx.pid

# source function library.
. /etc/rc.d/init.d/functions

# source networking configuration.
. /etc/sysconfig/network

# check that networking is up.
[ "$networking" = "no" ] && exit 0

perlfastcgi="/usr/bin/fastcgi-wrapper.pl"
prog=$(basename perl)

lockfile=/var/lock/subsys/perl-fastcgi

start() {
 [ -x $perlfastcgi ] || exit 5
 echo -n $"starting $prog: "
 daemon $perlfastcgi
 retval=$?
 echo
 [ $retval -eq 0 ] && touch $lockfile
 return $retval
}

stop() {
 echo -n $"stopping $prog: "
 killproc $prog -quit
 retval=$?
 echo
 [ $retval -eq 0 ] && rm -f $lockfile
 return $retval
}

restart() {
 stop
 start
}

reload() {
 echo -n $”reloading $prog: ”
 killproc $nginx -hup
 retval=$?
 echo
}

force_reload() {
 restart
}
rh_status() {
 status $prog
}

rh_status_q() {
 rh_status >/dev/null 2>&1
}

case "$1" in
 start)
  rh_status_q && exit 0
  $1
  ;;
 stop)
  rh_status_q || exit 0
  $1
  ;;
 restart)
  $1
  ;;
 reload)
  rh_status_q || exit 7
  $1
  ;;
 force-reload)
  force_reload
  ;;
 status)
  rh_status
  ;;
 condrestart|try-restart)
  rh_status_q || exit 0
  ;;
 *)
  echo $"usage: $0 {start|stop|status|restart|condrestart|try-restart|reload|force-reload}"
  exit 2
esac3.3 设置脚本权限
# chmod a+x /usr/bin/fastcgi-wrapper.pl
# chmod a+x /etc/rc.d/init.d/perl-fastcgi
4. fastcgi测试
4.1 启动nginx与fastcgi
# /usr/local/nginx-1.4.2/sbin/nginx
# /etc/init.d/perl-fastcgi start
4.2 perl测试文件:
文件路径/data/site/test.jb51.net/test.pl
#!/usr/bin/perl

print "content-type:text/html\n\n";
print <<endofhtml;
<html><head><title>perl environment variables</title></head>
<body>
<h1>perl environment variables</h1>
endofhtml

foreach $key (sort(keys %env)) {
 print "$key = $env{$key}<br>\n";
}

print "</body></html>";5. 访问测试
5.1 访问
http://http:test.jb51.net/test.pl,出现内容表示ok.
6. 简单压力测试:
6.1 使用tcp/ip方式
ab -n 1000 -c 10 http://test.jb51.net/test.pl
他是在是太慢了,只好用10个并发,共计100个请求来测试.

6.2 使用socket方式:
ab -n 100000 -c 500 http://test.jb51.net/test.pl
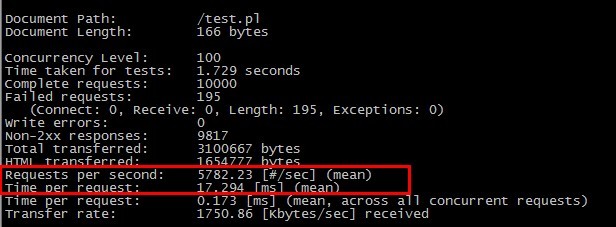
很奇怪,使用tcp/ip方式,每秒就140多个请求,而使用socket方式却有5800个请求/秒。差距不是一般的大。顺便测试了一下php的fastcgi,大概请求在3000(tcp/ip方式),4800(socket方式)。
perl模块的使用
如果对于一个绝大部分内容是静态的网站,只有极少数的地方需要动态显示,碰巧你又了解一点perl知识,那么nginx + perl的结合就能很好解决问题。要想nginx支持perl脚本,在编译nginx时候需要如下参数:
./configure --with-http_perl_module
如果make时候出现如下类似错误:
can't locate extutils/embed.pm in @inc (@inc contains: /usr/lib/perl5/5.10.0/i386-linux-thread-multi /usr/lib/perl5/5.10.0 /usr/local/lib/perl5/site_perl/5.10.0/i386-linux-thread-multi /usr/local/lib/perl5/site_perl/5.10.0 /usr/lib/perl5/vendor_perl/5.10.0/i386-linux-thread-multi /usr/lib/perl5/vendor_perl/5.10.0 /usr/lib/perl5/vendor_perl /usr/local/lib/perl5/site_perl .)
你的机器上可能需要安装perl-devel perl-extutils-embed,对于centos系统,直接使用yum搞定,例如:
yum -y install perl-devel perl-extutils-embed
nginx中使用perl有两种方法,一种是直接在配置文件写,还有一种是把perl脚本写在外部文件中,下面主要介绍一下第二种用法。
假设nginx的根目录为/usr/local/nginx,perl脚本存放的目录为nginx的根目录下的perl/lib下,脚本名字为test.pm,nginx配置为:
#位于http配置中
 perl_modules perl/lib;
 perl_require test.pm;

#位于server配置中
 location /user/ {
 perl pkg_name::process;
}上述配置是把所有来自http://servername/user/下的请求交由test.pm脚本中定义的process方法来处理。
test.pm脚本的内容如下:
package pkg_name;

use time::local;
use nginx;

sub process {
 my $r = shift;

 $r->send_http_header('text/html; charset=utf-8');
 my @arr = split('/', $r->uri);
 my $username = @arr[2];

 if (!$username || ($username eq "")) {
 $username = "anonymous";
 }

 $r->print('hello, you name is : <strong>' . $username . '</strong>');
 $r->rflush();
 return;
}

1;
__end__当你访问http://servername/user/netingcn,你应该可以在网页上看到:
hello, you name is : netingcn
另外:当使用 use nginx 时,会有如下的对象可以调用,可以看到上面 shift 一个对象到 $r 上,然后就可以用 $r 调用那些对象了:
$r->args – 请求的参数 .
$r->discard_request_body – 这个参数是让 nginx 放弃 request 的 body 的内容.
$r->filename – 返回合适的请求文件的名字
$r->has_request_body(function) – 如果没有请求主体,返回0,但是如果请求主体存在,那么建立传递的函数并返回1,在程序的最后,nginx将调用指定的处理器.
$r->header_in(header) – 查找请求头的信息
$r->header_only – 如果我们只要返回一个响应的头
$r->header_out(header, value) – 设置响应的头
$r->internal_redirect(uri) – 使内部重定向到指定的uri,重定向仅在完成perl脚本后发生.可以使用 header_out(location….的方法来让浏览器自己重定向
$r->print(args, …) – 发送数据给客户端
$r->request_body – 得到客户端提交过来的内容 (body 的参数,可能需要修改 nginx 的 client_body_buffer_size. )
$r->request_body_file —给客户的 body 存成文件,并返回文件名
$r->request_method — 得到请求 http method.
$r->remote_addr – 得到客户端的 ip 地址.
$r->rflush – 立即传送数据给客户端
$r->sendfile(file [, displacement [, length ] ) – 传送给客户端指定文件的内容,可选的参数表明只传送数据的偏移量与长度,精确的传递仅在perl脚本执行完毕后生效.这可是所谓的高级功能啊
$r->send_http_header(type) – 添加一个回应的 http 头的信息
$r->sleep(milliseconds, handler) – 设置为请求在指定的时间使用指定的处理方法和停止处理,在此期间nginx将继续处理其他的请求,超过指定的时间后,nginx将运行安装的处理方法,注意你需要为处理方法通过一个reference,在处理器间转发数据你可以使用$r->variable().
$r->status(code) – 设置 http 的响应码
$r->unescape(text) – 使用 http 方法加密内容如 %xx
$r->uri – 得到请求的 url.
$r->variable(name[, value]) – 设置变量的值
以上就是Linux下如何用Nginx作Perl程序服务器及其中Perl模块的详细内容,更多请关注php中文网其它相关文章!

每个人都需要一台速度更快、更稳定的 PC。随着时间的推移,垃圾文件、旧注册表数据和不必要的后台进程会占用资源并降低性能。幸运的是,许多工具可以让 Windows 保持平稳运行。

 广告
广告![ThinkPHP5快速开发企业站点[全程实录]](https://img.php.cn/upload/course/000/000/068/6253d918a3ce7278.png)


Copyright 2014-2025 https://www.php.cn/ All Rights Reserved | php.cn | 湘ICP备2023035733号


 669
669


