This article will share with you a UniApp practical implementation of a table component (UniApp) in a complex scenario. I hope it will be helpful to everyone!
#You are a mature programmer and you need to know how to reinvent your own wheel (I searched the uniApp plug-in market and found no plug-ins that meet my needs. There is no other way. , you can only build a wheel yourself). This article aims to review the record.
Usage scenarios: uniApp, mobile terminal (compatible with mini programs, App, H5)
Organize specific functions according to needs:
Table name
Configurable background
Font style can be modified (size, color)
Menu button (requires external exposure events)
Header
Support multi-level headers
Fixed headers
Header rows support custom names
Table
Supports setting cell width
Fixed first column
Support tree data
Content supports pictures and links
Others
Internal implementation of sorting
Internal implementation of paging
Internal calculation of total rows
The function is relatively complex, and squeezing it into one file is not elegant and will be messy-> Press The general direction is divided into several modules (refined granularity)
There are many requirements, and intuitively there are many parameters that need to be passed-> According to the module definition, the parameters are also classified
There are many parameters. How to manage them more elegantly and reduce the difficulty of getting started? -> Configuration file config.js
and set default values in it, which plays the role of field description and default status management
It will involve the use of some icons -> Select iconfont
icon library
Due to usage environment restrictions: uniApp
implements table-related components that are relatively simple, and have relatively large restrictions for non-H5 environments (for example, rowspan
, colspan
cannot be set ), it also seemed troublesome to use and could not meet the needs of the project, so I finally decided to build a wheel myself.
Header part
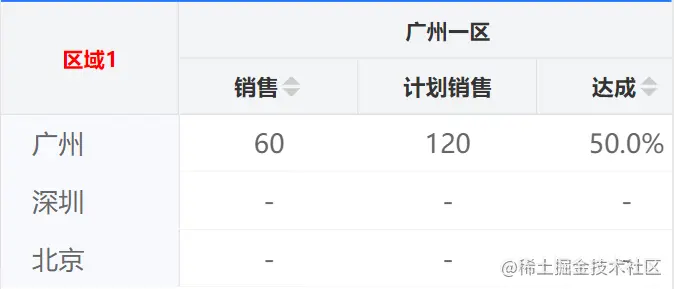
The main difficulty lies in the processing of multi-level headers, how to do it based on the data Driver display. At the beginning, I planned to implement it in the way of html table
. During the development process, I encountered many problems. First of all, data processing was troublesome. I had to calculate how many rows there were and the colspan## of the cells in each row. #,
rowspan. And there are no
td, tr and other components, so you need to implement them yourself. The data in
columns is in tree shape, as shown below
columns = [ { "title": "区域", "dataIndex": "区域" }, { "title": "广州一区", "children": [ { "title": "销售", "dataIndex": "广州一区销售"}, { "title": "计划销售", "dataIndex": "广州一区计划销售" }, { "title": "达成", "dataIndex": "广州一区达成"} ] }, // ... ]
flex layout
Each grid is set vertically Centered, if
children exists, traverse
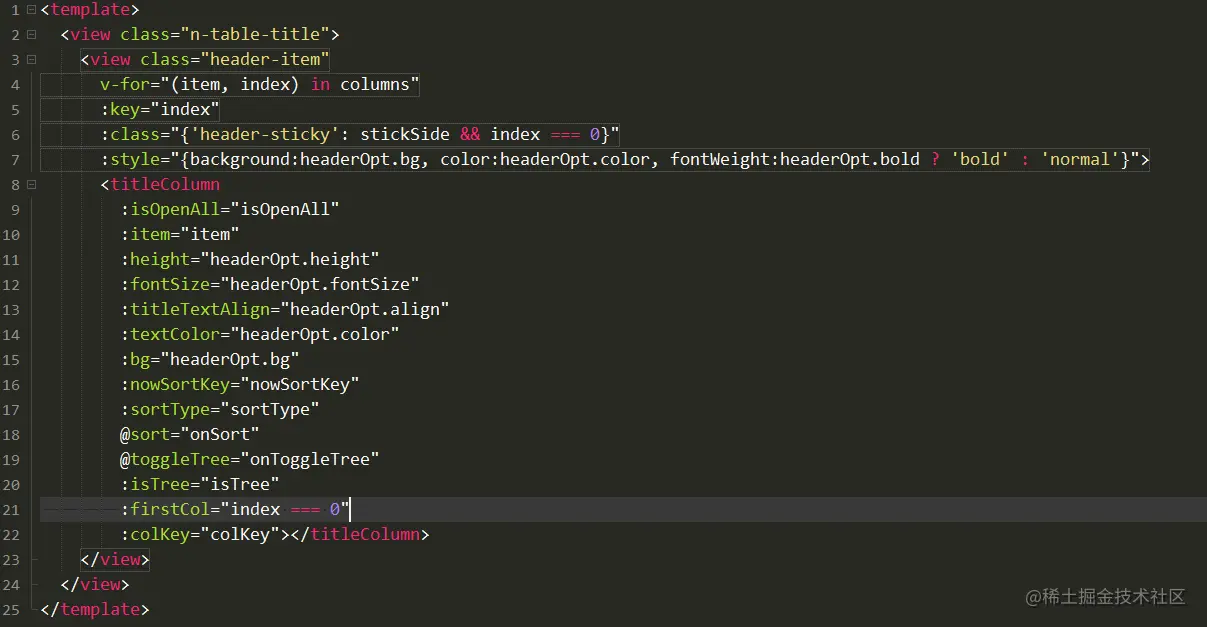
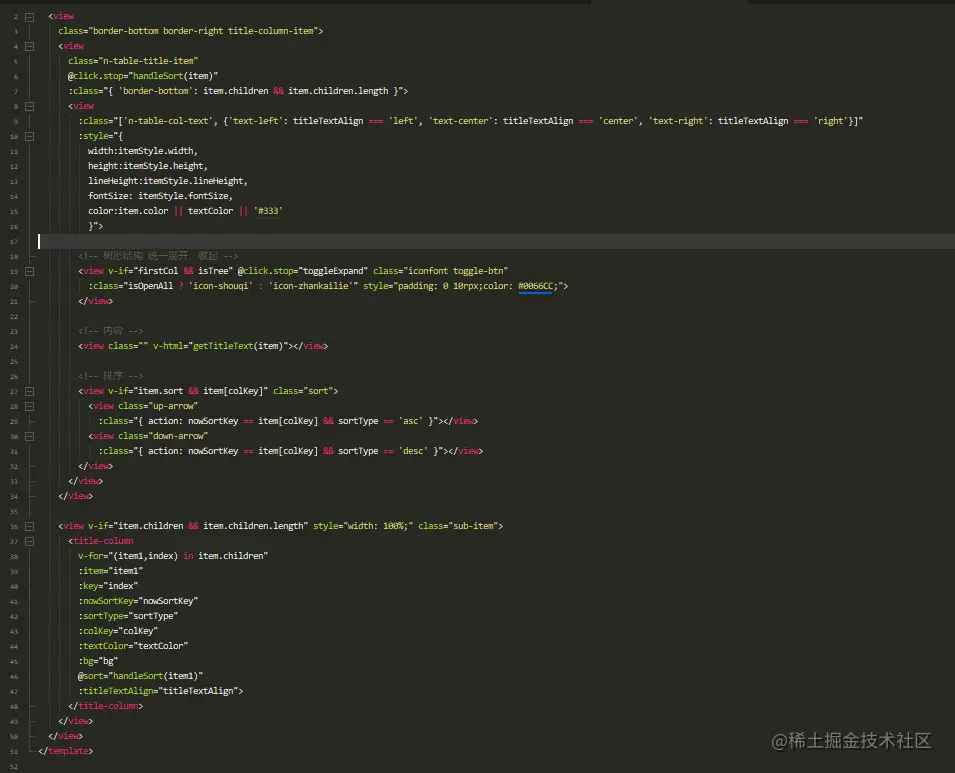
recursive rendering. Since rendering needs to be called recursively, the recursive part is separated into a component: titleColumn. Post the code first (the code has been released to the community, if you are interested, you can check it out
Portal):
table-header.vue
titleColumn.vue
There is a pit here:
In normalvue, recursive components do not need to be introduced, but in
uniApp, they are required.
// titleColumn.vue import titleColumn from "./title-column.vue"
Table content
Here First, we need to process the data ofcolumns (the multi-level header situation must be taken into account). According to the above
columns, we get the actual columns to be rendered:
dataIndexs, used to save the column data that needs to be actually rendered
columnsGet the final leaf node and save it.
// 根据Column 获取body中实际渲染的列 fmtColumns(list) { // 保存叶子节点 this.dataIndexs = [] if (!list || !list.length) return // 获取实际行 this.columnsDeal(list) }, // columnsDeal(list, level = 0) { list.forEach(item => { let { children, ...res } = item if (children && children.length) { this.columnsDeal(children, level + 1) } else { this.dataIndexs.push({ ...res }) } }) },
接下来就是处理列表数据中的树形结构了。
先看看数据结构 tableData
:
tableData = [ { "key": 1, "区域": "广州", "销售": 100, "计划销售": 200, "达成": "50.0%", "达成排名": 1, "GroupIndex": 1, "GroupLayer": 1, "GroupKey": "广州", "children": [{ "key": 11, "区域": "广州一区", "小区": "广州一区", "销售": 60, "计划销售": 120, "达成": "50.0%", "达成排名": 1, children: [{ "key": 111, "区域": "广州一区1", "小区": "广州一区1", "销售": 60, "计划销售": 120, "达成": "50.0%", "达成排名": 1, }] }, { "key": 12, "区域": "广州二区", "小区": "广州二区", "销售": 40, "计划销售": 80, "达成": "50.0%", "达成排名": 1 }, ], }, ]
树形的结构,key
是唯一值。
有想过使用递归组件的方式实现,但是考虑到会涉及到展开、收起的操作。也是比较麻烦。
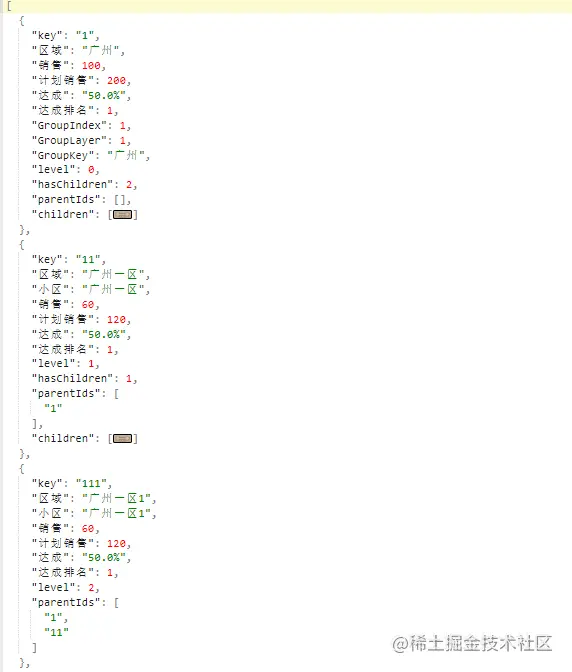
最终的方案是把数据扁平化处理,为每条数据添加 层级、是否子数据、父级ID 等属性。并通过一个数组变量来记录展开的行,并以此控制子数据的显示与否。处理后的数据存放在 dataList
中
扁平化处理函数:
// 递归处理数据,tree => Array listFmt(list, level, parentIds = []) { return list.reduce((ls, item) => { let { children, ...res } = item // 错误提示 if (res[this.idKey] === undefined || !res[this.idKey] === null) { // console.error(`tableData 数据中存在 [idKey] 属性不存在数据,请检查`) } let nowItem = { ...res, level, hasChildren: children && children.length, parentIds, children, [this.idKey]: res[this.idKey] && res[this.idKey].toString() } ls.push(nowItem) if (children && children.length) { this.isTree = true ls = ls.concat(this.listFmt(children, level + 1, [...parentIds, nowItem[this.idKey]])) } return ls }, []) },
最终得到的数据如下:
数据处理完可以渲染了,
需要嵌套两层遍历:
第一层 遍历 dataList
得到行
第二层 遍历 dataIndexs
得到列
最终完成渲染:
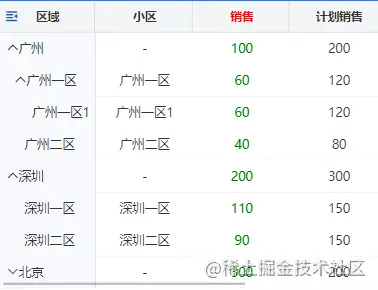
固定首列,固定表头
使用css
属性:position: sticky
实现。粘性定位元素(stickily positioned element)。大家都是成熟的前端程序猿啦~~,就不具体介绍了。说说一些需要注意的细节:
兼容性
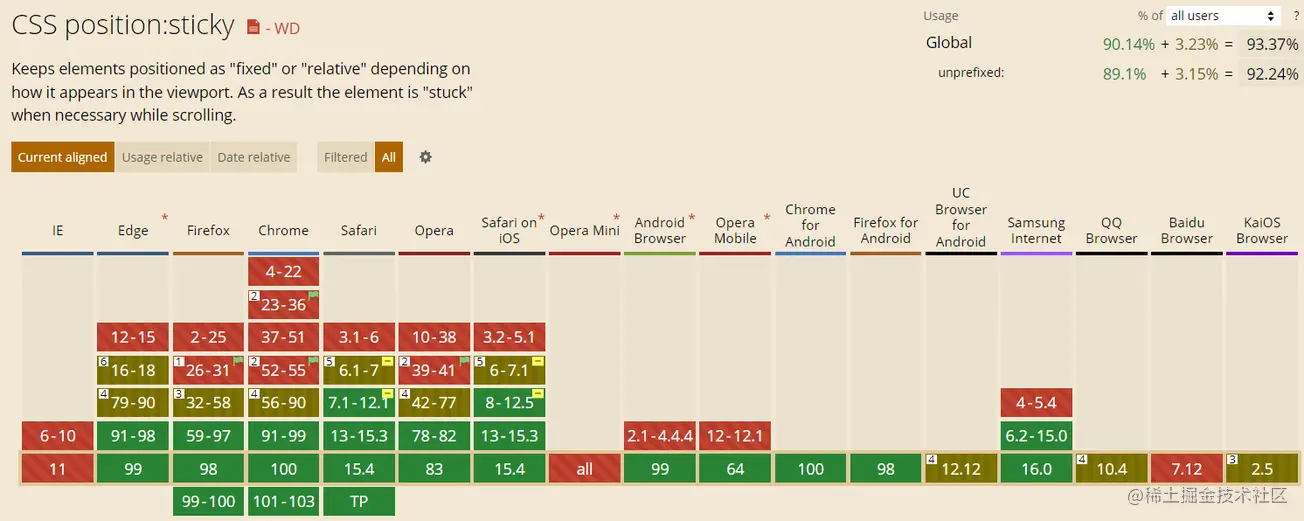
uniapp中小程序模式、App模式是支持的!!!
限制
设置了position:sticky
之后必现指定top left right bottom
其中任一,才会生效。不设置的话表现和相对定位相同。top
和 bottom
或者 left
和 right
同时设置的情况下,top
、 left
的优先级高。
设定为 position:sticky
元素的任意父节点的 overflow
属性必须是visible
,否则 不会生效 (都不能滚动还能咋办)。
造个轮子不难,造个好用的轮子不易。
涉及一些布局上和css部分的东西在文章中不好表达,不细说了,有兴趣的可以拉代码看看。传送门
开发过程中也遇到过不少的问题,都是一路修修补补过来,前期没有构思好会导致后面的开发磕磕碰碰(刚开始模块、参数没有划分好,整个东西逻辑都比较乱,后面停下来从新思考调整了,有种豁然开朗的痛快)
搬砖去了~
原文地址:https://juejin.cn/post/7083401121486045198
作者:沐夕花开
推荐:《uniapp教程》
The above is the detailed content of UniApp Practical Development of a Table Component for Complex Scenarios. For more information, please follow other related articles on the PHP Chinese website!